Vue 路由组件
组件数据局部化处理
- 不管页面组件还是小组件,都可能会被多次复用
- 复用组件的原因,其实就是复用组件的 页面结构、页面样式、页面逻辑
- 但是页面上的数据需要区分(被复用的两个组件数据多少是有区别的),所以组件的数据要做局部化处理
- 借助函数可以产生局部作用域的特点,为每一次复用组件产生一个独立的作用域
语法:
data () {

	return {

		// 数据们

	}

}
子组件
<template>

    <div class="beat" @click="count += 1">

        {{ count }}下

    </div>

</template>

<script>

    export default {

        name: "Beat",

        // 不管是页面组件还是小组件,都可能被复用,页面结构与样式都可以采用一套,但是数据一定要相互独立

        data () {

            return {

                count: 0

            }

        }

    }

</script>

<style scoped>

    .beat {

        width: 100px;

        height: 100px;

        background-color: orange;

        text-align: center;

        line-height: 100px;

        border-radius: 50%;

    }

</style>
父组件
<template>

    <div class="home">

        <Beat/>

        <Beat/>

    </div>

</template>

<script>

    import Beat from '@/components/Beat'

    export default {

        components: {

            Beat,

        }

    }

</script>
路由逻辑跳转
- 很多时候,我们需要通过普通按钮的逻辑,或是直接在某些逻辑中完成页面的跳转
- 可以通过在逻辑中用 this.$router.push() 来完成前往目标页,两种语法如下
- this.$router.push('路劲')
- this.$router.push({name: '路由名'})
- 在做移动端项目时,没有像浏览器那样的前进后台键,页可以用 this.$router.go() 来完成前进后退,语法如下
- 前进后退:this.$router.go(正负整数),正式代表前进,负数代表后台,数值就是步长
案例:
<template>

    <div class="home">

        <Nav/>

        <h1>主页</h1>

        <button @click="goPage('/first')">前往第一页</button>

        |

        <button @click="goPage('/second')">前往第二页</button>

        |

        <button @click="goBack(-1)">后退一页</button>

        |

        <button @click="goBack(-2)">后退二页</button>

        |

        <button @click="goBack(1)">前进一页</button>

    </div>

</template>

<script>

    import Nav from '@/components/Nav'

    export default {

        methods: {

            goPage(path) {

                // 可以通过 this.$router 完成逻辑跳转

                this.$router.push();

            },

            goBack(num) {

                // 一般在移动端项目上运用

                this.$router.go(num);

            }

        },

        components: {

            Nav,

        }

    }

</script>
组件传参
父传子
在子组件内通过 props 设置组件的自定义属性
props: ['abc', 'goods']
在父组件渲染子组件时对自定义属性赋值即可
<GoodsBox v-for="goods in goods_list" :abc="goods" :goods="goods"/>
子组件
<template>

    <div class="goods-box">

        <img :src="goods.img" alt="">

        <p>{{ goods.title }}</p>

    </div>

</template>

<script>

    export default {

        name: "GoodsBox",

        // 在组件内部通过props定义组件的自定义属性

        props: ['abc', 'goods'],

    }

</script>

<style scoped>

    .goods-box {

        width: 260px;

        height: 300px;

        border: 1px solid black;

        border-radius: 5px;

        margin: 20px;

        float: left;

        overflow: hidden;

        text-align: center;

    }

    img {

        width: 260px;

        height: 260px;

    }

</style>
父组件
<template>

    <div class="goods">

        <div class="main">

            <!-- 在使用子组件时对自定义属性赋值即可 -->

            <GoodsBox v-for="goods in goods_list" :key="goods" :goods="goods" />

        </div>

    </div>

</template>

<script>

    import GoodsBox from "../components/GoodsBox";

    let goods_list = [

        {

            img: require('@/assets/img/001.jpg'),

            title: '小猫',

        },

        {

            img: require('@/assets/img/002.jpg'),

            title: '小猫儿',

        },

        {

            img: require('@/assets/img/003.jpg'),

            title: '小狗',

        },

        {

            img: require('@/assets/img/004.jpg'),

            title: '小狗儿',

        },

    ];

    export default {

        name: "Goods",

        data () {

            return {

                goods_list,

            }

        },

        components: {

            GoodsBox,

        },

    }

</script>

{

            img: require('@/assets/img/1.jpeg'),

            title: '1号',

        },

        {

            img: require('@/assets/img/2.jpeg'),

            title: '2号',

        },

        {

            img: require('@/assets/img/3.jpg'),

            title: '3号',

        },

        {

            img: require('@/assets/img/4.jpeg'),

            title: '4号',

        },
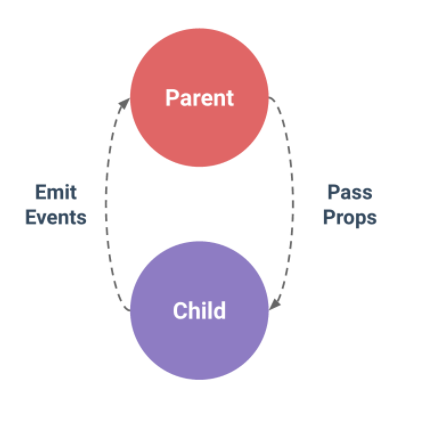
子传父
前提:子组件是被父组件渲染的,所以子组件渲染要晚于父组件
子组件一定要满足一个条件,才能对父组件进行传参(某个时间节点 === 某个被激活的方法)
- 子组件刚刚加载成功,给父组件传参
- 子组件某一个按钮被点击的时刻,给父组件传参 iii)子组件要被销毁了,给父组件传参
在子组件满足条件激活子组件的方法中,对父组件发生一个通知,并将数据携带处理(自定义组件事件)
<div class="goods-box" @click="boxClick"></div>

    methods: {

        boxClick () { this.$emit('receiveData', this.goods.title, '第二个数据', '第三个数据') }

    }
在父组件渲染子组件时,为自定义事件绑定方法
<GoodsBox @receiveData="recFn"/>
在父组件实现绑定方法时,就可以拿到子组件传参的内容(接收到了通知并在父组件中相应)
recFn(title, data2, data3) {

        console.log('接收到了' + title);

    }
组件标签不能绑定系统定义的事件,没有意义,子组件的事件都是在自己内部完成
子组件
<template>

    <div class="goods-box" @click="boxClick">

        <img :src="goods.img" alt="">

        <p>{{ goods.title }}</p>

    </div>

</template>

<script>

    export default {

        props: ['abc', 'goods'],

        methods: {

            boxClick () {

                // 通知父级 - 自定义组件的事件

                this.$emit('receiveData', this.goods.title)

            }

        }

    }

</script>
父组件
<template>

    <div class="goods">

        <div class="main">

            <!-- 实现自定义事件,接收子组件通知的参数 -->

            <GoodsBox v-for="goods in goods_list" @receiveData="recFn"/>

        </div>

    </div>

</template>

<script>

    import GoodsBox from "../components/GoodsBox";

    export default {

        name: "Goods",

        data () {

            return {

                goodsTitle: '哪个',

            }

        },

        methods: {

            recFn(title) {

                console.log('接收到了' + title);

                this.goodsTitle = title;

            }

        },

        components: {

            GoodsBox,

        },

    }

</script>
组件的生命周期钩子
组件的生命周期:一个组件从创建到销毁的整个过程
生命周期钩子:在一个组件生命周期中,会有很多特殊的时间节点,且往往会在特定的时间节点完成一定的逻辑,特殊的事件节点可以绑定钩
注:钩子 - 提前为某个事件绑定方法,当满足这个事件激活条件时,方法就会被调用 | 满足特点条件被回调的绑定方法就称之为钩子
<template>

    <div class="goods">

        <Nav />

    </div>

</template>

<script>

    import Nav from "../components/Nav";

    export default {

        name: "Goods",

        components: {

            Nav,

        },

        beforeCreate() {

            console.log('该组件要被加载了')

        },

        created() {

            console.log('该组件要被加载成功了')

        },

        updated() {

            console.log('数据更新了')

        },

        destroyed() {

            console.log('该组件销毁了')

        }

    }

</script>
路由传参
通过 url 正则传递数据
设置
路由:path: '/goods/detail/:pk'		|   '/goods/:pk/detail/:xyz'

请求:'/goods/detail/任意字符'        |    '/goods/任意字符/detail/任意字符'
如何传
<router-link :to="`/goods/detail/${pk}`"></router-link>

this.$router.push(`/goods/detail/${pk}`)
如何取
this.$route对象是管理路由参数的,传递的参数会在this.$route.params字典中

this.$route.params.pk
通过 url 参数传递数据
设置
路由: path: '/goods/detail'

请求: '/goods/detail?pk=数据'
如何传
<router-link :to="`/goods/detail?pk=${pk}`"></router-link>

<router-link :to="{name:'GoodsDetail', query:{pk: pk}}"></router-link>

this.$router.push(`/goods/detail?pk=${pk}`)

this.$router.push({name:'GoodsDetail', query:{pk: pk}})
如何取
this.$route对象是管理路由参数的,传递的参数会在this.$route.query字典中

this.$route.query.pk
第一种
配置:router/index.js
const routes = [

    {

        path: '/goods/detail/:pk',

        name: 'GoodsDetail',

        component: GoodsDetail

    },

]
传递: GoodsBox.vue
<router-link class="goods-box" :to="`/goods/detail/${goods.pk}`">

    <img :src="goods.img" alt="">

    <p>{{ goods.title }}</p>

</router-link>

<!------------------- 或者 ------------------->

<div class="goods-box" @click="goDetail(goods.pk)">

    <img :src="goods.img" alt="">

    <p>{{ goods.title }}</p>

</div>

<script>

    export default {

        name: "GoodsBox",

        methods: {

            goDetail (pk) {

                this.$router.push(`/goods/detail/${pk}`);

            }

        }

    }

</script>
接收:GoodsDetail.vue
<script>

    export default {

        name: "GoodsDetail",

        data () {

            return {

                pk: '未知',

            }

        },

        // 通常都是在钩子中获取路由传递的参数

        created() {

            this.pk = this.$route.params.pk || this.$route.query.pk;

        }

    }

</script>
第二种
配置:router/index.js
const routes = [

    {

        path: '/goods/detail',

        name: 'GoodsDetail',

        component: GoodsDetail

    },

]
传递:GoodsBox.vue
<router-link class="goods-box" :to="`/goods/detail?pk=${goods.pk}`">

    <img :src="goods.img" alt="">

    <p>{{ goods.title }}</p>

</router-link>

<!------------------- 或者 ------------------->

<div class="goods-box" @click="goDetail(goods.pk)">

    <img :src="goods.img" alt="">

    <p>{{ goods.title }}</p>

</div>

<script>

    export default {

        name: "GoodsBox",

        methods: {

            goDetail (pk) {

                // this.$router.push(`/goods/detail?pk=${goods.pk}`);

                // 或者

                this.$router.push({

                    name: 'GoodsDetail',

                    query: {

                        pk,

                    }

                });

            }

        }

    }

</script>
接收:GoodsDetail.vue
<script>

    export default {

        name: "GoodsDetail",

        data () {

            return {

                pk: '未知',

            }

        },

        // 通常都是在钩子中获取路由传递的参数

        created() {

            this.pk = this.$route.params.pk || this.$route.query.pk;

        }

    }

</script>
全家配置自定义 CSS 与 js
global.css
html, body {

    margin: 0;

}

a {

    color: black;

    text-decoration: none;

}

ul {

    margin: 0;

    padding: 0;

}
settings.js
export default {

    base_url: 'https://127.0.0.1:8000'

}
main.js
//1) 配置全局css

import '@/assets/css/global.css'

// import global_css from '@/assets/css/global.css'  // 资源需要用变量保存,方便以后使用

// require('@/assets/css/global.css')

// let global_css = require('@/assets/css/global.css')  // 资源需要用变量保存,方便以后使用

// 2) 配置自定义js设置文件

import settings from '@/assets/js/settings.js'

Vue.prototype.$settings = settings;

// 在任何一个组件中的逻辑,可以通过 this.$settings访问settings.js文件的{}数据
总结:
"""

项目:

	环境;node -> npm -> cnpm -> vue/cli

	创建:vue create proj

	配置:配置npm启动项

	项目目录结构:依赖、环境、入口、核心代码们

组件:

	构成:template + script + style

	导入:import 别名 from '路径'

	父加子:1)导入 2)注册 3)使用

	组件数据:组件化处理 data(){ return {} }

	传参:父传子 - 自定义组件属性  |  子传父 - 自定义组件事件

	生命周期钩子:created() { //完成后台请求等 }

路由:

	根组件中的页面占位:<router-view />

	导航栏中的页面跳转:<router-link to=""></router-link>

	代码中的逻辑跳转:this.$router.push() | this.$router.go()

	路由传参:两种方式

	两个路由对象:

		this.$router - 控制路由跳转

        this.$route - 控制路由数据

"""
Vue 路由组件的更多相关文章
- Vue路由组件vue-router
一.路由介绍 Creating a Single-page Application with Vue + Vue Router is dead simple. With Vue.js, we are ...
- Vue 路由&组件懒加载(按需加载)
当打包构建应用时,Javascript 包会变得非常大,影响页面加载速度.使用Vue路由懒加载和组件懒加载可以提升页面加载速度,减少白屏时间,提升用户体验. 用法有如下三种:(路由懒加载与组件懒加载用 ...
- vue路由组件传参
在组件中使用 $route 会使之与其对应路由形成高度耦合,从而使组件只能在某些特定的 URL 上使用,限制了其灵活性. 使用 props 将组件和路由解耦: 取代与 $route 的耦合 const ...
- vue 路由组件不重新加载
<!DOCTYPE html> <html> <head> <meta charset="utf-8"> <title> ...
- vue路由组件群
import Vue from 'vue'import VueRouter from 'vue-router'Vue.use(VueRouter) const first = { template: ...
- vue路由异步组件案例
最近研究了vue性能优化,涉及到vue异步组件.一番研究得出如下的解决方案. 原理:利用webpack对代码进行分割是异步调用组件前提.异步组件在优先级上让位同步组件.下面介绍的是怎么实现异步组件. ...
- 067——VUE中vue-router之使用transition设置酷炫的路由组件过渡动画效果
<!DOCTYPE html> <html lang="en"> <head> <meta charset="UTF-8&quo ...
- Vue.js—组件快速入门及Vue路由实例应用
上次我们学习了Vue.js的基础,并且通过综合的小实例进一步的熟悉了Vue.js的基础应用.今天我们就继续讲讲Vue.js的组件,更加深入的了解Vue,js的使用.首先我们先了解一下什么是Vue.js ...
- vue路由懒加载及组件懒加载
一.为什么要使用路由懒加载 为给客户更好的客户体验,首屏组件加载速度更快一些,解决白屏问题. 二.定义 懒加载简单来说就是延迟加载或按需加载,即在需要的时候的时候进行加载. 三.使用 常用的懒加载方式 ...
随机推荐
- 「JSOI2013」游戏中的学问
「JSOI2013」游戏中的学问 传送门 考虑 \(\text{DP}\) 设 \(dp_{i, j}\) 表示将前 \(i\) 个人分成 \(j\) 个集合,并且第 \(i\) 个人在第 \(j\) ...
- Plastic Bottle Manufacturer: Plastic Bottle Packaging Material, Is It Degradable?
For plastic bottle packaging, the current global market demand is still growing. However, for plasti ...
- twisted reactor 实现源码解析
twisted reactor 实现源码解析 1. reactor源码解析 1.1. 案例分析代码: from twisted.internet import protocol fro ...
- 201771010135杨蓉庆 《面对对象程序设计(java)》第八周学习总结
1.实验目的与要求 (1) 掌握接口定义方法: (2) 掌握实现接口类的定义要求: (3) 掌握实现了接口类的使用要求: (4) 掌握程序回调设计模式: (5) 掌握Comparator接口用法: ( ...
- 动态规划-爬楼梯问题java实现
最近开始看算法导论,研究了一下动态规划,下面就开始直入主题开始记录近期看的第一个知识点动态规划.提起动态规划就不得不提几个动态规划的金典问题爬楼梯.国王金矿.背包问题.今天就仔细分析一下爬楼梯问题. ...
- 洛谷 P2925 [USACO08DEC]干草出售Hay For Sale
嗯... 题目链接:https://www.luogu.org/problemnew/show/P2925 这是一道简单的01背包问题,但是按照正常的01背包来做会TLE一个点,所以要加一个特判(见代 ...
- msbuild发布web应用程序
aspnet_compiler.exe 只能编译 网站,web应用程序项目使用下面的命令即可. msbuild C:\Jenkins\jobs\KM_ERP_WEBAPP\workspace\KMWe ...
- 多Python版本共存
Python 3.4 和 3.7 共存 我的电脑上同时安装了 Python 3.4 和 Python 3.7 两个 Python 版本.现在打开终端窗口进入指定的版本. py -3.4 py -3.7 ...
- golang的io.copy使用
net/http 下载 在golang中,如果我们要下载一个文件,最简单的就是先用http.get()方法创建一个远程的请求后,后面可使用ioutil.WriteFile()等将请求内容直接写到文件中 ...
- Write-up-Violator
关于 下载地址:点我 Flag:/root/flag.txt 哔哩哔哩:视频 信息收集 网卡:虚拟机vmnet8 ➜ ~ ip addr show dev vmnet8 5: vmnet8: < ...