Docker的部署安装(CentOS)
环境准备
操作系统需求
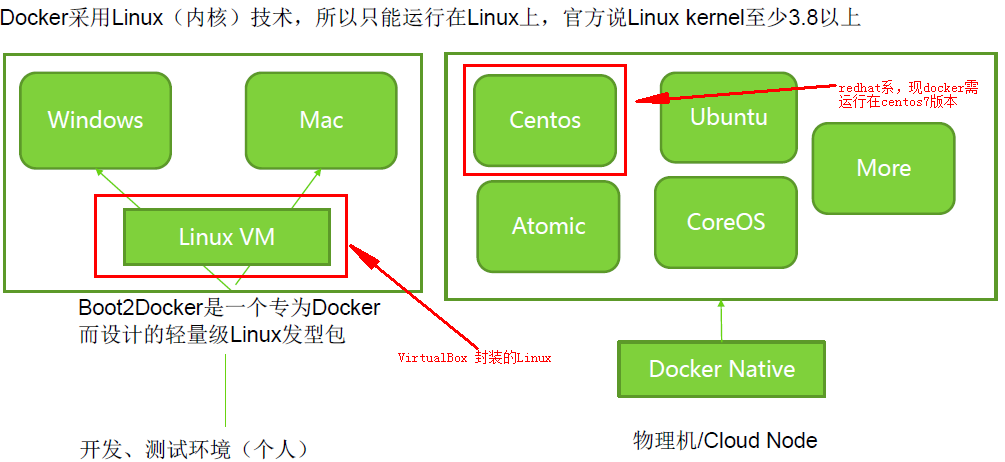
为兼容企业级应用,学习选用Centos7做为部署安装Docker的系统平台
- # 通过以下命令可查看系统版本和内核版本等信息
- cat /etc/redhat-release
- #-----------------------------------
- CentOS Linux release 7.4. (Core)
- #-----------------------------------
- uname -a
- #---------------------------------------------------------------------------------------------------------
- Linux docker01 3.10.-.el7.x86_64 # SMP Tue Aug :: UTC x86_64 x86_64 x86_64 GNU/Linux
- #---------------------------------------------------------------------------------------------------------
- cat /etc/os-release
- #------------------------------------------
- NAME="CentOS Linux"
- VERSION="7 (Core)"
- ID="centos"
- ID_LIKE="rhel fedora"
- VERSION_ID=""
- PRETTY_NAME="CentOS Linux 7 (Core)"
- ANSI_COLOR="0;31"
- CPE_NAME="cpe:/o:centos:centos:7"
- HOME_URL="https://www.centos.org/"
- BUG_REPORT_URL="https://bugs.centos.org/"
- CENTOS_MANTISBT_PROJECT="CentOS-7"
- CENTOS_MANTISBT_PROJECT_VERSION=""
- REDHAT_SUPPORT_PRODUCT="centos"
- REDHAT_SUPPORT_PRODUCT_VERSION=""
- #------------------------------------------
更换默认的yum源
Centos默认的yun源在国外,速度很慢有时间也无法访问
- yum repolist
- #------------------------------------------------------------------------------------------------------------------------------
- Loaded plugins: fastestmirror
- Could not retrieve mirrorlist http://mirrorlist.centos.org/?release=7&arch=x86_64&repo=os&infra=stock error was
- : curl# - "Could not resolve host: mirrorlist.centos.org; Unknown error"
- Could not retrieve mirrorlist http://mirrorlist.centos.org/?release=7&arch=x86_64&repo=extras&infra=stock error was
- : curl# - "Could not resolve host: mirrorlist.centos.org; Unknown error"
- Could not retrieve mirrorlist http://mirrorlist.centos.org/?release=7&arch=x86_64&repo=updates&infra=stock error was
- : curl# - "Could not resolve host: mirrorlist.centos.org; Unknown error"
- repo id repo name status
- base//x86_64 CentOS- - Base
- extras//x86_64 CentOS- - Extras
- updates//x86_64 CentOS- - Updates
- repolist:
- #------------------------------------------------------------------------------------------------------------------------------
- # 公司内服务器域名解析总有问题,时好时不好,很烦,这里直接用hosts做解析
- vi /etc/hosts
- #-------------------------------------
- 221.206.129.236 mirrors.aliyun.com
- #-------------------------------------
- # 更换成aliyun yum源
- cp /etc/yum.repos.d/CentOS-Base.repo /etc/yum.repos.d/CentOS-Base.repo.bak
- curl -o /etc/yum.repos.d/CentOS-Base.repo http://mirrors.aliyun.com/repo/Centos-7.repo
- # 编译CentOS-Base.repo,把带mirrors.aliyuncs.com的行都删除
- vi /etc/yum.repos.d/CentOS-Base.repo
- # 运行以下命令生成缓存
- yum clean all
- yum makecache
- # 查看已启用的repo,确保centos-extras repository是启用了,安装docker时需要
- yum repolist
- #--------------------------------------------------------------------------
- Loaded plugins: fastestmirror
- Loading mirror speeds from cached hostfile
- * base: mirrors.aliyun.com
- * extras: mirrors.aliyun.com
- * updates: mirrors.aliyun.com
- repo id repo name status
- base//x86_64 CentOS- - Base - mirrors.aliyun.com ,
- extras//x86_64 CentOS- - Extras - mirrors.aliyun.com
- updates//x86_64 CentOS- - Updates - mirrors.aliyun.com ,
- repolist: ,
- #--------------------------------------------------------------------------
更新系统(可选)
- yum update
删除docker旧版本
- # 有旧版本的docker话,可以用下面命令删除
- yum remove docker docker-common docker-selinux docker-engine
安装 Docker CE
- yum install -y yum-utils device-mapper-persistent-data lvm2
- # yum-config-manager --add-repo https://download.docker.com/linux/centos/docker-ce.repo
- yum-config-manager --add-repo http://mirrors.aliyun.com/docker-ce/linux/centos/docker-ce.repo
- yum install -y docker-ce
- #--------------------------------------------------------------------------
- .......
- Installed:
- docker-ce.x86_64 :17.09..ce-.el7.centos
- Dependency Installed:
- audit-libs-python.x86_64 :2.7.-.el7
- checkpolicy.x86_64 :2.5-.el7
- container-selinux.noarch :2.28-.git85ce147.el7
- libcgroup.x86_64 :0.41-.el7
- libseccomp.x86_64 :2.3.-.el7
- libsemanage-python.x86_64 :2.5-.el7
- policycoreutils-python.x86_64 :2.5-17.1.el7
- python-IPy.noarch :0.75-.el7
- setools-libs.x86_64 :3.3.-1.1.el7
- ......
- #--------------------------------------------------------------------------
若需要安装指定的版本时,可参照以下命令
- # 根据需要选择是否开启edge和test repositories
- yum-config-manager --enable docker-ce-edge
- yum-config-manager --enable docker-ce-test
- ## 禁用命令
- yum-config-manager --disable docker-ce-edge
- ## 安装指定的版本
- yum list docker-ce --showduplicates | sort -r
- #--------------------------------------------------------------------------
- Loading mirror speeds from cached hostfile
- Loaded plugins: fastestmirror
- Installed Packages
- docker-ce.x86_64 17.09..ce-.el7.centos docker-ce-stable
- docker-ce.x86_64 17.09..ce-.el7.centos @docker-ce-stable
- docker-ce.x86_64 17.09..ce-.el7.centos docker-ce-stable
- docker-ce.x86_64 17.06..ce-.el7.centos docker-ce-stable
- docker-ce.x86_64 17.06..ce-.el7.centos docker-ce-stable
- docker-ce.x86_64 17.06..ce-.el7.centos docker-ce-stable
- docker-ce.x86_64 17.03..ce-.el7.centos docker-ce-stable
- docker-ce.x86_64 17.03..ce-.el7.centos docker-ce-stable
- docker-ce.x86_64 17.03..ce-.el7.centos docker-ce-stable
- Available Packages
- #--------------------------------------------------------------------------
- yum install docker-ce-17.06..ce
启动docker
- systemctl start docker
- # 查看docker的版本信息
- docker version
- #--------------------------------------------------------------------------
- Client:
- Version: 17.09.-ce # 客户端版本
- API version: 1.32
- Go version: go1.8.3
- Git commit: 19e2cf6
- Built: Thu Dec ::
- OS/Arch: linux/amd64
- Server:
- Version: 17.09.-ce # 服务端版本
- API version: 1.32 (minimum version 1.12)
- Go version: go1.8.3
- Git commit: 19e2cf6
- Built: Thu Dec ::
- OS/Arch: linux/amd64
- Experimental: false
- #--------------------------------------------------------------------------
- # 查看网络信息
- ip addr
- #--------------------------------------------------------------------------
- : lo: <LOOPBACK,UP,LOWER_UP> mtu qdisc noqueue state UNKNOWN qlen
- link/loopback ::::: brd :::::
- inet 127.0.0.1/ scope host lo
- valid_lft forever preferred_lft forever
- inet6 ::/ scope host
- valid_lft forever preferred_lft forever
- : ens160: <BROADCAST,MULTICAST,UP,LOWER_UP> mtu qdisc mq state UP qlen
- link/ether :::ab:4c: brd ff:ff:ff:ff:ff:ff
- inet 10.240.4.185/ brd 10.240.4.255 scope global ens160
- valid_lft forever preferred_lft forever
- inet6 fe80:::56ff:feab:4c50/ scope link
- valid_lft forever preferred_lft forever
- : docker0: <NO-CARRIER,BROADCAST,MULTICAST,UP> mtu qdisc noqueue state DOWN # docker0 虚拟网桥
- link/ether :::ac::bf brd ff:ff:ff:ff:ff:ff
- inet 172.17.0.1/ scope global docker0
- valid_lft forever preferred_lft forever
- inet6 fe80:::72ff:feac:5bf/ scope link
- valid_lft forever preferred_lft forever
- #--------------------------------------------------------------------------
- systemctl list-unit-files | grep docker
- #--------------------------------------------------------------------------
- docker.service disabled
- #--------------------------------------------------------------------------
- # 设置成自启服务
- systemctl enable docker.service
- # 查看状态
- systemctl status docker
- #--------------------------------------------------------------------------
- ● docker.service - Docker Application Container Engine
- Loaded: loaded (/usr/lib/systemd/system/docker.service; enabled; vendor preset: disabled)
- Active: active (running) since Tue -- :: CST; 13min ago
- Docs: https://docs.docker.com
- Main PID: (dockerd)
- CGroup: /system.slice/docker.service
- ├─ /usr/bin/dockerd
- └─ docker-containerd -l unix:///var/run/docker/libcontainerd/docker-containerd.sock --metrics-interval=0 --start-timeout 2m --state-dir /var/run/docker/libco...
- Dec :: docker01 dockerd[]: time="2017-12-12T17:24:29.594209004+08:00" level=info msg="libcontainerd: new containerd process, pid: 23490"
- Dec :: docker01 dockerd[]: time="2017-12-12T17:24:30.596093094+08:00" level=warning msg="failed to rename /var/lib/docker/tmp for background deletio...chronously"
- Dec :: docker01 dockerd[]: time="2017-12-12T17:24:30.654014669+08:00" level=info msg="Graph migration to content-addressability took 0.00 seconds"
- Dec :: docker01 dockerd[]: time="2017-12-12T17:24:30.654714697+08:00" level=info msg="Loading containers: start."
- Dec :: docker01 dockerd[]: time="2017-12-12T17:24:30.852920366+08:00" level=info msg="Default bridge (docker0) is assigned with an IP address 172.17...IP address"
- Dec :: docker01 dockerd[]: time="2017-12-12T17:24:30.996504508+08:00" level=info msg="Loading containers: done."
- Dec :: docker01 dockerd[]: time="2017-12-12T17:24:31.004149257+08:00" level=info msg="Docker daemon" commit=19e2cf6 graphdriver(s)=overlay version=17.09.-ce
- Dec :: docker01 dockerd[]: time="2017-12-12T17:24:31.004282017+08:00" level=info msg="Daemon has completed initialization"
- Dec :: docker01 dockerd[]: time="2017-12-12T17:24:31.015479108+08:00" level=info msg="API listen on /var/run/docker.sock"
- Dec :: docker01 systemd[]: Started Docker Application Container Engine.
- Hint: Some lines were ellipsized, use -l to show in full.
- #--------------------------------------------------------------------------
运行hello-world image验证docker安装是否成功
- docker run hello-world
- #--------------------------------------------------------------------------
- Unable to find image 'hello-world:latest' locally
- latest: Pulling from library/hello-world
- ca4f61b1923c: Pull complete
- Digest: sha256:be0cd392e45be79ffeffa6b05338b98ebb16c87b255f48e297ec7f98e123905c
- Status: Downloaded newer image for hello-world:latest
- Hello from Docker!
- This message shows that your installation appears to be working correctly.
- To generate this message, Docker took the following steps:
- . The Docker client contacted the Docker daemon.
- . The Docker daemon pulled the "hello-world" image from the Docker Hub.
- (amd64)
- . The Docker daemon created a new container from that image which runs the
- executable that produces the output you are currently reading.
- . The Docker daemon streamed that output to the Docker client, which sent it
- to your terminal.
- To try something more ambitious, you can run an Ubuntu container with:
- $ docker run -it ubuntu bash
- Share images, automate workflows, and more with a free Docker ID:
- https://cloud.docker.com/
- For more examples and ideas, visit:
- https://docs.docker.com/engine/userguide/
- #--------------------------------------------------------------------------
升级和卸载docker
- # 升级
- yum -y upgrade docker-ce
- # 卸载
- yum remove docker-ce
- # 删除Images, containers, volumes, or customized configuration files
- rm -rf /var/lib/docker
使用阿里镜像加速器
使用阿里云专属加速器加快获取Docker官方镜像,否则在国内速度会慢到你无法忍受哒。步骤如下:
- 免费注册一个阿里云账号 www.aliyun.com
- 进入加速器页面 https://cr.console.aliyun.com/#/accelerator
- 选择
镜像加速器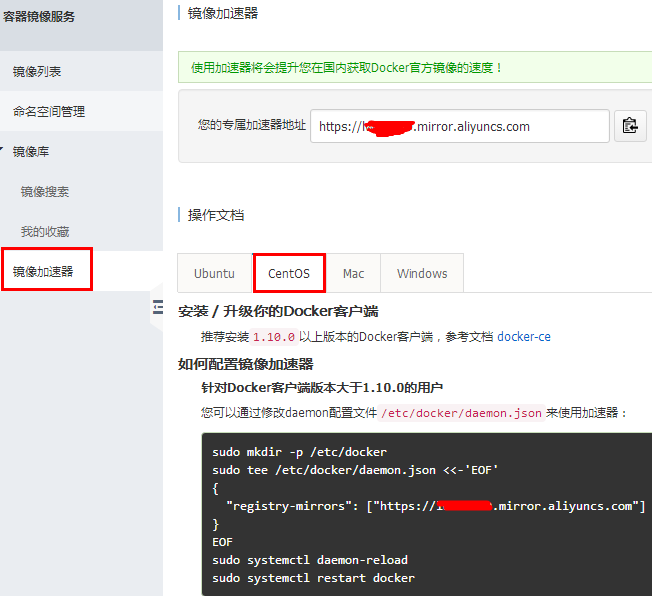
按图中进行相关配置
- # 下面的xxxxx要替换成你的专属加速器的地址哦
- tee /etc/docker/daemon.json <<-'EOF'
- {
- "registry-mirrors": ["https://xxxxxxx.mirror.aliyuncs.com"]
- }
- EOF
- systemctl daemon-reload
- systemctl restart docker
Docker的部署安装(CentOS)的更多相关文章
- Docker的部署安装(CentOS)-by paymob
环境准备 通过命令查看系统版本和内核版本等信息 [gmuser@--- ~]$ cat /etc/redhat-release CentOS Linux release (Core) [gmuser@ ...
- Devops实战(一)Docker的部署安装以及Docker-Compose的使用
Docker的部署安装以及Docker-Compose的使用 1.docker和docker-Compose简介 Docker是一组平台即服务(PaaS)产品,它们使用操作系统级虚拟化以称为容器的软件 ...
- docker运行环境安装-centos(一)
在这里我们使用的是docker的社区版Docker CE,针对的是未安装docker的新的主机,如果安装过docker的早期版本,先卸载它们及关联的依赖资源,安装的版本为docker 18.03. 1 ...
- (二)docker的部署安装,配置,基础命令
一.docker 的安装部署 这里不过多介绍,下面这两个linux发型版 安装可以参考 ubuntu的 docker-ce安装 centos7的 docker-ce安装 二.docker配置文件 重要 ...
- docker之windows安装¢OS安装
按这个安装 没什么毛病 https://blog.csdn.net/vitaair/article/details/80894890 https://www.runoob.com/docker/ce ...
- 【Docker学习之二】Docker部署安装
环境 docker-ce-19.03.1-3.el7.x86_64 一.Docker的部署安装 Docker采用Linux(内核)技术,所以只能运行在Linux上,官方说Linux kernel至少3 ...
- Docker学习笔记_04 Rancher的部署安装(编排选用K8S)
原文地址:http://dbase.cc/2018/01/12/docker/04_rancher的部署安装/ 为什么要使用Rancher Rancher是一个开源的企业级容器管理平台.通过Ranch ...
- Rancher的部署安装(编排选用K8S)
为什么要使用Rancher Rancher是一个开源的企业级容器管理平台.通过Rancher,企业再也不必自己使用一系列的开源软件去从头搭建容器服务平台.Rancher提供了在生产环境中使用的管理Do ...
- 【docker部署】基于linux的centos操作系统部署安装docker容器
一.docker介绍 容器是轻量级的,包含应用运行所需所有东西(代码.库.运行时环境.系统设置,以及依赖关系)的独立的包.每个容器都部署于它自己的 CPU.内存.块 I/O,以及网络资源上,所有这些都 ...
随机推荐
- AES学习小结
AES是基于数据块的加密方式,即每次处理的数据是一块(16字节),当数据不是16字节的倍数时填充,这就是所谓的分组密码(区别于基于比特位的流密码),16字节是分组长度. AES支持五种模式:CBC,C ...
- web项目servlet&jsp包失效问题
今天偶然遇到这样的一个问题,故做个总结. javaee开发只用到serlet和jsp两个包.而sun提供的jdk只是javase部分的包,对于se部分只提供了规范,而包由容器给出. 由于自己在新建好一 ...
- 阿里云服务器下安装配置phpMyAdmin
1.下载phpMyAdmin wget http://www.phpmyadmin.net/home_page/downloads.php 2.解压下载的文件 tar -zvxf phpMyAdmin ...
- TensorFlow中的Session、Graph、operation、tensor
TensorFlow中的Session.Graph.operation.tensor
- Java之同步方法处理继承Thread类的线程安全问题
/** * 使用同步方法处理继承Thread类的方式中的线程安全问题 * */class Window4 extends Thread { private static int ticket = 10 ...
- python-day4爬虫基础之正则表达式
正则表达式:(字符串匹配) 使用单个字符串来描述匹配一系列符合某个句法规则的字符串 是对字符串操作的一种逻辑公式 应用场景:处理文本和数据 正则表达式过程:依次拿出表达式和文本中的字符比较,如果每一个 ...
- IntelliJ IDEA2018.2.7安装和破解教程
一.安装 IntelliJ IDEA2018.2.7 IDEA官网下载地址链接:https://www.jetbrains.com/idea/download/previous.html 1.进入网站 ...
- Windows Boot Manager、Bootmgfw.efi、Bootx64.efi、bcdboot.exe 文件的关系
本教程针对于UEFI启动来叙述的,根据普遍的支持UEFI的机器来叙述. 标题简要说明:Windows Boot Manager --------安装完Windows系统后而出现的启动选项(相关的信息 ...
- [前端] VUE基础 (5) (过滤器、生命周期、钩子函数)
一.过滤器 过滤器分为局部过滤器和全局过滤器. 1.局部过滤器 <body> <div id="app"> </div> <script ...
- typescript-学习使用ts-3
函数 函数参数 参数及返回值类型 function add(x: number, y: number): number { return x + y } 可选参数 function add(x: nu ...