canal同步MySQL数据到ES6.X
背景:
最近一段时间公司做一个技术架构的更改,由于之前使用的solr和目前的业务不太匹配,具体原因不多说啦。所以要把数据放到Elasticsearch中进行快速的搜索,这是便产生了一个数据迁移的需求,把MySQL数据库中的部分库表放到ES一份,便于快速搜索。明确需求:MySQL数据迁移到ES中。
具体要求:
订单表作为主表,商品表和物流表作为附表,数据迁移到ES的同一个索引中。
方案:利用ES的父子文档类型、canal-server和canal-adapter
环境介绍:
内存很紧张,经费有限,但是不影响记录。
[root@aliyun ~]# cat /etc/redhat-release
CentOS Linux release  (Core)
[root@aliyun ~]# uname  -r
-.el7.x86_64
[root@aliyun ~]# free -h
              total        used        free      shared  buff/cache   available
Mem:           .8G        .3G         65M        528K        440M        345M
Swap:            0B          0B          0B

MySQL版本5.6.45

mysql> select version();
+-----------+
| version() |
+-----------+
| 5.6.45 |
+-----------+
1 row in set (0.03 sec)
elasticsearch版本6.7.0
[root@aliyun ~]# curl localhost:9200
{
"name" : "node-1",
"cluster_name" : "my-application",
"cluster_uuid" : "M5i8CoTJTOepn1GwdXgfxg",
"version" : {
"number" : "6.7.0",
"build_flavor" : "default",
"build_type" : "rpm",
"build_hash" : "8453f77",
"build_date" : "2019-03-21T15:32:29.844721Z",
"build_snapshot" : false,
"lucene_version" : "7.7.0",
"minimum_wire_compatibility_version" : "5.6.0",
"minimum_index_compatibility_version" : "5.0.0"
},
"tagline" : "You Know, for Search"
}
jdk版本:1.8.0
[root@aliyun ~]# java -version
openjdk version "1.8.0_212"
OpenJDK Runtime Environment (build 1.8.0_212-b04)
OpenJDK 64-Bit Server VM (build 25.212-b04, mixed mode)
canal-server/canal-adapter版本:1.1.3
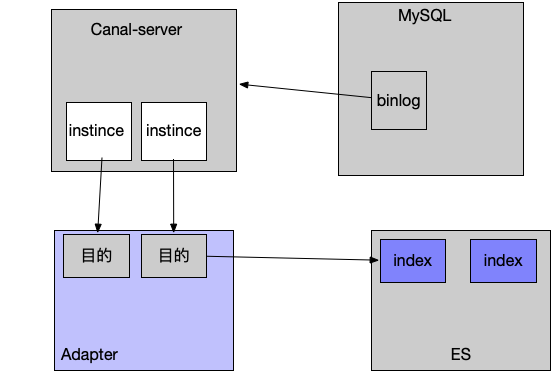
数据流的逻辑图如下:
canal-server伪装成mysql数据库的一个slave从库,获取mysql数据库的binlog日志数据,解析。canal-server自身配置实例来获取binlog数据,canap-adapter程序连接canal-server中配置的实例,获取binlog信息,消费binlog数据,通过ES适配器同步到ES对应的索引中。大致的一个数据流程就是这样的,具体配置请往下看。
具体配置实现:
1、开启MySQL数据的binlog日志记录并且为ROW模式
[root@aliyun ~]# vim /etc/my.cnf

......

[mysqld]
log-bin=mysql-bin # 开启 binlog
binlog-format=ROW # 选择 ROW 模式
server_id =

......
重启MySQL,登陆MySQL检测配置是否生效。
mysql> show variables like 'log_bin%';
+---------------------------------+----------------------------------+
| Variable_name                   | Value                            |
+---------------------------------+----------------------------------+
| log_bin                         | ON                               |
| log_bin_basename                | /data/mysql/data/mysql-bin       |
| log_bin_index                   | /data/mysql/data/mysql-bin.index |
| log_bin_trust_function_creators | OFF                              |
| log_bin_use_v1_row_events       | OFF                              |
+---------------------------------+----------------------------------+
 rows in set (0.00 sec)

mysql> show variables like 'binlog_format%';
+---------------+-------+
| Variable_name | Value |
+---------------+-------+
| binlog_format | ROW   |
+---------------+-------+
 row in set (0.00 sec)
创建canal-server连接MySQL的用户并授予读取binlog的权限。
mysql> grant all on *.* to canal@'%' identified by 'canal';
Query OK,  rows affected (0.01 sec)

mysql> flush privileges;
Query OK,  rows affected (0.00 sec)
2、部署canal-server
canal程序的各个组件的下载地址为:https://github.com/alibaba/canal/releases
下载程序包:
[root@aliyun ~]# wget https://github.com/alibaba/canal/releases/download/canal-1.1.3/canal.deployer-1.1.3.tar.gz
解压程序包:
[root@aliyun ~]# mkdir /usr/local/canal-server
[root@aliyun ~]# .tar.gz -C /usr/local/canal-server/
[root@aliyun ~]# ll /usr/local/canal-server/
total
drwxr-xr-x  root root  Jul  : bin
drwxr-xr-x  root root  Jul  : conf
drwxr-xr-x  root root  Jul  : lib
drwxrwxrwx  root root  Apr   : logs
上去修改配置文件:
需要我们重点关注的一些参数同时也是我们平常修改最多的参数如下:
canal.destinations = example #canal-server创建的实例,其他参数没有特殊需求的话不用改动
完整的根配置文件及简单参数的介绍如下:
[root@aliyun conf]# cd /usr/local/canal-server/conf/
[root@aliyun conf]# cat canal.properties
#################################################
#########         common argument        #############
#################################################
#canal.manager.jdbc.url=jdbc:mysql://127.0.0.1:3306/canal_manager?useUnicode=true&characterEncoding=UTF-8
#canal.manager.jdbc.username=root
#canal.manager.jdbc.password=
canal.id = 1                                  #无意义的值
canal.ip =                                    #运行canal-server服务的主机IP,可以不用配置,他会自动绑定一个本机的IP
canal.port = 11111                               #canal-server监听的端口(TCP模式下,非TCP模式不监听1111端口)
canal.metrics.pull.port = 11112                       #canal-server metrics.pull监听的端口canal.zkServers =                               #集群模式下要配置zookeeper进行协调配置,单机模式可以不用配置
# flush data to zk                              #下面的两个参数是刷新数据到ZK的配置
canal.zookeeper.flush.period =
canal.withoutNetty = false
# tcp, kafka, RocketMQ
canal.serverMode = tcp                            #canal-server运行的模式,TCP模式就是直连客户端,不经过中间件。kafka和mq是消息队列的模式
# flush meta cursor/parse position to file
canal.file.data.dir = ${canal.conf.dir}                  #存放数据的路径
canal.file.flush.period = 1000
## memory store RingBuffer size, should be Math.pow(,n)        #下面是一些系统参数的配置,包括内存、网络等
canal.instance.memory.buffer.size =
## memory store RingBuffer used memory unit size , default 1kb
canal.instance.memory.buffer.memunit =
## meory store gets mode used MEMSIZE or ITEMSIZE
canal.instance.memory.batch.mode = MEMSIZE
canal.instance.memory.rawEntry = true

## detecing config                                #这里是心跳检查的配置,做HA时会用到
canal.instance.detecting.enable = false
#canal.instance.detecting.sql = insert into retl.xdual values(,now()) on duplicate key update x=now()
canal.instance.detecting.sql =
canal.instance.detecting.interval.
canal.instance.detecting.retry.threshold =
canal.instance.detecting.heartbeatHaEnable = false

# support maximum transaction size, more than the size of the transaction will be cut into multiple transactions delivery
canal.instance.transaction.size =
# mysql fallback connected to new master should fallback times
canal.instance.fallbackIntervalInSeconds =

# network config
canal.instance.network.receiveBufferSize =
canal.instance.network.sendBufferSize =
canal.instance.network.soTimeout =

# binlog filter config                            #binlog过滤的配置,指定过滤那些SQL
canal.instance.filter.druid.ddl = true
canal.instance.filter.query.dcl = false
canal.instance.filter.query.dml = false
canal.instance.filter.query.ddl = false
canal.instance.filter.table.error = false
canal.instance.filter.rows = false
canal.instance.filter.transaction.entry = false

# binlog format/image check                         #binlog格式检测,使用ROW模式,非ROW模式也不会报错,但是同步不到数据,具体原因百度binlog格式的区别
canal.instance.binlog.format = ROW,STATEMENT,MIXED
canal.instance.binlog.image = FULL,MINIMAL,NOBLOB

# binlog ddl isolation
canal.instance.get.ddl.isolation = false

# parallel parser config                           #并行解析配置,如果是单个CPU就把下面这个true改为false
canal.instance.parser.parallel = true
## concurrent thread number, default % available processors, suggest not to exceed Runtime.getRuntime().availableProcessors()
#canal.instance.parser.parallelThreadSize =
## disruptor ringbuffer size, must be power of
canal.instance.parser.parallelBufferSize =

# table meta tsdb info                          #tsdb没搞明白他是干嘛的
canal.instance.tsdb.enable = true
canal.instance.tsdb.dir = ${canal.file.data.dir:../conf}/${canal.instance.destination:}
canal.instance.tsdb.url = jdbc:h2:${canal.instance.tsdb.;MODE=MYSQL;
canal.instance.tsdb.dbUsername = canal                 #连接数据的用户名和密码
canal.instance.tsdb.dbPassword = canal
# dump snapshot interval, default  hour
canal.instance.tsdb.snapshot.interval =
# purge snapshot expire , default  hour( days)
canal.instance.tsdb.snapshot.expire =

# aliyun ak/sk , support rds/mq
canal.aliyun.accessKey =
canal.aliyun.secretKey =

#################################################
#########         destinations        #############
#################################################
canal.destinations = example                            #这个是很重要的参数,在这里指定你要创建的实例的名字,比如test1,test2等,逗号隔开
# conf root dir
canal.conf.dir = ../conf
# auto scan instance dir add/remove and start/stop instance
canal.auto.scan = true                                #自动扫描加载配置
canal.auto.scan.interval =

canal.instance.tsdb.spring.xml = classpath:spring/tsdb/h2-tsdb.xml
#canal.instance.tsdb.spring.xml = classpath:spring/tsdb/mysql-tsdb.xml

canal.instance.global.mode = spring
canal.instance.global.lazy = false
#canal.instance.global.manager.address =
#canal.instance.global.spring.xml = classpath:spring/memory-instance.xml
canal.instance.global.spring.xml = classpath:spring/file-instance.xml
#canal.instance.global.spring.xml = classpath:spring/default-instance.xml

##################################################
#########              MQ              #############          #MQ的配置参数,这篇不讲消息队列,只写单机canal-server直连的TCP模式
##################################################
canal.mq.servers =
canal.mq.retries =
canal.mq.batchSize =
canal.mq.maxRequestSize =
canal.mq.lingerMs =
canal.mq.bufferMemory =
canal.mq.canalBatchSize =
canal.mq.canalGetTimeout =
canal.mq.flatMessage = true
canal.mq.compressionType = none
canal.mq.acks = all
# use transaction for kafka flatMessage batch produce
canal.mq.transaction = false
#canal.mq.properties. =
实例配置:
在根配置文件中创建了实例名称之后,需要在根配置的同级目录下创建该实例目录,canal-server为我们提供了一个示例的实例配置,因此我们可以直接复制该示例,举个例子吧:根配置配置了如下实例:
[root@aliyun conf]# vim canal.properties...canal.destinations = user_order,delivery_info
...
我们需要在根配置的同级目录下创建这两个实例
[root@aliyun conf]# pwd
/usr/local/canal-server/conf
[root@aliyun conf]# cp -a example/ user_order
[root@aliyun conf]# cp -a example/ delivery_info
下面是每个实例的配置参数:配置文件为 example/instance.properties
在这个配置里我们需要注意的参数有下面几个:
[root@aliyun example]# vim instance.properties
canal.instance.master.address=127.0.0.1:3306          #指定要读取binlog的MySQL的IP地址和端口
canal.instance.master.journal.name=                #从指定的binlog文件开始读取数据
canal.instance.master.position=                  #指定偏移量,做过主从复制的应该都理解这两个参数。
                                     #tips:binlog和偏移量也可以不指定,则canal-server会从当前的位置开始读取。我建议不设置
canal.instance.dbUsername=canal                   #指定连接mysql的用户密码
canal.instance.dbPassword=canal
canal.instance.connectionCharset = UTF-8             #字符集

canal.instance.filter.regex=.*\\..*                #这个是比较重要的参数,匹配库表白名单,比如我只要test库的user表的增量数据,则这样写 test.user
# table black regex
canal.instance.filter.black.regex=                #这个是黑名单,规则和白名单一样。具体匹配规则可以参见wiki:https://github.com/alibaba/canal/wiki/AdminGuide
完整配置和参数解释如下:
[root@aliyun conf]# cd example/
[root@aliyun example]# cat instance.properties
#################################################
## mysql serverId , v1.0.26+ will autoGen
# canal.instance.mysql.slaveId=

# enable gtid use true/false
canal.instance.gtidon=false                              #启用GTID,默认不启用

# position info                                     #同步的位置点信息,包括binlog和偏移量等
canal.instance.master.address=
canal.instance.master.journal.name=
canal.instance.master.position=
canal.instance.master.timestamp=
canal.instance.master.gtid=

# rds oss binlog                                    #rds oss的同步
canal.instance.rds.accesskey=
canal.instance.rds.secretkey=
canal.instance.rds.instanceId=

# table meta tsdb info
canal.instance.tsdb.enable=true                          #启用tsdb,他应该是记录数据用的
#canal.instance.tsdb.url=jdbc:mysql://127.0.0.1:3306/canal_tsdb
#canal.instance.tsdb.dbUsername=canal
#canal.instance.tsdb.dbPassword=canal

#canal.instance.standby.address =                        #这几个参数是设置高可用配置的,可以配置mysql从库的信息
#canal.instance.standby.journal.name =
#canal.instance.standby.position =
#canal.instance.standby.timestamp =
#canal.instance.standby.gtid=

# username/password                                #用户名密码
canal.instance.dbUsername=canal
canal.instance.dbPassword=canal
canal.instance.connectionCharset = UTF-
# enable druid Decrypt database password
canal.instance.enableDruid=false
#canal.instance.pwdPublicKey=MFwwDQYJKoZIhvcNAQEBBQADSwAwSAJBALK4BUxdDltRRE5/zXpVEVPUgunvscYFtEip3pmLlhrWpacX7y7GCMo2/JM6LeHmiiNdH1FWgGCpUfircSwlWKUCAwEAAQ==

# table regex                                    #过滤规则
canal.instance.filter.regex=.*\\..*
# table black regex
canal.instance.filter.black.regex=

# mq config                                    #MQ的相关配置,本篇不涉及
canal.mq.topic=example
# dynamic topic route by schema or table regex
#canal.mq.dynamicTopic=mytest1.user,mytest2\\..*,.*\\..*
canal.mq.partition=
# hash partition config
#canal.mq.partitionsNum=
#canal.mq.partitionHash=test.table:id^name,.*\\..*
#################################################
当你配置好你所需要的所有实例之后,就可以启动canal-server了
[root@aliyun example]# cd /usr/local/canal-server/bin/
[root@aliyun bin]# sh startup.sh                        #启动命令
[root@aliyun bin]# tailf ../logs/canal/canal.log              #查看日志信息
OpenJDK -Bit Server VM warning: ignoring option PermSize=96m; support was removed in 8.0
OpenJDK -Bit Server VM warning: ignoring option MaxPermSize=256m; support was removed in 8.0
OpenJDK -Bit Server VM warning: UseCMSCompactAtFullCollection is deprecated and will likely be removed in a future release.
OpenJDK -Bit Server VM warning: If the number of processors is expected to increase from one, then you should configure the number of parallel GC threads appropriately using -XX:ParallelGCThreads=N
OpenJDK -Bit Server VM warning: INFO: os::commit_memory(, ) failed; error=)
#
# There is insufficient memory for the Java Runtime Environment to continue.
# Native memory allocation (mmap) failed to map  bytes for committing reserved memory.
# An error report file with more information is saved as:
# /usr/local/canal-server/bin/hs_err_pid2261.log
不能分配内存,导致启动失败。把堆内存调小一点。
[root@aliyun bin]# vim startup.sh   #把启动设置的内存改小点,最后结果可以像我这样,注意,测试才这样用的,实际使用时注意给大点内存,多大自己把握。[root@aliyun bin]# grep 512m startup.sh
    JAVA_OPTS="-server -Xms512m -Xmx512m -Xmn512m -XX:SurvivorRatio=2 -XX:PermSize=96m -XX:MaxPermSize=256m -Xss256k -XX:-UseAdaptiveSizePolicy -XX:MaxTenuringThreshold=15 -XX:+DisableExplicitGC -XX:+UseConcMarkSweepGC -XX:+CMSParallelRemarkEnabled -XX:+UseCMSCompactAtFullCollection -XX:+UseFastAccessorMethods -XX:+UseCMSInitiatingOccupancyOnly -XX:+HeapDumpOnOutOfMemoryError"
重新启动:
[root@aliyun bin]# sh restart.sh ;tailf ../logs/canal/canal.log
-- ::14.107 [main] INFO  com.alibaba.otter.canal.deployer.CanalLauncher - ## set default uncaught exception handler
-- ::14.170 [main] INFO  com.alibaba.otter.canal.deployer.CanalLauncher - ## load canal configurations
-- ::14.203 [main] INFO  c.a.o.c.d.monitor.remote.RemoteConfigLoaderFactory - ## load local canal configurations
-- ::14.210 [main] INFO  com.alibaba.otter.canal.deployer.CanalStater - ## start the canal server.
-- ::]
-- ::15.307 [main] WARN  o.s.beans.GenericTypeAwarePropertyDescriptor - Invalid JavaBean property 'connectionCharset' being accessed! Ambiguous write methods found next to actually used [public void com.alibaba.otter.canal.parse.inbound.mysql.AbstractMysqlEventParser.setConnectionCharset(java.nio.charset.Charset)]: [public void com.alibaba.otter.canal.parse.inbound.mysql.AbstractMysqlEventParser.setConnectionCharset(java.lang.String)]
-- ::15.800 [main] ERROR com.alibaba.druid.pool.DruidDataSource - testWhileIdle is true, validationQuery not set
-- ::16.230 [main] WARN  c.a.o.canal.parse.inbound.mysql.dbsync.LogEventConvert - --> init table filter : ^.*\..*$
-- ::16.230 [main] WARN  c.a.o.canal.parse.inbound.mysql.dbsync.LogEventConvert - --> init table black filter :
-- ::16.476 [main] INFO  com.alibaba.otter.canal.deployer.CanalStater - ## the canal server is running now ......
-- :: , EventParser] WARN  c.a.o.c.p.inbound.mysql.rds.RdsBinlogEventParserProxy - ---> begin to find start position, it will be long time for reset or first position
-- :: , EventParser] WARN  c.a.o.c.p.inbound.mysql.rds.RdsBinlogEventParserProxy - prepare to find start position just show master status
-- ::] ERROR com.alibaba.druid.pool.DruidDataSource - testWhileIdle is true, validationQuery not set
-- ::] WARN  c.a.o.canal.parse.inbound.mysql.dbsync.LogEventConvert - --> init table filter : ^.*\..*$
-- ::] WARN  c.a.o.canal.parse.inbound.mysql.dbsync.LogEventConvert - --> init table black filter :
-- ::] INFO  c.a.o.canal.deployer.monitor.SpringInstanceConfigMonitor - auto notify start user_order successful.
-- :: , EventParser] WARN  c.a.o.c.p.inbound.mysql.rds.RdsBinlogEventParserProxy - ---> begin to find start position, it will be long time for reset or first position
-- :: , EventParser] WARN  c.a.o.c.p.inbound.mysql.rds.RdsBinlogEventParserProxy - prepare to find start position just show master status
-- ::] ERROR com.alibaba.druid.pool.DruidDataSource - testWhileIdle is true, validationQuery not set
-- ::] WARN  c.a.o.canal.parse.inbound.mysql.dbsync.LogEventConvert - --> init table filter : ^.*\..*$
-- ::] WARN  c.a.o.canal.parse.inbound.mysql.dbsync.LogEventConvert - --> init table black filter :
-- ::] INFO  c.a.o.canal.deployer.monitor.SpringInstanceConfigMonitor - auto notify start delivery_info successful.
-- :: , EventParser] WARN  c.a.o.c.p.inbound.mysql.rds.RdsBinlogEventParserProxy - ---> begin to find start position, it will be long time for reset or first position
-- :: , EventParser] WARN  c.a.o.c.p.inbound.mysql.rds.RdsBinlogEventParserProxy - prepare to find start position just show master status
-- :: , EventParser] WARN  c.a.o.c.p.inbound.mysql.rds.RdsBinlogEventParserProxy - ---> ,position=,serverId=,gtid=<] cost : 533ms , the next step is binlog dump
-- :: , EventParser] WARN  c.a.o.c.p.inbound.mysql.rds.RdsBinlogEventParserProxy - ---> ,position=,serverId=,gtid=<] cost : 1365ms , the next step is binlog dump
-- :: , EventParser] WARN  c.a.o.c.p.inbound.mysql.rds.RdsBinlogEventParserProxy - ---> ,position=,serverId=,gtid=<] cost : 1087ms , the next step is binlog dump
启动成功。至此呢canal-server端就启动完成了。下面配置canal-adapter适配器,同步数据到ES。
3、配置canal-adapter
下载地址:https://github.com/alibaba/canal/releases
[root@aliyun ~]# wget https://github.com/alibaba/canal/releases/download/canal-1.1.3/canal.adapter-1.1.3.tar.gz
解压:
[root@aliyun ~]# mkdir /usr/local/canal-adapter
[root@aliyun ~]# .tar.gz -C /usr/local/canal-adapter/
[root@aliyun ~]# ll /usr/local/canal-adapter/
total
drwxr-xr-x  root root  Jul  : bin
drwxrwxrwx  root root  Apr   : conf
drwxr-xr-x  root root  Jul  : lib
drwxrwxrwx  root root  Apr   : logs
drwxrwxrwx  root root  Apr   : plugin
配置文件介绍:
[root@aliyun ~]# cd /usr/local/canal-adapter/conf/
[root@aliyun conf]# ll
total
-rwxrwxrwx  root root  Apr   : application.yml    #adapter的主配置文件
-rwxrwxrwx  root root   Apr   : bootstrap.yml      #启动引导文件
drwxr-xr-x  root root  Jul  : es            #和es对接的配置文件目录,
drwxr-xr-x  root root  Jul  : hbase          #和hbase对接的配置文件目录
-rwxrwxrwx  root root  Apr   : logback.xml      #日志配置
drwxrwxrwx  root root  Jul  : META-INF
drwxrwxrwx  root root  Apr   : rdb
主配置文件我们需要重点关心的参数如下:
[root@aliyun conf]# grep -v "^#" application.yml
server:
  port:
spring:
  jackson:
    date-format: yyyy-MM-dd HH:mm:ss

    default-property-inclusion: non_null

canal.conf:
  mode: tcp # kafka rocketMQ              #模式
  canalServerHost: 127.0.0.1:11111           #指定canal-server的地址和端口
  batchSize:
  syncBatchSize:
  retries:
  timeout:
  accessKey:
  secretKey:
srcDataSources: #数据源配置,从哪里获取数据
defaultDS: #指定一个名字,在ES的配置中会用到,唯一
url: jdbc:mysql://127.0.0.1:3306/mytest?useUnicode=true #连接的数据库地址和一个库
username: root #数据库的用户和密码
password: 121212
  canalAdapters:                    #适配器配置
  - instance: example # canal instance Name or mq topic name    #指定在canal-server配置的实例
    groups:
    - groupId: g1                              #默认就好,组标示
      outerAdapters:                            #输出
      - name: es                               #输出到哪里?指定es      hosts: 127.0.0.1:9300                       #指定es的地址,注意端口为es的传输端口9300      properties:                          cluster.name: est                         #指定es的集群名称
然后配置es的部分:
[root@aliyun es]# pwd
/usr/local/canal-adapter/conf/es
[root@aliyun es]# ll
total
-rwxrwxrwx  root root  Apr   : biz_order.yml          #这三个配置文件是自带的,可以删除,不过最好不要删除,因为可以参考他的格式
-rwxrwxrwx  root root  Apr   : customer.yml
-rwxrwxrwx  root root  Apr   : mytest_user.yml
这里我们先配置一个简单的单表映射到es,后面在配置一个复杂点的父子文档映射(一父两子)。
单表映射配置文件取名为test.yml,要同步的数据库表结构如下:
mysql> desc order_item;
+----------------------+--------------+------+-----+-------------------+----------------+
| Field                | Type         | Null | Key | Default           | Extra          |
+----------------------+--------------+------+-----+-------------------+----------------+
| )   | NO   | PRI | NULL              | auto_increment |
| biz_code             | varchar()  | NO   |     | NULL              |                |
| user_id              | bigint()   | NO   | MUL | NULL              |                |
| user_name            | varchar()  | YES  |     |                   |                |
| order_id             | bigint()   | NO   | MUL | NULL              |                |
| payment_amount       | bigint()   | YES  |     |                  |                |
| item_id              | bigint()   | NO   | MUL | NULL              |                |
| discount_amount      | bigint()   | NO   |     |                  |                |
| point                | bigint()   | YES  |     |                  |                |
| refund_amount        | bigint()   | YES  |     |                  |                |
| point_amount         | bigint()   | NO   |     |                  |                |
| refund_reason_id     | tinyint()   | YES  |     | NULL              |                |
| refund_status        | tinyint()   | NO   | MUL |                  |                |
| refund_type          | tinyint()  | YES  | MUL | NULL              |                |
| refund_batch_no      | varchar()  | YES  |     | NULL              |                |
| refund_time          | datetime     | YES  | MUL | NULL              |                |
| refund_response_time | datetime     | YES  |     | NULL              |                |
| item_sku_id          | bigint()   | NO   |     | NULL              |                |
| item_sku_desc        | varchar() | NO   |     | NULL              |                |
| item_name            | varchar() | NO   |     | NULL              |                |
| delivery_mark        | )      | YES  |     |                  |                |
| item_type            | tinyint()   | YES  |     | NULL              |                |
| original_sku_id      | bigint()   | YES  |     | NULL              |                |
| item_image_url       | varchar() | NO   |     | NULL              |                |
| unit_price           | bigint()   | NO   |     | NULL              |                |
| category_id          | bigint()   | YES  |     | NULL              |                |
| item_brand_id        | bigint()   | YES  |     | NULL              |                |
| number               | )      | NO   |     | NULL              |                |
| delivery_type        | tinyint()   | NO   |     | NULL              |                |
| delivery_info_id     | bigint()   | YES  |     | NULL              |                |
| activity_id          | bigint()   | YES  |     | NULL              |                |
| seller_id            | bigint()   | NO   | MUL | NULL              |                |
| higo_mark            | tinyint()   | YES  |     |                  |                |
| higo_extra_info      | varchar() | YES  |     | NULL              |                |
| virtual_mark         | bigint()   | YES  |     |                  |                |
| supplier_id          | bigint()   | YES  |     |                  |                |
| delivery_print_mark  | tinyint()   | YES  |     |                  |                |
| print_info_id        | bigint()   | YES  |     |                  |                |
| cost_price           | bigint()   | YES  |     | NULL              |                |
| bar_code             | varchar() | YES  |     | NULL              |                |
| delivery_fee         | bigint()   | YES  |     | NULL              |                |
| tax_fee              | bigint()   | YES  |     | NULL              |                |
| real_point_amount    | bigint()   | YES  |     | NULL              |                |
| real_discount_amount | bigint()   | YES  |     | NULL              |                |
| real_payment_amount  | bigint()   | YES  |     | NULL              |                |
| supplier_biz_code    | varchar()  | NO   |     |                   |                |
| supplier_seller_id   | bigint()   | NO   |     |                  |                |
| supplier_item_id     | bigint()   | NO   |     |                  |                |
| supplier_sku_id      | bigint()   | NO   |     |                  |                |
| parent_order_id      | bigint()   | NO   |     |                  |                |
| league_amount        | bigint()   | NO   |     |                  |                |
| supplier_amount      | bigint()   | NO   |     |                  |                |
| proxy_mark           | tinyint()   | NO   |     |                  |                |
| proxy_profit         | bigint()   | NO   |     |                  |                |
| delete_mark          | tinyint()   | NO   |     |                  |                |
| delete_timestamp     | bigint()   | YES  |     |                  |                |
| gmt_created          | datetime     | NO   |     | CURRENT_TIMESTAMP |                |
| gmt_modified         | datetime     | NO   |     | CURRENT_TIMESTAMP |                |
| goods_status         | tinyint()  | YES  |     |                  |                |
| video_id             | bigint()   | YES  |     | NULL              |                |
| star_bonus_fee       | bigint()   | YES  |     | NULL              |                |
| service_fee          | bigint()   | YES  |     | NULL              |                |
| limit_type           | tinyint()   | NO   |     |                  |                |
+----------------------+--------------+------+-----+-------------------+----------------+
 rows in set (0.00 sec)
对应的映射[root@aliyun ~]# cat test.yml
dataSourceKey: defaultDS               #指定数据源,这个值和adapter的application.yml文件中配置的srcDataSources值对应。
destination: example                  #指定canal-server中配置的某个实例的名字,注意:我们可能配置多个实例,你要清楚的知道每个实例收集的是那些数据,不要瞎搞。
groupId: g1                       #组ID,默认就好
esMapping:                        #ES的mapping(映射)
  _index: user_order                  #要同步到的ES的索引名称(自定义),需要自己在ES上创建哦!
  _type: user_order                     # ES索引的类型名称(自定义)
  _id: _id                        #ES标示文档的唯一标示,通常对应数据表中的主键ID字段,注意我这里写成的是"_id",有个下划线哦!
  sql: "select concat('item_',t.id)  as _id,    #这里就是数据表中的每个字段到ES索引中叫什么名字的sql映射,注意映射到es中的每个字段都要是唯一的,不能重复。
        t.biz_code as item_biz_code,          #可以全表映射到ES中,也可以部分字段映射到ES中,只要把不要的字段不写在这个sql映射中就OK啦
        t.user_id as item_user_id,           # t.user_id 是数据表中的字段,当他到es中后叫做item_user_name,as后面是自定义的名字。
        t.user_name as item_user_name,
        t.order_id,                   #当然也可以不取别名,像这样,到ES中后就叫order_id
        t.id as item_primary_id,
        t.payment_amount as item_payment_amount,
        t.item_id  as item_id,
        t.discount_amount as item_discount_amount,
        t.refund_amount as item_refund_amount,
        t.refund_reason_id as item_refund_reason_id,
        t.order_id as item_order_id,
        t.refund_status as item_refund_status,
        t.refund_type as item_refund_type,
        t.refund_batch_no as item_refund_batch_no,
        t.refund_time as item_refund_time,
        t.refund_response_time as item_refund_response_time,
        t.item_sku_id as item_sku_id,
        t.item_sku_desc as item_sku_desc,
        t.item_name as item_item_name,
        t.delivery_mark as item_delivery_mark,
        t.item_type as item_type,
        t.item_image_url as item_image_url,
        t.unit_price as item_unit_price,
        t.category_id as item_category_id,
        t.number as item_number,
        t.delivery_type as item_delivery_type,
        t.delivery_info_id as item_delivery_info_id,
        t.activity_id as item_activity_id,
        t.seller_id as item_seller_id,
        t.cost_price as item_cost_price,
        t.bar_code as item_bar_code,
        t.delivery_fee as item_delivery_fee,
        t.parent_order_id as item_parent_order_id,
        t.proxy_mark as item_proxy_mark,
        t.proxy_profit as item_proxy_profit,
        t.delete_mark as item_delete_mark,
        t.delete_timestamp as item_delete_timestamp,
        t.gmt_created as item_gmt_created,
        t.gmt_modified as item_gmt_modified,
        t.star_bonus_fee as item_star_bonus_fee,
        t.service_fee as item_service_fee,
        t.limit_type as item_limit_type from order_item t"
etlCondition: "where t.c_time>='{0}'"              #ETL同步的条件,ETL是什么自行百度
  commitBatch: 3000                          #每次同步提交的大小
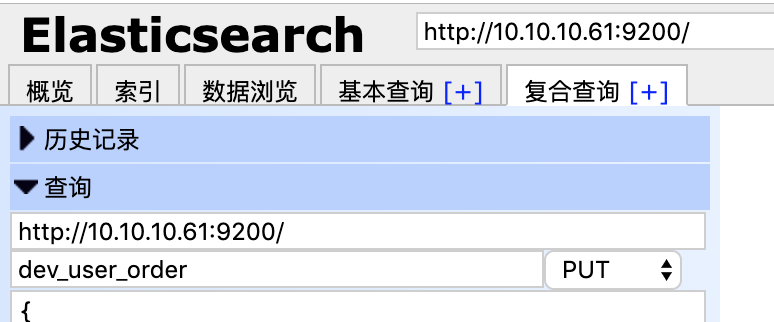
sql映射文件写完之后,要去ES上面创建对应的索引和映射,映射要求要和sql文件的映射保持一致,即sql映射中有的字段在ES的索引映射中必须要有,否则同步会报字段错误,导致失败。
上面对应的索引映射如下:
可以使用head插件创建索引映射:如图:
{
    "mappings": {
        "user_order": {
            "properties": {
                "item_user_id": {
                    "type": "long"
                },
                "item_user_name": {
                    "type": "text",
                    "analyzer": "ik_max_word",
                    "search_analyzer": "ik_smart"
                },
                "item_biz_code": {
                    "type": "text"
                },
                "order_user_name": {
                    "type": "text"
                },
                "item_payment_amount": {
                    "type": "long"
                },
                "item_id": {
                    "type": "long"
                },
                "item_discount_amount": {
                    "type": "long"
                },
                "item_refund_amount": {
                    "type": "long"
                },
                "item_refund_reason_id": {
                    "type": "long"
                },
                "item_refund_status": {
                    "type": "long"
                },
                "item_refund_type": {
                    "type": "long"
                },
                "item_refund_batch_no": {
                    "type": "text"
                },
                "item_refund_time": {
                    "type": "date"
                },
                "item_refund_response_time": {
                    "type": "date"
                },
                "item_sku_id": {
                    "type": "long"
                },
                "item_sku_desc": {
                    "type": "text"
                },
                "item_item_name": {
                    "type": "text"
                },
                "item_delivery_mark": {
                    "type": "long"
                },
                "item_type": {
                    "type": "long"
                },
                "item_image_url": {
                    "type": "text"
                },
                "item_unit_price": {
                    "type": "long"
                },
                "item_category_id": {
                    "type": "long"
                },
                "item_number": {
                    "type": "long"
                },
                "item_delivery_type": {
                    "type": "long"
                },
                "item_delivery_info_id": {
                    "type": "long"
                },
                "item_activity_id": {
                    "type": "long"
                },
                "item_seller_id": {
                    "type": "long"
                },
                "item_cost_price": {
                    "type": "long"
                },
                "item_bar_code": {
                    "type": "text"
                },
                "item_order_id": {
                    "type": "long"
                },
                "item_delivery_fee": {
                    "type": "long"
                },
                "item_parent_order_id": {
                    "type": "long"
                },
                "item_proxy_mark": {
                    "type": "long"
                },
                "item_proxy_profit": {
                    "type": "long"
                },
                "item_delete_mark": {
                    "type": "long"
                },
                "item_delete_timestamp": {
                    "type": "long"
                },
                "item_gmt_created": {
                    "type": "date"
                },
                "item_gmt_modified": {
                    "type": "date"
                },
                "item_star_bonus_fee": {
                    "type": "long"
                },
                "item_service_fee": {
                    "type": "long"
                },
                "item_limit_type": {
                    "type": "long"
                }
            }
        }
    }
}
可能我的sql映射和es的索引映射可能会有字段丢失,因为太多了大晚上的我也不想一个一个对照了,反正方法就是这样的。完成之后,启动canal-adapter,开始同步数据。
启动canal-adapter:
[root@aliyun bin]# pwd
/usr/local/canal-adapter/bin
[root@aliyun bin]# ./startup.sh
查看日志:
- ::41.608 [main] INFO  c.a.o.canal.adapter.launcher.loader.CanalAdapterService - ## the canal client adapters are running now ......
-- ::41.617 [main] INFO  org.apache.coyote.http11.Http11NioProtocol - Starting ProtocolHandler ["http-nio-8081"]
-- ::41.625 [main] INFO  org.apache.tomcat.util.net.NioSelectorPool - Using a shared selector for servlet write/read
-- ::] INFO  c.a.o.canal.adapter.launcher.loader.CanalAdapterWorker - =============> Start to connect destination: example <=============
-- :: (http) with context path ''
-- ::41.797 [main] INFO  c.a.otter.canal.adapter.launcher.CanalAdapterApplication - Started CanalAdapterApplication in 8.123 seconds (JVM running for 9.181)
-- ::] INFO  c.a.o.canal.adapter.launcher.loader.CanalAdapterWorker - =============> Start to subscribe destination: example <=============
-- ::] INFO  c.a.o.canal.adapter.launcher.loader.CanalAdapterWorker - =============> Subscribe destination: example succeed <=============
配置好通路之后,先做一次全量数据同步:
curl http://127.0.0.1:8081/etl/es/test.yml -X POST
现在可以在数据库中插入一条或者更改一条数据,查看日志看es中的数据是否同步,如果启动过程没有什么错误的话就成功啦,不过不可能那么顺利的,遇到问题解决问题才是进步成长的过程不要放弃!
鉴于篇幅原因,父子文档下篇在写。
canal同步MySQL数据到ES6.X的更多相关文章
- 使用Logstash来实时同步MySQL数据到ES
上篇讲到了ES和Head插件的环境搭建和配置,也简单模拟了数据作测试 本篇我们来实战从MYSQL里直接同步数据 一.首先下载和你的ES对应的logstash版本,本篇我们使用的都是6.1.1 下载后使 ...
- 使用logstash同步MySQL数据到ES
使用logstash同步MySQL数据到ES 版权声明:[分享也是一种提高]个人转载请在正文开头明显位置注明出处,未经作者同意禁止企业/组织转载,禁止私自更改原文,禁止用于商业目的. https:// ...
- Logstash使用jdbc_input同步Mysql数据时遇到的空时间SQLException问题
今天在使用Logstash的jdbc_input插件同步Mysql数据时,本来应该能搜索出10条数据,结果在Elasticsearch中只看到了4条,终端中只给出了如下信息 [2017-08-25T1 ...
- 推荐一个同步Mysql数据到Elasticsearch的工具
把Mysql的数据同步到Elasticsearch是个很常见的需求,但在Github里找到的同步工具用起来或多或少都有些别扭. 例如:某记录内容为"aaa|bbb|ccc",将其按 ...
- centos7配置Logstash同步Mysql数据到Elasticsearch
Logstash 是开源的服务器端数据处理管道,能够同时从多个来源采集数据,转换数据,然后将数据发送到您最喜欢的“存储库”中.个人认为这款插件是比较稳定,容易配置的使用Logstash之前,我们得明确 ...
- Canal——增量同步MySQL数据到ElasticSearch
1.准备 1.1.组件 JDK:1.8版本及以上: ElasticSearch:6.x版本,目前貌似不支持7.x版本: Kibana:6.x版本: Canal.deployer:1 ...
- Elasticsearch--Logstash定时同步MySQL数据到Elasticsearch
新地址体验:http://www.zhouhong.icu/post/139 一.Logstash介绍 Logstash是elastic技术栈中的一个技术.它是一个数据采集引擎,可以从数据库采集数据到 ...
- 快速同步mysql数据到redis中
MYSQL快速同步数据到Redis 举例场景:存储游戏玩家的任务数据,游戏服务器启动时将mysql中玩家的数据同步到redis中. 从MySQL中将数据导入到Redis的Hash结构中.当然,最直接的 ...
- logstash同步mysql数据失败
问题描述 前提: 项目采用Elasticsearch提供搜索服务,Mysql提供存储服务,通过Logstash将Mysql中数据同步到Elasticsearch. 问题: 使用logstash-j ...
随机推荐
- Netty源码分析--创建Channel(三)
恩~,没错,其实这一篇才是真正的开始分析源码,你打我呀~. 先看一下我Netty的启动类 private void start() throws Exception { EventLoopGroup ...
- CI框架注意
1.在ci框架中,如果想继承自己写的控制器,从而不继承CI_Controller,可以在application/core中定义控制器,从而就可以在controllers中的控制器继承. 2.在ci框架 ...
- 2018.12.1 万圣节的小L
我回来啦 试题描述 今天是万圣节,小L同学开始了一年一度的讨要糖果游戏,但是在刚刚过去的比赛中小有成就的他打算给自己增加一点难度:如果没有讨到每一家的糖果就算输. 已知小L共有n(n不大于10000) ...
- 前端笔记之React(四)生命周期&Virtual DOM和Diff算法&日历组件开发
一.React生命周期 一个组件从出生到消亡,在各个阶段React提供给我们调用的接口,就是生命周期. 生命周期这个东西,必须有项目,才知道他们干嘛的. 1.1 Mouting阶段[装载过程] 这个阶 ...
- 跟我学SpringCloud | 第十三篇:Spring Cloud Gateway服务化和过滤器
SpringCloud系列教程 | 第十三篇:Spring Cloud Gateway服务化和过滤器 Springboot: 2.1.6.RELEASE SpringCloud: Greenwich. ...
- 把 python 程序打包成 egg 或者 whl 安装包
原文出处:http://www.worldhello.net/2010/12/08/2178.html 本文略有改动 1.1 安装setuptools 首先要安装setuptools工具.Debian ...
- 2019.6.21 NOIP2018提高组模拟题(二)
1.咒语 (curse.pas/c/cpp) [题目描述] 亮亮梦到自己来到了魔法城堡,但一扇巨大的石门阻拦了他通向城堡内的路.正当他沮丧之际,突然发现门上有一处机关,机关上有一张很长的纸条.亮亮拿起 ...
- [笨方法学Python]ImportError"No module named bin.app"【笔记】
运行nosetests时,出现:ImportError"No module named bin.app" 解决方法: 1.检查路径是否是bin/app.py 2.检查是否创建bin ...
- re模块:模式匹配与正则表达式
一.用正则表达式查找文本模式 正则表达式,简称regex,是文本模式的描述方法.比如\d是一个正则表达式,用于表示一位0~9的数字.在一个模式后面加上花括号包围的数字n(如{n}),表示匹配这个模式n ...
- 【超详细】vultr(CentOS7)+LNMP+WordPress 搭建个人博客
心血来潮想搭建个人博客,我的vps只用来搭ss未免太过浪费 在这里记录一下搭建个人博客的历程 0x00 写在前面 why vultr: 优点:便宜. 性能优良.按时间计费(不用包年 学生党的福音).稳 ...