OAI SDR LTE 基站部署
目录
文章目录
硬件设备要求
OAI 要在基于 Intel 处理器架构的 PCs 上运行 eNB 和 UE,这是因为 DSP(数字信号处理器)大量的使用到了整数指令集(SSE, SSE2, SSS3, SSE4, and AVX2)。而对于 EPC,则可以在任意的 64 位 Linux 操作系统上运行,但不能使用容器来运行,因为 EPC 需要安装内核模块,eNB 对电脑配置的要求比 EPC 要更高一些。
OAI eNB 和 UE 在以下 CPU 型号完成了测试:
- Generation 3/4/5/6 Intel Core i5,i7
- Generation 2/3/4 Intel Xeon
- Intel Atom Rangeley, E38xx, x5-z8300
针对 UE 还在下列具体的 CPU 型号完成了测试:
- Intel Core i5-6600K CPU @ 3.50GHz × 4
- Intel Core i5-6600 CPU @ 3.30GHz × 4
- Intel Core i7-8700 CPU @ 3.20GHz × 6
当你希望与基站进行 Real-Time Operation 交互时,还需要特殊的硬件设备支持:
- RF 前端设备:NI/Ettus USRP B200/B210 需要 PC 具有 USB3.0 插口。
SIM Card 要求:在部署 OAI LTE SDR 之前,需要 SIM Card,并对其进行编程。
- 可编程 USIM 卡:例如 Sysmocom 的 sysmoUSIM-SJS1 型号 USIM Card(http://shop.sysmocom.de/products/sysmousim-sjs1)
- SIM Card 读卡机:PC/SC Smart Card Reader
- SIM Card 烧录软件:PySIM
物料购买
设备清单:
- EPC:PC1(Intel Core i5,双网卡)
- eNB:PC2(Intel Core i5,单网卡,USB3.0)
- RF 前端:USRP B210
- UE:安卓手机
- USIM Card:Sysmocom sysmoUSIM-SJS1
物料购买:
- USIM Card 相关
- USRP 210 相关
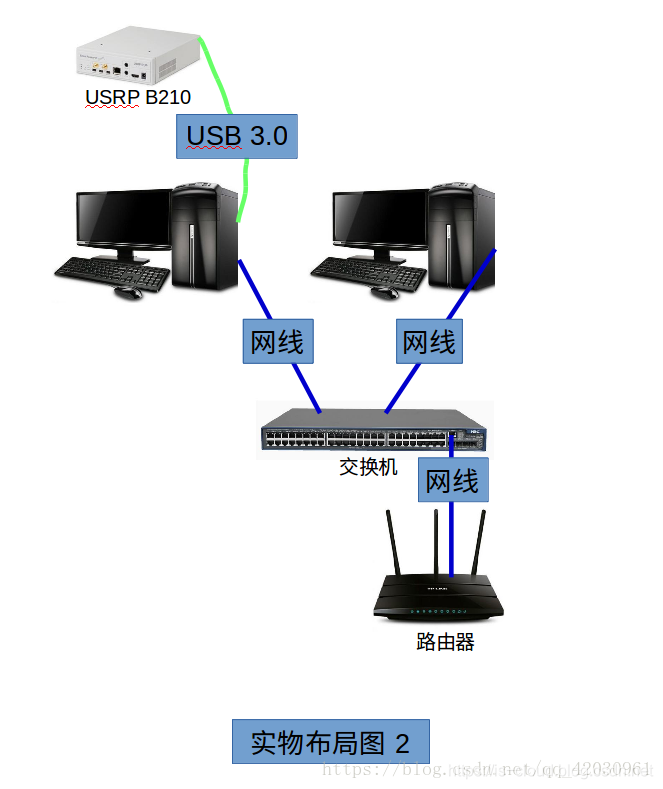
部署架构图
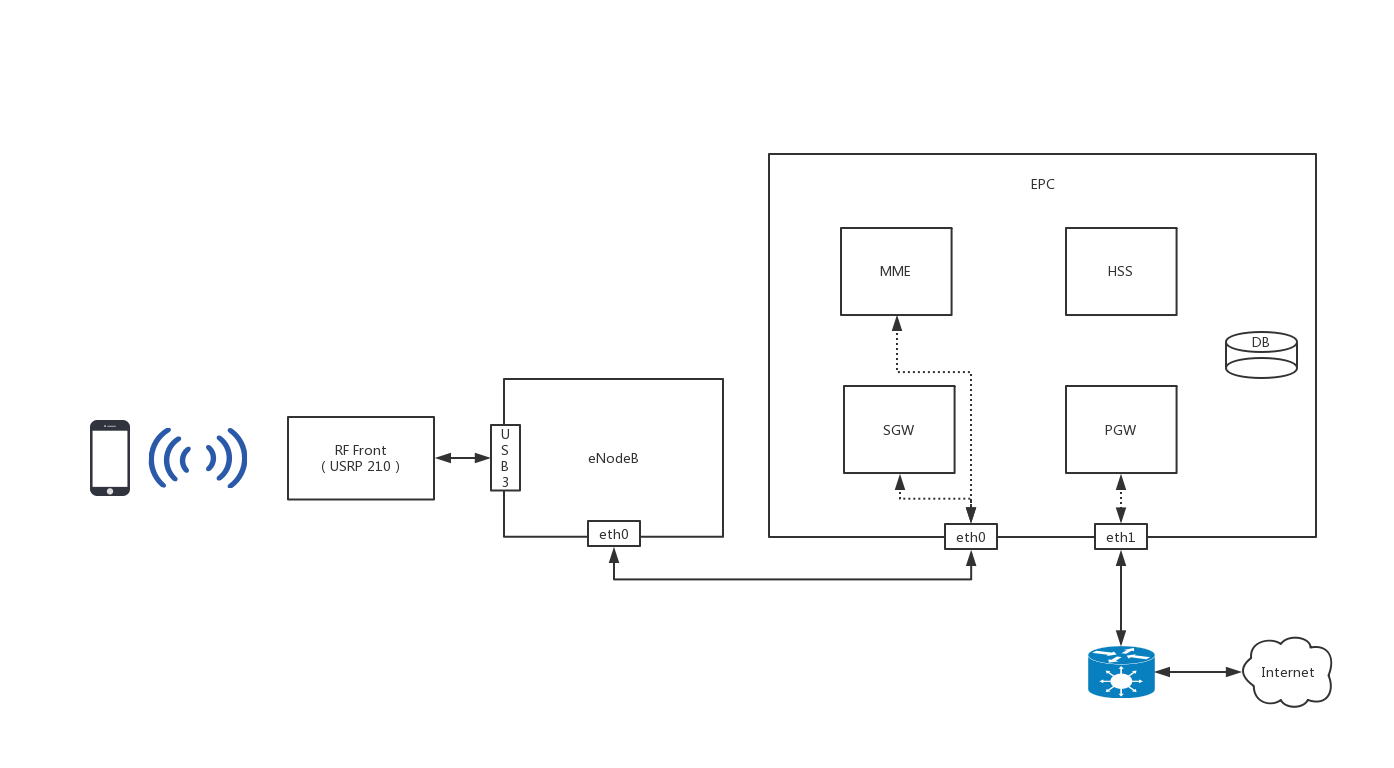
NOTE:官方不建议使用无线网卡代替 PGW 连接 PDN 的网关,所以对于只有单网卡的 PCs 可以参考下面的实物连线图。这么做的话需要分配静态 IP 地址来 Ping 通两台 PCs,注意千万别用 DHCP。
安装 LTE/EPC
注:以下所有操作均通过 root 用户执行。
前期准备
运维相关
国内软件源:
sudo vim /etc/apt/sources.list

deb http://mirrors.aliyun.com/ubuntu/ xenial main

deb-src http://mirrors.aliyun.com/ubuntu/ xenial main

deb http://mirrors.aliyun.com/ubuntu/ xenial-updates main

deb-src http://mirrors.aliyun.com/ubuntu/ xenial-updates main

deb http://mirrors.aliyun.com/ubuntu/ xenial universe

deb-src http://mirrors.aliyun.com/ubuntu/ xenial universe

deb http://mirrors.aliyun.com/ubuntu/ xenial-updates universe

deb-src http://mirrors.aliyun.com/ubuntu/ xenial-updates universe

deb http://mirrors.aliyun.com/ubuntu/ xenial-security main

deb-src http://mirrors.aliyun.com/ubuntu/ xenial-security main

deb http://mirrors.aliyun.com/ubuntu/ xenial-security universe

deb-src http://mirrors.aliyun.com/ubuntu/ xenial-security universe
运维工具:
sudo apt-get install git vim openssh-server i7z subversion
NOTE:请科学上网。e.g.
sudo gedit ~/.gitconfig

[http]

	   proxy = http://127.0.0.1:1080

[https]

	   proxy = https://127.0.0.1:1080
操作系统要求
用于部署 OAI 的操作系统强烈建议使用 Ubuntu Linux 发行版,因为 OAI 是在 Ubuntu 上进行开发的,所以这是最稳定的部署系统。
- 对于 old tags(older than v0.6.1_tdd)的 OAI 应该使用 Ubuntu 14.04 LTS with low-latency kernel 3.19;
- 对于 newer tags(starting v1.0.0 or develop)的 OAI 则应该使用 Ubuntu 16.04 with low-latency kernel 4.8.0 or higher。
NOTE:本文操作系统为 Ubuntu 16.04 LTS。
NOTE 1:不建议在虚拟机上运行 OAI,因为某些虚拟机可能没有加载需要的 CPU models。
NOTE 2:不建议在同一台 PC 上安装 eNB 和 EPC,因为存在对不同软件/内核版本的依赖。
首先更新操作系统环境:
sudo apt-get update

sudo apt-get upgrade
内核要求
OAI 其实对内核非常敏感,很多莫名其表的错误都是由内核不适应导致的,所以切记检查内核的版本。
NOTE:实际上 EPC 不依赖 low-latency kernel,但是为了部署的流畅度,也安装上。
安装 Kernel 4.8.0(最低要求):
wget http://kernel.ubuntu.com/~kernel-ppa/mainline/v4.8/linux-headers-4.8.0-040800-generic_4.8.0-040800.201610022031_amd64.deb

wget http://kernel.ubuntu.com/~kernel-ppa/mainline/v4.8/linux-image-4.8.0-040800-generic_4.8.0-040800.201610022031_amd64.deb

sudo dpkg -i linux-headers-4.8.0-040800-generic_4.8.0-040800.201610022031_amd64.deb

sudo dpkg -i linux-image-4.8.0-040800-generic_4.8.0-040800.201610022031_amd64.deb
安装 low-latency kernel(低延时内核):
sudo apt-get install linux-lowlatency

sudo apt-get install linux-image-`uname -r | cut -d- -f1-2`-lowlatency

sudo apt-get install linux-headers-`uname -r | cut -d- -f1-2`-lowlatency

sudo reboot
NOTE:重新登录可以看见当前内核版本,e.g. Welcome to Ubuntu 16.04.6 LTS (GNU/Linux 4.15.0-70-lowlatency x86_64)。
检查是否加载了 GTP 内核模块(for openair-cn):
uname -a

# 临时加载 gtp 模块

sudo modprobe gtp

dmesg | tail # You should see something that says about GTP kernel module

# e.g.

# [  111.364332] gtp: GTP module loaded (pdp ctx size 104 bytes)
CPU Frequency scaling,将 CPU 频率打满
CPU 调频功能允许操作系统通过提高或降低 CPU 频率来达到省电目的,这里我们将 CPU 的频率打满,不让操作系统自己控制 CPU 的频率。
NOTE:这里主要是对 eNB 节点进行的操作,因为 eNB 对 Real-Time 操作具有很高的要求。
NOTE 1:将 CPU 频率打满会损耗 CPU 的寿命,酌情处理。
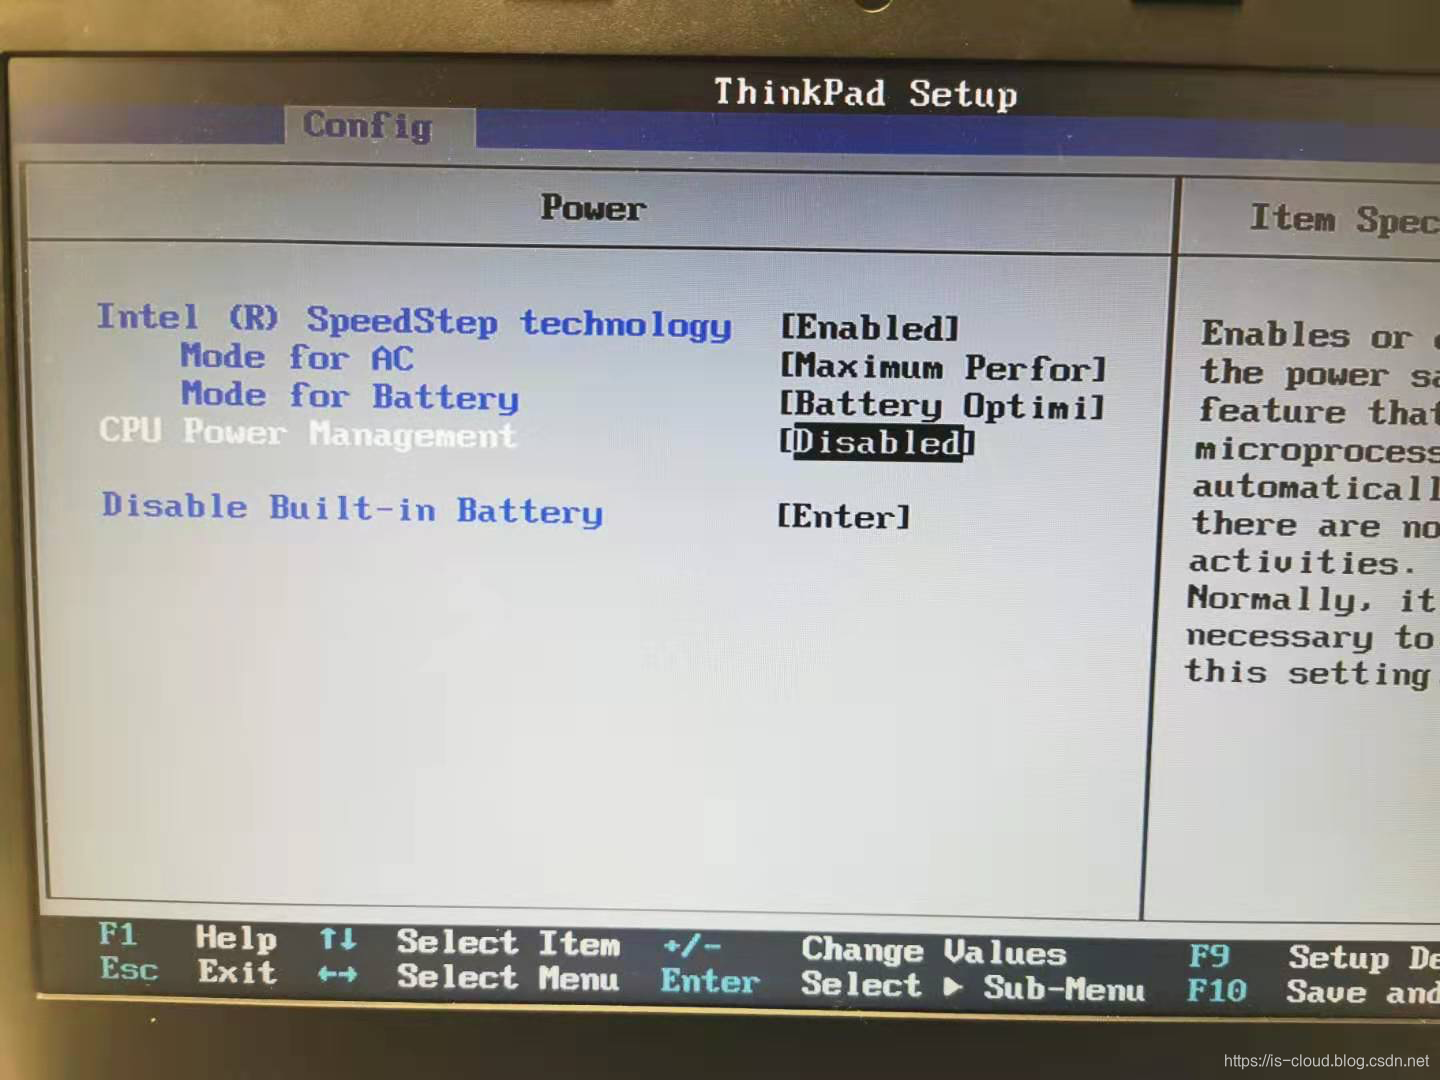
在 BIOS 中移除电源管理功能(P-states, C-states):
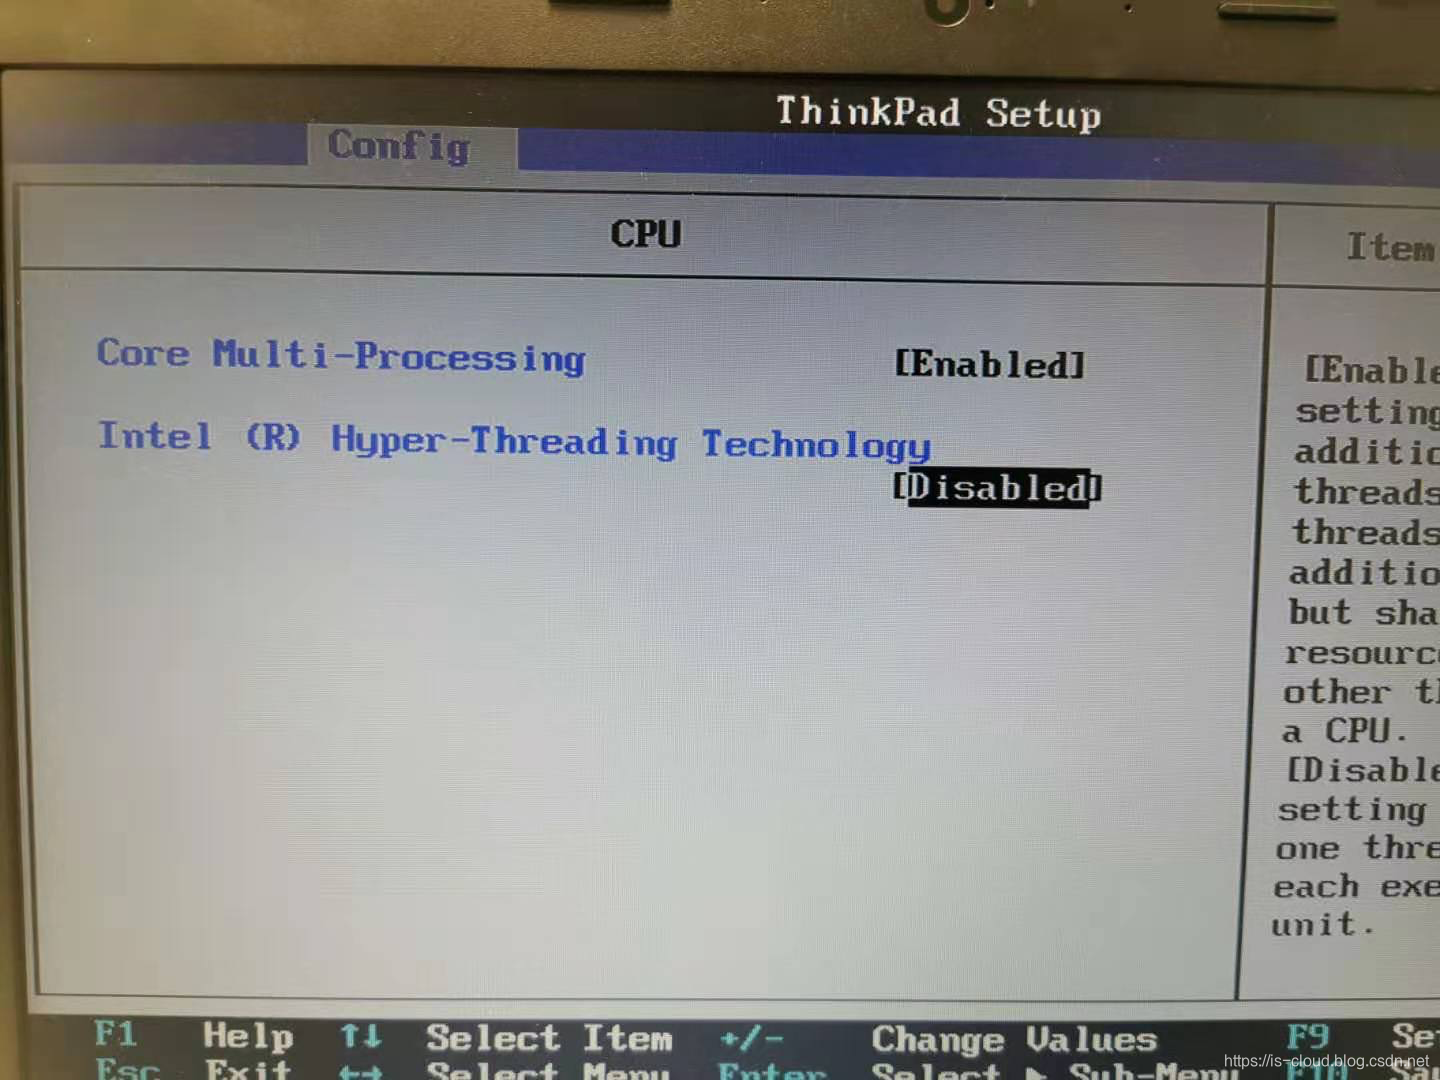
在 BIOS 中关闭超线程(hyper-threading):
禁用 Intel CPU 的 P-state 驱动(CONFIG_X86_INTEL_PSTATE),这个是 Intel CPU 专用的频率调节器驱动:
sudo vi /etc/default/grub

GRUB_CMDLINE_LINUX_DEFAULT="quiet splash"

GRUB_CMDLINE_LINUX_DEFAULT="quiet intel_pstate=disable"

GRUB_CMDLINE_LINUX_DEFAULT="quiet processor.max_cstate=1 intel_idle.max_cstate=0 idle=poll"

sudo update-grub
将 intel_powerclamp(Intel 电源管理驱动程序)加入黑名单:
sudo vi /etc/modprobe.d/blacklist.conf

# 末尾添加

blacklist intel_powerclamp

reboot
关闭 CPU 睿频:
sudo apt-get install cpufrequtils

sudo vi /etc/default/cpufrequtils

...

GOVERNOR="performance"

sudo update-rc.d ondemand disable

sudo /etc/init.d/cpufrequtils restart

# 查看睿频是否成功关闭,会看到所有频率都在 C0%

i7z
再次查看 CPU 功率,此时的 CPU 功率应该有了很大的提升,而且频率变动极小:
watch grep \"cpu MHz\" /proc/cpuinfo
NOTE:如果没有成功关闭 C-state 的话还需要执行以下操作
sudo gedit /etc/default/grub

#GRUB_CMDLINE_LINUX_DEFAULT="quiet splash”

#GRUB_CMDLINE_LINUX_DEFAULT="quiet intel_pstate=disable"

#GRUB_CMDLINE_LINUX_DEFAULT="processor.max_cstate=1 intel_idle.max_cstate=0 idle=poll”

GRUB_CMDLINE_LINUX_DEFAULT="quiet splash quiet intel_pstate=disable processor.max_cstate=1 intel_idle.max_cstate=0 idle=poll"

sudo update-grub

sudo reboot
eNodeB
获取 RAN 的代码:
git config --global http.sslverify false

git config --global http.postBuffer 1048576000

git clone https://gitlab.eurecom.fr/oai/openairinterface5g.git --branch v0.6.1

git checkout -b v0.6.1
配置 eNB:需要更改和确认的部分如下:前三行在 MME 中可以查到,之后就是把 IP 对应换成自己的 EPC 和 eNB 所在的 IP 地址。
sudo vi ~/openairinterface5g/targets/PROJECTS/GENERIC-LTE-EPC/CONF/enb.band7.tm1.usrpb210.conf

eNBs =

(

 {

    // Tracking area code, 0x0000 and 0xfffe are reserved values

    tracking_area_code  =  "1";

    mobile_country_code =  "208";

    mobile_network_code =  "92";

...

    ////////// MME parameters:

    mme_ip_address      = ( { ipv4       = "192.168.0.1";

                              ipv6       = "192:168:30::17";

                              active     = "yes";

                              preference = "ipv4";

                            }

                          );

    NETWORK_INTERFACES :

    {

        ENB_INTERFACE_NAME_FOR_S1_MME            = "enp0s31f6";

        ENB_IPV4_ADDRESS_FOR_S1_MME              = "192.168.0.2/24";

        ENB_INTERFACE_NAME_FOR_S1U               = "enp0s31f6";

        ENB_IPV4_ADDRESS_FOR_S1U                 = "192.168.0.2/24";

        ENB_PORT_FOR_S1U                         = 2152; # Spec 2152

    };
安装依赖包:这里采用了「文件安装 + USRP 驱动安装」的方式
cd ~/openairinterface5g

source oaienv

cd cmake_targets

sudo ./build_oai -I -w USRP
如有需要,可以按照 USRP 官方文档安装相应的 UHD 驱动:
https://kb.ettus.com/Building_and_Installing_the_USRP_Open-Source_Toolchain_(UHD_and_GNU_Radio)_on_Linux
编译安装 eNB + USRP(使用空口硬件传输):
cd ~/openairinterface5g

source oaienv

cd cmake_targets

./build_oai --eNB -c -w USRP
Will install external packages

Setting hardware to: OAI_USRP

CMAKE_CMD=cmake ..

RF HW set to OAI_USRP

Flags for Deadline scheduler: False

Flags for CPU Affinity: False

2. Setting the OAI PATHS ...

OPENAIR_DIR    = /root/openairinterface5g

FreeDiameter prefix not found, install freeDiameter if EPC, HSS

Installing packages

...

Installing ASN1. The log file for ASN1 installation is here: /root/openairinterface5g/cmake_targets/log/asn1c_install_log.txt

Cloning into '/opt/ssh'...

installing packages for USRP support

...

[INFO] Images destination: /usr/share/uhd/images

[INFO] Target usrp1_b100_fw_default is up to date.

[INFO] Target x3xx_x310_fpga_default is up to date.

[INFO] Target usrp2_n210_fpga_default is up to date.

[INFO] Target n230_n230_fpga_default is up to date.

[INFO] Target usrp1_b100_fpga_default is up to date.

[INFO] Target b2xx_b200_fpga_default is up to date.

[INFO] Target usrp2_n200_fpga_default is up to date.

[INFO] Target e3xx_e320_fpga_default is up to date.

[INFO] Target n3xx_n310_fpga_default is up to date.

[INFO] Target b2xx_b205mini_fpga_default is up to date.

[INFO] Target octoclock_octoclock_fw_default is up to date.

[INFO] Target usrp2_usrp2_fw_default is up to date.

[INFO] Target usrp2_n200_fw_default is up to date.

[INFO] Target usrp2_usrp2_fpga_default is up to date.

[INFO] Target b2xx_common_fw_default is up to date.

[INFO] Target n3xx_n320_fpga_default is up to date.

[INFO] Target b2xx_b200mini_fpga_default is up to date.

[INFO] Target usrp1_usrp1_fpga_default is up to date.

[INFO] Target usrp2_n210_fw_default is up to date.

[INFO] Target n3xx_n300_fpga_default is up to date.

[INFO] Target e3xx_e310_fpga_default is up to date.

[INFO] Target b2xx_b210_fpga_default is up to date.

[INFO] Downloading x3xx_x300_fpga_default-gbb85bdff.zip, total size: 19053.994 kB

[INFO] Downloading usb_common_windrv_default-g14000041.zip, total size: 4838.302 kB

[INFO] Images download complete.

3. building the compilation directives ...

10. Bypassing the Tests ...
EPC
配置 FQDN:
sudo vim /etc/hosts

...

127.0.0.1     localhost

127.0.1.1     epc.openair4G.eur      epc

127.0.1.1     hss.openair4G.eur      hss

hostname -f
获取 CN 代码(包括 MME、S/P-GW 及 HSS):
git config --global http.sslverify false

git config --global http.postBuffer 1048576000

//新版

sudo git clone https://github.com/OPENAIRINTERFACE/openair-cn.git

//史前的旧版

#git clone https://gitlab.eurecom.fr/oai/openair-cn.git

cd openair-cn

git checkout -b v0.5.0
准备 EPC config files in /usr/local/etc/oai:
sudo mkdir -p /usr/local/etc/oai/freeDiameter

sudo cp ~/openair-cn/etc/mme.conf /usr/local/etc/oai

sudo cp ~/openair-cn/etc/hss.conf /usr/local/etc/oai

sudo cp ~/openair-cn/etc/spgw.conf /usr/local/etc/oai

sudo cp ~/openair-cn/etc/acl.conf /usr/local/etc/oai/freeDiameter

sudo cp ~/openair-cn/etc/mme_fd.conf /usr/local/etc/oai/freeDiameter

sudo cp ~/openair-cn/etc/hss_fd.conf /usr/local/etc/oai/freeDiameter
HSS
安装依赖包:
cd ~/openair-cn/scripts

# -i 表示安装 Missing Packages

./build_hss -i
这里会安装 MySQL 和 phpmyadmin,过程中会要求输出 MySQL 的密码,一般设置为 linux。phpmyadmin 的用户名为 root,密码为 linux。安装成功后在浏览器中输入 http://127.0.0.1/phpmyadmin。如果发现访问不成功,则需要手动安装(视实际情况):
# 安装 apache2

sudo apt-get install apache2

# 安装 PHP

apt-get install php7.0

apt-get install libapache2-mod-php7.0

# 安装 MySQL

sudo apt-get install mysql-server mysql-client

# 安装 phpmyadmin

sudo apt-get install phpmyadmin

sudo ln -s /etc/phpmyadmin/apache.conf /etc/apache2/conf-available/phpmyadmin.conf

sudo a2enconf phpmyadmin

sudo /etc/init.d/apache2 reload

sudo service apache2 restart
修改 HSS 配置:
- 主要是修改 MySQL 连接信息,其中
OPERATOR_key也可以先不管,用这个默认的就可以,是后面 SIM 卡的相关信息。
sudo vim /usr/local/etc/oai/hss.conf

HSS :

{

  ## MySQL mandatory options

  MYSQL_server = "127.0.0.1";     # HSS S6a bind address

  MYSQL_user   = "root";  # Database server login

  MYSQL_pass   = "linux";  # Database server password

  MYSQL_db     = "oai_db";        # Your database name

  ## HSS options

  #OPERATOR_key = "@OPERATOR_KEY@"; # OP key matching your database

  #OPERATOR_key = "1006020f0a478bf6b699f15c062e42b3"; # OP key matching your database

  OPERATOR_key = "11111111111111111111111111111111"; # OP key matching your database

  RANDOM = "true";                                   # True random or only pseudo random (for subscriber vector generation)

  ## Freediameter options

  FD_conf = "@PREFIX@/freeDiameter/hss_fd.conf";

  PID_DIRECTORY = "@PID_DIRECTORY@";              # /var/run is the default

};
- 修改 HSS freeDiameter 配置。
sudo vim /usr/local/etc/oai/freeDiameter/hss_fd.conf

# The first parameter in this section is Identity, which will be used to

# identify this peer in the Diameter network. The Diameter protocol mandates

# that the Identity used is a valid FQDN for the peer. This parameter can be

# omitted, in that case the framework will attempt to use system default value

# (as returned by hostname --fqdn).

Identity = "hss.openair4G.eur";

# In Diameter, all peers also belong to a Realm. If the realm is not specified,

# the framework uses the part of the Identity after the first dot.

Realm = "openair4G.eur";
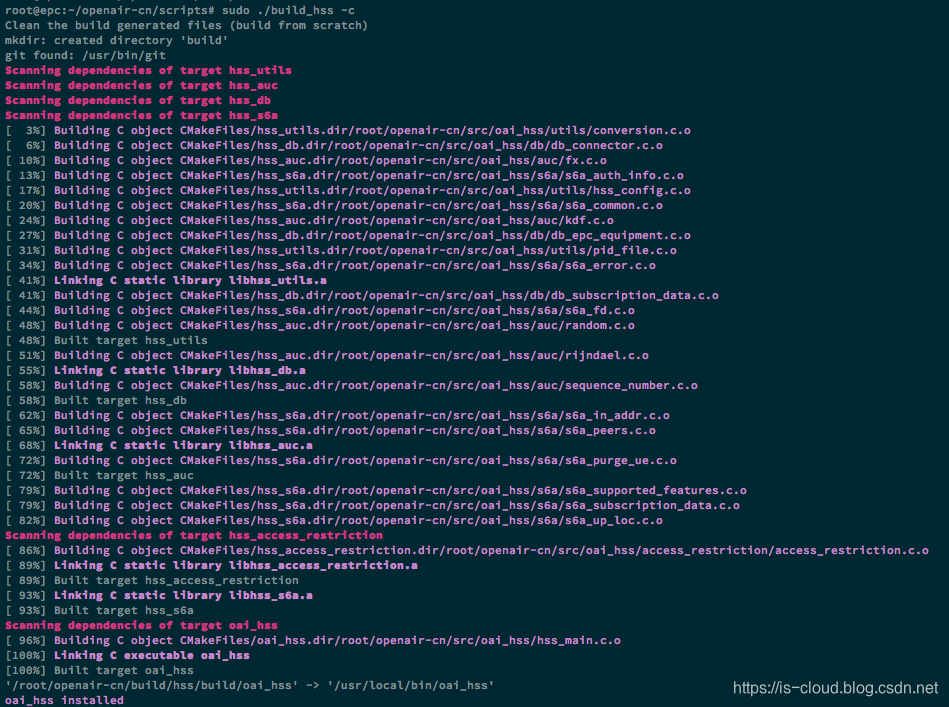
编译安装:
cd ~/openair-cn/scripts

sudo ./build_hss -c
MME
安装依赖包:
cd ~/openair-cn/scripts

sudo ./build_mme  -i
修改 MME 配置:
- 修改 MME Network Interface 配置,关注 S1 和 S11 接口。
NOTE:S1 和 eNB 和 EPC 连接的接口的统称;S11 是 S-GW 与 MME 连接的接口。
sudo vim /usr/local/etc/oai/mme.conf

    NETWORK_INTERFACES :

    {

        # MME binded interface for S1-C or S1-MME  communication (S1AP), can be ethernet interface, virtual ethernet interface, we don't advise wireless interfaces

        MME_INTERFACE_NAME_FOR_S1_MME   = "enp0s25";    # YOUR NETWORK CONFIG HERE

        MME_IPV4_ADDRESS_FOR_S1_MME     = "192.168.0.1/24";      # CIDR, YOUR NETWORK CONFIG HERE

        # MME binded interface for S11 communication (GTPV2-C)

        MME_INTERFACE_NAME_FOR_S11      = "lo";       # YOUR NETWORK CONFIG HERE

        MME_IPV4_ADDRESS_FOR_S11        = "127.0.11.1/8";         # CIDR, YOUR NETWORK CONFIG HERE

        MME_PORT_FOR_S11                = 2123;                                 # YOUR NETWORK CONFIG HERE

        #S10 Interface

        MME_INTERFACE_NAME_FOR_S10      = "@MME_INTERFACE_NAME_FOR_S10@";       # YOUR NETWORK CONFIG HERE

        MME_IPV4_ADDRESS_FOR_S10        = "@MME_IPV4_ADDRESS_FOR_S10@";         # CIDR, YOUR NETWORK CONFIG HERE

        MME_PORT_FOR_S10                = 2123;                                 # YOUR NETWORK CONFIG HERE

    };
- 修改 MME freediameter 配置。
sudo vim /usr/local/etc/oai/freeDiameter/mme_fd.conf

Identity = "epc.openair4G.eur";

Realm = "openair4G.eur";

ConnectPeer= "hss.openair4G.eur" {ConnectTo = "127.0.0.1"; No_SCTP ; No_IPv6; Prefer_TCP; No_TLS; port = 3868;  realm = "openair4G.eur";};
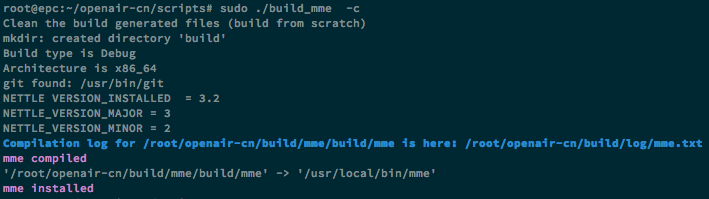
编译安装:
cd ~/openair-cn/scripts

sudo ./build_mme  -c
S/PGW
安装依赖包:
cd ~/openair-cn/scripts

sudo ./build_spgw -i
修改 S/PGW 配置:
- 修改 SGW 配置,关注 S1-U 和 S11 接口。
sudo vim /usr/local/etc/oai/spgw.conf

S-GW :

{

    NETWORK_INTERFACES :

    {

        # S-GW binded interface for S11 communication (GTPV2-C), if none selected the ITTI message interface is used

        SGW_INTERFACE_NAME_FOR_S11              = "lo"; # STRING, interface name, YOUR NETWORK CONFIG HERE

        SGW_IPV4_ADDRESS_FOR_S11                = "127.0.11.2/8"; # STRING, CIDR, YOUR NETWORK CONFIG HERE

        SGW_UDP_PORT_FOR_S11                    = 2123;                         # INTEGER, port number, PREFER NOT CHANGE UNLESS YOU KNOW WHAT YOU ARE DOING

        # S-GW binded interface for S1-U communication (GTPV1-U) can be ethernet interface, virtual ethernet interface, we don't advise wireless interfaces

        SGW_INTERFACE_NAME_FOR_S1U_S12_S4_UP    = "enp0s25"; # STRING, interface name, YOUR NETWORK CONFIG HERE, USE "lo" if S-GW run on eNB host

        SGW_IPV4_ADDRESS_FOR_S1U_S12_S4_UP      = "192.168.0.1/24";   # STRING, CIDR, YOUR NETWORK CONFIG HERE

        SGW_UDP_PORT_FOR_S1U_S12_S4_UP          = 2152;         # INTEGER, port number default is 2152, PREFER NOT CHANGE UNLESS YOU KNOW WHAT YOU ARE DOING

        # S-GW binded interface for S5 or S8 communication, not implemented, so leave it to none

        SGW_INTERFACE_NAME_FOR_S5_S8_UP         = "none";                       # STRING, interface name, DO NOT CHANGE (NOT IMPLEMENTED YET)

        SGW_IPV4_ADDRESS_FOR_S5_S8_UP           = "0.0.0.0/24";                 # STRING, CIDR, DO NOT CHANGE (NOT IMPLEMENTED YET)

    };
- 修改 PGW 配置,关注 SGi 接口。
sudo vim /usr/local/etc/oai/spgw.conf

P-GW =

{

    INSTANCE                                  = @INSTANCE@;                     # 0 is the default

    PID_DIRECTORY                             = "@PID_DIRECTORY@";              # /var/run is the default

    NETWORK_INTERFACES :

    {

        # P-GW binded interface for S5 or S8 communication, not implemented, so leave it to none

        PGW_INTERFACE_NAME_FOR_S5_S8          = "none";                         # STRING, interface name, DO NOT CHANGE (NOT IMPLEMENTED YET)

        # P-GW binded interface for SGI (egress/ingress internet traffic)

        PGW_INTERFACE_NAME_FOR_SGI            = "enp0s25"; # STRING, YOUR NETWORK CONFIG HERE

        PGW_IPV4_ADDRESS_FOR_SGI              = "192.168.0.1/24";   # STRING, CIDR, YOUR NETWORK CONFIG HERE

        PGW_MASQUERADE_SGI                    = "yes";                           # STRING, {"yes", "no"}. YOUR NETWORK CONFIG HERE, will do NAT for you if you put "yes", only if OVS/OPENFLOW not used.

        UE_TCP_MSS_CLAMPING                   = "no";                           # STRING, {"yes", "no"}, only if OVS/OPENFLOW not used.

    };
编译安装:
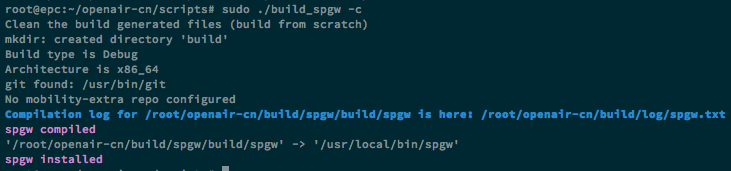
cd ~/openair-cn/scripts

sudo ./build_spgw -c
GTP-U handled by OVS in PGW
启动 LTE/EPC
测试前准备好 wireshark 抓包,启动 LTE/EPC 所有进程后可以抓到 S1 SetupRequest 和 S1 SetupResponse 的包,后面如果有 UE 接入,还会抓到 NAS 信令的包。
安装 gitlab.eurecom.fr 的 certificates:
echo -n | openssl s_client -showcerts -connect gitlab.eurecom.fr:443 2>/dev/null | sed -ne '/-BEGIN CERTIFICATE-/,/-END CERTIFICATE-/p' | sudo tee -a /etc/ssl/certs/ca-certificates.crt

cd  ~/openair-cn/scripts

sudo ./check_hss_s6a_certificate /usr/local/etc/oai/freeDiameter/ hss.openair4G.eur

sudo ./check_mme_s6a_certificate /usr/local/etc/oai/freeDiameter/ epc.openair4G.eur

root@epc:~/openair-cn/scripts# ll /usr/local/etc/oai/freeDiameter/

total 60

drwxr-xr-x 2 root root 4096 11月 29 15:32 ./

drwxr-xr-x 3 root root 4096 11月 29 15:25 ../

-rw-r--r-- 1 root root 1052 11月 29 13:21 acl.conf

-rw-r--r-- 1 root root  960 11月 29 15:32 hss.cacert.pem

-rw-r--r-- 1 root root  916 11月 29 15:32 hss.cakey.pem

-rw-r--r-- 1 root root 3071 11月 29 15:32 hss.cert.pem

-rw-r--r-- 1 root root 4123 11月 29 14:04 hss_fd.conf

-rw-r--r-- 1 root root  887 11月 29 15:32 hss.key.pem

-rw-r--r-- 1 root root  960 11月 29 15:32 mme.cacert.pem

-rw-r--r-- 1 root root  916 11月 29 15:32 mme.cakey.pem

-rw-r--r-- 1 root root 3071 11月 29 15:32 mme.cert.pem

-rw-r--r-- 1 root root 4150 11月 29 14:45 mme_fd.conf

-rw-r--r-- 1 root root  891 11月 29 15:32 mme.key.pem
NOTE:hss.openair4G.eur 和 epc.openair4G.eur 之前有空格。
HSS
编辑环境变量:
cd ~/openair-cn;  vi oaienv

export OPENAIRCN_DIR=$(pwd)

export PREFIX=/usr/local/etc/oai

export PID_DIRECTORY=/var/run

export REALM="openair4G.eur"

declare -A HSS_CONF

HSS_CONF[@PREFIX@]=$PREFIX

HSS_CONF[@PID_DIRECTORY@]=$PID_DIRECTORY

HSS_CONF[@REALM@]=$REALM

for K in "${!HSS_CONF[@]}"; do

  egrep -lRZ "$K" $PREFIX | xargs -0 -l sed -i -e "s|$K|${HSS_CONF[$K]}|g"

done
- 第一次启动 HSS
cd ~/openair-cn; source oaienv; cd scripts

sudo ./run_hss -i ~/openair-cn/src/oai_hss/db/oai_db.sql
NOTE:-i ~/openair-cn/src/oai_hss/db/oai_db.sql 会安装 oai_db 数据库,再次运行会重装数据库,仅执行一次。
- 后续启动 HSS
cd openair-cn; source oaienv; cd scripts; sudo ./run_hss
启动日志:
root@epc:~/openair-cn/scripts# sudo ./run_hss -i ~/openair-cn/src/oai_hss/db/oai_db.sql

setting import DB flag to: 1

OPENAIRCN_DIR   = /root/openair-cn

mysqladmin: [Warning] Using a password on the command line interface can be insecure.

Database "oai_db" dropped

mysql: [Warning] Using a password on the command line interface can be insecure.

HSS: oai_db creation succeeded

mysql: [Warning] Using a password on the command line interface can be insecure.

HSS: oai_db import succeeded

==== EURECOM OPENAIR-HSS vBranch: heads/v0.5.0 Abrev. Hash: d1d0e45 Date: Mon Sep 30 15:46:32 2019 +0200 ====

Initial built: Nov 29 2019 14:04:31

Please report any bug to: openaircn-user@lists.eurecom.fr

Parsing configuration file: /usr/local/etc/oai/hss.conf

Configuration

* Global:

	- File .............: /usr/local/etc/oai/hss.conf

* MYSQL:

	- Server ...........: 127.0.0.1

	- Database .........: oai_db

	- User .............: root

	- Password .........: *****

* FreeDiameter:

	- Conf file ........: /usr/local/etc/oai//freeDiameter/hss_fd.conf

* Security:

	- Operator key......: ********************************

	- Random      ......: true

Initializing db layer

Initializing db layer: DONE

Initialized random

Query: SELECT `imsi`,`key`,`OPc` FROM `users`

IMSI: 20834123456789Key: 2b.d6.45.9f.82.c5.b3.00.95.2c.49.10.48.81.ff.48.

OPc: 5e.9c.a4.4b.ac.ee.f2.88.d5.d8.46.65.55.ff.97.e0.

RijndaelKeySchedule: K 2BD6459F82C5B300952C49104881FF48

Compute opc:

	K:	2BD6459F82C5B300952C49104881FF48

	In:	11111111111111111111111111111111

	Rinj:	76FC81817B423A50600E9580B6270D48

	Out:	67ED90906A532B41711F8491A7361C59

Query: UPDATE `users` SET `OPc`=UNHEX('67ed90906a532b41711f8491a7361c59') WHERE `users`.`imsi`='20834123456789'

IMSI 20834123456789 Updated OPc 5e9ca44baceef288d5d8466555ff97e0 -> 67ed90906a532b41711f8491a7361c59

1 rows affected

...

...

Initializing s6a layer

10:10:22  NOTI   libfdproto '1.2.1' initialized.

10:10:22  NOTI   libgnutls '3.4.10' initialized.

10:10:22  NOTI   HASHLIST is enabled

10:10:22   DBG   Core state: 0 -> 1

10:10:22  NOTI   libfdcore '1.2.1' initialized.

10:10:22   DBG   Generating fresh Diffie-Hellman parameters of size 1024 (this takes some time)...

10:10:22   DBG   Loading : /usr/local/lib/freeDiameter/acl_wl.fdx

10:10:22  NOTI   Loading (acl_wl) extension.

10:10:22  NOTI   Extension ACL_wl initialized with configuration: '/usr/local/etc/oai/freeDiameter/acl.conf'

10:10:22   DBG   Loading : /usr/local/lib/freeDiameter/dict_nas_mipv6.fdx

10:10:23  NOTI   Loading (dict_nas_mipv6) extension.

10:10:23   DBG   Dictionary Extension 'MIPv6 NAS-to-HAAA Interaction' initialized

10:10:23   DBG   Loading : /usr/local/lib/freeDiameter/dict_s6a.fdx

10:10:23  NOTI   Dictionary Extension 'S6A from 3GPP standard v.10.5' initialized

10:10:23  NOTI   Unable to  resolve symbol 'fd_ext_init2' for extension /usr/local/lib/freeDiameter/acl_wl.fdx:

10:10:23  NOTI   Unable to  resolve symbol 'fd_ext_init2' for extension /usr/local/lib/freeDiameter/dict_nas_mipv6.fdx:

10:10:23  NOTI   Unable to  resolve symbol 'fd_ext_init2' for extension /usr/local/lib/freeDiameter/dict_s6a.fdx:

10:10:23  NOTI   All extensions loaded.

10:10:23  NOTI   freeDiameter configuration:

10:10:23  NOTI     Default trace level .... : +1

10:10:23  NOTI     Configuration file ..... : /usr/local/etc/oai//freeDiameter/hss_fd.conf

10:10:23  NOTI     Diameter Identity ...... : hss.openair4G.eur (l:17)

10:10:23  NOTI     Diameter Realm ......... : openair4G.eur (l:13)

10:10:23  NOTI     Tc Timer ............... : 30

10:10:23  NOTI     Tw Timer ............... : 30

10:10:23  NOTI     Local port ............. : 3868

10:10:23  NOTI     Local secure port ...... : 5868

10:10:23  NOTI     Number of SCTP streams . : 3

10:10:23  NOTI     Number of clients thr .. : 5

10:10:23  NOTI     Number of app threads .. : 4

10:10:23  NOTI     Local endpoints ........ : Default (use all available)

10:10:23  NOTI     Local applications ..... : (none)

10:10:23  NOTI     Flags : - IP ........... : Enabled

10:10:23  NOTI             - IPv6 ......... : DISABLED

10:10:23  NOTI             - Relay app .... : DISABLED

10:10:23  NOTI             - TCP .......... : Enabled

10:10:23  NOTI             - SCTP ......... : DISABLED (at compilation)

10:10:23  NOTI             - Pref. proto .. : TCP

10:10:23  NOTI             - TLS method ... : Separate port

10:10:23  NOTI     TLS :   - Certificate .. : /usr/local/etc/oai/freeDiameter/hss.cert.pem

10:10:23  NOTI             - Private key .. : /usr/local/etc/oai/freeDiameter/hss.key.pem

10:10:23  NOTI             - CA (trust) ... : /usr/local/etc/oai/freeDiameter/hss.cacert.pem (1 certs)

10:10:23  NOTI             - CRL .......... : (none)

10:10:23  NOTI             - Priority ..... : (default: 'NORMAL')

10:10:23  NOTI             - DH bits ...... : 1024

10:10:23  NOTI     Origin-State-Id ........ : 1575425422

10:10:23  NOTI   Loaded extensions: '/usr/local/lib/freeDiameter/acl_wl.fdx'[/usr/local/etc/oai/freeDiameter/acl.conf], loaded

10:10:23  NOTI   Loaded extensions: '/usr/local/lib/freeDiameter/dict_nas_mipv6.fdx'[(no config file)], loaded

10:10:23  NOTI   Loaded extensions: '/usr/local/lib/freeDiameter/dict_s6a.fdx'[(no config file)], loaded

10:10:23   DBG   Core state: 1 -> 2

10:10:23  NOTI   Local server address(es): 172.18.20.190{---L-}	192.168.0.1{---L-}

10:10:23   DBG   Core state: 2 -> 3

Initializing s6a layer: DONE
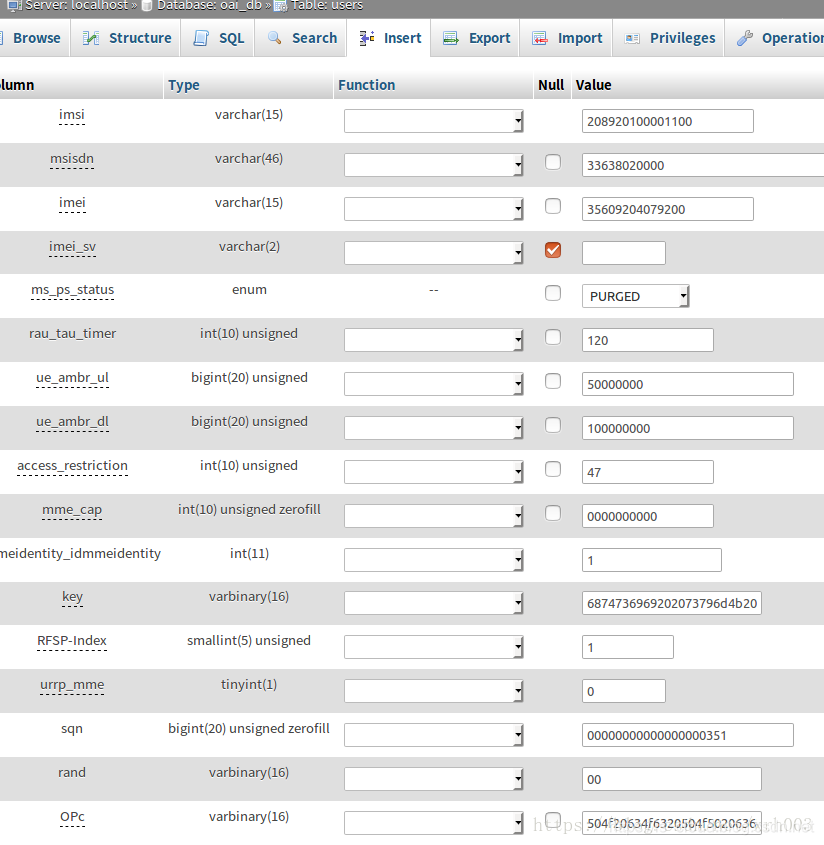
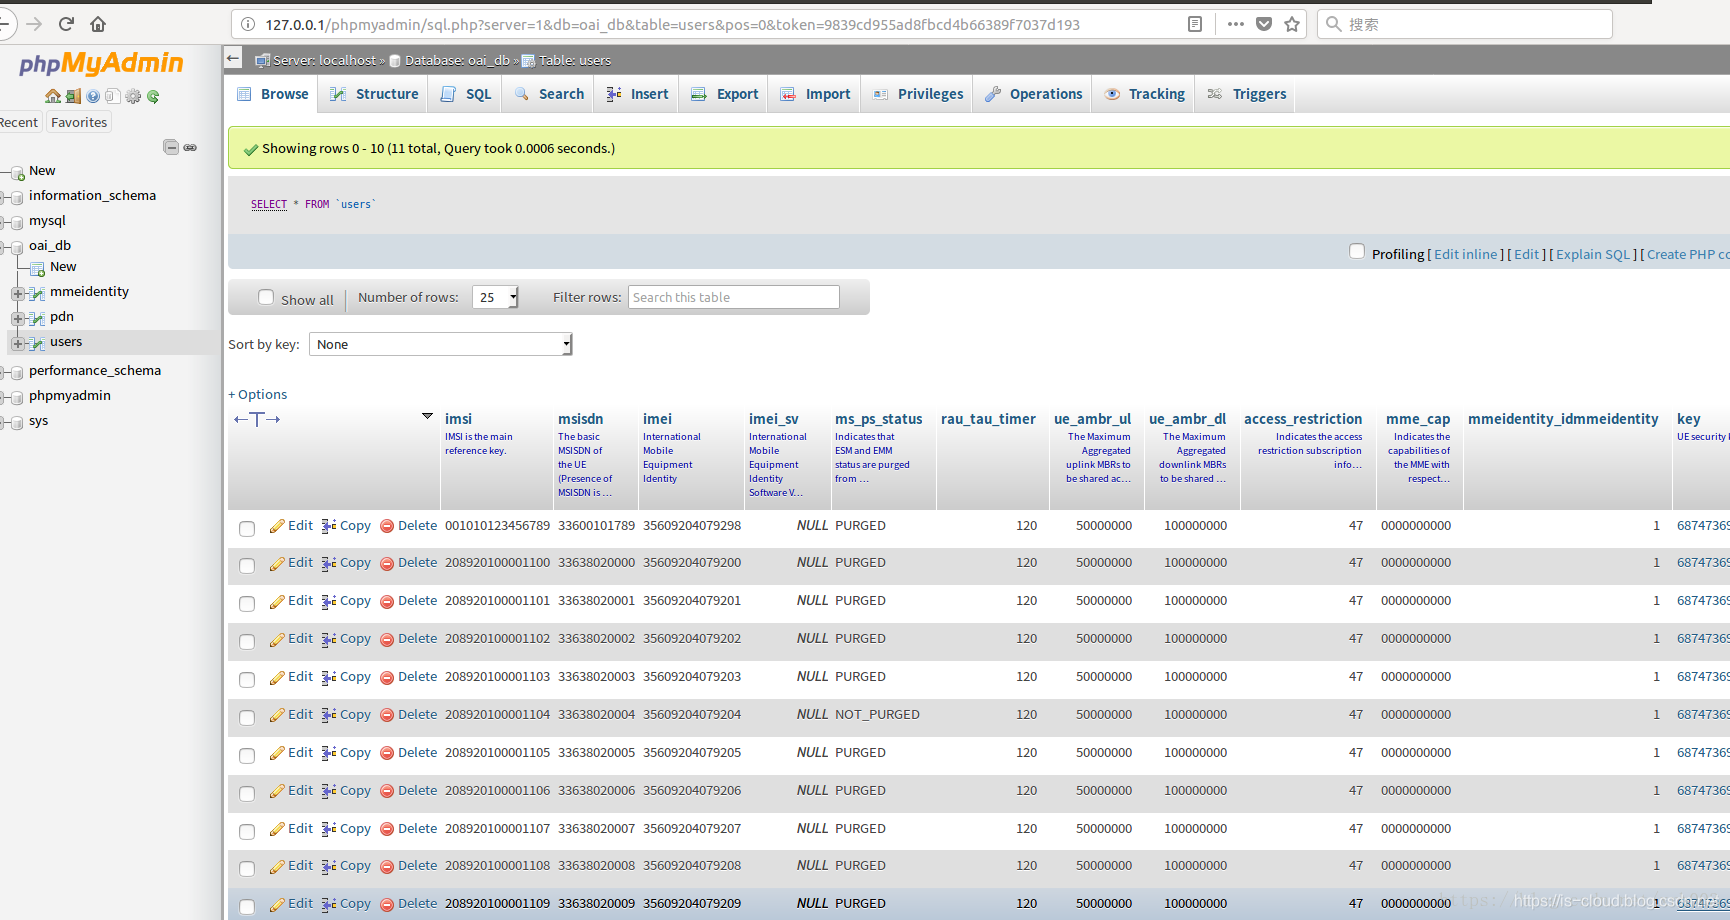
配置数据库:访问 http://127.0.0.1/phpmyadmin,在 oai_db 数据库里修改/添加一会儿要进行测试的 USIM 卡的信息,例如:USIM IMSI 是 208930100001111,key 值是 8baf473f2f8fd09487cccbd7097c6862,OPC 是 e734f8734007d6c5ce7a0508809e7e9c。则:
- mmeidentity 表里添加 epc.openair4G.eur 项
- users 表里修改 imsi=208930100001111 的 key 值为 8baf473f2f8fd09487cccbd7097c6862
- users 表里修改 OPC 为 e734f8734007d6c5ce7a0508809e7e9c,同时修改它的 mmeidentity_idmmeidentity 为你刚刚在 mmeidentity 里添加的新项的 ID
或者使用 SQL 语句进行修改:
sudo mysql -u root -p

use oai_db;

select * from mmeidentity;

update mmeidentity set mmehost="epc.openair4G.eur" where idmmeidentity=6;

update users set mmeidentity_idmmeidentity=6 where imsi=208930100001111;
MME & S/P-GW
- MME
cd openair-cn; source oaienv; cd scripts; ./run_mme
- S/P-GW
NOTE:需要首先运行 HSS
cd openair-cn; source oaienv; cd SCRIPTS; sudo -E ./run_spgw
eNB
- 启动 eNB
cd openairinterface5g; source oaienv

cd cmake_targets/lte_build_oai/build

sudo ./lte-softmodem -d -O ~/openairinterface5g/targets/PROJECTS/GENERIC-LTE-EPC/CONF/enb.band7.tm1.usrpb210.conf

# sudo -E ./lte-softmodem -O $OPENAIR_DIR/targets/PROJECTS/GENERIC-LTE-EPC/CONF/enb.band7.tm1.usrpb210.conf
Connect the UE, it should attach to network and be able to reach internet through OAI network
自动化脚本
一键启动 EPC:
#!/bin/sh

YOURNAME='kujou'

while :

do

  stillRunning=$(ps -A | grep "run_hss" |grep -v "grep")

  if [ "$stillRunning" ] ; then

    echo "HSS was already started by another way"

  else

  pkill -9 hss

    pkill -9 mme

    pkill -9 spgw

    echo "HSS was not started"

    echo "Starting service ..."

    /home/$YOURNAME/openair-cn/scripts/run_hss &

  fi

  sleep 2

  stillRunning=$(ps -A | grep "run_mme" |grep -v "grep")

  if [ "$stillRunning" ] ; then

    echo "MME was already started by another way"

  else

  pkill -9 hss

    pkill -9 mme

    pkill -9 spgw

    echo "MME was not started"

    echo "Starting service ..."

    /home/$YOURNAME/openair-cn/scripts/run_mme &

  fi

  sleep 2

  stillRunning=$(ps -A | grep "run_spgw" |grep -v "grep")

  if [ "$stillRunning" ] ; then

    echo "SPGW was already started by another way"

  else

  pkill -9 hss

    pkill -9 mme

    pkill -9 spgw

    echo "SPGW was not started"

    echo "Starting service ..."

    /home/$YOURNAME/openair-cn/scripts/run_spgw &

  fi

  sleep 6

done
- 一键关闭 EPC
#!/bin/bash

sudo pkill -9 hss

sudo pkill -9 mme

sudo pkill -9 spgw

sudo ps -A | grep hss

sudo ps -A | grep mme

sudo ps -A | grep spgw
COST UE
前提条件
- eNB 侧运行 scope 可以弹出观察窗,且不会提示 eNB 没有 associated with MME;
- EPC 侧可以观测到 MME 与 eNB 连上了。
写白卡
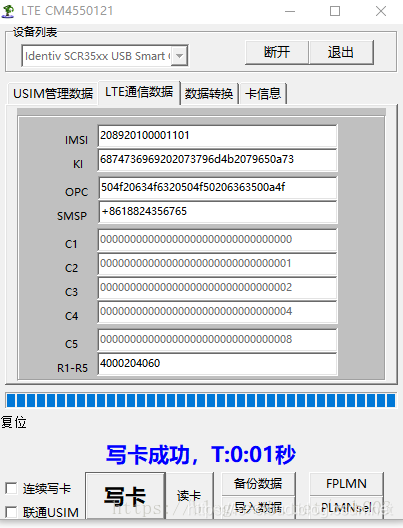
将 http://127.0.0.1/phpmyadmin 里面的参数写到 USIM 卡。
- OAI 预设了 10 个 IMSI: 20892010000110[0~9]
- Ki: 6874736969202073796d4b2079650a73
- OPC: 504f20634f6320504f50206363500a4f
- R1-R5: 4000204060
- 短消息中心随便填
EXAMPLE:
- 写卡:
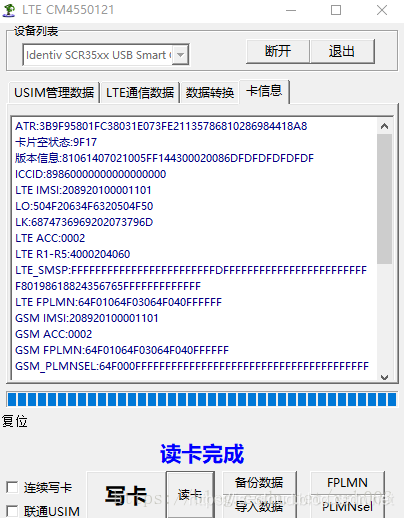
- 读卡:
- 手动添加 OAI DB 的 users 记录:
- 总共可以加 10 条记录
手机设置
- 添加 APN(Access Point Network),开启数据漫游
- 插入白卡,重启手机
- 扫描网络
注:测试机安装一款网优分析软件,e.g. 信号大师、网优大师。信号大师可以锁定网锁频段,在测试时锁频段后可以加快接入 eNB 的速度。
问题 1
问题:安装 HSS 依赖包过程中错误。
Cloning into 'freediameter'...

remote: Enumerating objects: 10135, done.

remote: Counting objects: 100% (10135/10135), done.

remote: Compressing objects: 100% (9796/9796), done.

error: RPC failed; curl 56 GnuTLS recv error (-9): A TLS packet with unexpected length was received.

fatal: The remote end hung up unexpectedly

fatal: early EOF

fatal: index-pack failed
分析:git clone 连接中断。
解决:重试。
问题 2
问题:编译安装 S/P-GW 过程中错误。
Install GTP kernel module

Do you want to install modified GTP kernel module for OVS ? <y/N> y

Check kernel

Kernel in 4.9.1...4.9.108 required. Aborting installation

Error: SPGW software installation failed
Workaround:不安装 OVS。
参考文档
https://blog.csdn.net/prowc/article/details/75253440
https://blog.csdn.net/xrh003/article/details/75285108
http://www.doc88.com/p-1186932021431.html
https://blog.csdn.net/BUPTOctopus/article/details/81560514
https://www.mobibrw.com/2018/10729
https://blog.csdn.net/qq_42030961/article/details/82751991
https://blog.csdn.net/qq_42030961/article/details/82695682
https://blog.csdn.net/qq_42030961/article/details/82740296
https://blog.csdn.net/qq_42030961/article/details/84039098
https://zhuanlan.zhihu.com/p/25675218
https://blog.csdn.net/feifei_csdn/article/details/80364770
https://blog.csdn.net/huangkangying/article/details/8104463
OAI SDR LTE 基站部署的更多相关文章
- 使用GnuRadio+OpenLTE+SDR搭建4G LTE基站(上)
0×00 前言 在移动互联网大规模发展的背景下,智能手机的普及和各种互联网应用的流行,致使对无线网络的需求呈几何级增长,导致移动运营商之间的竞争愈发激烈.但由于资费下调等各种因素影响,运营商从用户获得 ...
- LTE基站开局流程脚本的具体含义
1.全局参数配置MOD ENODEB(修改基站): ENODEBID=2015(基站标识2015), NAME="安职-1"(基站名称), ENBTYPE=DBS3900_LTE( ...
- LTE基站开局流程
1.全局参数配置 MOD ENODEB :修改基站 ADD CNOPERATOR: 添加运营商 ADD CNOPERATORTA:添加跟踪区(TA) 2.设备参数配置(机柜.机框.RRU.光纤链 ...
- GSM Hacking Part① :使用SDR扫描嗅探GSM网络
0×00 写在开头 近期,发现Crazy Danish Hacker在YouTuBe发布了一个挺不错的教程视频:使用SDR嗅探监听GSM网络的通信流量(GSM Sniffing Teaser – So ...
- LTE Module User Documentation(翻译15)——示例程序、参考场景以及故障检测和调试技巧
LTE用户文档 (如有不当的地方,欢迎指正!) 21 Examples Programs(示例程序) 路径 src/lte/examples/ 包含一些示例仿真程序,这些例子表明如何仿真不 ...
- The architecture of LTE network.
3GPP定义的LTE网络架构结构变得扁平化,无线RNC/BSC 消失,只有eNodeB.控制面使用MME进行处理,用户面使用SGW和PGW进行处理.相比GSM和UMTS,在逻辑接口上定义了S1/X2逻 ...
- 使用OpenBTS基站测试物联网模块安全性
0×00 引子 近年来,随着云计算.物联网技术的快速发展,物联网的理念和相关技术产品已经广泛渗透到社会经济民生的各个领域,越来越多的穿戴设备.家用电器通过蓝牙.Wi-Fi.Li-Fi.z-wave.L ...
- LTE时代的定位技术:OTDOA,LPP,SUPL2.0
LTE时代的定位技术:OTDOA,LPP,SUPL2.0 移动定位技术的发展历程 如今智能手机已经在整个社会普及,数量众多的手机应用成为了人们生活当中不可或缺的一部分.越来越多的手机应用都用到了手机定 ...
- LTE Module User Documentation(翻译8)——核心网(EPC)
LTE用户文档 (如有不当的地方,欢迎指正!) 14 Evolved Packet Core (EPC) 我们现在讲解如何编写一个仿真程序——除了 LTE 无线接入网外,还允许仿真 EPC. EP ...
- LTE切换与TAU问题
假如有两个LTE基站A B(同频组网) AB TAC不同 且添加了双向邻区关系 现终端开机重选至A然后往B方向移动 是先切换呢?还是先进性TAU更新 这个没有影响,,TAU并非需要在IDLE状态下才能 ...
随机推荐
- HE琥珀虚颜破解自由安装程序教程(001)
HE琥珀虚颜破解自由安装程序教程(001) 前言 自从狗尾草跑路后,HE琥珀就没法用了,当前APP还没法破解,但是笔者找到了HE琥珀存在的一些漏洞,可以实现安装自己的APP. 所需工具 所需工具 1. ...
- centos运行django,遇到sqlite报错
在centos上运行django,报错: django.core.exceptions.ImproperlyConfigured: SQLite 3.9.0 or later is required ...
- 想学习eTS开发?教你开发一款IQ-EQ测试应用
原文:https://mp.weixin.qq.com/s/eZgifjirAW58dFCa0W7kSQ,点击链接查看更多技术内容. 开发者Mack基于HarmonyOS的ArkUI框架开发的IQ- ...
- scala 生成指定日期范围的list
可以通过scala中的流处理,生成指定范围内的日期list import java.time.LocalDate def dateStream(fromDt:LocalDate):Stream[Loc ...
- Pytorch-卷积神经网络CNN之ResNet的Pytorch代码实现
先说一个小知识,助于理解代码中各个层之间维度是怎么变换的. 卷积函数:一般只用来改变输入数据的维度,例如3维到16维. Conv2d() Conv2d(in_channels:int,out_chan ...
- css3新单位vw、vh、vmin、vmax的使用详解
1,vw.vh.vmin.vmax 的含义 (1) vw. vh. vmin. vmax 是一种视窗单位,也是相对单位.它相对的不是父节点或者页面的根节点.而是由视窗( Viewport)大小来决定的 ...
- mysql入门操作(部分操作,不为完全格式)
查询数据库在电脑中绝对路径: show variables like '%datadir%'; 设置字符集 set names gbk; 导入数据库 source 绝对路径 eg: source D: ...
- JavaServlet类
"感谢您阅读本篇博客!如果您觉得本文对您有所帮助或启发,请不吝点赞和分享给更多的朋友.您的支持是我持续创作的动力,也欢迎留言交流,让我们一起探讨技术,共同成长!谢谢!" 介绍Ser ...
- 【Oracle】获取字符串中特定字符在字符串中出现的次数
[Oracle]获取字符串中特定字符在字符串中出现的次数 使用regexp_count函数 例子: select regexp_count('A,B,D,E;Q;F;GQWEQWE:qwe',';') ...
- PolarDB for PostgreSQL 内核解读 :HTAP架构介绍
简介:在 PolarDB 存储计算分离的架构基础上我们研发了基于共享存储的MPP架构步具备了 HTAP 的能力,对一套 TP的数据支持两套执行引擎:单机执行引擎用于处理高并发的 OLTP:MPP跨机分 ...