神经网络中的降维和升维方法 (tensorflow & pytorch)
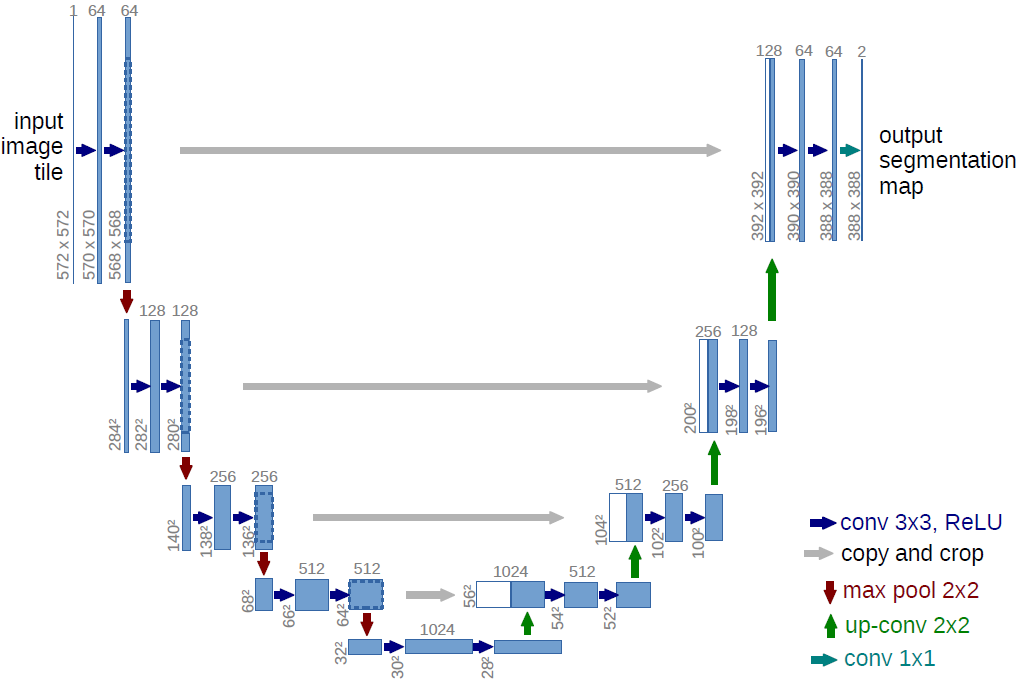
大名鼎鼎的UNet和我们经常看到的编解码器模型,他们的模型都是先将数据下采样,也称为特征提取,然后再将下采样后的特征恢复回原来的维度。这个特征提取的过程我们称为“下采样”,这个恢复的过程我们称为“上采样”,本文就专注于神经网络中的下采样和上采样来进行一次总结。写的不好勿怪哈。
神经网络中的降维方法
池化层
池化层(平均池化层、最大池化层),卷积
平均池化层
- pytorch
- tensorflow
最大池化层
- pytorch
- tensorflow
还有另外一些pool层:nn.LPPool、nn.AdaptiveMaxPool、nn.AdaptiveAvgPool、nn.FractionalMaxPool2d
卷积
普通卷积
- pytorch
- tensorflow
还有一些独特的卷积,感兴趣的可以自己去了解
- 扩张卷积 (又称空洞卷积): tf.nn.atrous_conv2d
- depthwise卷积: tf.nn.depthwise_conv2d
- 分离卷积: tf.nn.separable_conv2d
- 量化卷积: tf.nn.quantized_conv2d
- ...
升维方法
插值方法
插值方法有很多种有:阶梯插值、线性插值、三次样条插值等等
numpy的实现方法我在另外一篇文章中已经介绍过了,为了避免重复,想要了解的同学请移步【插值方法及python实现】
pytorch实现方法
torch.nn.Upsample(size=None, scale_factor=None, mode='nearest', align_corners=None)
对给定多通道的1维(时间)、2维(空间)、3维(体积)数据进行上采样。
- 1维(向量数据),输入数据Tensor格式为3维:(batch_size, channels, width)
- 2维(图像数据),输入数据Tensor格式为4维:(batch_size, channels, height, width)
- 3维(点云数据),输入数据Tensor格式为5维:(batch_size, channels, depth, height, width)
参数
- size:输入数据(一维 or 二维 or 三维)
- scale_factor:缩放大小
- mode:上采样算法(nearest(最近邻插值)、linear(线性插值)、bilinear(双线性插值)、bicubic(双三次插值)、trilinear(三次线性插值))
- align_corners:如果为True,则输入和输出张量的角像素对齐,从而保留这些像素处的值。 仅在模式为“线性”,“双线性”或“三线性”时有效。 默认值:False
返回:
Input:$(N, C, W_{in}), (N, C, H_{in}, W_{in}) 或(N, C, D_{in}, H_{in}, W_{in})$
Output: $(N, C, W_{out}), (N, C, H_{out}, W_{out}) 或(N, C, D_{out}, H_{out}, W_{out})$
$D_{out}=[D_{in}× \text{scale_factor}]$
$H_{out} = [H_{in} \times \text{scale_factor}]$
$W_{out} = [W_{in} \times \text{scale_factor}]$
unpooling
方法一


def unpool_with_with_argmax(pooled, ind, ksize=[1, 2, 2, 1]):

    """https://github.com/sangeet259/tensorflow_unpooling

      To unpool the tensor after  max_pool_with_argmax.

      Argumnets:

          pooled:    the max pooled output tensor

          ind:       argmax indices , the second output of max_pool_with_argmax

          ksize:     ksize should be the same as what you have used to pool

      Returns:

          unpooled:      the tensor after unpooling

      Some points to keep in mind ::

          1. In tensorflow the indices in argmax are flattened, so that a maximum value at position [b, y, x, c] becomes flattened index ((b * height + y) * width + x) * channels + c

          2. Due to point 1, use broadcasting to appropriately place the values at their right locations !

    """

    # Get the the shape of the tensor in th form of a list

    input_shape = pooled.get_shape().as_list()

    # Determine the output shape

    output_shape = (input_shape[0], input_shape[1] * ksize[1], input_shape[2] * ksize[2], input_shape[3])

    # Ceshape into one giant tensor for better workability

    pooled_ = tf.reshape(pooled, [input_shape[0] * input_shape[1] * input_shape[2] * input_shape[3]])

    # The indices in argmax are flattened, so that a maximum value at position [b, y, x, c] becomes flattened index ((b * height + y) * width + x) * channels + c

    # Create a single unit extended cuboid of length bath_size populating it with continous natural number from zero to batch_size

    batch_range = tf.reshape(tf.range(output_shape[0], dtype=ind.dtype), shape=[input_shape[0], 1, 1, 1])

    b = tf.ones_like(ind) * batch_range

    b_ = tf.reshape(b, [input_shape[0] * input_shape[1] * input_shape[2] * input_shape[3], 1])

    ind_ = tf.reshape(ind, [input_shape[0] * input_shape[1] * input_shape[2] * input_shape[3], 1])

    ind_ = tf.concat([b_, ind_], 1)

    ref = tf.Variable(tf.zeros([output_shape[0], output_shape[1] * output_shape[2] * output_shape[3]]))

    # Update the sparse matrix with the pooled values , it is a batch wise operation

    unpooled_ = tf.scatter_nd_update(ref, ind_, pooled_)

    # Reshape the vector to get the final result

    unpooled = tf.reshape(unpooled_, [output_shape[0], output_shape[1], output_shape[2], output_shape[3]])

    return unpooled

original_tensor = tf.random_uniform([1, 4, 4, 3], maxval=100, dtype='float32', seed=2)

pooled_tensor, max_indices = tf.nn.max_pool_with_argmax(original_tensor, ksize=[1, 2, 2, 1], strides=[1, 2, 2, 1],

                                                        padding='SAME')

print(pooled_tensor.shape)  # (1, 2, 2, 3)

unpooled_tensor = unpool_with_with_argmax(pooled_tensor, max_indices)

print(unpooled_tensor.shape)    # (1, 4, 4, 3)
方法二
from tensorflow.python.ops import gen_nn_ops

inputs = tf.get_variable(name="a", shape=[64, 32, 32, 4], dtype=tf.float32,

                         initializer=tf.random_normal_initializer(mean=0, stddev=1))

# 最大池化

pool1 = tf.nn.max_pool(inputs,

                       ksize=[1, 2, 2, 1],

                       strides=[1, 2, 2, 1],

                       padding='SAME')

print(pool1.shape)  # (64, 16, 16, 4)

# 最大反池化

grad = gen_nn_ops.max_pool_grad(inputs,  # 池化前的tensor,即max pool的输入

                                pool1,  # 池化后的tensor,即max pool 的输出

                                pool1,  # 需要进行反池化操作的tensor,可以是任意shape和pool1一样的tensor

                                ksize=[1, 2, 2, 1],

                                strides=[1, 2, 2, 1],

                                padding='SAME')

print(grad.shape)   # (64, 32, 32, 4)
在tensorflow 2.4版本中官方已经帮我们实现好了
tf.keras.layers.UpSampling2D(size=(2, 2), data_format=None, interpolation='nearest')
pytorch版本
转置卷积
转置卷积 (transpose convolution) 也会被称为 反卷积(Deconvolution),与Unpooling不同,使用反卷积来对图像进行上采样是可以习得的。通常用来对卷积层的结果进行上采样,使其回到原始图片的分辨率。
- pytorch
nn.ConvTranspose1d(in_channels=N, out_channels=2N, kernel_size=2*S, stride=S, padding=S//2 + S%2, otuput_padding=S%2)nn.ConvTranspose2d
- tensorflow
PixelShuffle
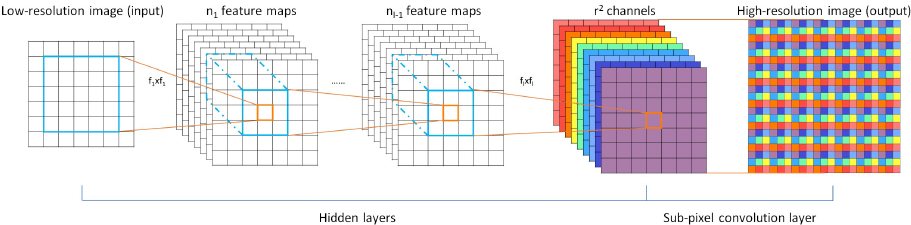
pixelshuffle算法的实现流程如上图,其实现的功能是:将一个[H, W]的低分辨率输入图像(Low Resolution),通过Sub-pixel操作将其变为[r*H, e*W]的高分辨率图像(High Resolution)。
但是其实现过程不是直接通过插值等方式产生这个高分辨率图像,而是通过卷积先得到$r^2$个通道的特征图(特征图大小和输入低分辨率图像一致),然后通过周期筛选(periodic shuffing)的方法得到这个高分辨率的图像,其中$r$为上采样因子(upscaling factor),也就是图像的扩大倍率。
二维SubPixel上采样
[batch, height, width, channels * r * r] --> [batch, height * r, width * r, channels]
tensorflow方法实现
import tensorflow as tf

def _phase_shift(I, r):

    # 相位偏移操作

    bsize, a, b, c = I.get_shape().as_list()

    bsize = tf.shape(I)[0]  # Handling Dimension(None) type for undefined batch dim

    X = tf.reshape(I, (bsize, a, b, r, r))

    X = tf.transpose(X, (0, 1, 2, 4, 3))  # bsize, a, b, 1, 1

    X = tf.split(X, a, 1)  # a, [bsize, b, r, r]

    X = tf.concat([tf.squeeze(x, axis=1) for x in X], axis=2)  # bsize, b, a*r, r

    X = tf.split(X, b, 1)  # b, [bsize, a*r, r]

    X = tf.concat([tf.squeeze(x, axis=1) for x in X], axis=2)  # bsize, a*r, b*r

    return tf.reshape(X, (bsize, a * r, b * r, 1))

def PixelShuffle(X, r, color=False):

    if color:

        Xc = tf.split(X, 3, 3)

        X = tf.concat([_phase_shift(x, r) for x in Xc], axis=3)

    else:

        X = _phase_shift(X, r)

    return X

if __name__ == "__main__":

    X1 = tf.get_variable(name='X1',

                         shape=[2, 8, 8, 4],

                         initializer=tf.random_normal_initializer(stddev=1.0),

                         dtype=tf.float32)

    Y = PixelShuffle(X1, 2)

    print(Y.shape)  # (2, 16, 16, 1)

    X2 = tf.get_variable(name='X2',

                         shape=[2, 8, 8, 4 * 3],

                         initializer=tf.random_normal_initializer(stddev=1.0),

                         dtype=tf.float32)

    Y2 = PixelShuffle(X2, 2, color=True)

    print(Y2.shape)  # (2, 16, 16, 3)
pytorch方法实现
import torch

import torch.nn as nn

input = torch.randn(size=(1, 9, 4, 4))

ps = nn.PixelShuffle(3)

output = ps(input)

print(output.size())    # torch.Size([1, 1, 12, 12])
numpy方法实现
def PS(I, r):

  assert len(I.shape) == 3

  assert r>0

  r = int(r)

  O = np.zeros((I.shape[0]*r, I.shape[1]*r, I.shape[2]/(r*2)))

  for x in range(O.shape[0]):

    for y in range(O.shape[1]):

      for c in range(O.shape[2]):

        c += 1

        a = np.floor(x/r).astype("int")

        b = np.floor(y/r).astype("int")

        d = c*r*(y%r) + c*(x%r)

        print a, b, d

        O[x, y, c-1] = I[a, b, d]

  return O
一维SubPixel上采样
(batch_size, width, channels * r)-->(batch_size, width * r, channels)
tensorflow实现
import tensorflow as tf

def SubPixel1D(I, r):

    """一维subpixel upsampling layer,

    输入维度(batch, width, r).

    """

    with tf.name_scope('subpixel'):

        X = tf.transpose(I, [2, 1, 0])  # (r, w, b)

        X = tf.batch_to_space_nd(X, [r], [[0, 0]])  # (1, r*w, b)

        X = tf.transpose(X, [2, 1, 0])

        return X

# 示例

# ---------------------------------------------------

if __name__ == "__main__":

    inputs = tf.get_variable(name='input',

                             shape=[64, 8192, 32],

                             initializer=tf.random_normal_initializer(stddev=1.0),

                             dtype=tf.float32)

    upsample_SubPixel1D = SubPixel1D(I=inputs, r=2)

    print(upsample_SubPixel1D.shape)  # (64, 16384, 16)
pytorch方法实现
class PixelShuffle1D(nn.Module):

    """

    1D pixel shuffler. https://arxiv.org/pdf/1609.05158.pdf

    Upscales sample length, downscales channel length

    "short" is input, "long" is output

    """

    def __init__(self, upscale_factor):

        super(PixelShuffle1D, self).__init__()

        self.upscale_factor = upscale_factor

    def forward(self, x):

        batch_size, channels, in_width = x.size()

        channels //= self.upscale_factor

        out_width = self.upscale_factor * in_width

        x = x.contiguous().view([batch_size, channels, self.upscale_factor, in_width])

        x = x.permute(0, 1, 3, 2).contiguous()

        x = x.view(batch_size, channels, out_width)

        return x
sub-pixel or fractional convolution可以看成是transposed convolution的一个特例
Meta upscale module
可以任意上采样尺寸,还不是很出名,等于后出名了再来补全
参考
这里很多API我还是分享的tensorflow 1.*的,主要原因是因为我最开始学深度学习的时候用的是 tensoflow 1,现在我已经转学pytorch了,今天看了看tensorflow,2版本已经发布一年多了,1版本相当于是烂尾了,2版本虽然解决了原来的问题,可是人是向前看的,我已经使用pytorch起来,再让我回头学tensorflow 2似乎是一件很不情愿的事情。而且tensorflow 2 已经在走向没落了,使用tensorflow 2的开源代码,除了google自家公司外,真的也越来越少。tensorflow加油吧,我内心深处还是喜欢你的,只不过pytorch太方便了,开源社区也很强大了。
【文档】tensorflow官方文档
【文档】pytorch官方文档
【代码】2D_subpixel
【代码】1D_pytorch-pixelshuffle1d
【动图】卷积的动画
神经网络中的降维和升维方法 (tensorflow & pytorch)的更多相关文章
- CNN-利用1*1进行降维和升维
降维: 比如某次卷积之后的结果是W*H*6的特征,现在需要用1*1的卷积核将其降维成W*H*5,即6个通道变成5个通道: 通过一次卷积操作,W*H*6将变为W*H*1,这样的话,使用5个1*1的卷积核 ...
- tensorflow与神经网络中遇到的问题与解决方法【持续更新】
1.如何在全连接层拼接特征? 有一种方法是有两个input,一个input通过网络最终达到全连接层,另一个input直接接一个全连接网络,神经元数是特征数,这两个可以进行一个concat. 当然了也 ...
- 机器学习实战基础(二十四):sklearn中的降维算法PCA和SVD(五) PCA与SVD 之 重要接口inverse_transform
重要接口inverse_transform 在上周的特征工程课中,我们学到了神奇的接口inverse_transform,可以将我们归一化,标准化,甚至做过哑变量的特征矩阵还原回原始数据中的特征矩阵 ...
- (原)CNN中的卷积、1x1卷积及在pytorch中的验证
转载请注明处处: http://www.cnblogs.com/darkknightzh/p/9017854.html 参考网址: https://pytorch.org/docs/stable/nn ...
- JAVA中生成、解析二维码图片的方法
JAVA中生成.解析二维码的方法并不复杂,使用google的zxing包就可以实现.下面的方法包含了生成二维码.在中间附加logo.添加文字功能,并有解析二维码的方法. 一.下载zxing的架包,并导 ...
- 神经网络中batch_size参数的含义及设置方法
本文作者Key,博客园主页:https://home.cnblogs.com/u/key1994/ 本内容为个人原创作品,转载请注明出处或联系:zhengzha16@163.com 在进行神经网络训练 ...
- AI之旅(3):升维与最小二乘法
前置知识 矩阵的逆 知识地图 首先我们将了解一种叫升维的方法,用已有特征构造更多的特征.接着通过对空间与投影建立一定的概念后,推导出最小二乘法. 当特征数量不足时 在上一篇<初识线性 ...
- 理解交叉熵(cross_entropy)作为损失函数在神经网络中的作用
交叉熵的作用 通过神经网络解决多分类问题时,最常用的一种方式就是在最后一层设置n个输出节点,无论在浅层神经网络还是在CNN中都是如此,比如,在AlexNet中最后的输出层有1000个节点: 而即便是R ...
- 利用神经网络进行网络流量识别——特征提取的方法是(1)直接原始报文提取前24字节,24个报文组成596像素图像CNN识别;或者直接去掉header后payload的前1024字节(2)传输报文的大小分布特征;也有加入时序结合LSTM后的CNN综合模型
国外的文献汇总: <Network Traffic Classification via Neural Networks>使用的是全连接网络,传统机器学习特征工程的技术.top10特征如下 ...
随机推荐
- PyQt(Python+Qt)学习随笔:Qt Designer中spacer部件的sizeHint属性
在两种Spacer部件中都有sizeHint属性,在<PyQt(Python+Qt)学习随笔:Qt Designer中部件的三个属性sizeHint缺省尺寸.minimumSizeHint建议最 ...
- PyQt(Python+Qt)学习随笔:formLayout的layoutRowWrapPolicy属性
Qt Designer的表单布局(formLayout)中,layoutRowWrapPolicy用于控制表单布局中表单行的标签和输入部件之间是否换行.如图: 上图中蓝色标记圈起来的下拉列表数据是其可 ...
- Spark流式状态管理(updateStateByKey、mapWithState等)
通常使用Spark的流式框架如Spark Streaming,做无状态的流式计算是非常方便的,仅需处理每个批次时间间隔内的数据即可,不需要关注之前的数据,这是建立在业务需求对批次之间的数据没有联系的基 ...
- 移动 drag&drop拖放
拖放事件 #1. 三个对象 源对象 -- 被拖放的元素 过程对象 -- 经过的元素 目标对象 -- 到达的元素 #2. 源对象中的事件 要想让某个元素可以拖拽需要设置draggable=" ...
- numpy和pandas-数据分析模块
应用:1.数据分析 2.深度学习 3.机器学习 运算速度快:numpy 和 pandas 都是采用 C 语言编写, pandas 又是基于 numpy, 是 numpy 的升级版本. 消耗资源少:采用 ...
- python之列表操作的几个函数
Python中的列表是可变的,这是它却别于元组和字符串最重要的特点,元组和字符串的元素不可修改.列举一些常用的列表操作的函数和方法. 1,list.append(x),将x追加到列表list末尾: 1 ...
- C#中的深度学习(四):使用Keras.NET识别硬币
在本文中,我们将研究一个卷积神经网络来解决硬币识别问题,并且我们将在Keras.NET中实现一个卷积神经网络. 在这里,我们将介绍卷积神经网络(CNN),并提出一个CNN的架构,我们将训练它来识别硬币 ...
- .NET Core 3.0或3.1 类库项目中引用 Microsoft.AspNetCore.App
本文为原创文章.首发:http://www.zyiz.net/ 在 ASP.NET Core 3.0+ web 项目中已经不需要在 .csproj 中添加对 Microsoft.AspNetCore. ...
- 手把手教你搭饥荒专用服务器(三)—MOD及其他高级设置
友情链接: 手把手教你搭饥荒专用服务器(一)-服务器准备工作 手把手教你搭饥荒专用服务器(二)-环境配置及基本使用 手把手教你搭饥荒专用服务器(三)-MOD及其他高级设置 手把手教你搭饥荒专用服务器( ...
- easyui datebox 年月 yyyyMM 格式
//js日期重写ny为 function formatTime(ny){ var p = ny.datebox('panel'), //日期选择对象 tds = false, //日期选择对象中月份 ...