consul是什么?
consul概念:
consul是用来做注册中心的 他和eureka是一样的 注册中心一般都是集群的形式存在
保证高可用 consul像是一个nosql 存储着键值对 可以做存储
consul是c/s架构的 其客户端负责和用户进行通讯 没有实际的意义 真正工作的是后端的服务端 存储数据也是在服务端存储
环境:
| 主机 | ip |
|---|---|
| consul-1 | 192.168.10.20 |
| consul-2 | 192.168.10.30 |
| consul-3 | 192.168.10.40 |
| client客户端 | 192.168.10.10 |
在第一、二台consul主机和第四台client主机上安装jdk和maven环境
安装jdk
[root@localhost ~]# java -version

openjdk version "1.8.0_102"

OpenJDK Runtime Environment (build 1.8.0_102-b14)

OpenJDK 64-Bit Server VM (build 25.102-b14, mixed mode)

[root@localhost ~]# rm -rf /usr/bin/java #删除原本主机上的Java程序

[root@localhost ~]# java -version

-bash: /usr/bin/java: 没有那个文件或目录

[root@localhost ~]# tar -zxf jdk-8u201-linux-x64.tar.gz

[root@localhost ~]# mv jdk1.8.0_201/ /usr/local/java
添加环境变量(通常情况我们使用第二种方法)
[root@localhost bin]# vim /etc/profile

#末尾添加

export JAVA_HOME=/usr/local/java

export JRE_HOME=/usr/local/java/jre

export CLASSPATH=$JAVA_HOME/lib:$JRE_HOME/lib

export PATH=$PATH:$JAVA_HOME/bin:$JRE_HOME/bin

[root@localhost bin]# source /etc/profile

[root@localhost bin]# echo $PATH

/usr/local/sbin:/usr/local/bin:/usr/sbin:/usr/bin:/root/bin:/usr/local/java/bin:/usr/local/java/jre/bin

[root@localhost bin]# java -version

java version "1.8.0_201"

Java(TM) SE Runtime Environment (build 1.8.0_201-b09)

Java HotSpot(TM) 64-Bit Server VM (build 25.201-b09, mixed mode)
安装maven
[root@localhost ~]# tar -zxf apache-maven-3.6.0-bin.tar.gz

[root@localhost ~]# mv apache-maven-3.6.0 /usr/local/maven

[root@localhost ~]# vim /etc/profile

export PATH=$PATH:/usr/local/maven/bin

[root@localhost ~]# source /etc/profile

[root@localhost ~]# mvn -v

Apache Maven 3.6.0 (97c98ec64a1fdfee7767ce5ffb20918da4f719f3; 2018-10-25T02:41:47+08:00)

Maven home: /usr/local/maven

Java version: 1.8.0_201, vendor: Oracle Corporation, runtime: /usr/local/java/jre

Default locale: zh_CN, platform encoding: UTF-8

OS name: "linux", version: "3.10.0-514.el7.x86_64", arch: "amd64", family: "unix"
安装consul服务(四台都要安)
[root@localhost ~]# unzip consul_1.4.0_linux_amd64.zip -d /usr/bin/

Archive:  consul_1.4.0_linux_amd64.zip

  inflating: /usr/bin/consul

[root@localhost ~]# mkdir -p /opt/consul/{data,config,logs}
参数释义:
data:存放数据的目录
config:存放配置信息的目录
logs:存放日志
consul没有配置文件,所以直接通过启动命令来配置称为集群
consul-1
[root@localhost ~]# systemctl stop firewalld

[root@localhost ~]# setenforce 0

[root@localhost ~]# consul agent -server -node=consul1 -data-dir /opt/consul/data/ -config-dir /opt/consul/config/ -bind 192.168.10.20 -client 0.0.0.0 -enable-script-checks=true  -datacenter=kgc -bootstrap-expect=2
参数释义:
consul 命令
agent 启动一个代理
-server 以服务端启动
-node=consul1 当前节点在集群中名称
-data-dir /opt/consul/data/ 数据文件的目录
-config-dir /opt/consul/config/ 配置文件的目录
-bind 192.168.2.10 监听的ip
-client 0.0.0.0 指定的客户端 代表所有的客户端
-enable-script-checks=true 开启心跳连接
-datacenter=kgc 数据中心的名称
-bootstrap-expect=2 至少两个节点形成集群
consul-2
[root@localhost ~]# systemctl stop firewalld

[root@localhost ~]# setenforce 0

[root@localhost ~]# consul agent -server -ui -node=consul2 -data-dir /opt/consul/data/ -config-dir /opt/consul/config/ -bind 192.168.10.30 -client 0.0.0.0 -enable-script-checks=true -datacenter=kgc -join 192.168.10.20
参数释义:
-ui :图形化界面
-join:加入集群
consul-3
[root@localhost ~]# systemctl stop firewalld

[root@localhost ~]# setenforce 0

[root@localhost ~]# consul agent -server -ui -node=consul3 -data-dir /opt/consul/data/ -config-dir /opt/consul/config/ -bind 192.168.10.40 -client 0.0.0.0 -enable-script-checks=true -datacenter=kgc -join 192.168.10.20
client客户端
[root@localhost ~]# systemctl stop firewalld

[root@localhost ~]# setenforce 0

[root@localhost ~]# consul agent  -node=client -data-dir /opt/consul/data/ -config-dir /opt/consul/config/ -bind 192.168.10.10 -client 0.0.0.0 -enable-script-checks=true -datacenter=kgc -join 192.168.10.20
执行完后所有的主机都会阻塞终端,可以在第一台consul主机上另开一个终端去查看一下集群是否构建成功
[root@localhost ~]# consul members

Node     Address             Status  Type    Build  Protocol  DC   Segment

consul1  192.168.10.20:8301  alive   server  1.4.0  2         kgc  <all>

consul2  192.168.10.30:8301  alive   server  1.4.0  2         kgc  <all>

consul3  192.168.10.40:8301  alive   server  1.4.0  2         kgc  <all>

client   192.168.10.10:8301  alive   client  1.4.0  2         kgc  <default>

[root@localhost ~]# curl http://192.168.10.20:8500/v1/status/leader

"192.168.10.20:8300"

[root@localhost ~]# curl http://192.168.10.20:8500/v1/status/peers

["192.168.10.20:8300","192.168.10.30:8300","192.168.10.40:8300"]

[root@localhost ~]# consul info #查看集群的信息

agent:

	check_monitors = 0

	check_ttls = 0

	checks = 0

	services = 0

build:

	prerelease =

	revision = 0bddfa23

	version = 1.4.0

consul:

	acl = disabled

	bootstrap = false

	known_datacenters = 1

	leader = true

	leader_addr = 192.168.10.20:8300

	server = true

……………………

[root@localhost ~]# curl http://192.168.10.20:8500/v1/catalog/nodes?pretty #查看所有的节点,并且转换为json格式

[

    {

        "ID": "e280d23d-58b1-72b4-1c93-5a240f0ee1cd",

        "Node": "client",

        "Address": "192.168.10.10",

        "Datacenter": "kgc",

        "TaggedAddresses": {

            "lan": "192.168.10.10",

            "wan": "192.168.10.10"

        },

        "Meta": {

            "consul-network-segment": ""

        },

        "CreateIndex": 23,

        "ModifyIndex": 24

    },

………………
访问第二台consul-2的ip和端口(因为第一台是没有图形化界面的,只有第二台和第三台有,所以这儿我们可以去访问验证查看一下)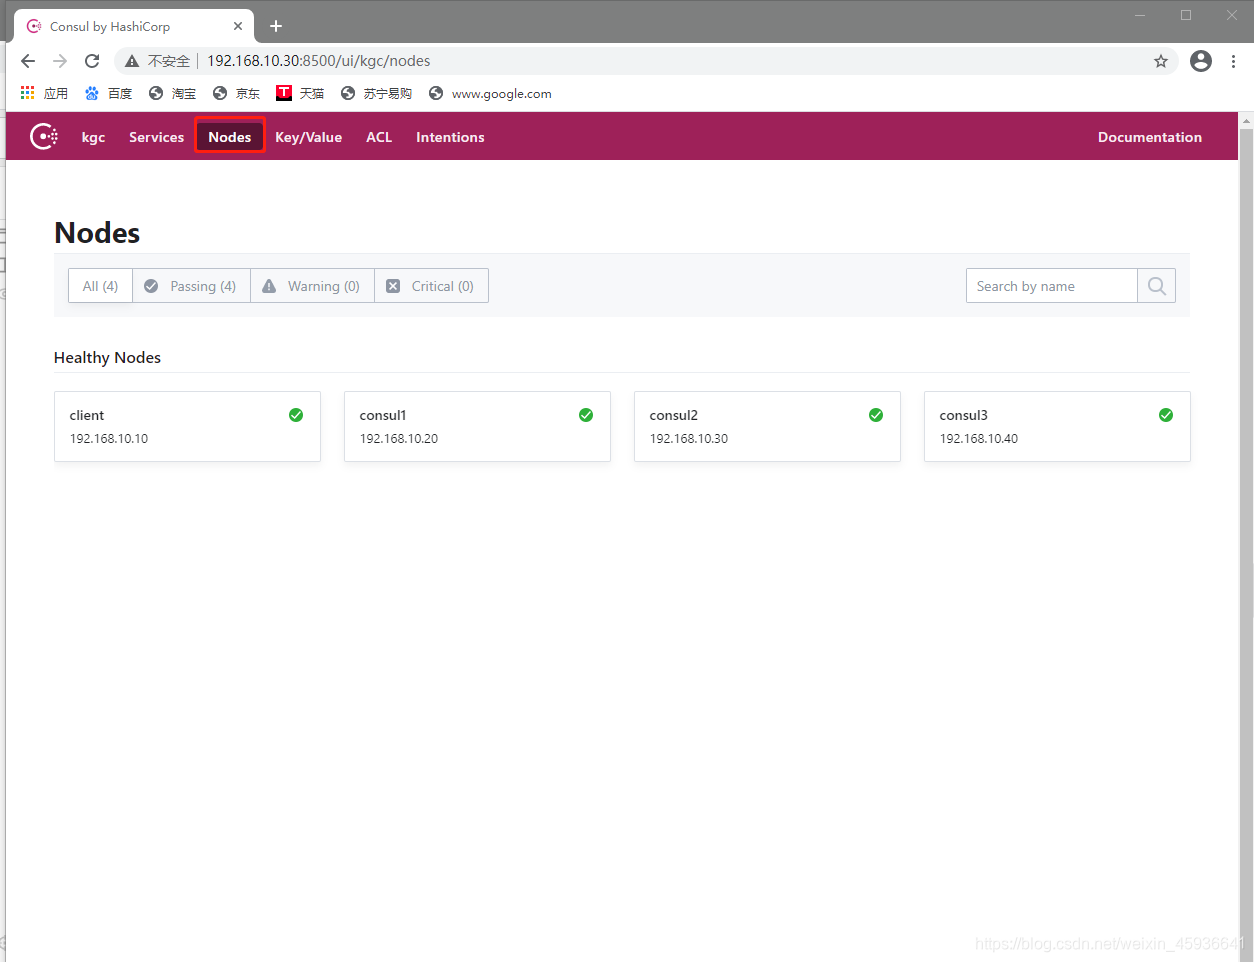
consul的基础命令
nosql 存储数据 添加数据
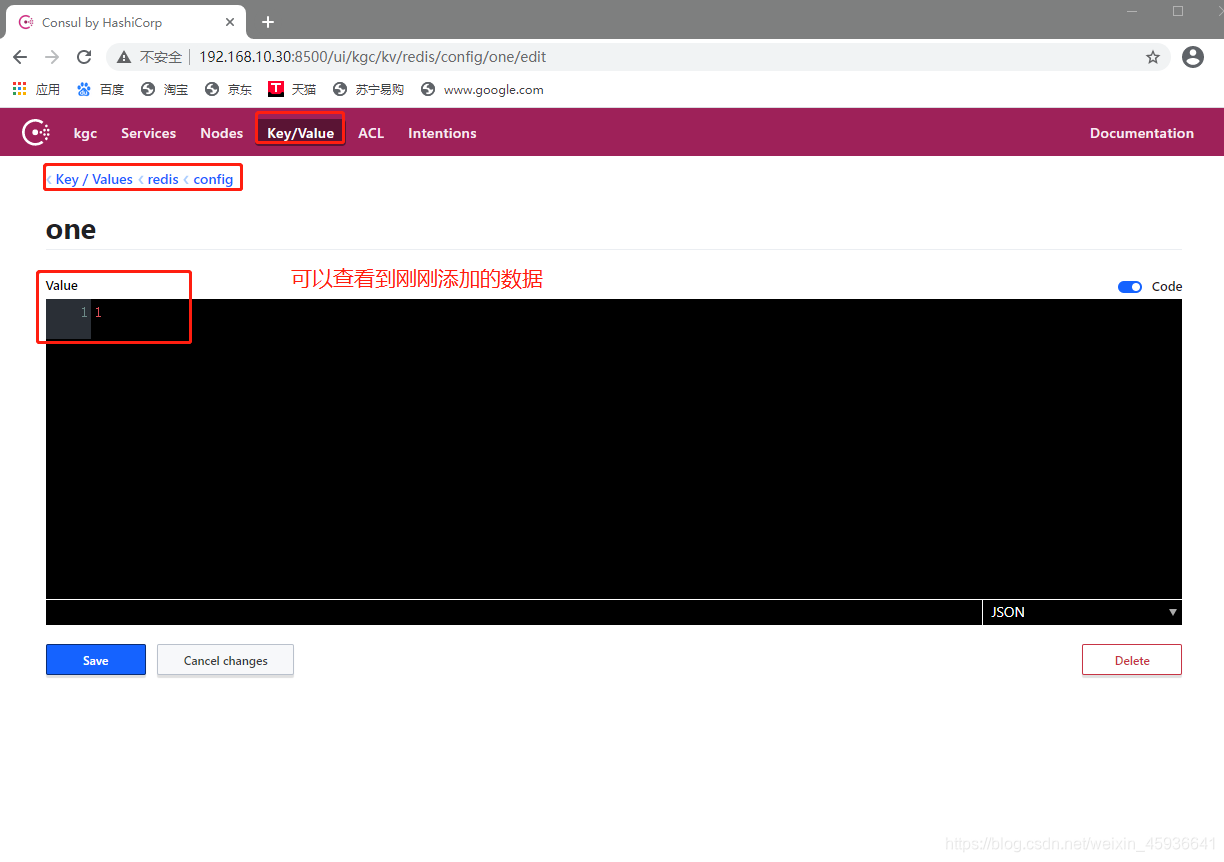
1、创建或者更新数据
[root@localhost ~]# consul kv put redis/config/one 1 #添加数据到集群

Success! Data written to: redis/config/one

[root@localhost ~]# consul kv get redis/config/one  #查看

1
2、获取值
[root@localhost ~]# consul kv get -detailed redis/config/one

CreateIndex      379

Flags            0

Key              redis/config/one

LockIndex        0

ModifyIndex      379

Session          -

Value            1
3、查看详情
[root@localhost ~]# consul kv get -detailed redis/config/one

CreateIndex      379

Flags            0

Key              redis/config/one

LockIndex        0

ModifyIndex      379

Session          -

Value            1
4、删除
[root@localhost ~]# consul kv delete redis/config/one #删除

Success! Deleted key: redis/config/one

[root@localhost ~]# consul kv get redis/config/one

Error! No key exists at: redis/config/one
5、递归删除
[root@localhost ~]# consul kv put redis/config/one 1

Success! Data written to: redis/config/one

[root@localhost ~]# consul kv put redis/config/two 2

Success! Data written to: redis/config/two

[root@localhost ~]# consul kv delete -recurse redis

Success! Deleted keys with prefix: redis

[root@localhost ~]# consul kv get redis/two

Error! No key exists at: redis/two
6、列出指定前缀的内容
[root@localhost ~]# consul kv put redis/config/one 1

Success! Data written to: redis/config/one

[root@localhost ~]# consul kv put redis/config/two 2

Success! Data written to: redis/config/two

[root@localhost ~]# consul kv get -keys redis/config/

redis/config/one

redis/config/two
7、列出所有的键
[root@localhost ~]# consul kv get -keys

redis/
consul作为注册中心的功能

consul-1、consul-2、client客户端
注:另开终端执行
root@localhost ~]# git clone https://github.com/luojunyong/spring-cloud-examples.git

正克隆到 'spring-cloud-examples'...

remote: Enumerating objects: 700, done.

remote: Total 700 (delta 0), reused 0 (delta 0), pack-reused 700

接收对象中: 100% (700/700), 66.07 KiB | 0 bytes/s, done.

处理 delta 中: 100% (216/216), done.
consul-1 生产者
[root@localhost ~]# cd /root/spring-cloud-examples/spring-cloud-consul/spring-cloud-consul-producer

[root@localhost spring-cloud-consul-producer]# vim src/main/resources/application.properties

 3 spring.cloud.consul.host=192.168.10.40 #这儿写的是第三台consul-3的ip(也就是没有安装maven的那台主机)

[root@localhost spring-cloud-consul-producer]# source /etc/profile

[root@localhost spring-cloud-consul-producer]# mvn spring-boot:run
consul-2 生产者
[root@localhost ~]# cd /root/spring-cloud-examples/spring-cloud-consul/spring-cloud-consul-producer-2/

[root@localhost spring-cloud-consul-producer-2]# vim src/main/resources/application.properties

3 spring.cloud.consul.host=192.168.10.40

[root@localhost spring-cloud-consul-producer-2]# source /etc/profile

[root@localhost spring-cloud-consul-producer-2]# mvn spring-boot:run
client 消费者
[root@localhost ~]# cd /root/spring-cloud-examples/spring-cloud-consul/spring-cloud-consul-consumer/

[root@localhost spring-cloud-consul-consumer]# vim src/main/resources/application.properties

spring.cloud.consul.host=192.168.10.40

[root@localhost spring-cloud-consul-consumer]# source /etc/profile

[root@localhost spring-cloud-consul-consumer]# mvn spring-boot:run
第四台client另开一个终端去访问
[root@localhost ~]# curl 192.168.10.10:8503/call

helle consul

[root@localhost ~]# curl 192.168.10.10:8503/call

helle consul two
再次去图形化界面查看验证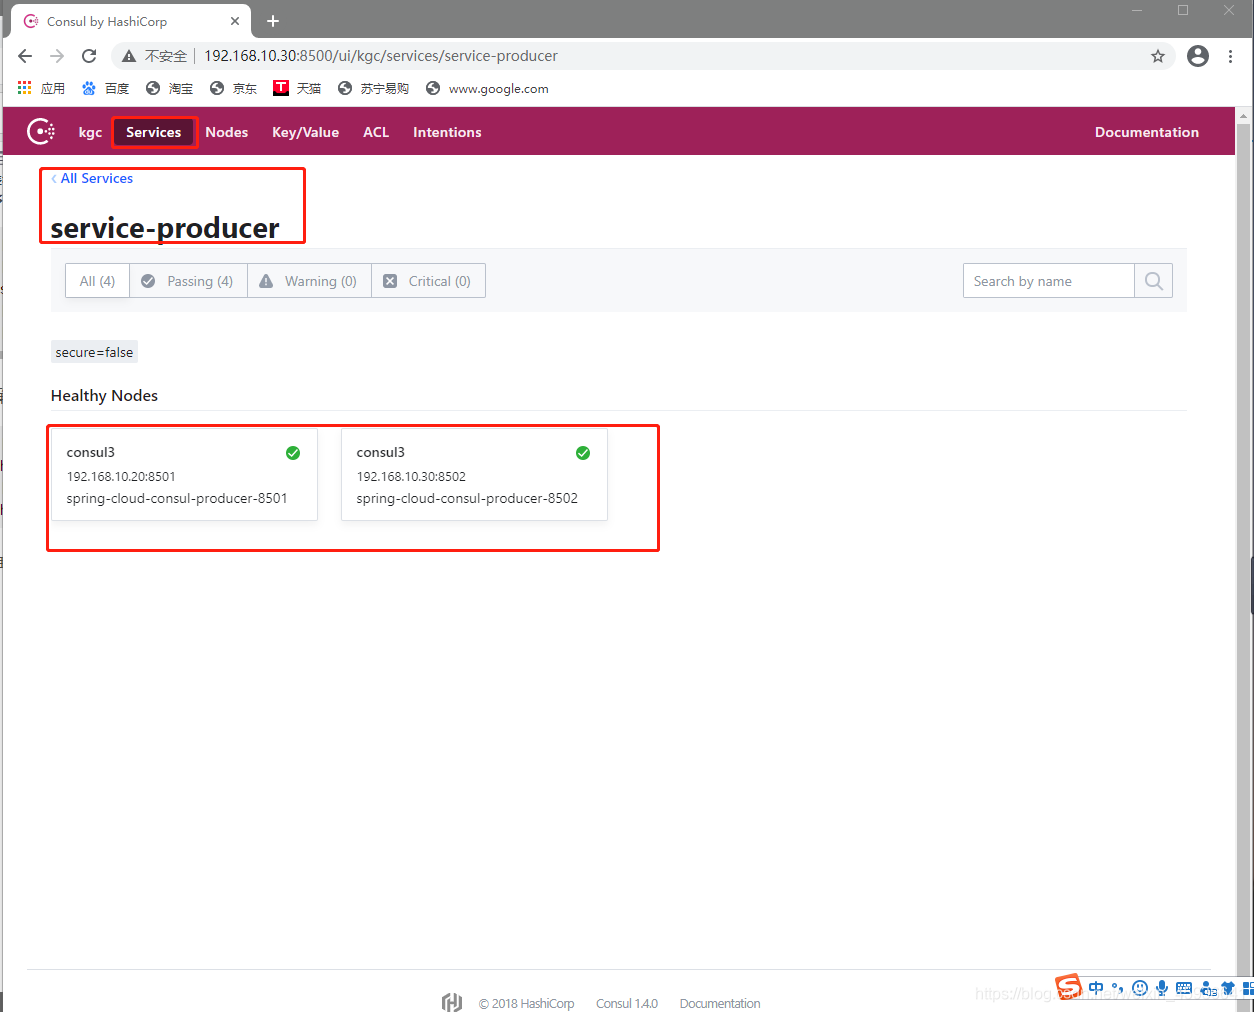
consul是什么?的更多相关文章
- Consul 服务注册与服务发现
上一篇:Mac OS.Ubuntu 安装及使用 Consul 1. 服务注册 对 Consul 进行服务注册之前,需要先部署一个服务站点,我们可以使用 ASP.NET Core 创建 Web 应用程序 ...
- Mac OS、Ubuntu 安装及使用 Consul
Consul 概念(摘录): Consul 是 HashiCorp 公司推出的开源工具,用于实现分布式系统的服务发现与配置.与其他分布式服务注册与发现的方案,比如 Airbnb 的 SmartStac ...
- 使用C# 和Consul进行分布式系统协调
随着大数据时代的到来,分布式是解决大数据问题的一个主要手段,随着越来越多的分布式的服务,如何在分布式的系统中对这些服务做协调变成了一个很棘手的问题.今天我们就来看看如何使用C# ,利用开源对分布式服务 ...
- 分布式服务注册和发现consul 简要介绍
Consul是HashiCorp公司推出的开源工具,用于实现分布式系统的服务发现与配置.与其他分布式服务注册与发现的方案,Consul的方案更"一站式",内置了服务注册与发现框 架 ...
- 第二章 consul的安装和启动
安装环境: mac:64bit(查看mac位数:打开终端-->"uname -a") consul_0.6.4_darwin_amd64.zip和consul_0.6.4_w ...
- 应用.Net+Consul维护RabbitMq的高可用性
懒人学习的过程就是工作中老大让干啥让做啥就研究研究啥,国庆放假回来的周末老大通过钉钉给我布置了个任务, RabbitMQ高可用解决方案,我想说钉钉太坑了: 这是国庆过后9号周日晚上下班给的任务,我周一 ...
- Consul的一个更新:服务端节点故障后重连
研究了一段时间Consul,想写个攻略来着,但太赖了而且表达能力非正常人...今天发现HashiCorp果然接纳大众意见改了点东西.. 场景是: 假如Consul集群内有三个Server Node 时 ...
- 搭建consul 集群
1. 准备工作 a) 启动三台虚拟机 s1:10.1.7.141 s2:10.1.7.139 s3:10.1.7.138 b) 每台机器上在 /home新建文件夹 mkdir ...
- Centos 7 Docker、docker-compose、Registrator、Consul、Consul Template和Nginx实现高可扩展的Web框架
安装所需软件 Docker Docker-compose 配置docker-compose.yml文件内容如下: #load balancer will automatically update th ...
- Consul Windows 安装
下载文件https://www.consul.io/downloads.html, 解压完毕后只有一个consul文件 consul 启动一个 Agent consul agent -server - ...
随机推荐
- 【英雄帖】FreeRedis 邀请您一起优化项目。
嘿!各位!自 FreeRedis 开库以来,相继出现了很多贡献者,我们正在对 FreeRedis 的各功能模块做优化,这并不意味着现版的 FreeRedis 有问题,我们只是希望在某些方面做得更好.如 ...
- 大白话详解大数据hive知识点,老刘真的很用心(3)
前言:老刘不敢说写的有多好,但敢保证尽量用大白话把自己复习的内容详细解释出来,拒绝资料上的生搬硬套,做到有自己的了解! 1. hive知识点(3) 从这篇文章开始决定进行一些改变,老刘在博客上主要分享 ...
- 30道 有趣的 的 JVM 面试题
目录 1.JVN内存结构 2.对象分配规则 3.解释内存中的栈(stack).堆(heap)和静态区(static area)的用法 4.Perm Space中保存什么数据?会引起OutOfMemor ...
- [NOIP2013 提高组] 货车运输
前言 使用算法:堆优化 \(prim\) , \(LCA\) . 题意 共有 \(n\) 个点,有 \(m\) 条边来连接这些点,每条边有权值.有 \(q\) 条类似于 \(u\) \(v\) 询问, ...
- JavaDailyReports10_14
1 package Test; 2 3 import java.util.Scanner; 4 5 public class Main { 6 7 public static void main(St ...
- tcp聊天
package tcp; import java.io.IOException; import java.io.InputStream; import java.net.ServerSocket; i ...
- Hi,这里是我的2020年,请查收!
Part 1. 回顾 还记得新年第一天,我在刚租的房子给自己做了一顿咖喱饭 (不好意思放照片...),然后回顾并展望了一下自己的 2020. 转眼间,2020 就过去了. 总的来说,今年小目标 (比如 ...
- 批量修改vsphere共享存储多路径选择策略
传统方式修改存储的多路径选择策略 首先说一下传统web界面操作方式: 可以看到至少需要6次才能修改完成一个.在生产环境中一般会挂载很多FC存储,这时候就需要一个批量快捷的方式来修改. 使用Powerc ...
- 11. const 修饰成员函数
const 限定只读,对函数的实参进行保护 常数据成员:必须出现在类的定义体中,常数据成员必须进行初始化,并且不能被更新,但常数据成员的初始化只能通过构造函数的初始化列表进行 1. 常函数 成员函数加 ...
- idea破解方式:永久激活
相信很多小伙伴都发现了,每年到年底的时候,idea注册码都大面积的失效,早上到办公室打开电脑发现注册码过期,还要花很长时间找新的: 这里介绍两种破解方式,都是有生之年不到期:与网上现有的方式基本一致. ...