alipay 当面付扫码支付实战开发
alipay 当面付扫码支付开发
1、当面付介绍:
当面付包括付款码支付和扫码支付两种收款方式。适用于线下实体店支付、面对面支付、自助售货机等场景。
付款码支付:商家使用扫码枪或其他扫码机具扫描用户出示的付款码,来实现收款。
扫码支付:商家提供收款二维码,由用户通过支付宝扫码支付,来实现收款。
2、参数准备
• APPID
• 商家私钥
• 支付宝公钥
• 支付回调地址
• 网关地址
• 加密签名算法RSA2
3、JAVA 代码实战,项目基础功能准备
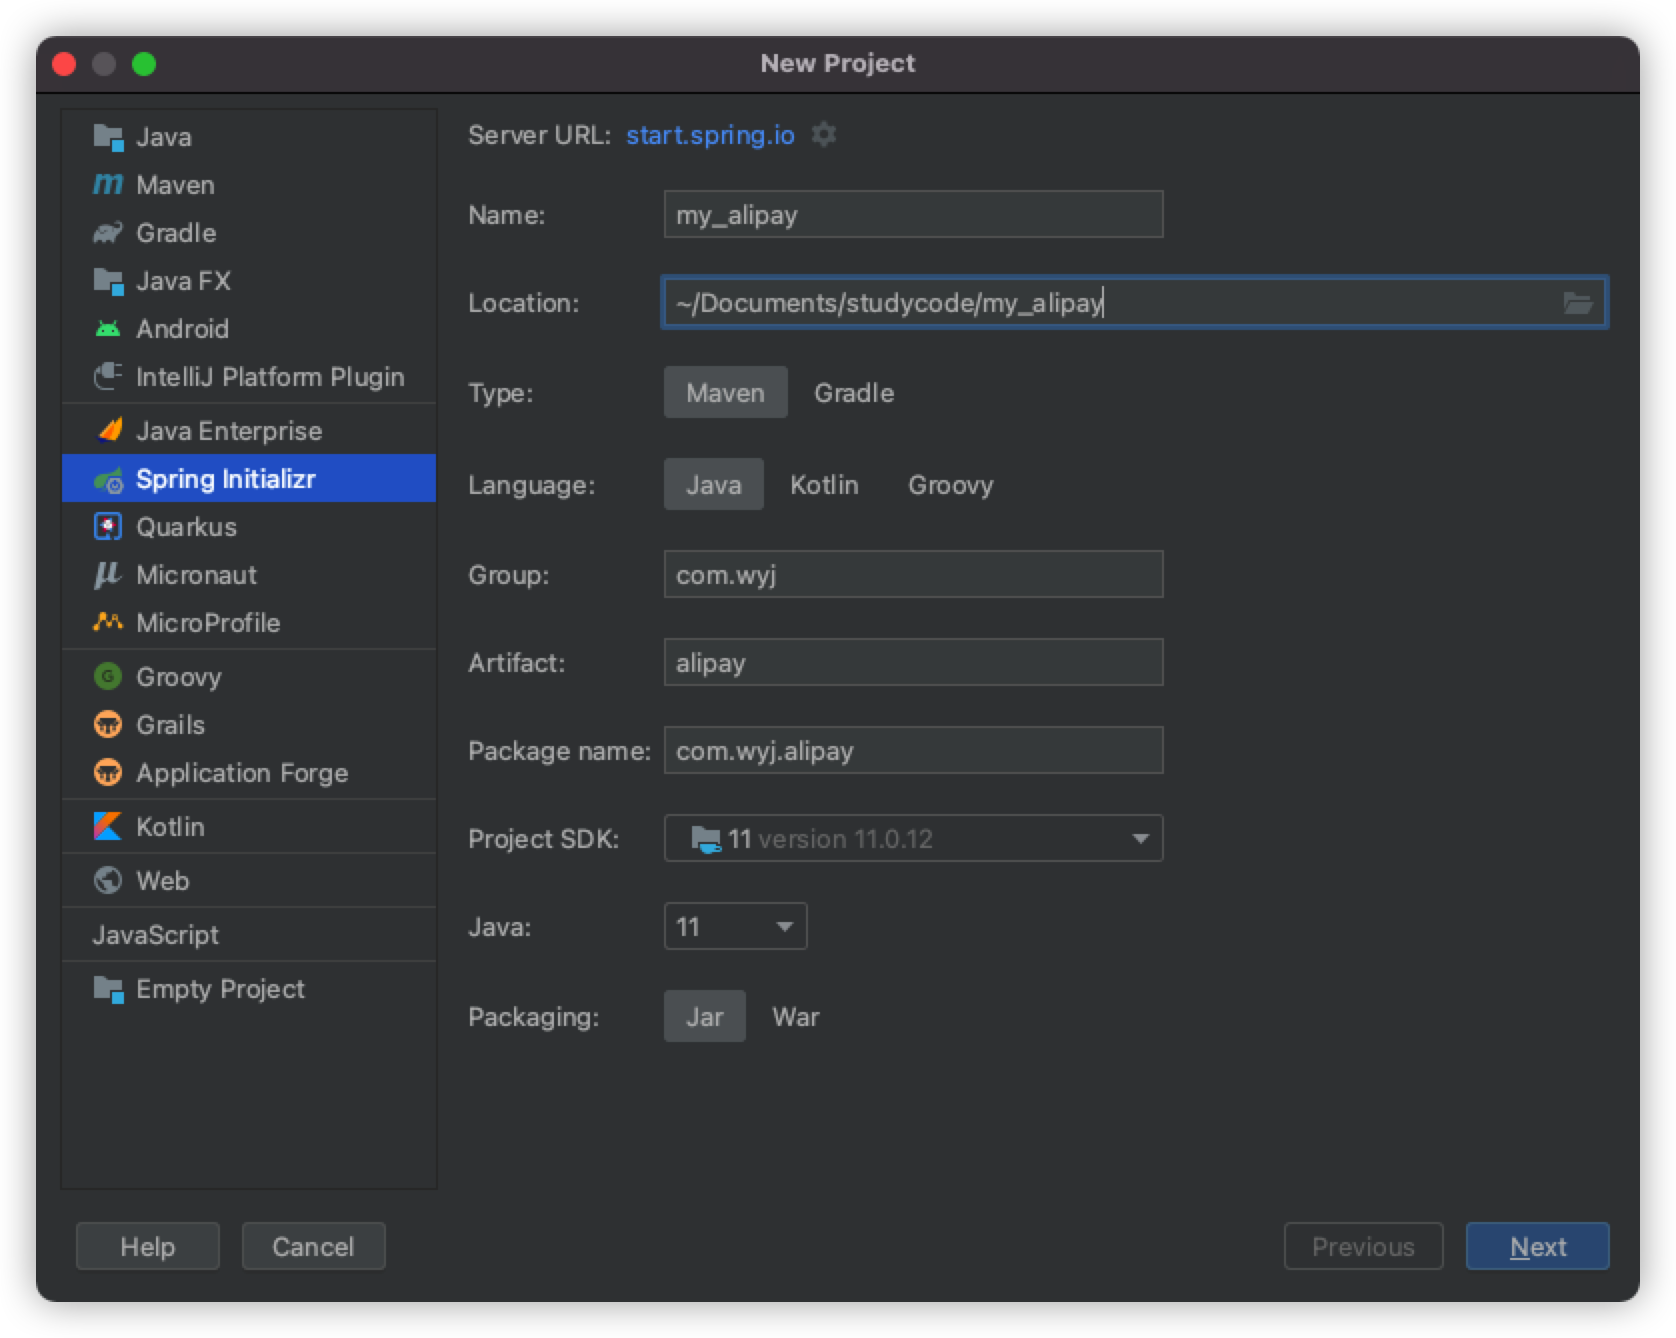
3.1 创建 springBoot 工程

3.2 导入依赖
<dependencies>
<!--web依赖-->
<dependency>
<groupId>org.springframework.boot</groupId>
<artifactId>spring-boot-starter-web</artifactId>
</dependency>
<!--测试依赖-->
<dependency>
<groupId>org.springframework.boot</groupId>
<artifactId>spring-boot-starter-test</artifactId>
<scope>test</scope>
</dependency>
<dependency>
<groupId>junit</groupId>
<artifactId>junit</artifactId>
<version>4.13</version>
</dependency>
<!--实体依赖-->
<dependency>
<groupId>org.projectlombok</groupId>
<artifactId>lombok</artifactId>
<optional>true</optional>
</dependency>
<!-- alipay sdk 支付依赖 -->
<dependency>
<groupId>com.alipay.sdk</groupId>
<artifactId>alipay-sdk-java</artifactId>
<version>4.22.57.ALL</version>
</dependency>
<!-- hutool 流行工具 -->
<dependency>
<groupId>cn.hutool</groupId>
<artifactId>hutool-all</artifactId>
<version>5.7.22</version>
</dependency>
<!-- 谷歌二维码生成工具 -->
<dependency>
<groupId>com.google.zxing</groupId>
<artifactId>core</artifactId>
<version>3.4.1</version>
</dependency>
</dependencies>
3.3 配置yml
 # 支付宝支付参数配置
 alipay:
   app_id: 公司支付宝的APPID
   merchant_private_key: 公司支付宝商户私钥
   alipay_public_key: 公司支付宝公钥
   notify_url: alipay 异步回调地址
   return_url: alipay 同步回调地址(我们做二维码扫码是异步操作,没用,可以不配置)
   sign_type: RSA2
   charset: utf-8
   gatewayUrl: https://openapi.alipay.com/gateway.do
3.4 定义配置类
import lombok.Data;
import org.springframework.beans.factory.annotation.Value;
import org.springframework.stereotype.Component;
/**
* @author: yijun.wen
* @date: 2022/3/11 5:32 下午
* @description: alipay 配置类
*/
@Data
@Component
public class AlipayConfig {
/**
* 应用ID,您的APPID,收款账号既是您的APPID对应支付宝账号
*/
@Value("${alipay.app_id}")
public String app_id;
/**
* 商户私钥,您的PKCS8格式RSA2私钥
*/
@Value("${alipay.merchant_private_key}")
public String merchant_private_key;
/**
* 支付宝公钥,查看地址:https://openhome.alipay.com/platform/keyManage.htm 对应APPID下的支付宝公钥。
*/
@Value("${alipay.alipay_public_key}")
public String alipay_public_key;
/**
* 服务器异步通知页面路径 需http://格式的完整路径,不能加参数,必须外网可以正常访问
*/
@Value("${alipay.notify_url}")
public String notify_url;
/**
* 页面跳转同步通知页面路径 需http://格式的完整路径,不能加参数,必须外网可以正常访问(我们这里没用这个)
*/
@Value("${alipay.return_url}")
public String return_url;
/**
* 签名方式
*/
@Value("${alipay.sign_type}")
public String sign_type;
/**
* 字符编码格式
*/
@Value("${alipay.charset}")
public String charset;
/**
* 支付宝网关
*/
@Value("${alipay.gatewayUrl}")
public String gatewayUrl;
}
3.5 二维码生成工具类
package com.wyj.alipay.util;
import cn.hutool.extra.qrcode.BufferedImageLuminanceSource;
import com.google.zxing.*;
import com.google.zxing.common.BitMatrix;
import com.google.zxing.common.HybridBinarizer;
import com.google.zxing.qrcode.decoder.ErrorCorrectionLevel;
import javax.imageio.ImageIO;
import java.awt.*;
import java.awt.geom.RoundRectangle2D;
import java.awt.image.BufferedImage;
import java.io.File;
import java.io.OutputStream;
import java.util.Hashtable;
/**
* @author: yijun.wen
* @date: 2022/3/11 5:36 下午
* @description:
*/
public class QrCodeUtil {
private static final String CHARSET = "utf-8";
private static final String FORMAT_NAME = "JPG";
// 二维码尺寸
private static final int QRCODE_SIZE = 300;
// LOGO宽度
private static final int WIDTH = 90;
// LOGO高度
private static final int HEIGHT = 90;
private static BufferedImage createImage(String content, String imgPath, boolean needCompress) throws Exception {
Hashtable hints = new Hashtable();
hints.put(EncodeHintType.ERROR_CORRECTION, ErrorCorrectionLevel.H);
hints.put(EncodeHintType.CHARACTER_SET, CHARSET);
hints.put(EncodeHintType.MARGIN, 1);
BitMatrix bitMatrix = new MultiFormatWriter().encode(content, BarcodeFormat.QR_CODE, QRCODE_SIZE, QRCODE_SIZE,
hints);
int width = bitMatrix.getWidth();
int height = bitMatrix.getHeight();
BufferedImage image = new BufferedImage(width, height, BufferedImage.TYPE_INT_RGB);
for (int x = 0; x < width; x++) {
for (int y = 0; y < height; y++) {
image.setRGB(x, y, bitMatrix.get(x, y) ? 0xFF000000 : 0xFFFFFFFF);
}
}
if (imgPath == null || "".equals(imgPath)) {
return image;
}
// 插入图片
insertImage(image, imgPath, needCompress);
return image;
}
private static void insertImage(BufferedImage source, String imgPath, boolean needCompress) throws Exception {
File file = new File(imgPath);
if (!file.exists()) {
System.err.println("" + imgPath + " 该文件不存在!");
return;
}
Image src = ImageIO.read(new File(imgPath));
int width = src.getWidth(null);
int height = src.getHeight(null);
if (needCompress) { // 压缩LOGO
if (width > WIDTH) {
width = WIDTH;
}
if (height > HEIGHT) {
height = HEIGHT;
}
Image image = src.getScaledInstance(width, height, Image.SCALE_SMOOTH);
BufferedImage tag = new BufferedImage(width, height, BufferedImage.TYPE_INT_RGB);
Graphics g = tag.getGraphics();
// 绘制缩小后的图
g.drawImage(image, 0, 0, null);
g.dispose();
src = image;
}
// 插入LOGO
Graphics2D graph = source.createGraphics();
int x = (QRCODE_SIZE - width) / 2;
int y = (QRCODE_SIZE - height) / 2;
graph.drawImage(src, x, y, width, height, null);
Shape shape = new RoundRectangle2D.Float(x, y, width, width, 6, 6);
graph.setStroke(new BasicStroke(3f));
graph.draw(shape);
graph.dispose();
}
public static void encode(String content, String imgPath, String destPath, boolean needCompress) throws Exception {
BufferedImage image = createImage(content, imgPath, needCompress);
mkdirs(destPath);
ImageIO.write(image, FORMAT_NAME, new File(destPath));
}
public static BufferedImage encode(String content, String imgPath, boolean needCompress) throws Exception {
BufferedImage image = createImage(content, imgPath, needCompress);
return image;
}
public static void mkdirs(String destPath) {
File file = new File(destPath);
// 当文件夹不存在时,mkdirs会自动创建多层目录,区别于mkdir.(mkdir如果父目录不存在则会抛出异常)
if (!file.exists() && !file.isDirectory()) {
file.mkdirs();
}
}
public static void encode(String content, String imgPath, String destPath) throws Exception {
encode(content, imgPath, destPath, false);
}
public static void encode(String content, String destPath) throws Exception {
encode(content, null, destPath, false);
}
public static void encode(String content, String imgPath, OutputStream output, boolean needCompress)
throws Exception {
BufferedImage image = createImage(content, imgPath, needCompress);
ImageIO.write(image, FORMAT_NAME, output);
}
public static void encode(String content, OutputStream output) throws Exception {
encode(content, null, output, false);
}
public static String decode(File file) throws Exception {
BufferedImage image;
image = ImageIO.read(file);
if (image == null) {
return null;
}
BufferedImageLuminanceSource source = new BufferedImageLuminanceSource(image);
BinaryBitmap bitmap = new BinaryBitmap(new HybridBinarizer(source));
Result result;
Hashtable hints = new Hashtable();
hints.put(DecodeHintType.CHARACTER_SET, CHARSET);
result = new MultiFormatReader().decode(bitmap, hints);
String resultStr = result.getText();
return resultStr;
}
public static String decode(String path) throws Exception {
return decode(new File(path));
}
}
package com.wyj.alipay.util;
import lombok.Data;
/**
* @author: yijun.wen
* @date: 2022/3/11 5:39 下午
* @description:
*/
@Data
public class QrCodeResponse {
/**
* 返回的状态码
*/
private String code;
/**
* 返回的信息
*/
private String msg;
/**
* 交易的流水号
*/
private String out_trade_no;
/**
* 生成二维码的内容
*/
private String qr_code;
}
package com.wyj.alipay.util;
import lombok.Data;
/**
* @author: yijun.wen
* @date: 2022/3/11 5:38 下午
* @description:
*/
@Data
public class QrResponse {
private QrCodeResponse alipay_trade_precreate_response;
private String sign;
public QrCodeResponse getAlipay_trade_precreate_response() {
return alipay_trade_precreate_response;
}
public void setAlipay_trade_precreate_response(QrCodeResponse alipay_trade_precreate_response) {
this.alipay_trade_precreate_response = alipay_trade_precreate_response;
}
}
3.6 订单号生成工具类
类似雪花只试用单体项目
package com.wyj.alipay.util;
import java.text.SimpleDateFormat;
import java.util.Date;
/**
* @author: yijun.wen
* @date: 2022/3/14 10:23 上午
* @description:
*/
public class GenerateNum {
/**
* 全局自增数
*/
private static int count = 0;
/**
* 每毫秒秒最多生成多少订单(最好是像9999这种准备进位的值)
*/
private static final int total = 99;
/**
* 格式化的时间字符串
*/
private static final SimpleDateFormat sdf = new SimpleDateFormat("yyyyMMddHHmmss");
/**
* 获取当前时间年月日时分秒毫秒字符串
*
* @return
*/
private static String getNowDateStr() {
return sdf.format(new Date());
}
/**
* 记录上一次的时间,用来判断是否需要递增全局数
*/
private static String now = null;
/**
* 生成一个订单号
*/
public static String generateOrder() {
String dataStr = getNowDateStr();
if (dataStr.equals(now)) {
count++;
} else {
count = 1;
now = dataStr;
}
// 算补位
int countInteger = String.valueOf(total).length() - String.valueOf(count).length();
//补字符串
String bu = "";
for (int i = 0; i < countInteger; i++) {
bu += "0";
}
bu += String.valueOf(count);
if (count >= total) {
count = 0;
}
return dataStr + bu;
}
}
3.7 项目VO与DTO导入
package com.wyj.alipay.model;
import lombok.Data;
import lombok.NoArgsConstructor;
import java.io.Serializable;
/**
* @author: yijun.wen
* @date: 2022/3/11 5:52 下午
* @description:
*/
@Data
@NoArgsConstructor
public class ViewData<V> implements Serializable {
protected int code;
protected V data;
protected Object error;
}
package com.wyj.alipay.model;

import lombok.Data;

import java.io.Serializable;

/**
 * @author: yijun.wen
 * @date: 2022/3/11 5:50 下午
 * @description:
 */
@Data
public class PayDto implements Serializable {

    private Long userId;

    private String totalAmount;

    private int payType;
}
package com.wyj.alipay.model;

import lombok.Data;

import java.io.Serializable;

/**
 * @author: yijun.wen
 * @date: 2022/3/11 5:52 下午
 * @description:
 */
@Data
public class PayCallbackDto implements Serializable {

    private Long userId;

    private String payNumber;
}
package com.wyj.alipay.model;

import lombok.Data;

/**
 * @author: yijun.wen
 * @date: 2022/3/14 10:21 上午
 * @description:
 */
@Data
public class QrCodeVo {
    private Long UserId;

    private String payNumber;

    private String qrCode;
}
上述为准备工作,接下来开始核心代码
4、 创建alipay业务接口及实现类
4.1 整体业务接口
package com.wyj.alipay.service;

import com.alipay.api.AlipayApiException;
import com.wyj.alipay.model.PayCallbackDto;
import com.wyj.alipay.model.PayDto;
import com.wyj.alipay.model.ViewData;

import javax.servlet.http.HttpServletRequest;

/**
 * @author: yijun.wen
 * @date: 2022/3/11 5:44 下午
 * @description:
 */
public interface AlipayService {
    /**
     * 生成支付二维码
     *
     * @param payInfo
     * @return
     */
    ViewData alipay(PayDto payInfo);

    /**
     * 支付宝回调接口
     *
     * @param request
     * @return
     */
    boolean alipayCallback(HttpServletRequest request);

    /**
     * alipay 监听支付状态的接口
     *
     * @param payCallbackInfo
     * @return
     * @throws AlipayApiException
     */
    ViewData alipayCallback(PayCallbackDto payCallbackInfo) throws AlipayApiException;

}
4.2 二维码返回接口实现
package com.wyj.alipay.service.impl;

import cn.hutool.json.JSONObject;
import cn.hutool.json.JSONUtil;
import com.alibaba.fastjson.JSON;
import com.alipay.api.AlipayApiException;
import com.alipay.api.AlipayClient;
import com.alipay.api.DefaultAlipayClient;
import com.alipay.api.domain.AlipayTradePrecreateModel;
import com.alipay.api.request.AlipayTradePrecreateRequest;
import com.alipay.api.response.AlipayTradePrecreateResponse;
import com.wyj.alipay.config.AlipayConfig;
import com.wyj.alipay.model.PayCallbackDto;
import com.wyj.alipay.model.PayDto;
import com.wyj.alipay.model.QrCodeVo;
import com.wyj.alipay.model.ViewData;
import com.wyj.alipay.service.IAlipayService;
import com.wyj.alipay.util.GenerateNum;
import com.wyj.alipay.util.QrCodeResponse;
import com.wyj.alipay.util.QrCodeUtil;
import com.wyj.alipay.util.QrResponse;
import org.springframework.beans.factory.annotation.Autowired;
import org.springframework.util.FileCopyUtils;

import javax.imageio.ImageIO;
import javax.imageio.stream.ImageOutputStream;
import javax.servlet.http.HttpServletRequest;
import java.awt.image.BufferedImage;
import java.io.ByteArrayInputStream;
import java.io.ByteArrayOutputStream;
import java.util.Base64;

/**
 * @author: yijun.wen
 * @date: 2022/3/14 10:19 上午
 * @description:
 */
@Service
@Slf4j
public class AlipayServiceImpl implements IAlipayService {

    @Autowired
    private AlipayConfig alipayConfig;

    @Override
    public ViewData alipay(PayDto payInfo) {
        ViewData<QrCodeVo> viewData = new ViewData<>();
        // 1:支付的用户
        Long userId = payInfo.getUserId();
        // 2: 支付金额
        String totalAmount = payInfo.getTotalAmount();
        // 3: 支付的产品名称
        String productName = "Alipay test";
        // 4: 支付的订单编号
        String payNumber = GenerateNum.generateOrder();
        // 5: 支付方式
        int payType = payInfo.getPayType();
        // 6:支付宝携带的参数在回调中可以通过request获取 参数
        JSONObject json = JSONUtil.createObj();
        json.set("memberId", userId);
        json.set("totalAmount", totalAmount);
        json.set("productName", productName);
        json.set("payNumber", payNumber);
        json.set("payType", payType);
        // 7:设置支付相关的信息
        AlipayTradePrecreateModel model = new AlipayTradePrecreateModel();
        // 自定义订单号
        model.setOutTradeNo(payNumber);
        // 支付金额
        model.setTotalAmount(totalAmount);
        // 支付的产品名称
        model.setSubject(productName);
        // 支付的请求体参数
        model.setBody(json.toString());
        // 支付的超时时间
        model.setTimeoutExpress("5m");
        // 支付的库存 id(根据 cloudPKI 业务,这里我们用用户id )
        model.setStoreId(userId + "");
        // 调用 alipay 获取二维码参数
        QrCodeResponse qrCodeResponse = qrcodePay(model);

        try {
            ByteArrayOutputStream output = new ByteArrayOutputStream();
            // 自定义二维码logo todo: 可以在二维码中间可以加上公司 logo
            //String logoPath = ResourceUtils.getFile("classpath:favicon.png").getAbsolutePath();
            String logoPath = "";
            // 生成二维码
            BufferedImage buffImg = QrCodeUtil.encode(qrCodeResponse.getQr_code(), logoPath, false);
            ImageOutputStream imageOut = ImageIO.createImageOutputStream(output);
            ImageIO.write(buffImg, "JPEG", imageOut);
            imageOut.close();
            ByteArrayInputStream input = new ByteArrayInputStream(output.toByteArray());
            byte[] data = FileCopyUtils.copyToByteArray(input);
            QrCodeVo qrCodeVo = new QrCodeVo();
            qrCodeVo.setQrCode(Base64.getEncoder().encodeToString(data));
            qrCodeVo.setPayNumber(payNumber);
            qrCodeVo.setUserId(userId);
            viewData.setData(qrCodeVo);
            return viewData;
        } catch (Exception ex) {
            ex.printStackTrace();
            return viewData;
        }
    }

    @Override
    public boolean alipayCallback(HttpServletRequest request) {
        return false;
    }

    @Override
    public ViewData alipayCallback(PayCallbackDto payCallbackInfo) throws AlipayApiException {
        return null;
    }

    /**
     * 扫码运行代码
     * 验签通过返回QrResponse
     * 失败打印日志信息
     * 参考地址:https://opendocs.alipay.com/apis/api_1/alipay.trade.app.pay
     *
     * @param model
     * @return
     */
    public QrCodeResponse qrcodePay(AlipayTradePrecreateModel model) {
        // 1: 获取阿里请求客户端
        AlipayClient alipayClient = getAlipayClient();
        // 2: 获取阿里请求对象
        AlipayTradePrecreateRequest request = new AlipayTradePrecreateRequest();
        // 3:设置请求参数的集合,最大长度不限
        request.setBizModel(model);
        // 设置异步回调地址
        request.setNotifyUrl(alipayConfig.getNotify_url());
        // 设置同步回调地址
        request.setReturnUrl(alipayConfig.getReturn_url());
        AlipayTradePrecreateResponse alipayTradePrecreateResponse = null;
        try {
            alipayTradePrecreateResponse = alipayClient.execute(request);
        } catch (AlipayApiException e) {
            e.printStackTrace();
        }
        QrResponse qrResponse = JSON.parseObject(alipayTradePrecreateResponse.getBody(), QrResponse.class);
        return qrResponse.getAlipay_trade_precreate_response();
    }

    /**
     * 获取AlipayClient对象
     *
     * @return
     */
    private AlipayClient getAlipayClient() {
        //获得初始化的AlipayClient
        AlipayClient alipayClient =
                new DefaultAlipayClient(alipayConfig.getGatewayUrl(), alipayConfig.getApp_id(), alipayConfig.getMerchant_private_key(),
                        "JSON", alipayConfig.getCharset(), alipayConfig.getAlipay_public_key(), alipayConfig.getSign_type());
        return alipayClient;
    }
}
4.3 创建 web 接口
package com.wyj.alipay.controller;

import com.wyj.alipay.model.PayDto;
import com.wyj.alipay.model.ViewData;
import com.wyj.alipay.service.IAlipayService;
import org.springframework.beans.factory.annotation.Autowired;
import org.springframework.web.bind.annotation.PostMapping;
import org.springframework.web.bind.annotation.RequestBody;
import org.springframework.web.bind.annotation.RequestMapping;
import org.springframework.web.bind.annotation.RestController;

/**
 * @author: yijun.wen
 * @date: 2022/3/14 10:57 上午
 * @description:
 */
@RestController
@RequestMapping("/api/pay/alipay/")
public class AlipayController {
    @Autowired
    private IAlipayService alipayService;

    /**
     * 生成支付宝支付二维码
     *
     * @param payInfo
     * @return
     */
    @PostMapping("/qr_code")
    public ViewData alipay(@RequestBody PayDto payInfo) {
        return alipayService.alipay(payInfo);
    }

}
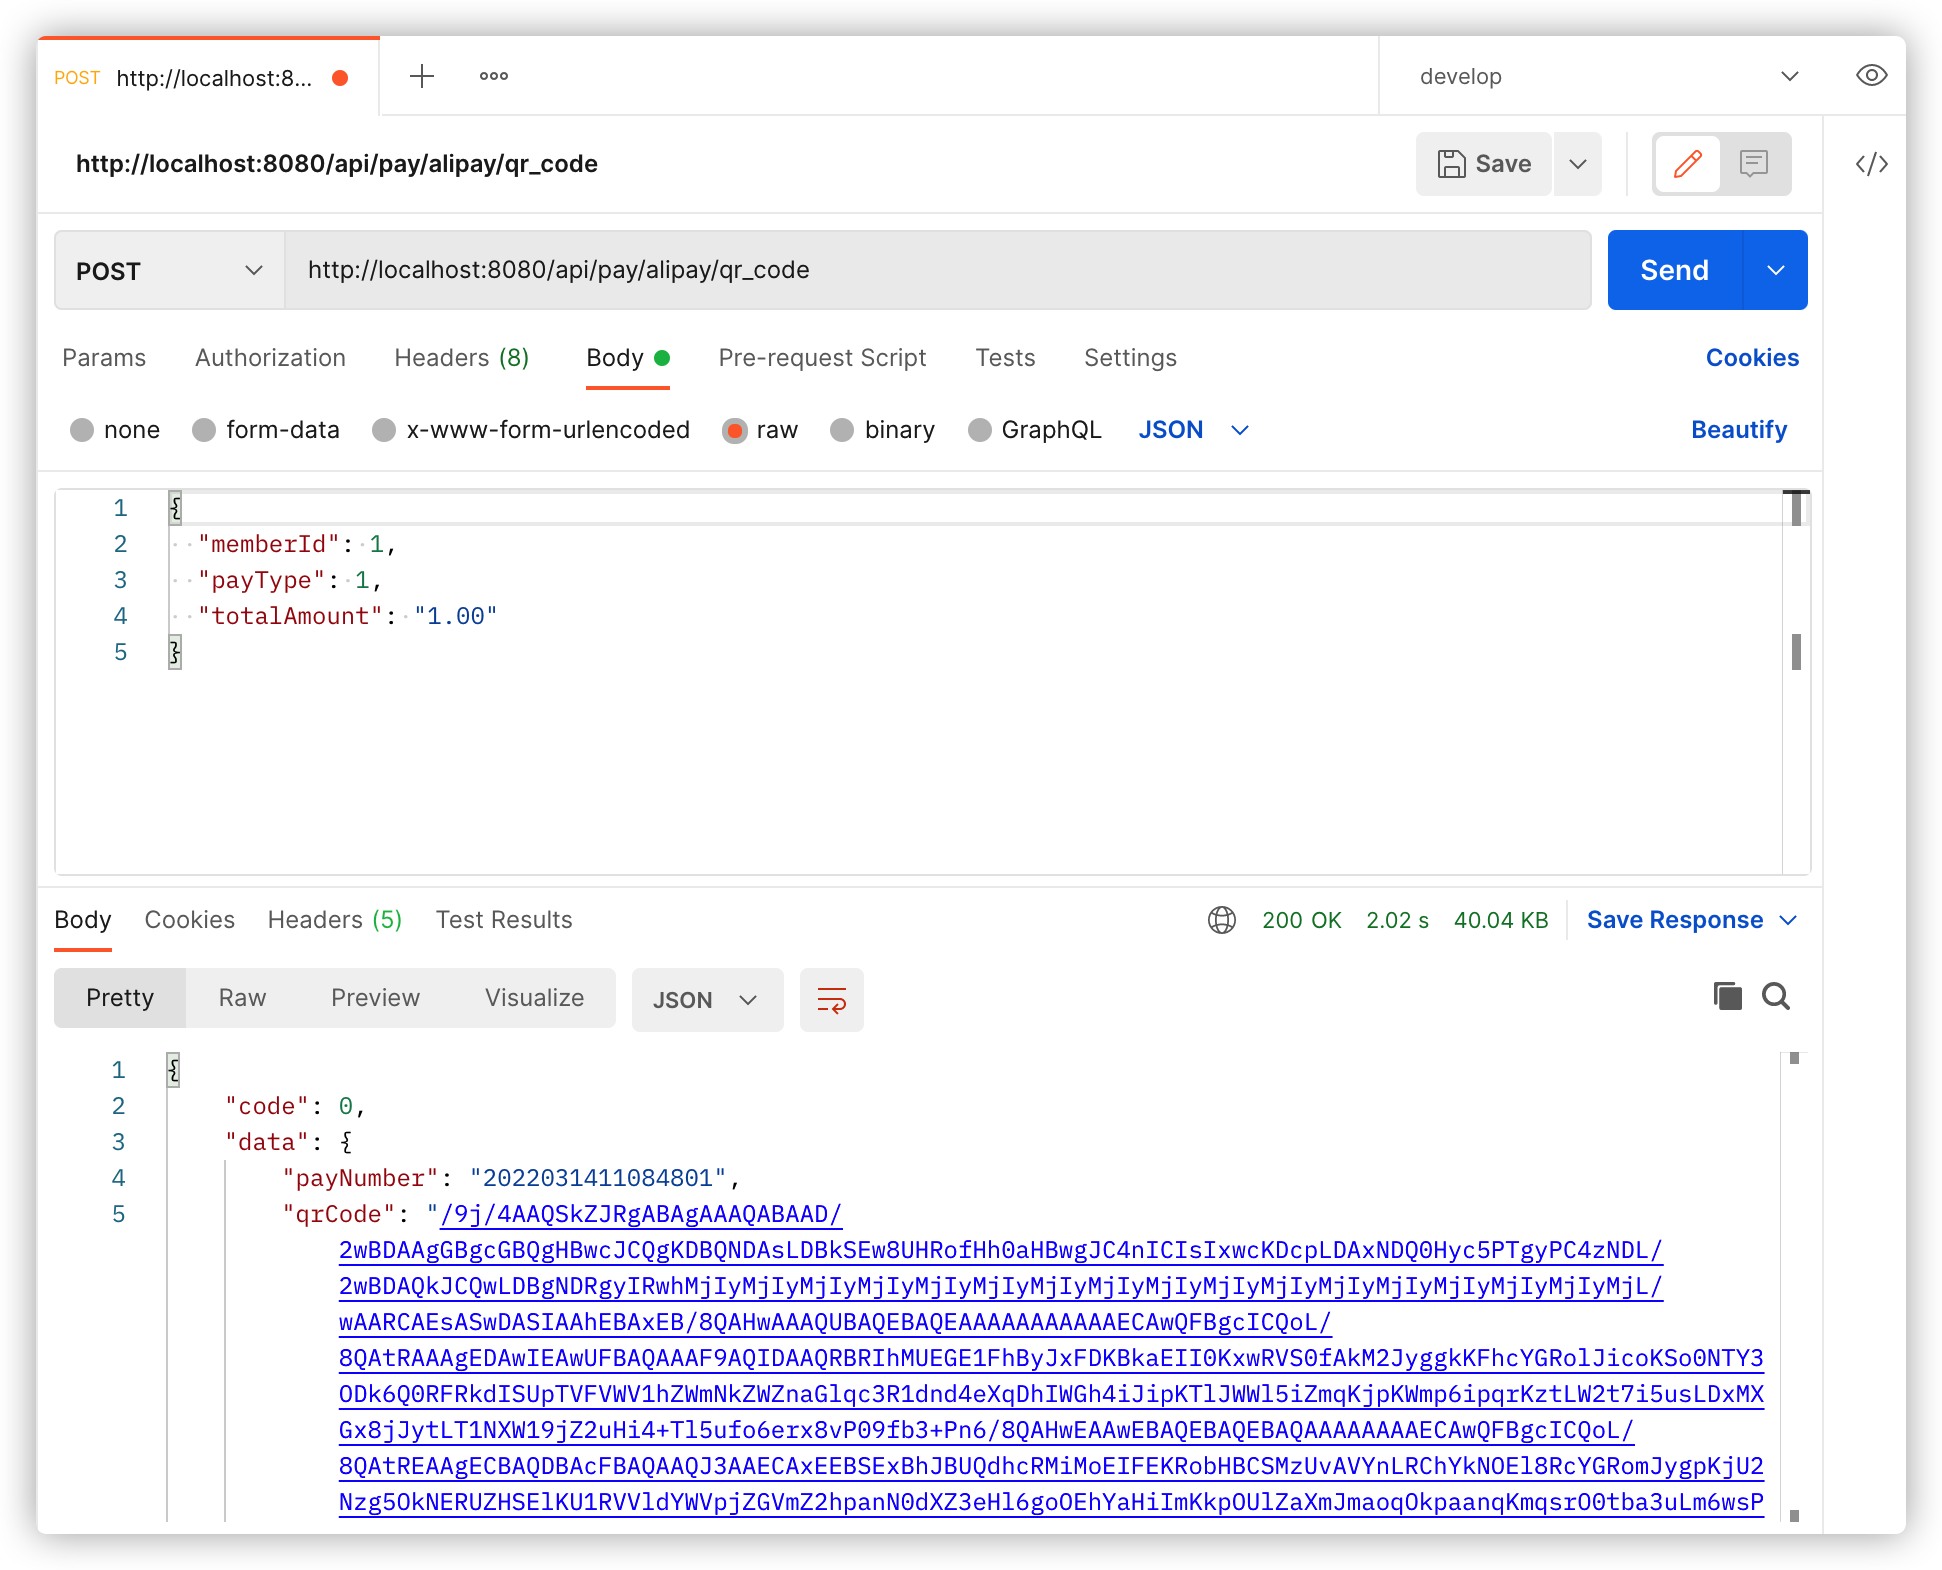
4.4 使用 Postman 进行接口测试

qr_Code响应值为 Base64 编码
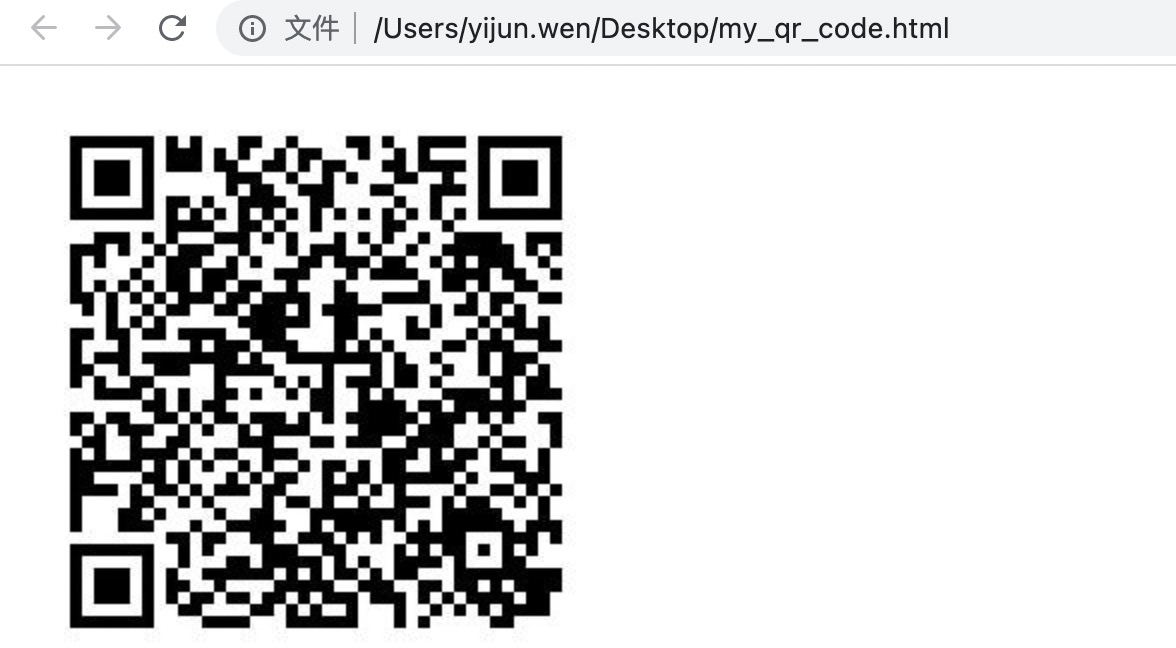
我们可以简单写个 html 页面来测试
<!DOCTYPE html>
<html lang="en">
<head>
    <meta charset="UTF-8" />
    <title>My alipay qr_code</title>
</head>
<body>
<img src="data:image/jpeg;base64,《这里写 qr_Code 编码》">
</body>
</html>
4.5 测试效果

5、扫码后回调接口开发
5.1 支付回调接口实现
重写 AlipayServiceImpl alipayCallback方法
    /**
     * 支付宝回调
     *
     * @return
     * @throws Exception
     */
    @Override
    public boolean alipayCallback(HttpServletRequest request) {
        // 获取支付宝GET过来反馈信息
        Map<String, String> params = new LinkedHashMap<>();
        Map requestParams = request.getParameterMap();
        for (Iterator iter = requestParams.keySet().iterator(); iter.hasNext(); ) {
            String name = (String) iter.next();
            String[] values = (String[]) requestParams.get(name);
            String valueStr = "";
            for (int i = 0; i < values.length; i++) {
                valueStr = (i == values.length - 1) ? valueStr + values[i] : valueStr + values[i] + ",";
            }
            try {
                params.put(name, new String(valueStr.getBytes("ISO-8859-1"), "UTF-8"));
            } catch (UnsupportedEncodingException e) {
                e.printStackTrace();
            }
        }
        // 计算得出通知验证结果
        log.info("1:获取支付宝回传的参数" + params);
        try {
            // 验签
            //RSA2密钥验签
            boolean checkV1 = AlipaySignature.rsaCheckV1(params, alipayConfig.alipay_public_key, alipayConfig.charset, alipayConfig.sign_type);
            log.info("验签成功");
            if (!checkV1) {
                log.info("验签失败接口参数:{}", params);
                return false;
            }
        } catch (AlipayApiException e) {
            e.printStackTrace();
        }
        // 返回公共参数
        String extparamString = request.getParameter("extra_common_param");
        log.info("2:支付宝交易返回的公共参数:{}", extparamString);
        String tradeNo = params.get("trade_no");
        //交易完成
        String body = params.get("body");
        log.info("3:【支付宝】交易的参数信息是:{},流水号是:{}", body, tradeNo);
        try {
            JSONObject bodyJson = new JSONObject(body);
            Long userId = bodyJson.getLong("userId");
            String payType = bodyJson.getStr("payType");
            String payNumber = bodyJson.getStr("payNumber");
            log.info("4:【支付宝】交易的参数信息是:payType:{},payNumber:{},userId:{}", payType, payNumber, userId);
            // todo 入库充值记录 修改库存等一系列 DB 操作
        } catch (Exception ex) {
            log.error("支付宝支付出现了异常,流水号是:{}", tradeNo);
            ex.printStackTrace();
            return false;
        }
        return true;
    }
5.2 创建 web 接口
下面代码拷贝到 AlipayController
检查 alipay 回调地址是否为当前接口地址
    /**
     * alipay 异步通知
     * 参考地址:https://opendocs.alipay.com/support/01ravg
     */
    @ResponseBody
    @PostMapping("/notifyUrl")
    public String notify_url(HttpServletRequest request) {
        boolean result = alipayService.alipayCallback(request);
        if (result) {
            // alipay 规范,请不要修改或删除
            return "success";
        } else {
            // 验证失败
            return "fail";
        }
    }
5.3 查看测试效果
注意:回调接口为 alipay 调用,必须外网能够访问
我这里打包部署到服务器上,给大家看下日志效果
重新按照步骤4生成二维码,支付宝扫码支付成功后,可见日志:

6、Alipay 支付状态查询
这个接口主要是给前端轮询调用获取支付状态使用
当然,还有一种解决方案,使用websocket,在步骤5中直接发送消息通知前端
6.1 监听支付状态的接口实现
重写 AlipayServiceImpl alipayCallback 方法
    @Override
    public ViewData alipayCallback(PayCallbackDto payCallbackInfo) throws AlipayApiException {
        ViewData<Object> viewData = new ViewData<>();
        // 1: 获取阿里请求客户端
        AlipayClient alipayClient = getAlipayClient();
        // 2: 获取阿里请求对象
        AlipayTradeQueryRequest request = new AlipayTradeQueryRequest();
        // 3: 设置业务参数
        request.setBizContent(JSONUtil.toJsonStr(JSONUtil.createObj().set("out_trade_no", payCallbackInfo.getPayNumber())));
        //通过alipayClient调用API,获得对应的response类
        AlipayTradeQueryResponse response = alipayClient.execute(request);
        String body = response.getBody();
        JSONObject json = new JSONObject(new JSONObject(body).getStr("alipay_trade_query_response"));
        if ("10000".equals(json.getStr("code")) && "TRADE_SUCCESS".equals(json.getStr("trade_status"))) {
            viewData.setData("success");
        } else {
            viewData.setData("fail");
        }
        return viewData;
    }
6.2 创建 web 接口
    /**
     * alipay 监听支付状态的接口
     *
     * @param PayCallbackInfo
     * @return
     */
    @PostMapping("/alipaycallback")
    public ViewData alipayCallback(@RequestBody PayCallbackDto PayCallbackInfo) throws AlipayApiException {
        return alipayService.alipayCallback(PayCallbackInfo);
    }
6.3 测试
这里前端轮询逻辑,展示二维码 5 秒后,每3秒调用一次支付查询接口,得到响应success或5分钟后结束调用
alipay 当面付扫码支付实战开发的更多相关文章
- Spring使用支付宝扫码支付
前一段一直在研究支付宝的扫码支付,不得不说,支付宝的文档写的真是一个烂(起码在下刚开始看的时候是mengbi的).文档上面的示例和demo里面的示例长的完全不一样.往往文档上面的例子很简单,而demo ...
- php实现支付宝在线支付和扫码支付demo
### php实现支付宝在线支付和扫码支付demo 背景:在做一个公众号时增加了h5端,需要接入支付,非微信环境,选择了支付宝,以下简单记录下实现过程,并做了简单的封装,拿来即可使用,注意:本项目只是 ...
- ASP.NET Core 2.0 支付宝当面付之扫码支付
前言 自从微软更换了CEO以后,微软的战略方向有了相当大的变化,不再是那么封闭,开源了许多东西,拥抱开源社区,.NET实现跨平台,收购xamarin并免费提供给开发者等等.我本人是很喜欢.net的,并 ...
- Python实现支付宝当面付之——扫码支付
转载请注明原文地址:http://www.cnblogs.com/ygj0930/p/7680348.html 一:配置信息准备 登录蚂蚁金服开放平台:https://open.alipay.com/ ...
- .NET Core2.0 环境下MVC模式的支付宝扫码支付接口-沙箱环境开发测试
所有配置以及相关信息均可以从PC支付中获取 使用的生成二维码的组件名为QRCoder,该组件引用了一个第三方实现的System.Drawing类库,和支付宝官网类似 当面付SDK为Alipay.Aop ...
- Java微信公众平台开发之扫码支付模式一
官方文档点击查看准备工作:已通过微信认证的公众号,必须通过ICP备案域名(否则会报支付失败)借鉴了很多大神的文章,在此先谢过了大体过程:先扫码(还没有确定实际要支付的金额),这个码是商品的二维码,再生 ...
- Java之微信支付(扫码支付模式二)案例实战
摘要:最近的一个项目中涉及到了支付业务,其中用到了微信支付和支付宝支付,在做的过程中也遇到些问题,所以现在总结梳理一下,分享给有需要的人,也为自己以后回顾留个思路. 一:微信支付接入准备工作: 首先, ...
- 微信支付之扫码支付开发:我遇到的坑及解决办法(附:Ecshop 微信支付插件)
前段时间帮一个朋友的基于ecshop开发的商城加入微信扫描支付功能,本以为是很简单的事儿——下载官方sdk或开发帮助文档,按着里面的做就ok了,谁知折腾了两三天的时间才算搞定,中间也带着疑问在网上找了 ...
- php微信支付(仅pc端扫码支付模式二)详细步骤.----仅适合第一次做微信开发的程序员
本人最近做了微信支付开发,是第一次接触.其中走了很多弯路,遇到的问题也很多.为了让和我一样的新人不再遇到类似的问题,我把我的开发步骤和问题写出来,以供参考. 开发时间是2016/8/10,所以微信支付 ...
随机推荐
- python练习册 每天一个小程序 第0007题
1 # -*-coding:utf-8-*- 2 __author__ = 'Deen' 3 ''' 4 题目描述: 5 有个目录,里面是你自己写过的程序,统计一下你写过多少行代码.包括空行和注释,但 ...
- CF1504X Codeforces Round #712
CF1504D Flip the Cards(找规律+贪心) 题目大意:给你n张牌,正反面都有数字,保证所有牌上的数字在$[1,2n]$内且互不相同.你可以翻转任意张牌,接下来需要把牌按正面的数字从小 ...
- Spring事件监听机制源码解析
Spring事件监听器使用 1.Spring事件监听体系包括三个组件:事件.事件监听器,事件广播器. 事件:定义事件类型和事件源,需要继承ApplicationEvent. package com.y ...
- P2P图书馆实践:让知识更好的传播
人才是每个公司最重要的资产,而人的成长自然就成了最重要的事.苏轼曾经说过:"腹有诗书气自华,代码万行零缺陷",阅读对人成长的影响是巨大的.相信不同的团队都有着自己打造学习氛围.技术 ...
- vector存放边的方法
#include<bits/stdc++.h> using namespace std; struct Edge{ int x; int y; }; vector <Edge> ...
- idea 下 Vue
一.需要了解的基本知识 node.js Node.js是一个Javascript运行环境(runtime),发布于2009年5月,由Ryan Dahl开发,实质是对Chrome V8引擎进行了封装.N ...
- struts2学习一:hello struts2及struts2环境配置中遇到的问题
17年下半年的时候简单学了下strus2,好吧,现在已经全忘了,idea也是刚开始用,本来想按教程写个hello struts2,结果,出了以下系列问题. pre:step1-5是我按照百度的教程搭的 ...
- mq 的缺点?
(1)系统可用性降低 系统引入的外部依赖越多,越容易挂掉,本来你就是 A 系统调用 BCD 三个系统的接口就好了,人 ABCD 四个系统好好的,没啥问题,你偏加个 MQ 进来,万一MQ 挂了咋整?MQ ...
- jQuery对象的创建
1.js类库 JavaScript封装了很多的预定义的对象和实用函数,能帮助使用者建立有高难度交互 客户端页面,并且兼容各大浏览器.跑在浏览器,请求服务器 当前比较流行的js库: jquery EXT ...
- docker-compose配置django web项目容器和EMQX容器
1.Dockerfile FROM gatewayserver_null:v1.1 ADD ./GatewayServer /code ADD ./entrypoint.sh /code# 给entr ...
