【分布式锁】07-Zookeeper实现分布式锁:Semaphore、读写锁实现原理
前言
前面已经讲解了Zookeeper可重入锁的实现原理,自己对分布式锁也有了更深的认知。
我在公众号中发了一个疑问,相比于Redis来说,Zookeeper的实现方式要更好一些,即便Redis作者实现了RedLock算法来解决Redis集群模式下分布式锁的弊端,但Redis实现的分布式锁仍然不是那么完美。
比如有5台Redis集群,按照n/2 + 1代表获取锁成功,如果客户端A此时获取锁,Redis集群(1,2,3)返回成功,客户端A获取锁成功。
此时Redis 1 master宕机,切换到slave,而slave并未来得及同步客户端A加锁成功的信息到slave。
客户端B获取锁,Redis集群(1,4,5)返回成功,客户端B仍然可以成功获取锁。
即使如此,为何在实际生产项目中分布式锁大多还是由Redis来完成?
这一点我仍然有些疑惑,我接触过的公司和项目都普遍用Redis来实现分布式锁。
这里就不再纠结了,接着继续学习Zookeeper剩下几个实现分布式锁的组件吧。
Semaphore实现原理
前面已经讲过Redisson中Semaphore的实现原理(【分布式锁】05-使用Redisson中Semaphore和CountDownLatch原理),现在学习下ZK中Semaphore是如何实现的
Semaphore 使用案例
使用示例很简单,Curator官网上有对应代码,使用InterProcessSemaphoreV2类即可,代码如下:
- /**
- * Zookeeper分布式锁测试代码
- *
- * @author wangmeng
- * @date 2020/03/30 18:59
- */
- public class Application {
- /** Zookeeper info */
- private static final String ZK_ADDRESS = "YourZkIP:2181";
- private static final String ZK_LOCK_PATH = "/locks/lock_01";
- private static final String ZK_SEMAPHORE_LOCK_PATH = "/semaphore/semaphore_01";
- public static void main(String[] args) throws InterruptedException {
- // 1.Connect to zk
- CuratorFramework client = CuratorFrameworkFactory.newClient(
- ZK_ADDRESS,
- new RetryNTimes(10, 5000)
- );
- client.start();
- System.out.println("zk client start successfully!");
- Thread t1 = new Thread(() -> {
- testSemaphore(client);
- }, "t1");
- Thread t2 = new Thread(() -> {
- testSemaphore(client);
- }, "t2");
- Thread t3 = new Thread(() -> {
- testSemaphore(client);
- }, "t3");
- t1.start();
- t2.start();
- t3.start();
- }
- /**
- * 测试Semaphore
- */
- private static void testSemaphore(CuratorFramework client) {
- InterProcessSemaphoreV2 semaphore = new InterProcessSemaphoreV2(client, ZK_SEMAPHORE_LOCK_PATH, 2);
- try {
- Lease lease = semaphore.acquire();
- System.out.println(Thread.currentThread().getName() + " hold lock");
- Thread.sleep(5000L);
- semaphore.returnLease(lease);
- System.out.println(Thread.currentThread().getName() + " release lock");
- } catch (Exception e) {
- e.printStackTrace();
- }
- }
- }
打印结果为:
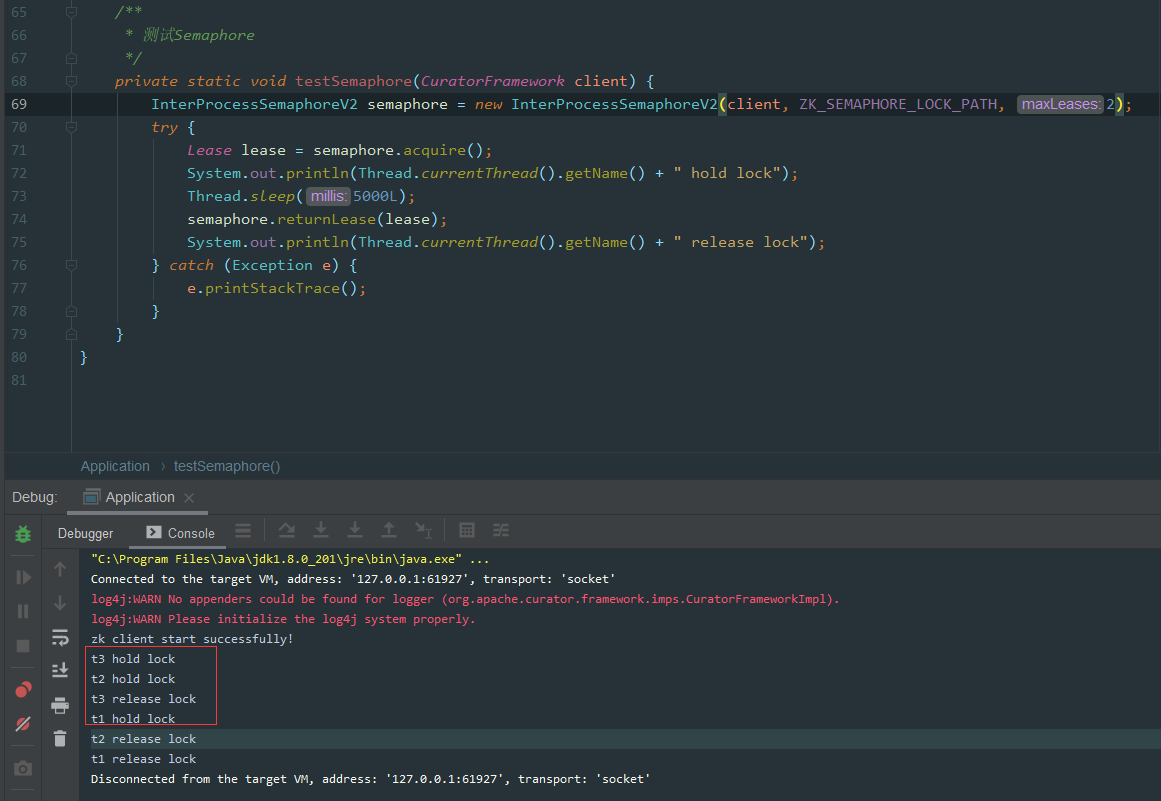 image.png
因为设置的只允许最多2个客户端同时获取锁。
从效果上看t3和t2同时获取到了锁,接着t3释放了锁后t1才获取锁。
Semaphore加锁源码解析
源码面前出真知,我们直接看下源码:
- public class InterProcessSemaphoreV2 {
- private static final String LOCK_PARENT = "locks";
- private static final String LEASE_PARENT = "leases";
- private static final String LEASE_BASE_NAME = "lease-";
- public Collection<Lease> acquire(int qty, long time, TimeUnit unit) throws Exception
- {
- long startMs = System.currentTimeMillis();
- boolean hasWait = (unit != null);
- long waitMs = hasWait ? TimeUnit.MILLISECONDS.convert(time, unit) : 0;
- Preconditions.checkArgument(qty > 0, "qty cannot be 0");
- ImmutableList.Builder<Lease> builder = ImmutableList.builder();
- boolean success = false;
- try
- {
- while ( qty-- > 0 )
- {
- int retryCount = 0;
- long startMillis = System.currentTimeMillis();
- boolean isDone = false;
- while ( !isDone )
- {
- switch ( internalAcquire1Lease(builder, startMs, hasWait, waitMs) )
- {
- case CONTINUE:
- {
- isDone = true;
- break;
- }
- // 省略其他分支逻辑
- }
- }
- }
- success = true;
- }
- finally
- {
- if ( !success )
- {
- returnAll(builder.build());
- }
- }
- return builder.build();
- }
- private InternalAcquireResult internalAcquire1Lease(ImmutableList.Builder<Lease> builder, long startMs, boolean hasWait, long waitMs) throws Exception
- {
- if ( client.getState() != CuratorFrameworkState.STARTED )
- {
- return InternalAcquireResult.RETURN_NULL;
- }
- if ( hasWait )
- {
- long thisWaitMs = getThisWaitMs(startMs, waitMs);
- if ( !lock.acquire(thisWaitMs, TimeUnit.MILLISECONDS) )
- {
- return InternalAcquireResult.RETURN_NULL;
- }
- }
- else
- {
- lock.acquire();
- }
- try
- {
- PathAndBytesable<String> createBuilder = client.create().creatingParentsIfNeeded().withProtection().withMode(CreateMode.EPHEMERAL_SEQUENTIAL);
- String path = (nodeData != null) ? createBuilder.forPath(ZKPaths.makePath(leasesPath, LEASE_BASE_NAME), nodeData) : createBuilder.forPath(ZKPaths.makePath(leasesPath, LEASE_BASE_NAME));
- String nodeName = ZKPaths.getNodeFromPath(path);
- builder.add(makeLease(path));
- synchronized(this)
- {
- for(;;)
- {
- List<String> children = client.getChildren().usingWatcher(watcher).forPath(leasesPath);
- if ( !children.contains(nodeName) )
- {
- log.error("Sequential path not found: " + path);
- return InternalAcquireResult.RETRY_DUE_TO_MISSING_NODE;
- }
- if ( children.size() <= maxLeases )
- {
- break;
- }
- if ( hasWait )
- {
- long thisWaitMs = getThisWaitMs(startMs, waitMs);
- if ( thisWaitMs <= 0 )
- {
- return InternalAcquireResult.RETURN_NULL;
- }
- wait(thisWaitMs);
- }
- else
- {
- wait();
- }
- }
- }
- }
- finally
- {
- lock.release();
- }
- return InternalAcquireResult.CONTINUE;
- }
- }
代码有点长,我们一点点分析,我们以客户端A、B、C同时进入获取锁逻辑来举例,这里Semaphore最大可允许2个客户端同时获取锁。
- 三个客户端同时进入switch逻辑,执行
internalAcquire1Lease()方法 - 在
internalAcquire1Lease()方法中,先使用lock.acquire()执行加锁逻辑,这个lock是我们上一章讲的可重入锁逻辑,不再赘述 - 这个
lock是哪里初始化的呢?在InterProcessSemaphoreV2构造函数中:lock = new InterProcessMutex(client, ZKPaths.makePath(path, LOCK_PARENT));this.maxLeases = (count != null) ? count.getCount() : maxLeases; - 注意lock的path为:
/semaphore/semaphore_01/locks, maxLeases为传入的3 - 此时客户端A、B、C执行
lock.acquire()只会有一个可以成功获取锁,其他两个客户端会wait()
到了这里,Zookeeper中就会有三条类似于:/semaphores/semaphore_01/locks/_c_a9302e20-de9c-4356-923a-274664d7676c-lock-0000000001 的数据
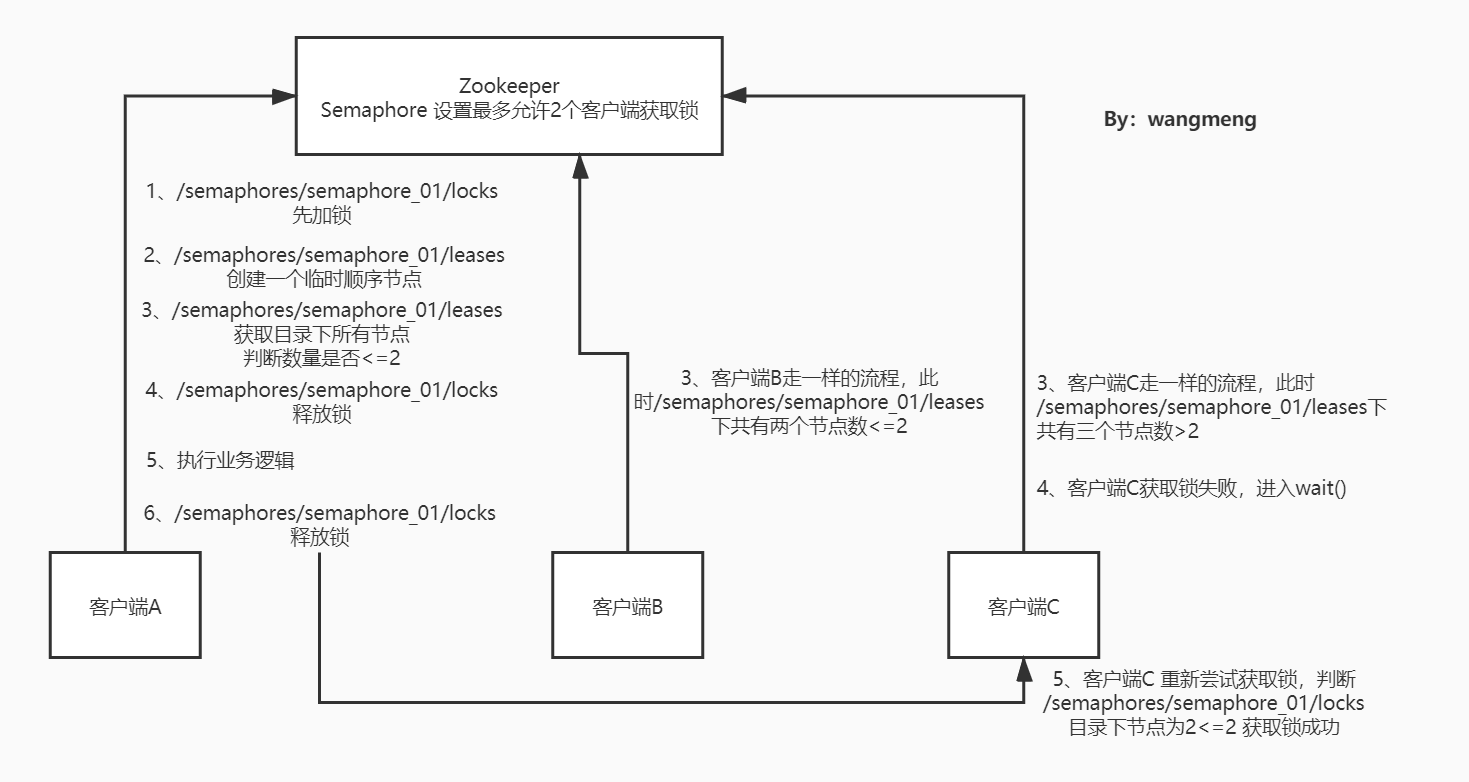
接着客户端A继续往下执行,具体逻辑如图:
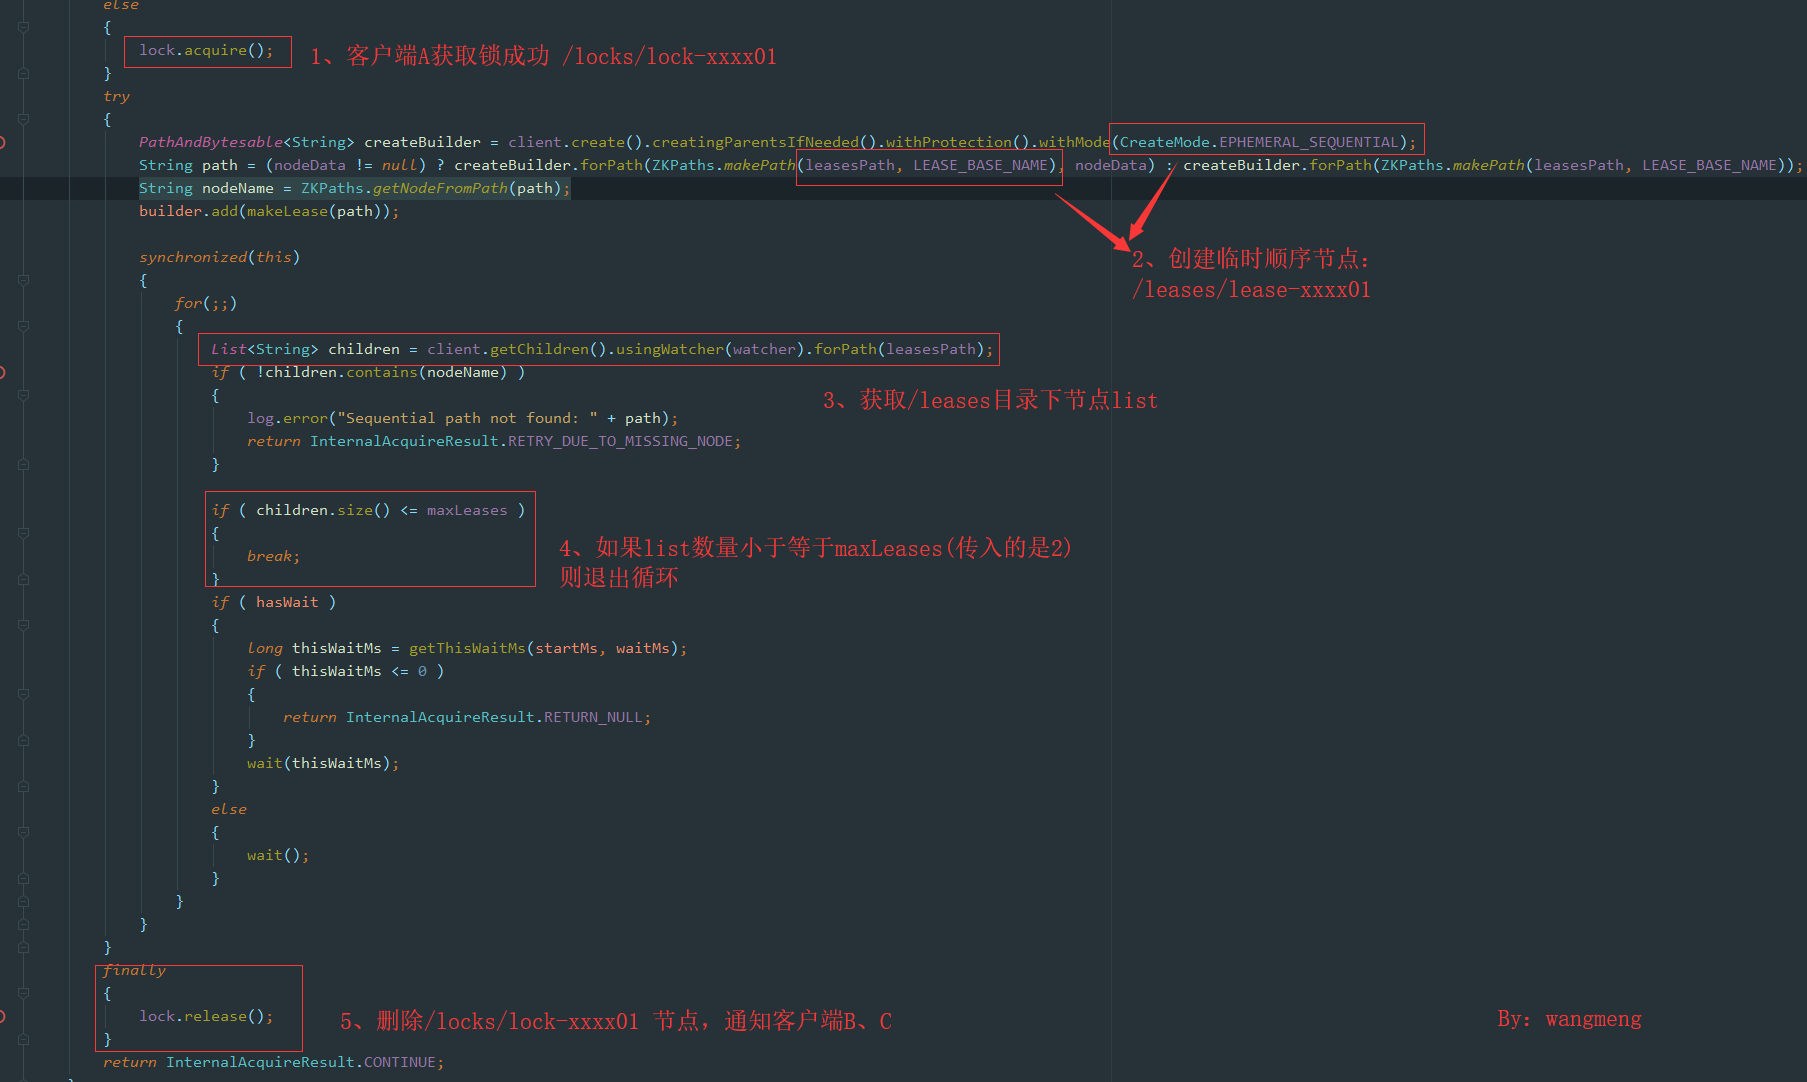
- 首先是客户端A创建一个/locks/lock-xxxx01节点,获取锁成功过
- 接着创建临时顺序节点/leases/lease-xxxx01
- 判断/leases目录下节点数量(数量为1)是否小于等于maxLeases(maxLeases=2)
- 如果成功则退出循环,释放/locks加的锁,返回
InternalAcquireResult.CONTINUE,状态,执行lock.release()通知客户端B、C争抢/locks节点下的锁 - 此时如果客户端B抢到锁,然后同样创建/leases/lease-xxxx02,
- 判断/leases目录下节点数量(数量为2)是否小于等于maxLeases(maxLeases=2)
- 客户端B也退出循环,返回
InternalAcquireResult.CONTINUE,接着客户端C来获取锁 - 客户端C执行时,判断/leases目录下节点数量(数量为3)是否小于等于maxLeases(maxLeases=2)
此时客户端C会进入到wait()方法,直到客户端A或者客户端B释放leases节点下锁时才会重试获取锁。
返回InternalAcquireResult.CONTINUE后,就标志获取锁成功。
Semaphore释放锁源码分析
我们直接看代码,释放锁代码很简单:
- /**
- * Convenience method. Closes the lease
- *
- * @param lease lease to close
- */
- public void returnLease(Lease lease)
- {
- Closeables.closeQuietly(lease);
- }
一路跟下去,可以看到closeQuietly实现方法:
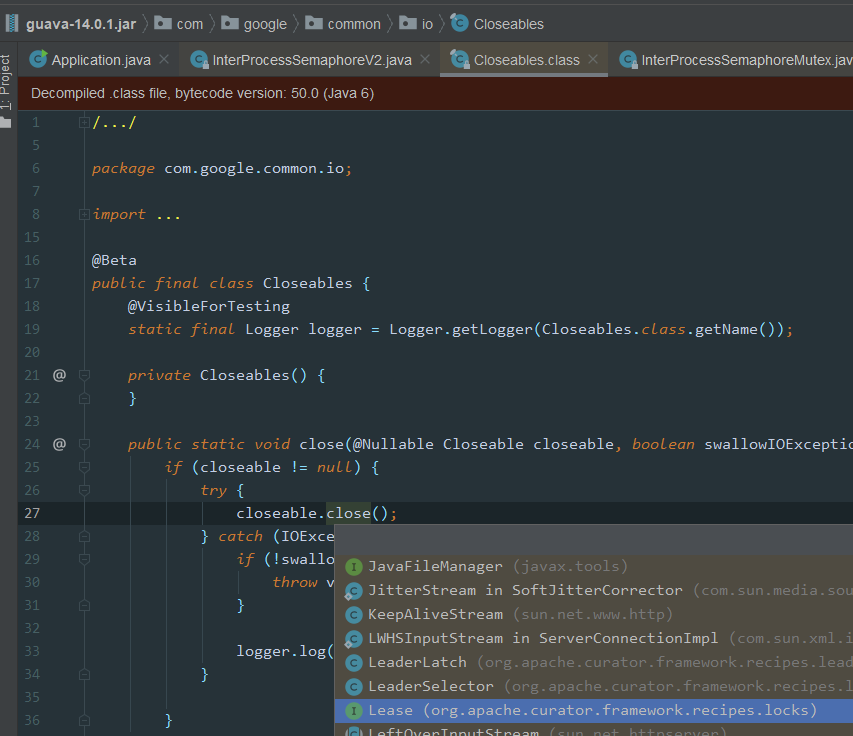 image.png
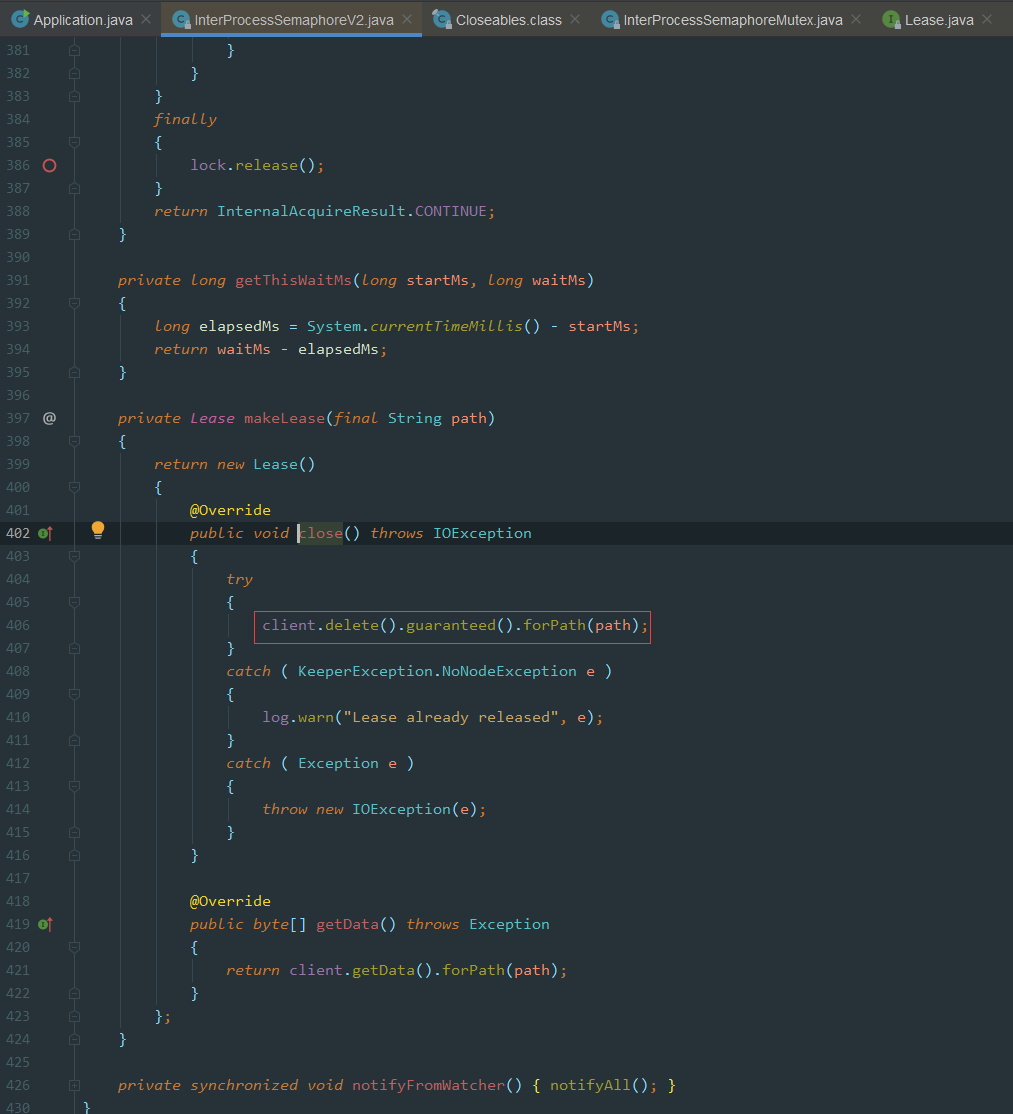
最后用到Lease中的close()方法,删除创建的/leases/lease-xxxx节点数据,然后通知其他节点客户端,使用notifyAll()
ZK-Semaphore总结
一张图总结下:
 05_Zookeeper中Semaphore实现原理 _1_.jpg
Zookeeper 非重入锁实现原理
之前听小伙伴说过一个面试题,请说出你所知道的非重入锁?
在脑子中搜索JDK中非重入锁?好像没有?
Zookeeper中提供了一个非重入锁的实现方式,实现原理使用Semaphore,最大允许1个客户端获取锁
按理说JDK中的Semaphore也可以实现此功能,哈哈,感觉自己被忽悠了,接着还是勉为其难的看下ZK中"非重入锁"的实现方式吧:
使用示例
- /**
- * 测试非重入锁
- */
- private static void testSemaphoreMutex(CuratorFramework client) {
- InterProcessSemaphoreMutex semaphoreMutex = new InterProcessSemaphoreMutex(client, ZK_SEMAPHORE_LOCK_PATH);
- try {
- semaphoreMutex.acquire();
- Thread.sleep(5000L);
- semaphoreMutex.release();
- } catch (Exception e) {
- e.printStackTrace();
- }
- }
源码分析
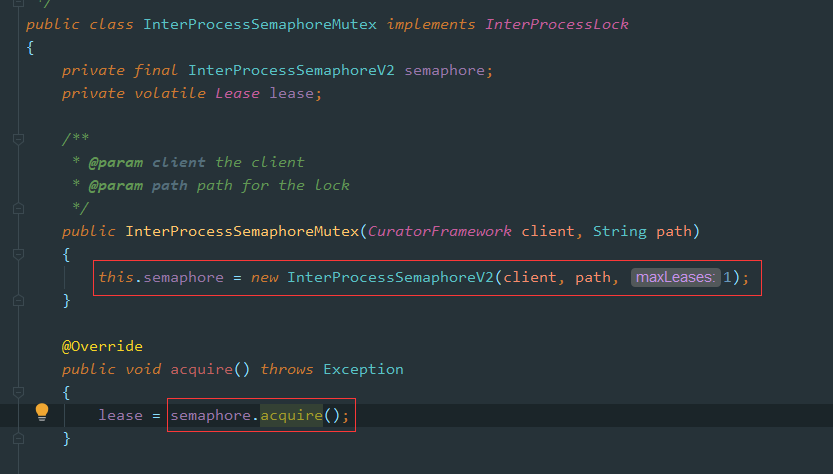 image.png
实际上就是设置maxLeases为1,原理同上面的Semaphore源码分析
Zookeeper读写锁原理
之前在Redisson中已经见过它对读写锁的实现,分别举例了读读、写写、读写、写读这几种场景锁的互斥性以及可重入性,这里也采用类似的场景分析。
读写锁使用案例
直接看案例,可以针对案例修改几种场景进行测试:
- /**
- * @author wangmeng
- * @date 2020/03/30 18:59
- */
- public class Application {
- /** Zookeeper info */
- private static final String ZK_ADDRESS = "yourZkIP:2181";
- private static final String ZK_LOCK_PATH = "/locks/lock_01";
- private static final String ZK_SEMAPHORE_LOCK_PATH = "/semaphore/semaphore_01";
- private static final String ZK_READ_WRITE_LOCK_PATH = "/readwrite/readwrite_01";
- public static void main(String[] args) throws InterruptedException {
- // 1.Connect to zk
- CuratorFramework client = CuratorFrameworkFactory.newClient(
- ZK_ADDRESS,
- new RetryNTimes(10, 5000)
- );
- client.start();
- System.out.println("zk client start successfully!");
- Thread t1 = new Thread(() -> {
- testReadWriteLock(client);
- }, "t1");
- Thread t2 = new Thread(() -> {
- testReadWriteLock(client);
- }, "t2");
- t1.start();
- t2.start();
- }
- /**
- * 测试读写锁
- */
- private static void testReadWriteLock(CuratorFramework client) {
- InterProcessReadWriteLock readWriteLock = new InterProcessReadWriteLock(client, ZK_READ_WRITE_LOCK_PATH);
- try {
- // 获取读锁
- InterProcessMutex readLock = readWriteLock.readLock();
- readLock.acquire();
- System.out.println(Thread.currentThread().getName() + " hold read lock");
- Thread.sleep(5000);
- readLock.release();
- System.out.println(Thread.currentThread().getName() + " release read lock");
- // 获取写锁
- InterProcessMutex writeLock = readWriteLock.writeLock();
- writeLock.acquire();
- System.out.println(Thread.currentThread().getName() + " hold write lock");
- Thread.sleep(5000);
- writeLock.release();
- System.out.println(Thread.currentThread().getName() + " release write lock");
- } catch (Exception e) {
- e.printStackTrace();
- }
- }
- }
运行后结果:
 image.png
从结果可以看出来: 读读不互斥、 写写互斥
读写锁源码解析
首先看下InterProcessReadWrite的构造函数:
- public class InterProcessReadWriteLock {
- public InterProcessReadWriteLock(CuratorFramework client, String basePath)
- {
- writeMutex = new InternalInterProcessMutex
- (
- client,
- basePath,
- WRITE_LOCK_NAME,
- 1,
- new SortingLockInternalsDriver()
- {
- @Override
- public PredicateResults getsTheLock(CuratorFramework client, List<String> children, String sequenceNodeName, int maxLeases) throws Exception
- {
- return super.getsTheLock(client, children, sequenceNodeName, maxLeases);
- }
- }
- );
- readMutex = new InternalInterProcessMutex
- (
- client,
- basePath,
- READ_LOCK_NAME,
- Integer.MAX_VALUE,
- new SortingLockInternalsDriver()
- {
- @Override
- public PredicateResults getsTheLock(CuratorFramework client, List<String> children, String sequenceNodeName, int maxLeases) throws Exception
- {
- return readLockPredicate(children, sequenceNodeName);
- }
- }
- );
- }
- }
因为ZK中的读写锁底层也是基于第一讲中InterProcessMutex.internalLock()去实现的,所以InterProcessReadWriteLock读锁和写锁分别初始化了maxLeases及重写了getsTheLock()方法,这个方法是判断是否可以获取锁的核心代码,类似于:
- int ourIndex = children.indexOf(sequenceNodeName);
- boolean getsTheLock = ourIndex < maxLeases;
不清楚的可以回头看看:【分布式锁】06-Zookeeper实现分布式锁:可重入锁源码分析
另外写锁和读锁的path会有区别:
- private static final String READ_LOCK_NAME = "__READ__";
- private static final String WRITE_LOCK_NAME = "__WRIT__";
写锁的maxLeases是1,加了写锁就不允许再加其他读锁(但可重入加写锁和读锁)
读锁的maxLeases是Integer.MAX_VALUE,读读锁不互斥
读读互斥及重入
查看读锁中判断获取锁成功的核心逻辑:
- private PredicateResults readLockPredicate(List<String> children, String sequenceNodeName) throws Exception
- {
- // 如果当前线程获取写锁,那么直接返回true,获取读锁成功
- if ( writeMutex.isOwnedByCurrentThread() )
- {
- return new PredicateResults(null, true);
- }
- int index = 0;
- int firstWriteIndex = Integer.MAX_VALUE;
- int ourIndex = Integer.MAX_VALUE;
- for ( String node : children )
- {
- if ( node.contains(WRITE_LOCK_NAME) )
- {
- firstWriteIndex = Math.min(index, firstWriteIndex);
- }
- else if ( node.startsWith(sequenceNodeName) )
- {
- ourIndex = index;
- break;
- }
- ++index;
- }
- StandardLockInternalsDriver.validateOurIndex(sequenceNodeName, ourIndex);
- boolean getsTheLock = (ourIndex < firstWriteIndex);
- String pathToWatch = getsTheLock ? null : children.get(firstWriteIndex);
- return new PredicateResults(pathToWatch, getsTheLock);
- }
如果客户端A已经获取了读锁
此时客户端B再来获取读锁
- children:[xxx_READ_0001, xxxx_READ_0002],此时都是读锁,不包含WRITE锁标识
- sequenceNodeName就是node创建的节点名称,这里ourIndex=index0
- ourIndex<firstWriteIndex = Integer.MAX_VALUE 获取锁成功
执行debug流程如下图:
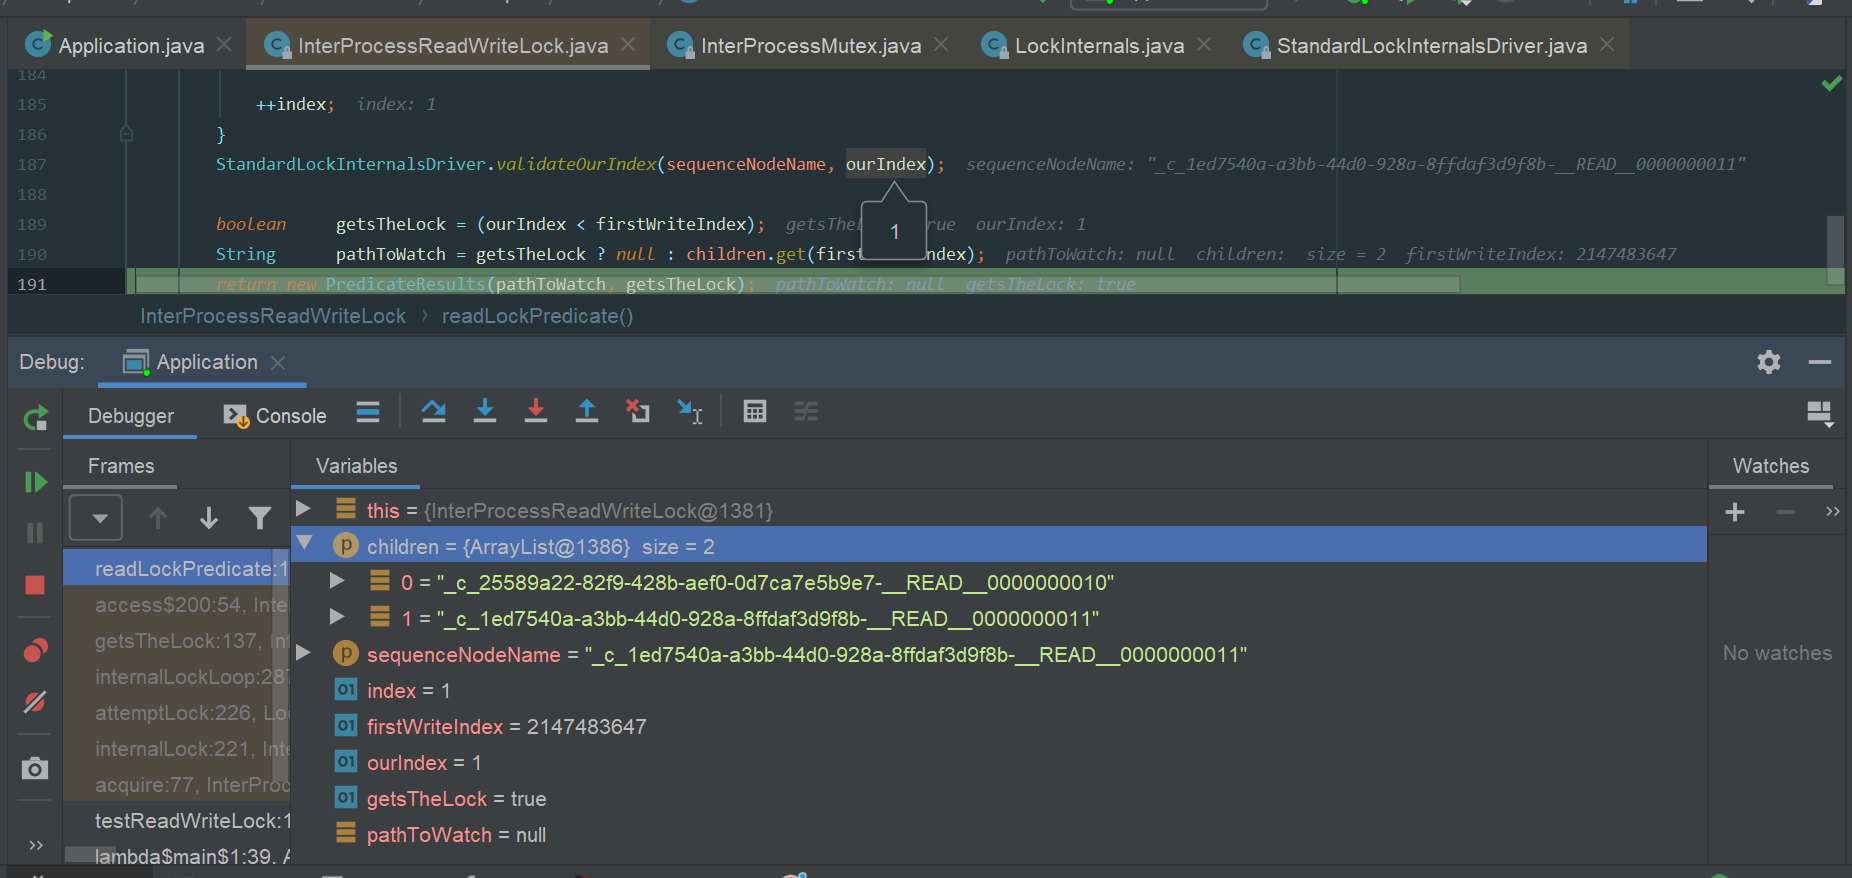 image.png
因为读读不互斥,所以这里读锁也是可重入的
写读互斥及重入
上面已经分析过读读的逻辑了,这里接着按照上面的代码分析下读写的逻辑:
客户端A加写锁成功
客户端B加读锁
node.contains(WRITE_LOCK_NAME),此时客户端B中含有WRITE标识- firstWriteIndex = Math.min(index, firstWriteIndex)=0
- boolean getsTheLock = (ourIndex < firstWriteIndex);
此时ourIndex = Integer.MAX_VALUE,判断条件不成立,所以加写锁失败
不同客户端写读锁互斥
接着看看同一个客户端逻辑:
- if ( writeMutex.isOwnedByCurrentThread() )
- {
- return new PredicateResults(null, true);
- }
如果当前线程获取了写锁,那么再加读写直接返回成功。
所以同一个客户端同一线程:先加写锁、再加读锁可重入,这一点和Redisson中是一致的,具体可以看:【分布式锁】04-使用Redisson实现ReadWriteLock原理
写写互斥及重入
写锁完全可以看做成InterProcessMutex,这里maxLeases为1,所以同一个线程写是可重入的,不同客户端获取锁时互斥的
读写互斥及重入
客户端A加读锁
客户端B加写锁
同样道理,此时children数据结构如:
[_c_13bf63d6-43f3-4c2f-ba98-07a641d351f2-__READ__0000000004,
_c_73b60882-9361-4fb7-8420-a8d4911d2c99-__WRIT__0000000005]
判断写锁在"/readwrite/readwrite_01"目录下的位置,不是在首位,加锁失败
可重入锁也是同样原理,不可重入
Zookeeper中MultiLock实现原理
我们在Redisson中已经见过MultiLock原理,其中Redissoon为了实现RedLock算法,也有MultiLock的实现(可以参考【分布式锁】03-使用Redisson实现RedLock原理)当多个资源需要统一加锁的时候,我们就可以使用MultiLock
Zookeeper中的MultiLock实现非常简单,就是依次加锁,实现如下图:
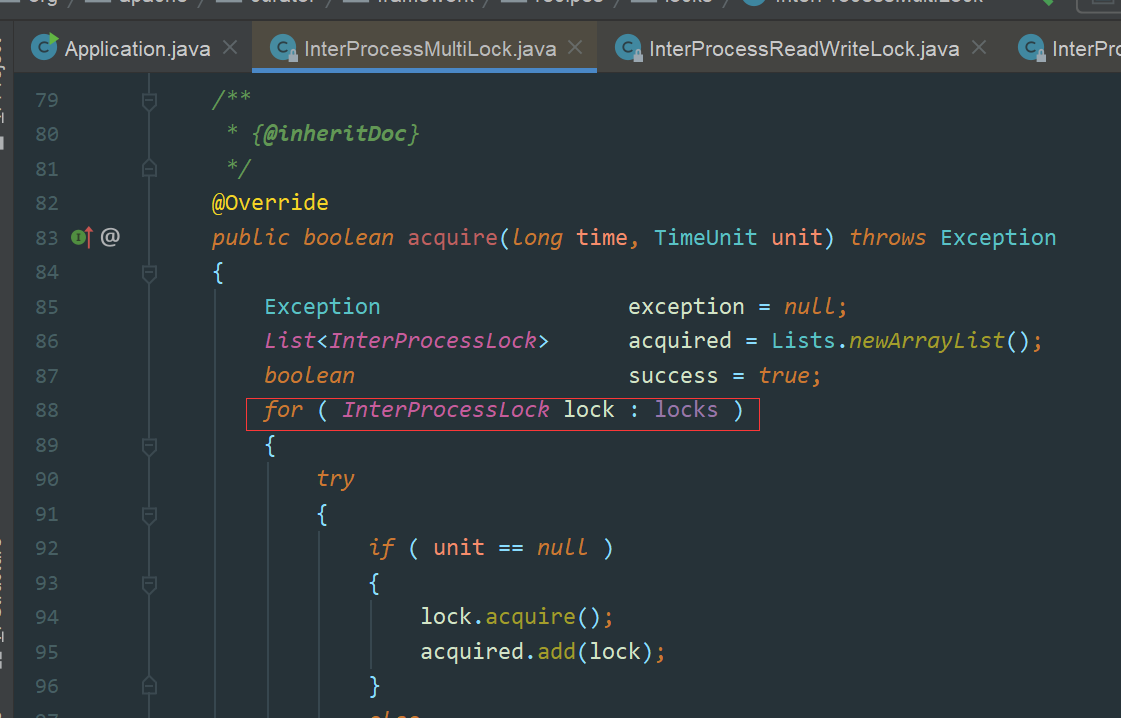 image.png
总结
Zookeeper实现分布式锁的相关原理全都讲完了,仔细阅读Curator源码觉得还挺有意思,再来会先Curator官网那句话:
Guava is to Java what Curator is to Zookeeper
Curator真的很强,分布式锁实现的很棒!
申明
本文章首发自本人公众号:壹枝花算不算浪漫,如若转载请标明来源!
感兴趣的小伙伴可关注个人公众号:壹枝花算不算浪漫

【分布式锁】07-Zookeeper实现分布式锁:Semaphore、读写锁实现原理的更多相关文章
- linux c 线程间同步(通信)的几种方法--互斥锁,条件变量,信号量,读写锁
Linux下提供了多种方式来处理线程同步,最常用的是互斥锁.条件变量.信号量和读写锁. 下面是思维导图: 一.互斥锁(mutex) 锁机制是同一时刻只允许一个线程执行一个关键部分的代码. 1 . ...
- 分布式服务框架 Zookeeper — 管理分布式环境中的数据
本节本来是要介绍ZooKeeper的实现原理,但是ZooKeeper的原理比较复杂,它涉及到了paxos算法.Zab协议.通信协议等相关知识,理解起来比较抽象所以还需要借助一些应用场景,来帮我们理解. ...
- JUC 并发编程--04 常用的辅助类CountDownLatch , CyclicBarrier , Semaphore , 读写锁 , 阻塞队列,CompletableFuture(异步回调)
CountDownLatch 相当于一个减法计数器, 构造方法指定一个数字,比如6, 一个线程执行一次,这个数字减1, 当变为0 的时候, await()方法,才开始往下执行,, 看这个例子 Cycl ...
- 分布式服务框架 Zookeeper -- 管理分布式环境中的数据
转自:http://www.ibm.com/developerworks/cn/opensource/os-cn-zookeeper/index.html Zookeeper 分布式服务框架是 Apa ...
- 分布式服务框架 Zookeeper -- 管理分布式环境中的数据(转载)
本文转载自:http://www.ibm.com/developerworks/cn/opensource/os-cn-zookeeper/ Zookeeper 分布式服务框架是 Apache Had ...
- 分布式服务框架 Zookeeper -- 管理分布式环境中的数据--转载
原文:http://www.ibm.com/developerworks/cn/opensource/os-cn-zookeeper/ Zookeeper 分布式服务框架是 Apache Hadoop ...
- 【Zookeeper】分布式服务框架 Zookeeper -- 管理分布式环境中的数据
Zookeeper 分布式服务框架是 Apache Hadoop 的一个子项目,它主要是用来解决分布式应用中经常遇到的一些数据管理问题,如:统一命名服务.状态同步服务.集群管理.分布式应用配置项的管理 ...
- 【转】分布式服务框架 Zookeeper -- 管理分布式环境中的数据
Zookeeper 分布式服务框架是 Apache Hadoop 的一个子项目,它主要是用来解决分布式应用中经常遇到的一些数据管理问题,如:统一命名服务.状态同步服务.集群管理.分布式应用配置项的管理 ...
- 【Hadoop 分布式部署 九:分布式协作框架Zookeeper架构 分布式安装部署 】
1.首先将运行在本地上的 zookeeper 给停止掉 2.到/opt/softwares 目录下 将 zookeeper解压到 /opt/app 目录下 命令: tar -zxvf zoo ...
随机推荐
- XX系统测试总结报告
XX系统测试总结报告 1 引言 1.1 编写目的 编写该测试总结报告主要有以下几个目的 1. 通过对测试结果的分析,得到对软件质量的评价 2. 分析测试的过程,产品,资源,信息, ...
- 7——PHP选择结构
*/ * Copyright (c) 2016,烟台大学计算机与控制工程学院 * All rights reserved. * 文件名:text.cpp * 作者:常轩 * 微信公众号:Worldhe ...
- cooking和session
## Cookie ## # 基本概念: >> 用于保存一次会话中的记录,存放在客户端(浏览器); |-- "一次会话" |-- 当客户端打开一个界面时 被称作一次会话 ...
- kafka知识整理
title: kafka知识整理 date: 2019-06-18 10:59:46 categories: MQ tags: kafka --- 转载自:https://www.cnblogs.co ...
- Cisco模拟器的基本使用
获取帮助查找命令 只需输入一个'?'便可得到详细的帮助信息,如果想获取c开头的命名,那么直接输入'c?'即可. 在各个模式下切换的方法 给如图所示路由器接口配置IP地址 第一步:安装HWIC-2T(串 ...
- 使用移动自适应布局+easy mock实现移动界面的简单实现
一.使用easy mock模拟数据 easy mock链接地址 二.自己写移动自适应布局 自己编写主要是利用rem进行宽度栅格布局: html { /* 相当于一个界面适配器,pc以及移动端都可以进行 ...
- 那些年,我的前端/Java后端书单
全文为这些年,我曾阅读.深入理解过(或正在阅读学习.即将阅读)的一些优秀经典前端/Java后端书籍.全文为纯原创,且将持续更新,未经许可,不得进行转载.当然,如果您喜欢这篇文章,可以动手点点赞或者收藏 ...
- JZOJ 5235. 【NOIP2017模拟8.7A组】好的排列
5235. [NOIP2017模拟8.7A组]好的排列 (File IO): input:permutation.in output:permutation.out Time Limits: 1000 ...
- 关于Java序列化的问题你真的会吗?
引言 在持久化数据对象的时候我们很少使用Java序列化,而是使用数据库等方式来实现.但是在我看来,Java 序列化是一个很重要的内容,序列化不仅可以保存对象到磁盘进行持久化,还可以通过网络传输.在平时 ...
- Feign 客户端的使用 二
一.Feign的使用(客户端调用 json/xml格式的接口) 1.服务端接口编写 <parent> <groupId>org.springframework.boot< ...