@Configuration的使用 和作用(转)
从Spring3.0,@Configuration用于定义配置类,可替换xml配置文件,被注解的类内部包含有一个或多个被@Bean注解的方法,这些方法将会被AnnotationConfigApplicationContext或AnnotationConfigWebApplicationContext类进行扫描,并用于构建bean定义,初始化Spring容器。
注意:@Configuration注解的配置类有如下要求:
- @Configuration不可以是final类型;
- @Configuration不可以是匿名类;
- 嵌套的configuration必须是静态类。
一、用@Configuration加载spring
1.1、@Configuration配置spring并启动spring容器
1.2、@Configuration启动容器+@Bean注册Bean
1.3、@Configuration启动容器+@Component注册Bean
1.4、使用 AnnotationConfigApplicationContext 注册 AppContext 类的两种方法
1.5、配置Web应用程序(web.xml中配置AnnotationConfigApplicationContext)
二、组合多个配置类
2.1、在@configuration中引入spring的xml配置文件
2.2、在@configuration中引入其它注解配置
2.3、@configuration嵌套(嵌套的Configuration必须是静态类)
三、@EnableXXX注解
四、@Profile逻辑组配置
五、使用外部变量
一、@Configuation加载Spring方法
1.1、@Configuration配置spring并启动spring容器
@Configuration标注在类上,相当于把该类作为spring的xml配置文件中的<beans>,作用为:配置spring容器(应用上下文)

package com.dxz.demo.configuration;

import org.springframework.context.annotation.Configuration;

@Configuration

public class TestConfiguration {

    public TestConfiguration() {

        System.out.println("TestConfiguration容器启动初始化。。。");

    }

}
相当于:
<?xml version="1.0" encoding="UTF-8"?>

<beans xmlns="http://www.springframework.org/schema/beans" xmlns:xsi="http://www.w3.org/2001/XMLSchema-instance"

    xmlns:context="http://www.springframework.org/schema/context" xmlns:jdbc="http://www.springframework.org/schema/jdbc"

    xmlns:jee="http://www.springframework.org/schema/jee" xmlns:tx="http://www.springframework.org/schema/tx"

    xmlns:util="http://www.springframework.org/schema/util" xmlns:task="http://www.springframework.org/schema/task" xsi:schemaLocation="

        http://www.springframework.org/schema/beans http://www.springframework.org/schema/beans/spring-beans-4.0.xsd

        http://www.springframework.org/schema/context http://www.springframework.org/schema/context/spring-context-4.0.xsd

        http://www.springframework.org/schema/jdbc http://www.springframework.org/schema/jdbc/spring-jdbc-4.0.xsd

        http://www.springframework.org/schema/jee http://www.springframework.org/schema/jee/spring-jee-4.0.xsd

        http://www.springframework.org/schema/tx http://www.springframework.org/schema/tx/spring-tx-4.0.xsd

        http://www.springframework.org/schema/util http://www.springframework.org/schema/util/spring-util-4.0.xsd

        http://www.springframework.org/schema/task http://www.springframework.org/schema/task/spring-task-4.0.xsd" default-lazy-init="false">

</beans>
主方法进行测试:
package com.dxz.demo.configuration;

import org.springframework.context.ApplicationContext;

import org.springframework.context.annotation.AnnotationConfigApplicationContext;

public class TestMain {

    public static void main(String[] args) {

        // @Configuration注解的spring容器加载方式,用AnnotationConfigApplicationContext替换ClassPathXmlApplicationContext

        ApplicationContext context = new AnnotationConfigApplicationContext(TestConfiguration.class);

        // 如果加载spring-context.xml文件:

        // ApplicationContext context = new

        // ClassPathXmlApplicationContext("spring-context.xml");

    }

}
从运行主方法结果可以看出,spring容器已经启动了:

1.2、@Configuration启动容器+@Bean注册Bean,@Bean下管理bean的生命周期
@Bean标注在方法上(返回某个实例的方法),等价于spring的xml配置文件中的<bean>,作用为:注册bean对象
bean类:
package com.dxz.demo.configuration;

public class TestBean {

    private String username;

    private String url;

    private String password;

    public void sayHello() {

        System.out.println("TestBean sayHello...");

    }

    public String toString() {

        return "username:" + this.username + ",url:" + this.url + ",password:" + this.password;

    }

    public void start() {

        System.out.println("TestBean 初始化。。。");

    }

    public void cleanUp() {

        System.out.println("TestBean 销毁。。。");

    }

}
配置类:
package com.dxz.demo.configuration;

import org.springframework.context.annotation.Bean;

import org.springframework.context.annotation.Configuration;

import org.springframework.context.annotation.Scope;

@Configuration

public class TestConfiguration {

    public TestConfiguration() {

        System.out.println("TestConfiguration容器启动初始化。。。");

    }

    // @Bean注解注册bean,同时可以指定初始化和销毁方法

    // @Bean(name="testBean",initMethod="start",destroyMethod="cleanUp")

    @Bean

    @Scope("prototype")

    public TestBean testBean() {

        return new TestBean();

    }

}
主方法测试类:
package com.dxz.demo.configuration;

import org.springframework.context.ApplicationContext;

import org.springframework.context.annotation.AnnotationConfigApplicationContext;

public class TestMain {

    public static void main(String[] args) {

        // @Configuration注解的spring容器加载方式,用AnnotationConfigApplicationContext替换ClassPathXmlApplicationContext

        ApplicationContext context = new AnnotationConfigApplicationContext(TestConfiguration.class);

        // 如果加载spring-context.xml文件:

        // ApplicationContext context = new

        // ClassPathXmlApplicationContext("spring-context.xml");

         //获取bean

        TestBean tb = (TestBean) context.getBean("testBean");

        tb.sayHello();

    }

}
结果:

注:
(1)、@Bean注解在返回实例的方法上,如果未通过@Bean指定bean的名称,则默认与标注的方法名相同;
(2)、@Bean注解默认作用域为单例singleton作用域,可通过@Scope(“prototype”)设置为原型作用域;
(3)、既然@Bean的作用是注册bean对象,那么完全可以使用@Component、@Controller、@Service、@Ripository等注解注册bean,当然需要配置@ComponentScan注解进行自动扫描。
@Bean下管理bean的生命周期
可以使用基于 Java 的配置来管理 bean 的生命周期。@Bean 支持两种属性,即 initMethod 和destroyMethod,这些属性可用于定义生命周期方法。在实例化 bean 或即将销毁它时,容器便可调用生命周期方法。生命周期方法也称为回调方法,因为它将由容器调用。使用 @Bean 注释注册的 bean 也支持 JSR-250 规定的标准 @PostConstruct 和 @PreDestroy 注释。如果您正在使用 XML 方法来定义 bean,那么就应该使用 bean 元素来定义生命周期回调方法。以下代码显示了在 XML 配置中通常使用 bean 元素定义回调的方法。
@Configuration

@ComponentScan(basePackages = "com.dxz.demo.configuration")

public class TestConfiguration {

    public TestConfiguration() {

        System.out.println("TestConfiguration容器启动初始化。。。");

    }

    //@Bean注解注册bean,同时可以指定初始化和销毁方法

    @Bean(name="testBean",initMethod="start",destroyMethod="cleanUp")

    @Scope("prototype")

    public TestBean testBean() {

        return new TestBean();

    }

}
启动类:
public class TestMain {

    public static void main(String[] args) {

        ApplicationContext context = new AnnotationConfigApplicationContext(TestConfiguration.class);

        TestBean tb = (TestBean) context.getBean("testBean");

        tb.sayHello();

        System.out.println(tb);

        TestBean tb2 = (TestBean) context.getBean("testBean");

        tb2.sayHello();

        System.out.println(tb2);

    }

}
结果:

分析:
结果中的1:表明initMethod生效
结果中的2:表明@Scope(“prototype”)生效
1.3、@Configuration启动容器+@Component注册Bean
bean类:
package com.dxz.demo.configuration;

import org.springframework.stereotype.Component;

//添加注册bean的注解

@Component

public class TestBean {

    private String username;

    private String url;

    private String password;

    public void sayHello() {

        System.out.println("TestBean sayHello...");

    }

    public String toString() {

        return "username:" + this.username + ",url:" + this.url + ",password:" + this.password;

    }

    public void start() {

        System.out.println("TestBean 初始化。。。");

    }

    public void cleanUp() {

        System.out.println("TestBean 销毁。。。");

    }

}
配置类:
package com.dxz.demo.configuration;

import org.springframework.context.annotation.Bean;

import org.springframework.context.annotation.ComponentScan;

import org.springframework.context.annotation.Configuration;

import org.springframework.context.annotation.Scope;

@Configuration

//添加自动扫描注解,basePackages为TestBean包路径

@ComponentScan(basePackages = "com.dxz.demo.configuration")

public class TestConfiguration {

    public TestConfiguration() {

        System.out.println("TestConfiguration容器启动初始化。。。");

    }

    /*// @Bean注解注册bean,同时可以指定初始化和销毁方法

    // @Bean(name="testNean",initMethod="start",destroyMethod="cleanUp")

    @Bean

    @Scope("prototype")

    public TestBean testBean() {

        return new TestBean();

    }*/

}
主方法测试获取bean对象:
package com.dxz.demo.configuration;

import org.springframework.context.ApplicationContext;

import org.springframework.context.annotation.AnnotationConfigApplicationContext;

public class TestMain {

    public static void main(String[] args) {

        // @Configuration注解的spring容器加载方式,用AnnotationConfigApplicationContext替换ClassPathXmlApplicationContext

        ApplicationContext context = new AnnotationConfigApplicationContext(TestConfiguration.class);

        // 如果加载spring-context.xml文件:

        // ApplicationContext context = new

        // ClassPathXmlApplicationContext("spring-context.xml");

         //获取bean

        TestBean tb = (TestBean) context.getBean("testBean");

        tb.sayHello();

    }

}
sayHello()方法都被正常调用。

1.4、使用 AnnotationConfigApplicationContext 注册 AppContext 类的两种方法
1.4.1、 配置类的注册方式是将其传递给 AnnotationConfigApplicationContext 构造函数
public static void main(String[] args) {

        // @Configuration注解的spring容器加载方式,用AnnotationConfigApplicationContext替换ClassPathXmlApplicationContext

        ApplicationContext context = new AnnotationConfigApplicationContext(TestConfiguration.class);

        //获取bean

        TestBean tb = (TestBean) context.getBean("testBean");

        tb.sayHello();

    }
1.4.2、 AnnotationConfigApplicationContext 的register 方法传入配置类来注册配置类
public static void main(String[] args) {

  ApplicationContext ctx = new AnnotationConfigApplicationContext();

  ctx.register(AppContext.class)

}
1.5、配置Web应用程序(web.xml中配置AnnotationConfigApplicationContext)
过去,您通常要利用 XmlWebApplicationContext 上下文来配置 Spring Web 应用程序,即在 Web 部署描述符文件 web.xml 中指定外部 XML 上下文文件的路径。XMLWebApplicationContext 是 Web 应用程序使用的默认上下文类。以下代码描述了 web.xml 中指向将由 ContextLoaderListener 监听器类载入的外部 XML 上下文文件的元素。
<web-app>

    <context-param>

        <param-name>contextConfigLocation</param-name>

        <param-value>/WEB-INF/applicationContext.xml</param-value>

    </context-param>

    <listener>

        <listener-class>

            org.springframework.web.context.ContextLoaderListener

        </listener-class>

    </listener>

    <servlet>

    <servlet-name>sampleServlet</servlet-name>

    <servlet-class>

        org.springframework.web.servlet.DispatcherServlet

    </servlet-class>

    </servlet>

...

</web-app>
现在,您要将 web.xml 中的上述代码更改为使用 AnnotationConfigApplicationContext 类。切记,XmlWebApplicationContext 是 Spring 为 Web 应用程序使用的默认上下文实现,因此您永远不必在您的web.xml 文件中显式指定这个上下文类。现在,您将使用基于 Java 的配置,因此在配置 Web 应用程序时,需要在web.xml 文件中指定 AnnotationConfigApplicationContext 类。上述代码将修改如下:
<web-app>

    <context-param>

        <param-name>contextClass</param-name>

        <param-value>

            org.springframework.web.context.

            support.AnnotationConfigWebApplicationContext

        </param-value>

    </context-param>

    <context-param>

        <param-name>contextConfigLocation</param-name>

        <param-value>

            demo.AppContext

        </param-value>

    </context-param>

    <listener>

        <listener-class>

            org.springframework.web.context.ContextLoaderListener

        </listener-class>

    </listener>

    <servlet>

    <servlet-name>sampleServlet</servlet-name>

    <servlet-class>

        org.springframework.web.servlet.DispatcherServlet

    </servlet-class>

    <init-param>

        <param-name>contextClass</param-name>

        <param-value>

            org.springframework.web.context.

            support.AnnotationConfigWebApplicationContext

        </param-value>

    </init-param>

    </servlet>

...

</web-app>
以上修改后的 web.xml 现在定义了 AnnotationConfigWebApplicationContext 上下文类,并将其作为上下文参数和 servlet 元素的一部分。上下文配置位置现在指向 AppContext 配置类。这非常简单。下一节将演示 bean 的生命周期回调和范围的实现。
1.6、@Configuation总结
@Configuation等价于<Beans></Beans>
@Bean等价于<Bean></Bean>
@ComponentScan等价于<context:component-scan base-package=”com.dxz.demo”/>
二、组合多个配置类
2.1、在@configuration中引入spring的xml配置文件
package com.dxz.demo.configuration2;

import org.springframework.context.annotation.Configuration;

import org.springframework.context.annotation.ImportResource;

@Configuration

@ImportResource("classpath:applicationContext-configuration.xml")

public class WebConfig {

}
bean类:
package com.dxz.demo.configuration2;

public class TestBean2 {

    private String username;

    private String url;

    private String password;

    public void sayHello() {

        System.out.println("TestBean2 sayHello...");

    }

    public String toString() {

        return "TestBean2 username:" + this.username + ",url:" + this.url + ",password:" + this.password;

    }

    public void start() {

        System.out.println("TestBean2 初始化。。。");

    }

    public void cleanUp() {

        System.out.println("TestBean2 销毁。。。");

    }

}
测试类:
package com.dxz.demo.configuration2;

import org.springframework.context.ApplicationContext;

import org.springframework.context.annotation.AnnotationConfigApplicationContext;

public class TestMain2 {

    public static void main(String[] args) {

        // @Configuration注解的spring容器加载方式,用AnnotationConfigApplicationContext替换ClassPathXmlApplicationContext

        ApplicationContext context = new AnnotationConfigApplicationContext(WebConfig.class);

        // 如果加载spring-context.xml文件:

        // ApplicationContext context = new

        // ClassPathXmlApplicationContext("spring-context.xml");

        // 获取bean

        TestBean2 tb = (TestBean2) context.getBean("testBean2");

        tb.sayHello();

    }

}
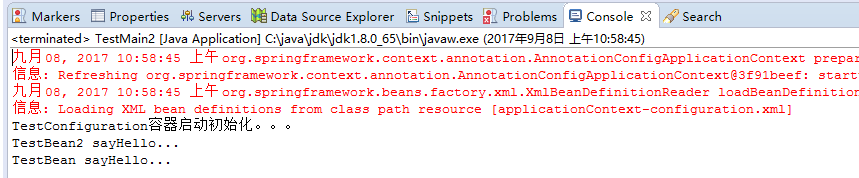
结果:

2.2、在@configuration中引入其它注解配置
package com.dxz.demo.configuration2;

import org.springframework.context.annotation.Configuration;

import org.springframework.context.annotation.Import;

import org.springframework.context.annotation.ImportResource;

import com.dxz.demo.configuration.TestConfiguration;

@Configuration

@ImportResource("classpath:applicationContext-configuration.xml")

@Import(TestConfiguration.class)

public class WebConfig {

}
测试类:
package com.dxz.demo.configuration2;

import org.springframework.context.ApplicationContext;

import org.springframework.context.annotation.AnnotationConfigApplicationContext;

import com.dxz.demo.configuration.TestBean;

public class TestMain2 {

    public static void main(String[] args) {

        // @Configuration注解的spring容器加载方式,用AnnotationConfigApplicationContext替换ClassPathXmlApplicationContext

        ApplicationContext context = new AnnotationConfigApplicationContext(WebConfig.class);

        // 如果加载spring-context.xml文件:

        // ApplicationContext context = new

        // ClassPathXmlApplicationContext("spring-context.xml");

        // 获取bean

        TestBean2 tb2 = (TestBean2) context.getBean("testBean2");

        tb2.sayHello();

        TestBean tb = (TestBean) context.getBean("testBean");

        tb.sayHello();

    }

}
结果:
2.3、@configuration嵌套(嵌套的Configuration必须是静态类)
通过配置类嵌套的配置类,达到组合多个配置类的目的。但注意内部类必须是静态类。
上代码:
package com.dxz.demo.configuration3;

import org.springframework.stereotype.Component;

@Component

public class TestBean {

    private String username;

    private String url;

    private String password;

    public void sayHello() {

        System.out.println("TestBean sayHello...");

    }

    public String toString() {

        return "username:" + this.username + ",url:" + this.url + ",password:" + this.password;

    }

    public void start() {

        System.out.println("TestBean start");

    }

    public void cleanUp() {

        System.out.println("TestBean destory");

    }

}
package com.dxz.demo.configuration3;

public class DataSource {

    private String dbUser;

    private String dbPass;

    public String getDbUser() {

        return dbUser;

    }

    public void setDbUser(String dbUser) {

        this.dbUser = dbUser;

    }

    public String getDbPass() {

        return dbPass;

    }

    public void setDbPass(String dbPass) {

        this.dbPass = dbPass;

    }

    @Override

    public String toString() {

        return "DataSource [dbUser=" + dbUser + ", dbPass=" + dbPass + "]";

    }

}
配置类:
package com.dxz.demo.configuration3;

import org.springframework.context.annotation.Bean;

import org.springframework.context.annotation.ComponentScan;

import org.springframework.context.annotation.Configuration;

@Configuration

@ComponentScan(basePackages = "com.dxz.demo.configuration3")

public class TestConfiguration {

    public TestConfiguration() {

        System.out.println("TestConfiguration容器启动初始化。。。");

    }

    @Configuration

    static class DatabaseConfig {

        @Bean

        DataSource dataSource() {

            return new DataSource();

        }

    }

}
启动类:
package com.dxz.demo.configuration3;

import org.springframework.context.ApplicationContext;

import org.springframework.context.annotation.AnnotationConfigApplicationContext;

public class TestMain {

    public static void main(String[] args) {

        // @Configuration注解的spring容器加载方式,用AnnotationConfigApplicationContext替换ClassPathXmlApplicationContexts

        ApplicationContext context = new AnnotationConfigApplicationContext(TestConfiguration.class);

         //bean

        TestBean tb = (TestBean) context.getBean("testBean");

        tb.sayHello();

        DataSource ds = (DataSource) context.getBean("dataSource");

        System.out.println(ds);

    }

}
结果:
TestConfiguration容器启动初始化。。。

TestBean sayHello...

DataSource [dbUser=null, dbPass=null]
3、@EnableXXX注解
配合@Configuration使用,包括 @EnableAsync, @EnableScheduling, @EnableTransactionManagement, @EnableAspectJAutoProxy, @EnableWebMvc。
@EnableAspectJAutoProxy—《spring AOP 之:@Aspect注解》
@EnableScheduling–《Spring 3.1新特性之二:@Enable*注解的源码,spring源码分析之定时任务Scheduled注解》
4、@Profile逻辑组配置
5、使用外部变量
1、@PropertySource + Environment,通过@PropertySource注解将properties配置文件中的值存储到Spring的 Environment中,Environment接口提供方法去读取配置文件中的值,参数是properties文件中定义的key值。
2、@PropertySource(PropertySourcesPlaceholderConfigurer)+@Value
原文地址:https://blog.csdn.net/u014199143/article/details/80692685
@Configuration的使用 和作用(转)的更多相关文章
- @Configuration的使用 和作用
1从spring4.0以后,@Spring boot Application就包含了@ComponentScan,@ComponentScan就不用写了 2@MapperScan(basePackag ...
- hibernate中Configuration类的作用
问题:我们在获得一个SessionFactory对象的时候经常是写下面这行代码: SessionFactory sessionFactory = new Configuration().configu ...
- Configuration对象
Configuration对象 Hibernate的持久化操作离不开SessionFactory对象,使用该对象的openSession()方法可以打开Session对象.而SessionFactor ...
- 5 -- Hibernate的基本用法 --4 1 创建Configuration对象
org.hibernate.cfg.Configuration实例代表了应用程序到SQL数据库的配置信息,Configuration对象提供了一个buildSessionFactory()方法,该方法 ...
- Spring源码解析之@Configuration
@Configuration简介 用于标识一个类为配置类,与xml配置效果类似 用法简介 public class TestApplication { public static void main( ...
- SpringBoot自动装配原理之Configuration以及@Bean注解的使用
Configuration以及Bean注解的使用 该知识点在Spring中应该学过,没有学过或者遗忘的的朋友需要预习或温习前置知识点.SpringBoot其实就是Spring的进一步简化,所以前置知识 ...
- jvm系列(四):jvm调优-命令大全(jps jstat jmap jhat jstack jinfo)
文章同步发布于github博客地址,阅读效果更佳,欢迎品尝 运用jvm自带的命令可以方便的在生产监控和打印堆栈的日志信息帮忙我们来定位问题!虽然jvm调优成熟的工具已经有很多:jconsole.大名鼎 ...
- Dozer扫盲级教程
前言 这篇文章是本人在阅读Dozer官方文档(5.5.1版本,官网已经一年多没更新了)的过程中,整理下来我认为比较基础的应用场景. 本文中提到的例子应该能覆盖JavaBean映射的大部分场景,希望对你 ...
- maven常用插件: 打包源码 / 跳过测试 / 单独打包依赖项
一.指定编译文件的编码 maven-compile-plugin <plugin> <groupId>org.apache.maven.plugins</groupId& ...
随机推荐
- MySQL主从同步报错1507
mysql 从库上手动删除partiton后,主库未做修改.后期主库上删除partiton后,出现问题. 故障现场 Last_Errno: 1507 Last_Error: Error 'Error ...
- (十四)mybatis 和 spring 整合
目录 整合思想 整合步骤 整合之后原始 dao 开发 整合之后 Mapper 代理开发 总结 整合思想 让 spring 管理 sqlSessionFactory ,使用 单例模式 创建该对象 : 根 ...
- codeforces 1249D1/D2 Too Many Segments (贪心)
(点击此处查看原题) 题意说明 有n个区间,第i个区间覆盖范围[li,ri]内所有点,问删除最少哪些区间,使得所有点被区间覆盖的次数少于等于k次 解题思路 看到这个题的时候,觉得和开关(反转)问题很像 ...
- python学习-6 猜拳小游戏
import random # 调用随机数模块 pc = random.randint(1,3) # 产生1-3的随机数 print("来玩个猜拳游戏吧!") a = '石头' b ...
- linux下shell 脚本 中windows换行符换成linux换行符
sed -i 's/\r//' filename window下默认是 \r\n linux下是\n unix下是\r
- vue插件总结——总有你能用上的插件
UI组件 框架 element - 饿了么出品的Vue2的web UI工具套件 mint-ui - Vue 2的移动UI元素 iview - 基于 Vuejs 的开源 UI 组件库 Keen-UI - ...
- GoLang语言环境搭建及idea集成开发(超详细)
一.所需安装包(windows) 1. https://golang.org/dl/ 下载 MSI installer.不会翻墙的自己找国内下载,双击运行,按照提示安装即可.环境变量自动配置 2.i ...
- 怎样设置HTTP请求头Header
使用: xhr.setRequestHeader(); xhr.setRequestHeader('Content-Type', 'application/json'); xhr.setRequest ...
- Web API 自动生成接口文档
1.添加NuGet程序包 Microsoft ASP.NET Web API 2.2 Help Page (这是微软官方的) A Simple Test Client for ASP.NET ...
- 说说css hack,说真的,我也是才去了解这个东西
之前在很多地方看到css hack,今天狠下心,看看到底是什么鬼,所有我去百度了,然后看了一篇文章,然后写个小总结. css hack就是通过加一些特定的符号,不同的浏览器可以识别特定符号的样式,以此 ...