QGIS编译教程
注意更新时间:Thursday November 02, 2017
1. Introduction 简介
This document is the original installation guide of the described software QGIS. The software and hardware descriptions named in this document are in most cases registered trademarks and are therefore subject to the legal requirements. QGIS is subject to the GNU General Public License. Find more information on the QGIS Homepage: http://qgis.org
该文档是QGIS原始安装指南。在本文档中指名的软件和硬件描述在大多数情况下是注册商标并且符合合法描述的。QGIS是符合GNU通用公共许可的。在QGIS主页查找更多信息:http://qgis.org。
The details, that are given in this document have been written and verified to the best of knowledge and responsibility of the editors. Nevertheless, mistakes concerning the content are possible. Therefore, all data are not liable to any duties or guarantees. The editors and publishers do not take any responsibility or liability for failures and their consequences. You are always welcome for indicating possible mistakes.
Because the code of QGIS evolves from release to release, These instructions are regularly updated to match the corresponding release. Instructions for the current master branch are available at http://htmlpreview.github.io/?https://raw.github.com/qgis/QGIS/master/doc/INSTALL.html. If you wish to build another version of QGIS, ensure to checkout the appropriate release branch. The QGIS source code can be found in the repository.
由于QGIS的代码是随着每一版本而进化的。这些指导一般更新以符合相应的版本。当前的主分支指导可以在:http://htmlpreview.github.io/?https://raw.github.com/qgis/QGIS/master/doc/INSTALL.html.。如果你希望编译另一版本的QGIS的话,请确保符合相应的版本分支。QGIS源代码可以在这里找到。
Please visit http://qgis.org for information on joining our mailing lists and getting involved in the project further.
请访问http://qgis.org查找融合我们的邮箱列表并融入我们的项目的信息。
/!\ Note to document writers: Please use this document as the central place for describing build procedures. Please do not remove this notice.
/!\ Note to document writers: This document is generated from doc/INSTALL.t2t - if you need to edit this document, be sure to edit that file rather than the generated INSTALL document found in the root of the source directory.
2. Overview 概述
QGIS, like a number of major projects (e.g., KDE 4.0), uses CMake (http://www.cmake.org) for building from source.
QGIS,如大量的大工程(比如,KDE4.0),使用CMake(http://www.cmake.org)编译代码。
Following a summary of the required dependencies for building:
遵照编译需要的依赖总结:
Required build tools:需要的编译工具:
- CMake >= 3.0.0
- Flex >= 2.5.6
- Bison >= 2.4
Required build dependencies:
- Qt >= 5.3.0
- Proj >= 4.4.x
- GEOS >= 3.4
- Sqlite3 >= 3.0.0
- SpatiaLite
- libspatialindex
- GDAL/OGR >= 2.1
- Qwt >= 5.0 & (< 6.1 with internal QwtPolar)
- expat >= 1.95
- QScintilla2
- QCA
- qtkeychain (>= 0.5)
- libzip
Optional dependencies:
- for GRASS providers and plugin - GRASS >= 7.0.0.
- for georeferencer - GSL >= 1.8
- for PostGIS support - PostgreSQL >= 8.0.x
- for gps plugin - gpsbabel
- for mapserver export and PyQGIS - Python >= 3.3
- for python support - SIP >= 4.12, PyQt >= 5.3 must match Qt version, Qscintilla2
- for qgis mapserver - FastCGI
- for oracle provider - Oracle OCI library
Indirect dependencies:
Some proprietary formats (e.g., ECW and MrSid) supported by GDAL require proprietary third party libraries. QGIS doesn't need any of those itself to build, but will only support those formats if GDAL is built accordingly. Refer to http://gdal.org/formats_list.html ff. for instructions how to include those formats in GDAL.
4. Building on Windows 在Windows上编译
4.1. Building with Microsoft Visual Studio 使用VS编译
This section describes how to build QGIS using Visual Studio on Windows. This is currently also how the binary QGIS packages are made (earlier versions used MinGW).
This section describes the setup required to allow Visual Studio to be used to build QGIS.
这一部分描述了如何使用VS在Windows上编译QGIS。这目前也是二进制QGIS包如何编译的(早前版本是用MinGW)。
这一部分描述了使用VS编译QGIS的安装步骤。
4.1.1. Visual C++ Community Edition 社区版VC++
The free (as in free beer) Community installer is available under:免费的社区版安装器如下所示:
4.1.2. Other tools and dependencies其他工具和依赖库
Download and install following packages:下载并安装如下的包:
|
Tool |
Website |
|
CMake |
|
|
GNU flex, GNU bison and GIT |
http://cygwin.com/setup-x86.exe (32bit) or http://cygwin.com/setup-x86_64.exe (64bit) |
|
OSGeo4W |
http://download.osgeo.org/osgeo4w/osgeo4w-setup-x86.exe (32bit) or http://download.osgeo.org/osgeo4w/osgeo4w-setup-x86_64.exe (64bit) |
|
ninja |
https://github.com/ninja-build/ninja/releases/download/v1.7.2/ninja-win.zip |
OSGeo4W does not only provide ready packages for the current QGIS release and nightly builds of master, but also offers most of the dependencies needs to build it.
For the QGIS build you need to install following packages from cygwin: 对于QGIS编译你需要从cygwin中安装以下包:
- bison>= 2.4
- flex>= 2.5.6
- git
and from OSGeo4W (select Advanced Installation): 以及从OSGeo4W中(选择Advanced高级安装):
- expat>= 1.95
- fcgi
- gdal>= 2.1
- grass
- gsl-devel
- iconv
- libzip-devel
- libspatialindex-devel
- pyqt5
- python3-devel
- python3-qscintilla
- python3-nose2
- python3-future
- python3-pyyaml
- python3-mock
- python3-six
- qca-qt5-devel
- qca-qt5-libs
- qscintilla-qt5
- qt5-devel
- qt5-libs-debug
- qtwebkit-qt5-devel
- qtwebkit-qt5-libs-debug
- qwt-devel-qt5
- sip-qt5
- spatialite>=4.2.0
- oci
- qtkeychain
- libzip
This will also select packages the above packages depend on.
这还将选择如上依赖的包。
If you install other packages, this might cause issues. Particularly, make sure not to install the msinttypes package. It installs a stdint.h file in OSGeo4W[64]\include, that conflicts with Visual Studio own stdint.h, which for example breaks the build of the virtuallayer provider.
如果你安装其它的包,可能会引发问题。尤其是,确保不要安装msinttypes包。它安装stdint.h文件在OSGeo4W[64]\include中。
Earlier versions of this document also covered how to build all above dependencies. If you're interested in that, check the history of this page in the Wiki or the SVN repository.
该文档的早期版本还讲述了如何编译上述的依赖。如果你感兴趣的话,可以查看维基或SVN托管上的该页面的历史记录。
4.1.3. Setting up the Visual Studio project with CMake使用CMake创建Visual Studio项目
/!\ Consider this section as example. It tends to outdate, when OSGeo4W and SDKs move on. ms-windows/osgeo4w/package-nightly.cmd is used for the nightly builds and constantly updated and hence might contain necessary updates that are not yet reflected here.
注意:请把该部分当成示例。它倾向于过时,因为OSGeo4W和SDK包总是进化的。ms-windows/osgeo4w/package-nightly.cmd用来最新的编译和不断地更新,因此可能包含必须的更新(这里可能还没来得及反应)。
To start a command prompt with an environment that both has the VC++ and the OSGeo4W variables create the following batch file (assuming the above packages were installed in the default locations):
要启动一个命令提示符(在同时拥有VC++和OSGeo4W变量符的环境),创建如下的batch文件(假设上述的包已经在默认的路径下安装)(batch文件后缀名为.bat):
- @echo off
- set OSGEO4W_ROOT=C:\OSGeo4W
- call "%OSGEO4W_ROOT%\bin\o4w_env.bat"
- call "%OSGEO4W_ROOT%\bin\py3_env.bat"
- call "%OSGEO4W_ROOT%\bin\qt5_env.bat"
- set O4W_ROOT=%OSGEO4W_ROOT:\=/%
- set LIB_DIR=%O4W_ROOT%
- call "C:\Program Files\Microsoft Visual Studio 14.0\VC\vcvarsall.bat" amd64
- path %path%;C:\Program Files\Microsoft Visual Studio 14.0\VC\bin
- path %PATH%;C:\Program Files\CMake\bin;c:\cygwin\bin
- @set GRASS_PREFIX=c:/OSGeo4W/apps/grass/grass-7.2.1
- @set INCLUDE=%INCLUDE%;%OSGEO4W_ROOT%\include
- @set LIB=%LIB%;%OSGEO4W_ROOT%\lib;%OSGEO4W_ROOT%\lib
- set LIB=%LIB%;%OSGEO4W_ROOT%\apps\Qt5\lib;%OSGEO4W_ROOT%\lib
- set INCLUDE=%INCLUDE%;%OSGEO4W_ROOT%\apps\Qt5\include;%OSGEO4W_ROOT%\include
- @cmd
Start the batch file and on the command prompt checkout the QGIS source from git to the source directory QGIS:
启动batch文件,而且在命令提示符中从git获取QGIS源代码到源路径QGIS:
git clone git://github.com/qgis/QGIS.git
Create a 'build' directory somewhere. This will be where all the build output will be generated.
在某个地方创建一个'build'目录。这将是编译输出将生成的地方。
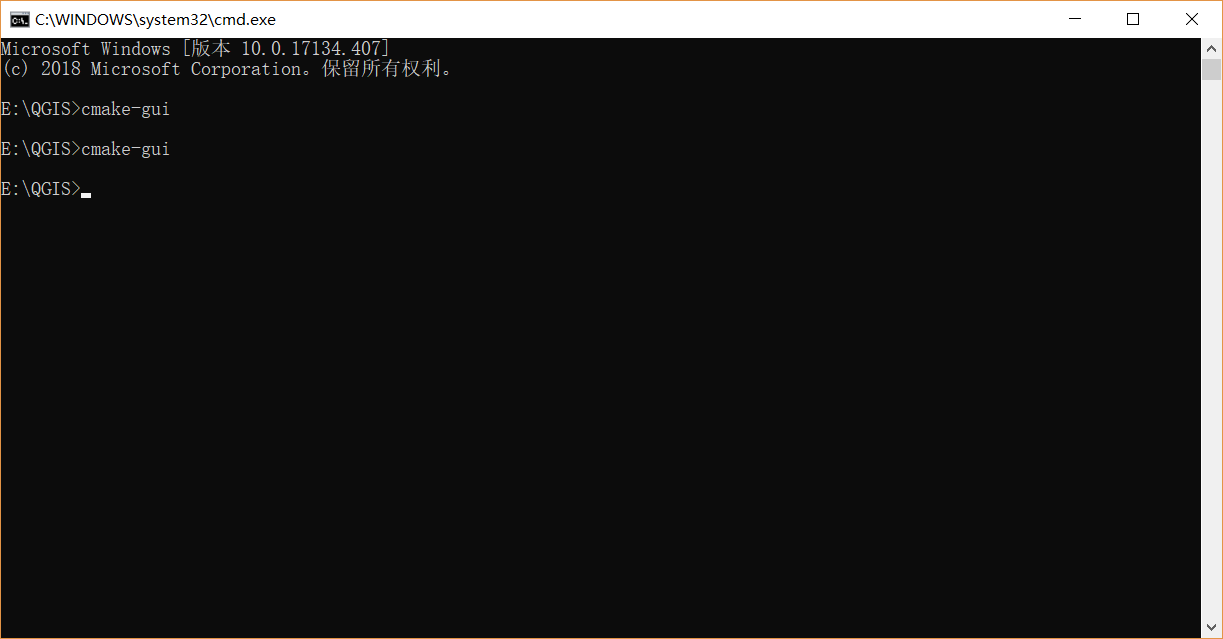
Now run cmake-gui (still from cmd) and in the Where is the source code: box, browse to the top level QGIS directory.
现在运行cmake-gui(依然是从cmd中运行)然后在Where is the source code:方框里,浏览到QGIS目录的最上层。
In the Where to build the binaries: box, browse to the 'build' directory you created.
在Where to build the binaries:方框里,浏览到你创建的'build'目录。
If the path to bison and flex contains blanks, you need to use the short name for the directory (i.e. C:\Program Files should be rewritten to C:\Progra~n, where n is the number as shown in `dir /x C:\``).
如果bison和flex的路径包含空格,你需要使用目录的短名称(例如:C:\Program Files应该重写成C:\Progra~n,这里n是在'dir /x C:\''显示的数字)。
Verify that the 'BINDINGS_GLOBAL_INSTALL' option is not checked, so that python bindings are placed into the output directory when you run the INSTALL target.
验证'BINDINGS_GLOBAL_INSTALL'选项没有选上,从而当你运行INSTALL目标时python bindings被放置在输出目录。
Hit Configure to start the configuration and select Visual Studio 9 2008 and keep native compilers and click Finish.
按下Configure键开始配置并且选择Visual Studio 9 2008并保持native compilers然后点击Finish。
The configuration should complete without any further questions and allow you to click Generate.
配置应该是没有问题的,并允许你点击Generate。
Now close cmake-gui and continue on the command prompt by starting vcexpress. Use File / Open / Project/Solutions and open the qgis-x.y.z.sln File in your project directory.
现在关闭cmake-gui然后继续命令提示行启动vcexpress。使用File / Open / Project/Solutions然后打开你的项目目录下的qgis-x.y.z.sln文件。
Change Solution Configuration from Debug to RelWithDebInfo (Release with Debug Info) or Release before you build QGIS using the ALL_BUILD target (otherwise you need debug libraries that are not included).
更改方案配置从Debug到RelWithDebInfo(Release with Debug Info)或者是Release,在你使用ALL_BUILD目标编译QGIS(否则你需要编译类库,那暂时还并没有包含进来)。
After the build completed you should install QGIS using the INSTALL target.
运行完ALL_BUILD之后你应该使用INSTALL安装QGIS。
Install QGIS by building the INSTALL project. By default this will install to c:\Program Files\qgis<version> (this can be changed by changing the CMAKE_INSTALL_PREFIX variable in cmake-gui).
You will also either need to add all the dependency DLLs to the QGIS install directory or add their respective directories to your PATH.
4.1.4. Packaging
To create a standalone installer there is a perl script named 'creatensis.pl' in 'qgis/ms-windows/osgeo4w'. It downloads all required packages from OSGeo4W and repackages them into an installer using NSIS.
The script can be run on both Windows and Linux.
On Debian/Ubuntu you can just install the 'nsis' package.
NSIS for Windows can be downloaded at:
And Perl for Windows (including other requirements like 'wget', 'unzip', 'tar' and 'bzip2') is available at:
4.1.5. Packaging your own build of QGIS
Assuming you have completed the above packaging step, if you want to include your own hand built QGIS executables, you need to copy them in from your windows installation into the ms-windows file tree created by the creatensis script.
cd ms-windows/
rm -rf osgeo4w/unpacked/apps/qgis/*
cp -r /tmp/qgis1.7.0/* osgeo4w/unpacked/apps/qgis/
Now create a package.
./quickpackage.sh
After this you should now have a nsis installer containing your own build of QGIS and all dependencies needed to run it on a windows machine.
4.1.6. Osgeo4w packaging
The actual packaging process is currently not documented, for now please take a look at:
ms-windows/osgeo4w/package.cmd
本文转自:https://htmlpreview.github.io/?https://raw.github.com/qgis/QGIS/master/doc/INSTALL.html#toc14
>>QGIS官网:http://www.qgis.org
>>QGIS托管:https://github.com/qgis/QGIS
一定要在运行a.bat之后的弹出的cmd.exe里使用cmake-gui打开CMAKE

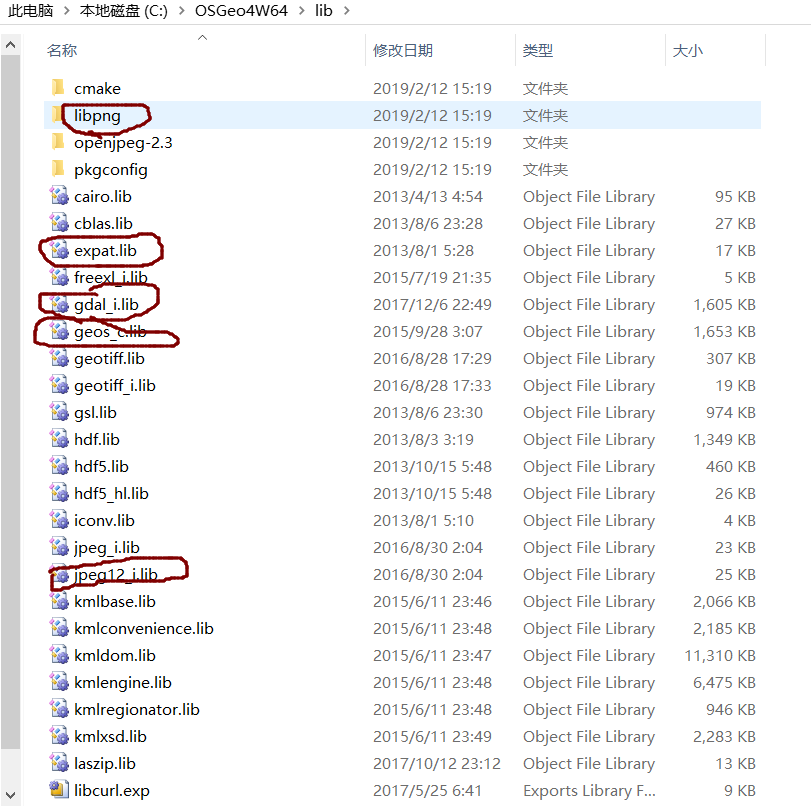
这里面的几个类库你都熟悉了吗?
而且注意是64位!!!
>>若实在编译不成功,可以直接调用官方已经编译好的sdk:https://blog.csdn.net/xiongjia516/article/details/81668665
QGIS编译教程的更多相关文章
- CM12同步源码及编译教程
同时提供基于安卓5.0的MKL魔趣猪扒饭编译教程~[玩机组出品]魔趣猪扒饭MKL50.1编译教程http://www.oneplusbbs.com/forum.php?mod=viewthread&a ...
- Android反编译教程
本文摘自 http://blog.csdn.net/ithomer/article/details/6727581 本文Android反编译教程,测试环境: Win7 Ultimate x64 Ubu ...
- QGIS编译
一.准备工作 1.下载QGIS源码 最新版本的QGIS源码需要从git上下载.最新的发布版是2.0,下载地址见下.https://github.com/qgis/QGIS/tree/release-2 ...
- DevExpress Components16.2.6 Source Code 重编译教程
DevExpress 是一个比较有名的界面控件套件,提供了一系列优秀的界面控件.这篇文章将展示如何在拥有源代码的情况下,对 DevExpress 的程序集进行重新编译. 特别提示:重编译后,已安装好的 ...
- QGIS 编译
QGIS 编译 在编译的过程中花费了很长时间,特别是编译Debug版本.release版本的编译可以从晚上找到很多的资料,但是Debug的编译相对较少.在Debug编译的过程中,需要单独build工程 ...
- gRPC编译教程
windows平台的编译 一.编译openssl ① 安装perl(可以使用ActivePerl),执行perl Configure VC-WIN64A no-asm .在这里解释一下参数含义,VC- ...
- CM12.1/13.0编译教程
环境搭建 1.安装64位Ubuntu系统(实体安装.虚拟机安装均可) 注意:要求机器至少4G内存(虚拟机至少分配4G内存),硬盘至少100G空间(源码20G+,编译后整个目录约60~70G) 安装方法 ...
- Mysql 源码编译教程贴
题外话:这是一篇教程贴,不仅学的是mysql的编译,还是一些编译的知识.我也是一个菜鸟,写一些感悟和心得,有什么问题可以批评指正,谢谢! 如果只是为了安装请移到我的另一篇安装贴: Mysql安装贴 环 ...
- QT5静态编译教程,主要针对vs2012(渡世白玉)
QT5,VS2012静态编译,所有的库准备充分的话qwebkit也可以静态编译通过,但是我编译的版本使用中如果用了QWEBVIEW控件在连接时会出错. 注:我自己编译的环境是:win server 2 ...
随机推荐
- PHP定时任务Crontab结合CLI模式详解
从版本 4.3.0 开始,PHP 提供了一种新类型的 CLI SAPI(Server Application Programming Interface,服务端应用编程端口)支持,名为 CLI,意为 ...
- from表单
构建一个表单 假设你想在你的网站上创建一个简单的表单,以获得用户的名字.你需要类似这样的模板: 1 2 3 4 5 <form action="/your-name/" me ...
- python开发面向对象基础:封装
一,封装 [封装] 隐藏对象的属性和实现细节,仅对外提供公共访问方式. [好处] 1. 将变化隔离: 2. 便于使用: 3. 提高复用性: 4. 提高安全性: [封装原则] 1. 将不需要对外提供的内 ...
- Py修行路 python基础 (二十三)模块与包
一.模块 1)定义: 模块就是一个包含了python定义和声明的文件,文件名就是模块名字加上.py的后缀. 2)为何要用模块: 退出python解释器然后重新进入,那之前定义的函数或者变量都将丢失,因 ...
- 请尽可能详尽的解释AJAX的工作原理
第一步:创建ajax对象(XMLHttpRequest/ActiveXObject(Microsoft.XMLHttp)) 第二步:判断数据传输方式(GET/POST) 第三步:打开链接 open() ...
- Venom的简单使用
工具地址:https://github.com/r00t-3xp10it/venom 打开到venom目录,输入./venom.sh 打开程序 按回车键继续 这里有很多的模块,要用哪个模块就输入它的编 ...
- Shell编程的基本语法
Shell编程 创建sh文件 touch test.sh vim test.sh 写入如下内容 #!/bin/bash a="hello" 运行 chmod +x /root/te ...
- springboot成神之——Scheduler定时任务
本文介绍spring的Scheduler定时任务 目录结构 config scheduler @Scheduled配置参数 本文介绍spring的Scheduler定时任务 目录结构 config / ...
- html 之表单,div标签等
一 , 表单 功能 : 表单用于向服务器传输数据, 从而实现用户与Web服务器的交互 表单能够包含input系列标签,比如文本字段,复选框 , 单选框 , 提交按钮等等. 表单还可以包含textare ...
- 搭建Easyui环境在Myeclipse或Eclipse中
转自:https://www.cnblogs.com/henuyuxiang/p/4283018.html 1.下载Easyui.网址:http://www.jeasyui.com/download/ ...