高并发Flask服务部署
高并发Flask服务部署
AI模型持久化
OOP:
利用面向对象思想,实现算法在内存上的实例化及持久化。即一次模型加载,多次请求调用。
class ocr_infer_class(threading.Thread):

    def __init__(self, input_queue, output_queue):

        super().__init__()

        logger.info("Model Init Start ...")

        # YOLO Needed

        self.yolo_model_def = os.path.join("../config", "yolov3.cfg")

        self.yolo_weights_path = os.path.join("../checkpoints", "yolo.pth")

        # OCR Needed

        self.ocr_weights_path = os.path.join("../checkpoints", "ocr.h5")

        # 初始化队列

        self.input_queue = input_queue

        self.output_queue = output_queue

        # allow growth

        config = tf.ConfigProto()

        config.gpu_options.allow_growth = True

        self.graph = tf.get_default_graph()

        self.sess = tf.Session(config=config)

        # 初始化模型并加载权重

        self.yolo_init()

        # 初始化OCR

        self.ocr_init()

    def yolo_init(self):

        # load model

        logger.info("YOLO Init Success ...")

    def ocr_init(self):

        with self.graph.as_default():

            with self.sess.as_default():

            	# load model

        logger.info("OCR Init Success ...")
Thread+Queue
利用thread和queue实现请求监听
# 接收端

# 循环监听input_queue,一旦有数据就执行推理动作

def run(self):

    while True:

        try:

            data = self.input_queue.get(True, 2000)  # 监听获取input_queue中的数据

            except queue.Empty as e:  # 没有数据

                logger.info('waiting for request...')

                else:

                    # 获取数据后进行推理

                    image = data[0]

                    image_name = data[1]

                    # 推理代码

                    result = self.get_detect_result(image, image_name,

                                                    height=image.shape[0], width=image.shape[1])

                    # 推理完毕后将结果放到output_queue中

                    self.output_queue.put(result)

#################################################################################################

# 发送端

# 将请求数据通过request拿到后,put到被监听的queue中。

def get_result(self, image, image_name):

    # 向被监听queue中put数据,触发推理动作

    self.input_queue.put((image, image_name), )

    logger.info("Geting Request ...")

    # 推理完毕后会向output_queue中put数据

    res = self.output_queue.get()

    return res
一些名词解释
高并发
并发是OS的一个概念,指一段时间内多任务交替执行的现象。高并发泛指大流量、高请求量的业务场景;如双十一秒杀、春运抢票
度量指标QPS、TPS、RT、并发数
QPS:Queries Per Second意思是“每秒查询率”,服务器在规定时间内处理多少流量。
TPS:Transactions Per Second意思是“每秒事务量”。一个事务是指一个客户机向服务器发送请求然后服务器做出反应的过程。客户机在发送请求时开始计时,收到服务器响应后结束计时,以此来计算使用的时间和完成的事务个数。
RT: Response Time,客户端发起请求到收到服务器响应结果的时间。直接反映了系统的快慢
并发数: 系统同时能处理的请求数量,反应了系统的负载能力。
吞吐量: 即承压能力。与request对CPU、IO的消耗等等紧密关联。单个request 对CPU消耗越高,外部系统接口、IO速度越慢,系统吞吐能力越低,反之越高。
实现高并发的手段
扩充硬件。更多核心更高主频更大存储空间更多带宽
优化软件。改进架构、应用多线程、协程、更快的数据结构等
架构分层、服务拆分、微服务解耦等。通过分布式集群和计算实现
高可用
通过设计减少系统不能提供服务的时间。如果一个系统能够一直提供服务,那么这个可用性则是百分之百,如keepalived+Nginx实现的双机热备方法,当一台Nginx服务器宕机时,另一台顶上
高性能
程序处理速度越快,所占内存越少,cpu占用率越低,性能越高
并发与并行
- 并发:同时执行多个任务,但可能一个正在执行,另一个已暂停或结束。
- 并行:多个任务同时执行
Flask
Flask是一个同步的Web框架,可以实现简易的web服务,但处理请求的时候是以单进程的方式,当同时访问的人数过多时,服务就会出现阻塞的情况。
优点:易调试、可以很快的实现web server interface。
缺点:自带的web server不稳定,无法承受大量并发请求。
WSGI
Web Server Gateway interface,服务器网关接口,是web服务器与web程序/框架 之间的通用接口。是一种协议,一种规范。用于解决众多web 服务器和web程序/框架之间的兼容性问题。
Gunicorn
What's Gunicorn?

Gunicorn是一个实现了WSGI协议的HTTP 服务器。类似的还有uWSGI、Gevent、Proxy setups等。
What's pre-fork?
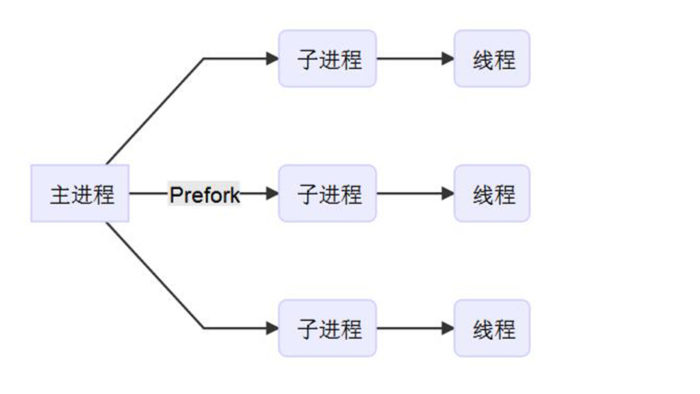
可以采用pre-fork的方式提前准备多个子进程用于承载请求。实现了接收并处理并发请求。
安装Gunicorn
pip install gunicorn -i http://pypi.douban.com/simple/ --trusted-host pypi.douban.com

# 安装异步worker支持的三方库

pip install gevent eventlet greenlet
配置Gunicorn
$ vim gunicorn.conf

bind = ":5000"

workers = 2 # 推荐核数*2+1发挥最佳性能

worker_class = 'gevent' # 除协程外,还有sync异步等等

threads = 1

worker_connections = 2000

timeout = 600  # 深度学习模型加载比较耗时,设长一点

reload = True

daemon = False

accesslog = '../logs/access.log'

errorlog = '../logs/error.log'

loglevel = 'debug'
启动Gunicorn
# flask运行的入口文件为Flask_App.py,Flask实例名称为app

# 利用配置文件,启动一个主进程,两个子进程

$ gunicorn -c gunicorn.conf Flask_APP:app

请求实例
Gunicorn pre-fork了两个Flask进程,对外端口为5000,我们请求容器映射的 30006->5000/tcp

至此已经利用面向对象+线程+队列+Gunicorn实现了一个持久化的、可以处理并发请求的web服务。但HTTP 服务器性能还不够,
Nginx
正向代理与反向代理
正向代理:
代理服务器替客户端请求访问不到的资源并返回(中介)
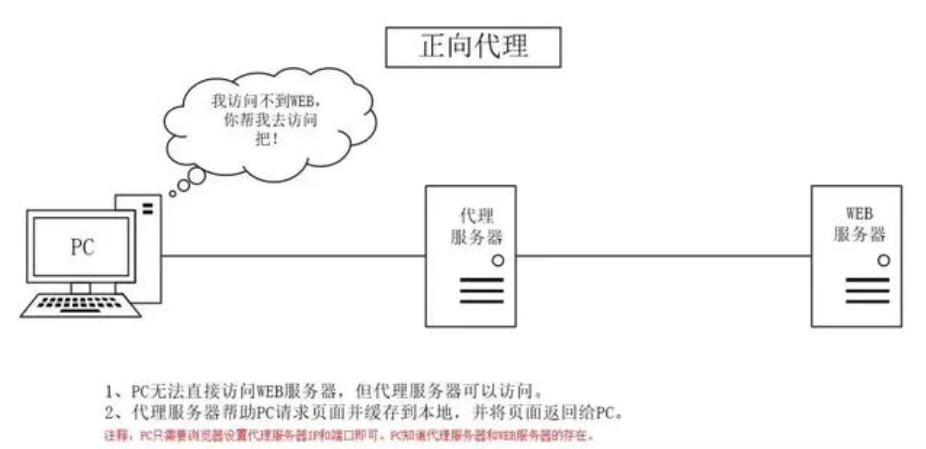
用处:
- 突破访问限制(梯子)
- 提升访问速度,一个客户端请求过的内容可能会缓存下来,另一个请求时直接发送。
- 隐藏客户端真实IP,避免受攻击
反向代理:
代理服务器接收Internet上的链接请求,然后将请求转发给内部网络上的服务器,并将其返回的结果再返回给Internet上请求链接的客户端。此时代理服务器的行为就叫做反向代理。(二房东)

用处:
- 对客户端隐藏服务器真实IP
- 负载均衡,代理服务器做反向代理前,会根据所有真实服务器的负载情况,决定将客户端的请求分发到哪台服务器上
- 提升访问速度,同正向代理时一样,可以缓存一些东西,客户端请求时直接返回,如一些静态文件
- 提供安全保障。可以用作防火墙,提供对web攻击的防护、加密服务器等
What's Nginx?
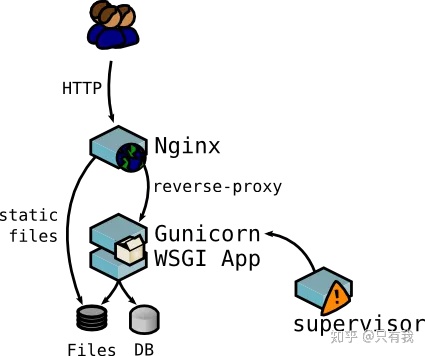
更强的HTTP 服务器,对外界请求做反向代理,能缓存一些静态文件提升访问速度的同时,还能做负载均衡,减轻服务器压力,并能提高服务器安全性。
使用nginx来转发gunicorn服务。为什么要在gunicorn之上再加层nginx呢?一方面nginx可以补充gunicorn在某些方面的不足,如SSL支持、高并发处理、负载均衡处理等,另一方面如果是做一个web网站,除了服务之外,肯定会有一些静态文件需要托管,这方面也是nginx的强项
Nginx 安装
apt upgrade && apt install nginx
Nginx配置
$ vim /etc/nginx/sites-available/default

# 修改对外端口

server {

        listen 8000 default_server;

        listen [::]:8000 default_server;

# 添加反向代理服务

location / {

    # 这一行记得注掉,因为我们没有缓存静态文件,只是一个请求接口

    # try_files $uri $uri/ =404;

	# 要转发的服务为本地5000端口的gunicorn服务

    proxy_pass http://0.0.0.0:5000/;

    proxy_redirect off;

    proxy_set_header Host $host;

    proxy_set_header X-Real-IP $remote_addr;

    proxy_set_header X-Forwarded-For $proxy_add_x_forwarded_for;

}
Nginx启动
/etc/init.d/nginx start

请求实例
Nginx代理了5000端口的gunicorn服务,对外端口为8000,映射到容器外为30007。

利用ab 进行压力测试
What's ab?
ApacheBench(ab),命令使用简单,效率高,统计信息完善,施压机器内存压力小。是在unix机器上推荐的压测工具。
ab的安装
apt-get install apache2-utils
ab的命令选项
| option | 含义 |
|---|---|
| -r | 当接收到socket错误的时候ab不退出 |
| -t | 发送请求的最长时间 |
| -c | 并发数,一次构造的请求数量 |
| -n | 发送的请求数量 |
| -p | postfile,指定包含post数据的文件 |
| -T | content-type,指定post和put发送请求时请求体的类型 |
Flask服务的并发测试
单纯的Flask 服务时, 设置60s超时,1k并发,总请求10w,60s超时
$ ab -r -t 60 -c 1000 -n 100000 -p /workspace/pressure_test/post_data.txt -T 'application/json' http://127.0.0.1:8705/id_recognition

This is ApacheBench, Version 2.3 <$Revision: 1807734 $>

Copyright 1996 Adam Twiss, Zeus Technology Ltd, http://www.zeustech.net/

Licensed to The Apache Software Foundation, http://www.apache.org/

Benchmarking 127.0.0.1 (be patient)

Completed 10000 requests

Completed 20000 requests

Completed 30000 requests

Completed 40000 requests

Finished 44442 requests

Server Software:        Werkzeug/2.0.1

Server Hostname:        127.0.0.1

Server Port:            8705

Document Path:          /id_recognition

Document Length:        78 bytes

Concurrency Level:      1000

Time taken for tests:   60.000 seconds

Complete requests:      44442

Failed requests:        2790

   (Connect: 0, Receive: 930, Length: 930, Exceptions: 930)

Total transferred:      10312344 bytes

Total body sent:        7696691010

HTML transferred:       3393936 bytes

Requests per second:    740.70 [#/sec] (mean)

Time per request:       1350.080 [ms] (mean)

Time per request:       1.350 [ms] (mean, across all concurrent requests)

Transfer rate:          167.84 [Kbytes/sec] received

                        125271.12 kb/s sent

                        125438.96 kb/s total

Connection Times (ms)

              min  mean[+/-sd] median   max

Connect:        0  620 2456.7      0   31086

Processing:     0  458 2627.2    175   53163

Waiting:        0  235 613.7    173   26668

Total:        142 1079 3959.1    176   54166

Percentage of the requests served within a certain time (ms)

  50%    176

  66%    186

  75%    205

  80%   1172

  90%   1395

  95%   3215

  98%   8853

  99%  17271

 100%  54166 (longest request)
Flask+Gunicorn服务的并发测试
$ ab -r -t 60 -c 1000 -n 100000 -p /workspace/pressure_test/post_data.txt -T 'application/json' http://127.0.0.1:5000/id_recognition

This is ApacheBench, Version 2.3 <$Revision: 1807734 $>

Copyright 1996 Adam Twiss, Zeus Technology Ltd, http://www.zeustech.net/

Licensed to The Apache Software Foundation, http://www.apache.org/

Benchmarking 127.0.0.1 (be patient)

Completed 10000 requests

Completed 20000 requests

Completed 30000 requests

Completed 40000 requests

Finished 48453 requests

Server Software:        gunicorn

Server Hostname:        127.0.0.1

Server Port:            5000

Document Path:          /id_recognition

Document Length:        96 bytes

Concurrency Level:      1000

Time taken for tests:   60.000 seconds

Complete requests:      48453

Failed requests:        706

   (Connect: 0, Receive: 193, Length: 320, Exceptions: 193)

Total transferred:      12273915 bytes

Total body sent:        8364221730

HTML transferred:       4620768 bytes

Requests per second:    807.55 [#/sec] (mean)

Time per request:       1238.315 [ms] (mean)

Time per request:       1.238 [ms] (mean, across all concurrent requests)

Transfer rate:          199.77 [Kbytes/sec] received

                        136136.24 kb/s sent

                        136336.01 kb/s total

Connection Times (ms)

              min  mean[+/-sd] median   max

Connect:        0  747 1805.0      1   31078

Processing:     0  417 2215.4    171   53472

Waiting:        0  312 994.1    169   33853

Total:         69 1164 2977.1    193   54476

Percentage of the requests served within a certain time (ms)

  50%    193

  66%   1157

  75%   1180

  80%   1195

  90%   3147

  95%   3390

  98%   7197

  99%  12255

 100%  54476 (longest request)
Flask+Gunicorn+Nginx服务的并发测试
$ ab -r -t 60 -c 1000 -n 100000 -p /workspace/pressure_test/post_data.txt -T 'application/json' http://127.0.0.1:8000/id_recognition

This is ApacheBench, Version 2.3 <$Revision: 1807734 $>

Copyright 1996 Adam Twiss, Zeus Technology Ltd, http://www.zeustech.net/

Licensed to The Apache Software Foundation, http://www.apache.org/

Benchmarking 127.0.0.1 (be patient)

Completed 10000 requests

Completed 20000 requests

Completed 30000 requests

Completed 40000 requests

Completed 50000 requests

Completed 60000 requests

Completed 70000 requests

Finished 79043 requests

Server Software:

Server Hostname:        127.0.0.1

Server Port:            8000

Document Path:          /id_recognition

Document Length:        0 bytes

Concurrency Level:      1000

Time taken for tests:   60.006 seconds

Complete requests:      79043

Failed requests:        100893

   (Connect: 0, Receive: 21865, Length: 46413, Exceptions: 32615)

Non-2xx responses:      1850

Total transferred:      12631524 bytes

Total body sent:        13739835630

HTML transferred:       4650808 bytes

Requests per second:    1317.26 [#/sec] (mean)

Time per request:       759.154 [ms] (mean)

Time per request:       0.759 [ms] (mean, across all concurrent requests)

Transfer rate:          205.57 [Kbytes/sec] received

                        223608.53 kb/s sent

                        223814.10 kb/s total

Connection Times (ms)

              min  mean[+/-sd] median   max

Connect:        0    8  45.2      1    1009

Processing:     0  693 1742.3    177   32773

Waiting:        0  686 1744.0    176   32773

Total:          0  701 1745.3    179   32774

Percentage of the requests served within a certain time (ms)

  50%    179

  66%    209

  75%    604

  80%   1190

  90%   1499

  95%   3219

  98%   7186

  99%   7362

 100%  32774 (longest request)
至此,我们利用Gunicorn+Nginx实现了一个可做负载均衡,具有反向代理功能的高并发Web服务。但意外停止怎么办?
我们利用supervisor实现进程管理,对Nginx和Gunicorn服务做监听,掌控它们的启动、停止、重启
Supervisor
supervisor是一个用python语言编写的进程管理工具,它可以很方便的监听、启动、停止、重启一个或多个进程。当一个进程意外被杀死,supervisor监听到进程死后,可以很方便的让进程自动恢复
安装supervisor
# 安装supervisor的方式很多种,现在新版本的supervisor也原生支持python3,但apt安装的版本配置更简单,坑少,推荐

apt-get install supervisor

# 启动、停止、重启

$ /etc/init.d/supervisor start / stop / restart
配置Gunicorn服务
# 测试是否成功方法,在directory下执行command,如果不报错就行

$ vim /etc/supervisor/conf.d/gunicorn.conf

[program:gunicorn_flask]

command=gunicorn -c gunicorn.conf Flask_App:app

directory=/workspace/Flask/

autostart=true

autorestart=true

user=root

redirect_stderr=true
配置Nginx服务
$ vim /etc/supervisor/conf.d/nginx.conf

[program:nginx_flask]

command=/usr/sbin/nginx -g 'daemon on;'

autostart=true

autorestart=true

user=root

redirect_stderr=true
查看supervisor的日志
cat /var/log/supervisor/supervisord.log
启动测试
先关闭Gunicorn和Nginx服务。
$ kill -9 $(ps -ef| egrep 'gunicorn|nginx' | grep -v grep | awk '{print $2}')

$ ps ax | egrep 'gunicorn|nginx'
利用supervisor启动Gunicorn和Nginx
$ /etc/init.d/supervisor start

$ ps ax | egrep 'gunicorn|nginx'
请求测试Nginx的代理服务

重启测试
大工告成!感谢阅读
高并发Flask服务部署的更多相关文章
- 转---高并发Web服务的演变——节约系统内存和CPU
[问底]徐汉彬:高并发Web服务的演变——节约系统内存和CPU 发表于22小时前| 4223次阅读| 来源CSDN| 22 条评论| 作者徐汉彬 问底Web服务内存CPU并发徐汉彬 摘要:现在的Web ...
- IM即时通讯设计 高并发聊天服务:服务器 + qt客户端(附源码)
来源:微信公众号「编程学习基地」 目录 IM即时通信程序设计 IM即时通讯 设计一款高并发聊天服务需要注意什么 如何设计可靠的消息处理服务 什么是粘包 什么是半包 解决粘包和半包 IM通信协议 应用层 ...
- 高并发Web服务的演变:节约系统内存和CPU
一.越来越多的并发连接数 现在的Web系统面对的并发连接数在近几年呈现指数增长,高并发成为了一种常态,给Web系统带来不小的挑战.以最简单粗暴的方式解决,就是增加Web系统的机器和升级硬件配置.虽然现 ...
- 高并发 Web 服务的演变:节约系统内存和 CPU
本文内容 越来越多的并发连接数 Web 前端优化,降低服务端压力 节约 Web 服务端的内存 节约 Web 服务器的 CPU 小结 一,越来越多的并发连接数 现在,Web 系统面对的并发连接数呈现指数 ...
- (转)高并发Web服务的演变——节约系统内存和CPU
一.越来越多的并发连接数 现在的Web系统面对的并发连接数在近几年呈现指数增长,高并发成为了一种常态,给Web系统带来不小的挑战.以最简单粗暴的方式解决,就是增加Web系统的机器和升级硬件配置.虽然现 ...
- 【WEB】高并发Web服务的演变-节约系统内存和CPU
目前主流浏览器通常可以存在2-6个并发. 连接和请求,占据了服务器的大量CPU和内存等资源.在资源数目超过100+的网站页面中,使用更多的下载连接,非常有必要. 缓解“高并发”的压力的手段. 一. W ...
- 高并发WEB服务的演变
一.越来越多的并发连接数 现在的Web系统面对的并发连接数在近几年呈现指数增长,高并发成为了一种常态,给Web系统带来不小的挑战.以最简单粗暴的方式解决,就是增加 Web系统的机器和升级硬件配置.虽然 ...
- 提高Django高并发性的部署方案(Python)
方案: nginx + uWSGI 提高 Django的并发性 1. uWSGI : uWSGI是一个web服务器,实现了WSGI协议.uwsgi协议.h ...
- 高并发Web服务的演变——节约系统内存和CPU
节约系统内存和CPU http://www.csdn.net/article/2015-02-12/2823952 Web系统大规模并发——电商秒杀与抢购 http://www.csdn.net/ar ...
随机推荐
- 逻辑引擎、工作流、CMDB小感
工作流是啥? 在界面上画画点点就能生成代码,这是很吸引人的事情,也是很多自动化工具追求的目标.工作流就是这么一个东西,通过定义流程和输入,就能实现你想要的东西,不需要编写代码. 工作流的实现 通过解析 ...
- MVC之实现基于token的认证
安装Nuget包 项目中添加包:dotnet add package Microsoft.AspNetCore.Authentication.JwtBearer 添加认证配置 Startup类中添加如 ...
- 2- 计算机的组成以及VMware使用
计算机的组成: 硬件: 处理器(CPU):I3 I5 I7 运行内存RAM(存储数据) 容量(字节为单位) 主板(总线设备) 输入输出设备(显示屏,键盘,鼠标,触目屏) 外部存储设备(硬盘,U盘,TF ...
- 【Nginx(二)】Nginx目录结构和常用的命令以及核心配置文件
Nginx的目录结构: 默认的安装路径 : /usr/local/nginx 安装完成后,Nginx的目录结构如下: conf: #所有配置文件的目录 nginx.conf #默认的主要配置文件 ...
- 【JDK8】Java8 新增BASE64加解密API
什么是Base64编码? Base64是网络上最常见的用于传输8Bit字节码的编码方式之一,Base64就是一种基于64个可打印字符来表示二进制数据的方法 基于64个字符A-Z,a-z,0-9,+,/ ...
- 逆向 stdio.h 函数库 fseek 函数(调试版本)
0x01 fseek 函数 函数原型:int fseek(FILE *stream, long int offset, int whence) 函数功能:设置流 stream 的文件位置为给定的偏移 ...
- windows-CODE注入(远程线程注入)
远程线程注入(先简单说,下面会详细说)今天整理下代码注入(远程线程注入),所谓代码注入,可以简单的理解为是在指定内进程里申请一块内存,然后把我们自己的执行代码和一些变量拷贝进去(通常是以启线程的方式) ...
- Listview滑动时不加载数据,停下来时加载数据,让App更优
http://blog.csdn.net/yy1300326388/article/details/45153813
- 月薪6K和月薪2W的测试,有什么区别?
之前,我收到了一位朋友的好消息,说自己拿到了接近月薪 20k 的 offer. 说实话,软件测试岗位前期门槛低,但是想要拿到高薪真没那么简单.工作 2-3 年薪资还在原地打转的同学,都大有人在. ...
- [敏杰开发]知识路书——图形化文献管理大师 Beta版发布喽!!!
[敏杰开发]知识路书--图形化文献管理大师 Beta版发布喽!!! 一.总览 项目名称:知识路书 发布形式:网页应用 发布地址:http://roadmap.imcoming.top 二.运行环境与使 ...