26.Qt Quick QML-RotationAnimation、PathAnimation、SmoothedAnimation、Behavior、PauseAnimation、SequentialAnimation和ParallelAnimation
1.RotationAnimation
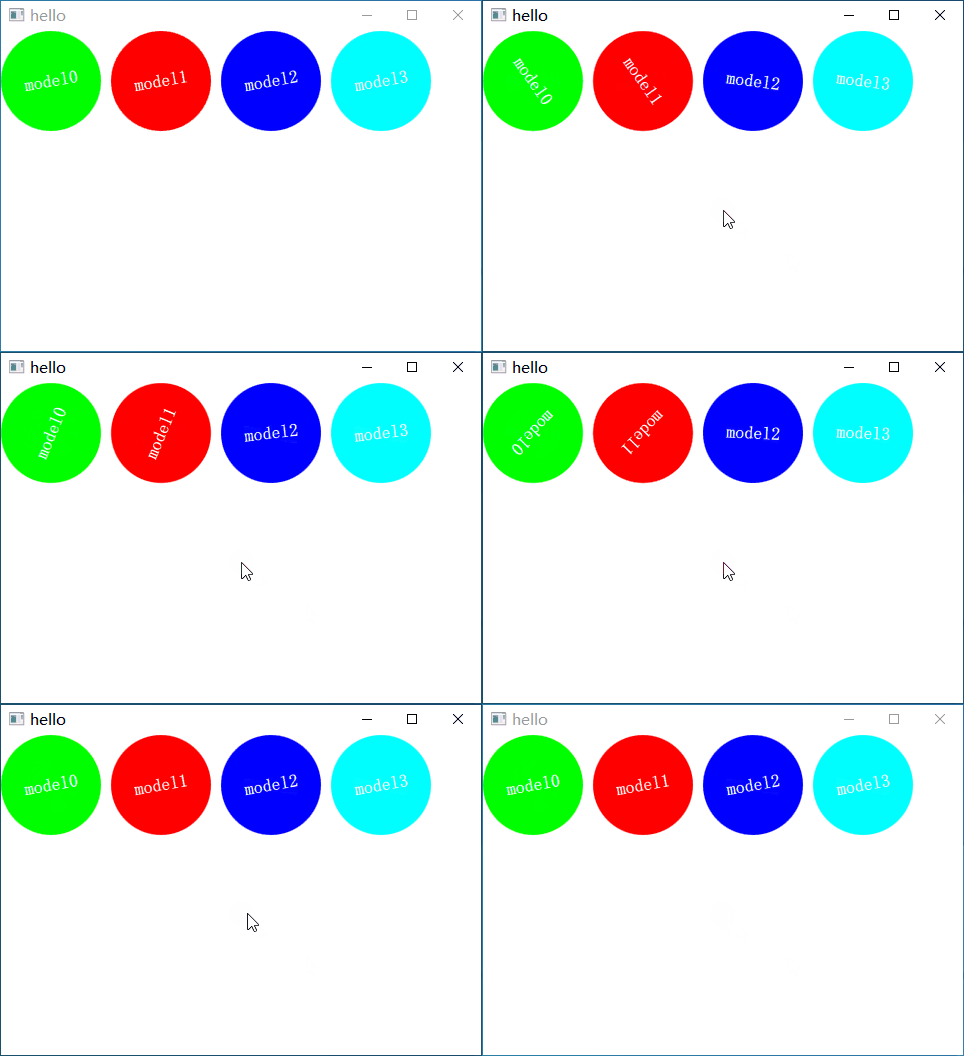
RotationAnimation也是继承于PropertyAnimation组件,但是它有点特殊,它只需要指定taget目标对象,并且不需要指定property,因为rotation就是要绑定的属性.并且它还多了个direction属性:
- direction : enumeration,设置旋转的方向,取值有:
- RotationAnimation.Numerical (默认值) - 数值旋转,通过to-from得出要旋转的度数,然后进行旋转,比如from为10,to为100,那么旋转就是90°
- RotationAnimation.Clockwise - 在两个度数之间进行顺时针旋转,比如from为10,to为100,那么顺旋转就是90°
- RotationAnimation.Counterclockwise - 在两个度数之间进行逆时针旋转,比如from为10,to为100,那么逆旋转就是90°
- RotationAnimation.Shortest - 沿最短路径的方向旋转。比如from为10,to为350,那么将逆时针旋转20°
示例如下所示:
  property var rotationModel: [

        ["#00FF00", RotationAnimation.Numerical],

        ["#FF0000", RotationAnimation.Clockwise],

        ["#0000FF", RotationAnimation.Counterclockwise],

        ["#00FFFF", RotationAnimation.Shortest],

    ]

    property var animations: new Array(0)

    MouseArea {

        id: area

        anchors.fill: parent

        onPressed: {

            for (var i in animations) {

                console.log(animations[i].direction)

                animations[i].start();

            }

        }

    }

    Row {

        spacing: 10

        Repeater {

            model: rotationModel.length

            Rectangle {

                id: rect

                width: 100

                height: 100

                radius: width / 2

                color: rotationModel[index][0]

                Text {

                    anchors.centerIn: parent

                    text: "model"+ index.toString()

                    color: "white"

                    font.pixelSize: 18

                    font.bold: true

                }

                RotationAnimation {

                    running: true

                    duration: 500

                    target: rect

                    direction: rotationModel[index][1]

                    from :  10

                    to :  350

                    Component.onCompleted: animations[index] = this

                }

            }

        }

    }
效果如下所示:

2.PathAnimation
PathAnimation继承于Animation组件,用来实现一个路径动画.
它的属性如下所示:
- anchorPoint : point,设置目标瞄点,默认为目标的左上角(其0,0点)将定位到(或跟随)路径。比如10x10的Rectangle,那么anchorPoint为Qt.point(5, 5)时则表示始终让物体中心处于路径上
- duration : int,持续时间
- easing.type : enumeration,设置动画的缓和曲线.默认值为Easing.Linear(线性过程),比如我们设置为Easing.InQuad时,动画效果就是从慢到快的过程.
- easing.amplitude : real,设置缓和曲线的振幅,默认值为1.0,值越大振幅越大,仅当easing.type为Easing.InBounce, Easing.OutBounce, Easing.InOutBounce, Easing.OutInBounce, Easing.InElastic, Easing.OutElastic, Easing.InOutElastic or Easing.OutInElastic才生效
- orientation : enumeration,设置对象在路径上的方向,取值有以下几种:
- PathAnimation.Fixed (default) - 在动画中只是移动物体,并不旋转物体
- PathAnimation.RightFirst - 始终让目标的右侧在前面沿着路径移动
- PathAnimation.LeftFirst - 始终让目标的左侧在前面沿着路径移动
- PathAnimation.BottomFirst - 始终让目标的底部在前面沿着路径移动
- PathAnimation.TopFirst - 始终让目标的顶部在前面沿着路径移动
- endRotation : real,设置目标移动路径结束后的旋转角度,如果orientationEntryDuration未设置,物体则会直接跳转到该值,否则就以动画的形式结束
- orientationEntryDuration : real,设置启动时的旋转过渡时间(毫秒单位),比如启动动画时,如果当前目标方向和orientation值方向不一致,则需要一个过渡时间才行
- orientationExitDuration : real,设置结束时的旋转过渡时间(毫秒单位),如果endRotation已设置,那么就会有个过渡时间,让物体最终旋转到endRotation角度.
- target : Item ,设置动画的目标对象
- path : Path,设置动画的路径。
接下来我们便来讲解Path路径
3.Path
一个Path可以由下面多个Path段组成:
- PathLine : 由一个坐标指定的直线路径
- PathPolyline : 由一个path坐标列表指定的多段路径
- PathQuad : 由一个控制点生成的二次贝塞尔曲线路径
- PathCubic : 由两个控制点生成的三次贝塞尔曲线路径
- PathArc : 由结束坐标,以及一个radiusX和radiusY半径实现的一个圆弧(顺时针绘画)
- PathAngleArc : 由中心点、半径和起始角度startAngle、旋转角度sweepAngle指定的圆弧。
- PathCurve :由一个坐标点生成的curve曲线路径(通常需要配合多个PathCurve才行)
- PathSvg : 由SVG路径字符串实现的路径。你可以用它创建线条, 曲线, 弧形等等
显示一个Path路径
我们可以通过设置context2D的path属性,来显示出我们绘画的Path路径,不然都不知道绘制的路径到底对不对,真是"半夜吃黄瓜-摸不着头尾"
我们以PathArc为例,示例如下所示:
Canvas {

            id: canvas

            anchors.fill: parent

            antialiasing: true

            onPaint: {

                var context = canvas.getContext("2d")

                context.clearRect(0, 0, width, height)

                context.strokeStyle = "black"

                context.path = path

                context.stroke()

            }

        }

        Path {

            id: path

            startX: 100; startY: 100

            PathArc {

              x: 100; y: 140

              radiusX: 100; radiusY: 50

              useLargeArc: true

              xAxisRotation: 30

            }

}
效果如下所示:

这里我们设置弧线的起始位置为(100,100),终点位置为(100,140).
它的useLargeArc为true,表示使用角度大的那个圆弧,如果设置为false,则将会使用小的那个圆弧
它的xAxisRotation表示x水平方向是否倾斜,我们这里按顺时针倾斜了30°,该值仅在x和y半径不同时有用,这意味着圆弧是椭圆形的
接下来我们便来学习PathSvg路径.
4.PathSvg
PathSvg支持的命令如下所示:
- M = moveto,移动画笔到指定点处(只是移动位置,不画线),写法:M x y
- L = lineto,从当前点绘制一条直线到目的点,写法:L x y
- H = horizontal lineto,绘制一条平行线,写法:H x
- V = vertical lineto,绘制一条垂直线,写法:V y
- C = curveto,绘制一条三次贝塞尔曲线,写法:C x1 y1, x2 y2, x y (x和y为终点,其它两个为控制点)
- S = smooth curveto,用来写在C命令后面时来延长贝塞尔曲线,当然也可以跟在S命令后面,写法:S x1 y1, x y(x1和y1是控制点,x和y是终点)
- Q = quadratic Bézier curve,绘制一条二次贝塞尔曲线,写法:Q x1 y1, x y
- T = smooth quadratic Bézier curveto,用来写在Q命令后面时来延长贝塞尔曲线,当然也可以跟在T命令后面,写法:T x y
- A = elliptical Arc,绘制一条圆弧,写法:A rx ry x-axis-rotation large-arc-flag sweep-flag x y
- rx、ry:表示圆弧的半径
- x-axis-rotation: 表示x水平方向是否倾斜,比如设置为-45,则圆弧会逆时针倾斜45°,注意:该值仅在x和y半径不同时有用,这意味着圆弧是椭圆形的
- large-arc-flag:设置为0表示绘制小圆弧,为1表示大圆弧
- sweep-flag: 表示弧线的方向,0表示从起点到终点沿逆时针画弧,1表示从起点到终点沿顺时针画弧
- x、y:表示绘制的终点位置
- Z = closepath,关闭路径,将会从当前点绘制一条直线到开始点.
5.PathAnimation使用PathSvg示例
Canvas {

            id: canvas

            anchors.fill: parent

            antialiasing: true

            onPaint: {

                var context = getContext("2d")

                context.clearRect(0, 0, width, height)

                context.strokeStyle = "red"

                context.path = pathAnim.path

                context.stroke()

            }

    }

    PathAnimation {

        id: pathAnim

        running: true

        loops: Animation.Infinite

        duration: 5000

        easing.type: Easing.InQuad

        target: car

        orientation: PathAnimation.RightFirst

        anchorPoint: Qt.point(car.width/2, car.height)

        path: Path {

            startX: 100; startY: 100

            PathSvg {

               path: "M100 100 C600 50, 50 300, 550 250"

            }

        }

    }

    Item {

        id: car

        x: 25; y: 25

        width: 80; height: 38

        Canvas {

            id: canvas2

            anchors.fill: parent

            antialiasing: true

            onPaint: {

                var context = getContext("2d")

                context.clearRect(0, 0, width, height)

                context.fillStyle = "blue"

                context.fillRect(0,0,width,height-10)

                context.fillStyle = "yellow"

                context.ellipse(10,height-20,20,20)

                context.ellipse(width-30,height-20,20,20)

                context.fill()

                console.log(width,height)

            }

        }

        Text {

            anchors.centerIn: parent

            text: "小车"

            color: "white"

        }

    }
效果如下所示:

6.SmoothedAnimation
SmoothedAnimation继承于NumberAnimation组件,它比NumberAnimation更加人性化,不仅可以设置duration时间,还可以设置滑动速率。
并且SmoothedAnimation的easing.type默认值为Easing.InOutQuad(慢->快->慢).
SmoothedAnimation如果同时指定了velocity速度和duration持续时间,则会选择导致动画速度最快的那个所需时间.
例如:
- 如果velocity速度设置为200,如果duration设置为5000.
- 假如此时需要将一个物体从0位移到800,那么此时将会选择velocity速度的时间,因为只需要4秒时间.
- 假如此时需要将一个物体从0位移到2000,那么此时将会选择duration时间,因为只需要5秒时间.
它的属性如下所示:
- duration : int,持续时间,默认值为-1.表示禁用持续时间值。
- reversingMode : enumeration,设置如果动画方向被突然被反转后的行为(比如当前动画正在往左边移动时,突然用户让动画往右边移动),取值如下所示:
- SmoothedAnimation.Eased(默认)-动画将按照速度平滑减速到0后,开始反转方向加速
- SmoothedAnimation.Immediate-动画将立即以0的速度开始反向加速
- SmoothedAnimation.Sync-立即将属性设置为目标值
- velocity : real,设置速度,默认值为200(200像素点每秒),如果将此设置为-1(默认值)将禁用速度值。
示例如下所示:
    MouseArea {

            anchors.fill: parent

            hoverEnabled: true

            onPositionChanged: {

                animation1.to = mouseX - rect.width/2

                animation2.to = mouseY - rect.height/2

                animation1.restart()

                animation2.restart()

            }

        }

    Rectangle {

        id: rect

        color: "red"

        width: 60; height: 60

        radius: width/2

        SmoothedAnimation on x{

            id: animation1

            velocity: 100

            reversingMode: SmoothedAnimation.Immediate

        }

        SmoothedAnimation on y{

            id: animation2

            velocity: 100

            reversingMode: SmoothedAnimation.Immediate

        }

    }
只要当我们鼠标位置发生改变就会启动SmoothedAnimation动画进行平滑移动,但是我们这样写,代码显得有点繁琐,可以使用Behavior组件来代替设置from和to的行为来节省代码量
接下来我们来给大家讲讲Behavior.
7.Behavior
Behavior用来让动画绑定到对象一个属性上,Behavior中文翻译就是行为的意思,所以当绑定属性发生改变时,就会自动触发Behavior行为,Behavior就会自动设置动画的to属性,并启动动画.
Behavior只有两个属性animation和enabled, animation保存着要触发行为的哪个动画,enabled表示是否使能行为,默认为true.
Behavior示例如下所示:
MouseArea {

        anchors.fill: parent

        hoverEnabled: true

        onPositionChanged: {

            rect.x = mouseX - rect.width/2

            rect.y = mouseY - rect.height/2

        }

    }

Rectangle {

    id: rect

    color: "red"

    width: 60; height: 60

    radius: width/2

    Behavior on x {

        SmoothedAnimation {

            velocity: 100

            reversingMode: SmoothedAnimation.Immediate

        }

    }

    Behavior on y {

        SmoothedAnimation {

            velocity: 100

            reversingMode: SmoothedAnimation.Immediate

        }

    }

}
这里我们使用Behavior分别为属性绑定了SmoothedAnimation动画,然后我们只需要改变x,y属性,就会自动触发行为,设置我们改变的值到动画的to属性中,并启动动画
8.PauseAnimation
PauseAnimation顾名思义就是暂停动画的意思,只有一个duration属性,用来设置该期间内什么都不做.
并且只能在SequentialAnimation动画中使用,接下来我们便来学习SequentialAnimation和ParallelAnimation,并在代码中使用它
9.SequentialAnimation和ParallelAnimation
SequentialAnimation用来将多个动画串行地执行下去.而ParallelAnimation是用来将多个动画并行地执行下去.
并且SequentialAnimation和ParallelAnimation还可以互相嵌套.
需要注意的是:
- SequentialAnimation或ParallelAnimation中定义的动画不能单独启动和停止;必须作为一个组来启动和停止。
- 并且SequentialAnimation和ParallelAnimation的running默认为false.如果要想加载组件后立即启动的话,我们需要手动设置(不需要全部设置,只需要设置最顶层动画的running值即可)
示例如下所示:
Window{

    id: window

    width: 480

    height: 320

    visible: true

    SequentialAnimation {

        SequentialAnimation {

            ParallelAnimation {

                NumberAnimation {

                    target: ball1

                    property: "y"

                    from: 20

                    to: height - ball1.height - 20

                    easing.type: Easing.OutBounce;

                    duration: 1200

                }

                NumberAnimation {

                    target: ball2

                    property: "y"

                    from: 20

                    to: height - ball2.height - 20

                    easing.type: Easing.OutBounce;

                    duration: 800

                }

            }

        }

        PauseAnimation { duration: 500 }

        running: true

        loops: Animation.Infinite

    }

    Rectangle {

        id: ball1

        width: 40; height: 40;

        radius: 20

        color: "blue"

        x: 30

    }

    Rectangle {

        id: ball2

        width: 60; height: 60;

        radius: 30

        color: "red"

        x: 200

    }

}
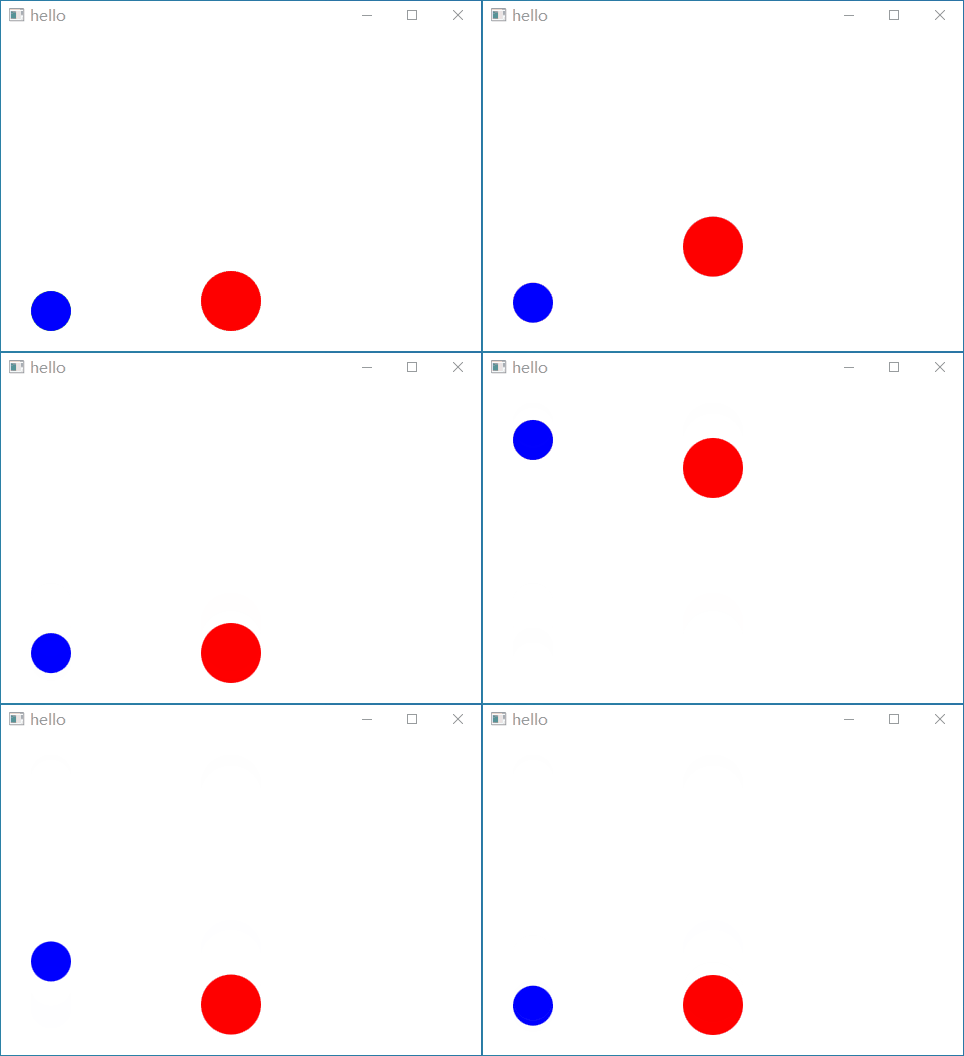
效果如下所示:

如上图所示,可以看到每当小球落到地后,就会启动PauseAnimation暂停动画,等待500ms
26.Qt Quick QML-RotationAnimation、PathAnimation、SmoothedAnimation、Behavior、PauseAnimation、SequentialAnimation和ParallelAnimation的更多相关文章
- Qt Quick QMl学习笔记 之图片浏览器
Qt Quick模块是编写QML应用程序的标准库.虽然Qt QML模块提供QML引擎和语言基础结构,但Qt Quick模块提供了使用QML创建用户界面所需的所有基本类型.它提供了一个可视画布,包括用于 ...
- Qt Quick之StackView具体解释(1)
Qt Quick中有个StackView.我在<Qt Quick核心编程>一书中没有讲到.近期有人问起,趁机学习了一下,把它的基本使用方法记录下来. 我准备分两次来讲.第一次讲主要的使用方 ...
- qt quick中qml编程语言
Qt QML 入门 — 使用C++定义QML类型 发表于 2013 年 3 月 11 日 注册C++类 注册可实例化的类型 注册不实例化的QML类型 附带属性 注册C++类 注册可实例化的类型 如 ...
- Qt Quick 之 QML 与 C++ 混合编程具体解释
Qt Quick 技术的引入.使得你能够高速构建 UI ,具有动画.各种绚丽效果的 UI 都不在话下.但它不是万能的.也有非常多局限性,原来 Qt 的一些技术,比方低阶的网络编程如 QTcpSocke ...
- 从头学Qt Quick(3)-- 用QML写一个简单的颜色选择器
先看一下效果图: 实现功能:点击不同的色块可以改变文字的颜色. 实现步骤: 一.创建一个默认的Qt Quick工程: 二.添加文件Cell.qml 这一步主要是为了实现一个自定义的组件,这个组件就是我 ...
- Qt Quick 与 QML语言(初学笔记1)
Qt Quick Qt Quick是一些新的UI技术的集合,用来帮助开发者创建一种现在越来越多用于手机.多媒体播放器.机顶盒以及其他便携式设备上的直观的.现代的.流畅的用户界面.简单来说,Qt Qui ...
- 对Qt for Android的评价(很全面,基本已经没有问题了,网易战网客户端就是Qt quick写的),可以重用QT积累20年的RTL是好事,QML效率是HTML5的5倍
现在Qt不要光看跨平台了,Qt也有能力和原生应用进行较量的.可以直接去Qt官网查看他和那些厂商合作.关于和Java的比较,框架和Java进行比较似乎不且实际.如果是C++和Java比较,网上有很多文章 ...
- Qt Quick编程(1)——QML的核心部分ECMAScript
说道QML,不得不先说一下ECMAScript: ECMAScript语言的标准是由Netscape.Sun.微软.Borland等公司基于JavaScript和JScript锤炼.定义出来的. EC ...
- 【Qt】Qt Quick 之 QML 与 C++ 混合编程详解
Qt Quick 之 QML 与 C++ 混合编程详解 - CSDN博客 专栏:Qt Quick简明教程 - CSDN博客 .
随机推荐
- 007-Java中方法的使用(基础篇)
目录 一.方法的基本概述 一.方法的概述 二.方法的语法机制 三.方法的调用 一.方法的基本概述 一.方法的概述 方法其实就是一段可以完成某个特定功能的并且可以被重复利用的代码片段,方法的出现,让 ...
- 生活随笔:Furious 7:人生的路口,你先向西,但终点只有一个
FOR PAUL It's never goodbye see you again "他永远都是我们的家人."Dom起身准备离开 Letty问他,你打算不告而 ...
- 1061 Dating
Sherlock Holmes received a note with some strange strings: Let's date! 3485djDkxh4hhGE 2984akDfkkkkg ...
- ASP检测客户是否取消微信公众号
有时因为项目内需要用到检测客户是否已经取消关注微信公众号,只有没被取消执行相关模板信息发送.图文信息发送.视频语音等信息发送给客户才有意义.也可以知道多少客户还在我们的微信公众号关注内.方便后期做公众 ...
- 硬件篇-04-SLAM移动底盘机械设计
这篇比较水,发出来主要是为了呼应专栏主题,既然是实现,那各个方面都得讲一下不是. 底盘SW模型 淘的,主要是看上了它有弹簧阻尼器,适合野外,抗震,但是这种底盘结构转向起来比较吃力.是再有个全轮 ...
- 【小技巧】Windows 小技巧
快捷键: 1.Win7窗口最大化和最小化快捷键 最大化:window+↑ 最小化:window+↓
- Linux系统应急响应
目录 排查用户相关的信息 排查进程端口相关的信息 查找恶意程序并杀掉 斩草除根 判断入侵方式,修复漏洞 当我们被告知一台Linux服务器被黑客入侵,黑客利用该服务器进行挖矿,并且在该服务器上放置了木马 ...
- 使用jenkins一键打包发布vue项目
jenkins的安装 Jenkins是一款开源 CI&CD 软件,用于自动化各种任务,包括构建.测试和部署软件. Jenkins 支持各种运行方式,可通过系统包.Docker 或者通过一个独立 ...
- Mac使用brew搭建LNMP
一. brew常用命令 安装brew /usr/bin/ruby -e "$(curl -fsSL https://raw.githubusercontent.com/Homebrew/in ...
- v-bind的使用
v-bind v-bind的引入 内容的绑定可以通过mustache语法,而属性的绑定往往需要通过v-bind 如动态绑定img的src属性 如动态绑定div的class属性 如动态绑定li元素的 ...
