Vuex2.0+Vue2.0构建备忘录应用实践
一、介绍Vuex
Vuex 是一个专为 Vue.js 应用程序开发的状态管理模式。它采用集中式存储管理应用的所有组件的状态,并以相应的规则保证状态以一种可预测的方式发生变化,适合于构建中大型单页应用。
1、什么是状态管理模式?
看个简单的例子:
<!DOCTYPE html>

<html>

<head>

  <meta charset="utf-8">

  <meta name="viewport" content="width=device-width">

  <title>Vuex Demo 01</title>

<script src="http://cdn.bootcss.com/vue/1.0.26/vue.min.js"></script>

<script src="http://cdn.bootcss.com/vuex/0.8.2/vuex.min.js"></script>

</head>

<body>

  <!-- 2、view,映射到视图的数据counterValue; -->

  <h3>Count is {{ counterValue }}</h3>

  <div>

    <button @click="increment">Increment +1</button>

    <button @click="decrement">Decrement -1</button>

  </div>

</body>

<script>

var app = new Vue({

  el: 'body',

  store: new Vuex.Store({

    // 1、state,驱动应用的数据源;

    state: {

      count: 0

    },

    mutations: {

      INCREMENT: function(state, amount) {

        state.count = state.count + amount

      },

      DECREMENT: function(state, amount) {

        state.count = state.count - amount

      }

    }

  }),

  vuex: {

    getters: {

      counterValue: function(state) {

        return state.count

      }

    },

    // 3、actions,响应在view上的用户输入导致的状态变化。

    actions: {

      increment: function({ dispatch, state }){

        dispatch('INCREMENT', 1)

      },

      decrement: function({ dispatch, state }){

        dispatch('DECREMENT', 1)

      }

    }

  }

})

</script>

</html>
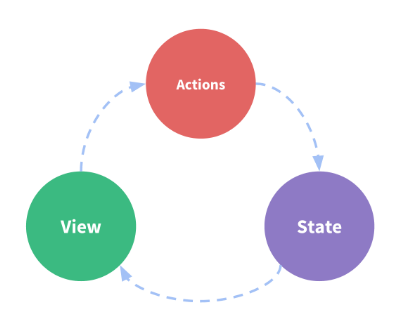
代码中标识了:
1、state,驱动应用的数据源;
2、view,映射到视图的数据counterValue;
3、actions,响应在view上的用户输入导致的状态变化。
用简单示意图表示他们之间的关系:
我们知道,中大型的应用一般会遇到多个组件共享同一状态的情况:
1、多个视图依赖于同一状态
2、来自不同视图的行为需要变更同一状态
于是需要把组件的共享状态抽取出来,以一个全局单例模式管理,另外,需要定义和隔离状态管理中的各种概念并强制遵守一定的规则。
这就是 Vuex 背后的基本思想,借鉴了 Flux、Redux、和 The Elm Architecture。与其他模式不同的是,Vuex 是专门为 Vue.js 设计的状态管理库,以利用 Vue.js 的细粒度数据响应机制来进行高效的状态更新。
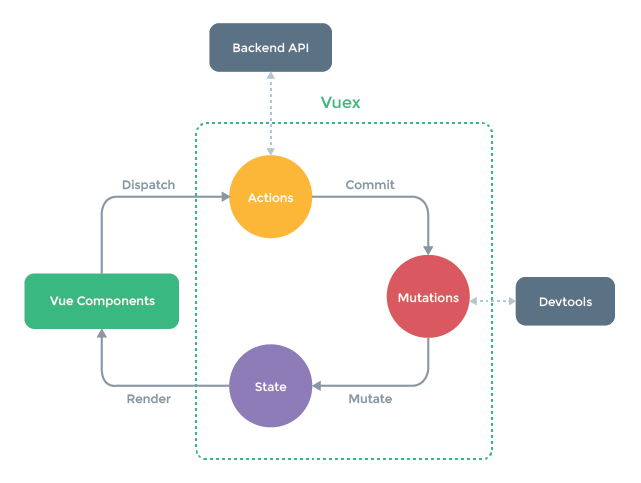
2、Vuex的核心概念
1、State: 单一状态树,用一个对象包含了全部的应用层级状态,作为一个『唯一数据源(SSOT)』而存在,每个应用将仅仅包含一个 store 实例。
2、Getters: Vuex 允许我们在 store 中定义『getters』(可以认为是 store 的计算属性)。
3、Mutations: Vuex 中的 mutations 非常类似于事件:每个 mutation 都有一个字符串的 事件类型 (type) 和 一个 回调函数 (handler)。这个回调函数就是我们实际进行状态更改的地方,并且它会接受 state 作为第一个参数。
4、Actions: 类似于 mutation,不同在于:①Action 提交的是 mutation,而不是直接变更状态;②Action 可以包含任意异步操作。
5、Modules: 为解决单一状态树导致应用的所有状态集中在一个store对象的臃肿问题,Vuex将store分割到模块(module)。每个模块拥有自己的 state、mutation、action、getters、甚至是嵌套子模块——从上至下进行类似的分割。
接着我们开始构建备忘录应用,在以下构建过程的介绍中,再加深理解上述概念。
二、环境安装
1.安装 vue-cli

2.初始化应用
vue init webpack vue-notes-demo

cd vue-notes-demo

npm install // 安装依赖包

npm run dev // 启动服务

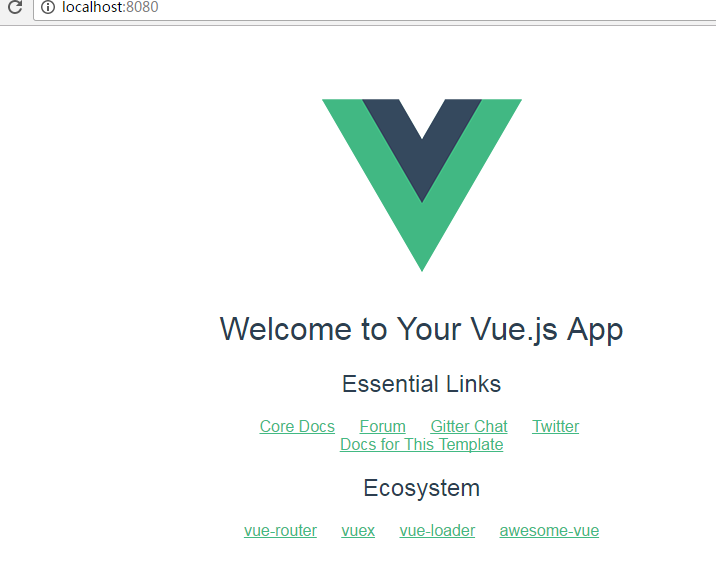
结果为:
目录结构为:

三、功能模块
先看下我们要做的demo的效果为:
主要功能模块为:
新增计划,新增一个计划,编辑区显示空的计划内容。
移除计划,删除一个计划之后,计划列表少了该计划。
所有计划的总时长,将所有的计划时间加起来。
四、项目组件划分
在原来的目录结构的调整下,最终的目录结构为:
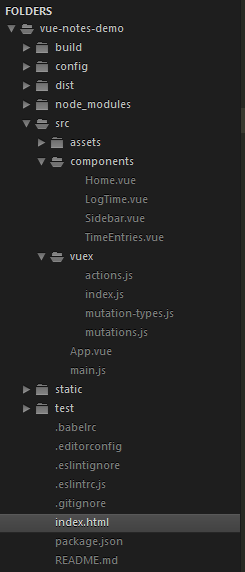
下面详细介绍下:
1、组件部分
1.首页组件:Home.vue
<template>

  <div class="jumbotron">

    <h1>我的备忘录</h1>

    <p>

      <strong>

        <router-link to="/time-entries">创建一个计划</router-link>

      </strong>

    </p>

  </div>

</template>
2.计算计划总时长组件:Sidebar.vue
<template>

  <div class="panel panel-default">

    <div class="panel-heading">

      <h3 class="text-center">所有计划的总时长: {{ time }} 小时</h3>

    </div>

  </div>

</template>

<script>

  export default {

    computed: {

        time() {

          return this.$store.state.totalTime

        }

      }

  }

</script>
3.计划列表组件:TimeEntries.vue
<template>

  <div>

    <router-link

      v-if="$route.path !== '/time-entries/log-time'"

      to="/time-entries/log-time"

      class="btn create-plan">

      创建

    </router-link>

    <div v-if="$route.path === '/time-entries/log-time'">

      <h3>新的计划</h3>

    </div>

    <hr>

    <router-view></router-view>

    <div class="time-entries">

      <p v-if="!plans.length"><strong>还没有任何计划(┬_┬),快去创建吧ヽ(●-`Д´-)ノ</strong></p>

      <div class="list-group">

        <a class="list-group-item" v-for="(plan,index) in plans">

          <div class="row">

            <div class="col-sm-2 user-details">

              <img :src="plan.avatar" class="avatar img-circle img-responsive" />

              <p class="text-center">

                <strong>

                  {{ plan.name }}

                </strong>

              </p>

            </div>

            <div class="col-sm-2 text-center time-block">

              <p class="list-group-item-text total-time">

                <span class="glyphicon glyphicon-time">计划总时间:</span>

                {{ plan.totalTime }}

              </p>

              <p class="label label-primary text-center">

                <span class="glyphicon glyphicon-calendar">开始时间:</span>

                {{ plan.date }}

              </p>

            </div>

            <div class="col-sm-7 comment-section">

              <p>备注信息:{{ plan.comment }}</p>

            </div>

              <button

                class="btn btn-xs delete-button"

                @click="deletePlan(index)">

              X

              </button>

          </div>

        </a>

      </div>

    </div>

  </div>

</template>

<script>

    export default {

        name : 'TimeEntries',

        computed : {

          plans () {

            return this.$store.state.list

          }

        },

        methods : {

          deletePlan(idx) {

            // 减去总时间

            this.$store.dispatch('decTotalTime',this.plans[idx].totalTime)

            // 删除该计划

            this.$store.dispatch('deletePlan',idx)

          }

        }

    }

</script>
4.新增计划组件:LogTime.vue
<template>
<div class="form-horizontal">
<div class="form-group">
<div class="col-sm-6">
<label>开始日期:</label>
<input
type="date"
class="form-control"
v-model="date"
placeholder="Date"
/>
</div>
<div class="col-sm-6">
<label>总时间 :</label>
<input
type="number"
class="form-control"
v-model="totalTime"
placeholder="Hours"
/>
</div>
</div>
<div class="form-group">
<div class="col-sm-12">
<label>备注 :</label>
<input
type="text"
class="form-control"
v-model="comment"
placeholder="Comment"
/>
</div>
</div>
<button class="btn btn-primary" @click="save()">保存</button>
<router-link to="/time-entries" class="btn btn-danger">取消</router-link>
<hr>
</div>
</template> <script>
export default {
name : 'LogTime',
data() {
return {
date : '',
totalTime : '',
comment : ''
}
},
methods:{
save() {
const plan = {
name : 'eraser',
image : 'https://pic.cnblogs.com/avatar/504457/20161108225210.png',
date : this.date,
totalTime : this.totalTime,
comment : this.comment
};
this.$store.dispatch('savePlan', plan)
this.$store.dispatch('addTotalTime', this.totalTime)
this.$router.go(-1)
}
}
}
</script>
2、vuex中用来存储数据的划分为:
1.初始化vuex.Store: index.js
import Vue from 'vue'

import Vuex from 'vuex'

import mutations from './mutations'

import actions from './actions'

Vue.use(Vuex);

const state = {

  totalTime: 0,

  list: []

};

export default new Vuex.Store({

  state,

  mutations,

  actions

})
State: 单一状态树,用一个state对象包含了全部的应用层级状态,代码中只new 了一次store实例 Vuex.Store。
2.负责触发事件和传入参数:actions.js
import * as types from './mutation-types'

export default {

  addTotalTime({ commit }, time) {

    commit(types.ADD_TOTAL_TIME, time)

  },

  decTotalTime({ commit }, time) {

    commit(types.DEC_TOTAL_TIME, time)

  },

  savePlan({ commit }, plan) {

    commit(types.SAVE_PLAN, plan);

  },

  deletePlan({ commit }, plan) {

    commit(types.DELETE_PLAN, plan)

  }

};
实践中,我们会经常会用到 ES2015 的 参数解构 来简化代码(特别是我们需要调用 commit 很多次的时候):
actions: {

  increment ({ commit }) {

    commit('increment')

  }

}
3.注册各种数据变化的方法: mutations.js
import * as types from './mutation-types'

export default {

    // 增加总时间

  [types.ADD_TOTAL_TIME] (state, time) {

    state.totalTime = state.totalTime + time

  },

  // 减少总时间

  [types.DEC_TOTAL_TIME] (state, time) {

    state.totalTime = state.totalTime - time

  },

  // 新增计划

  [types.SAVE_PLAN] (state, plan) {

    // 设置默认值,未来我们可以做登入直接读取昵称和头像

    const avatar = 'https://pic.cnblogs.com/avatar/504457/20161108225210.png';

    state.list.push(

      Object.assign({ name: 'eraser', avatar: avatar }, plan)

    )

  },

  // 删除某计划

  [types.DELETE_PLAN] (state, idx) {

    state.list.splice(idx, 1);

  }

};
使用常量替代 mutation 事件类型在各种 Flux 实现中是很常见的模式。这样可以使 linter 之类的工具发挥作用,同时把这些常量放在单独的文件中可以让你的代码合作者对整个 app 包含的 mutation 一目了然:
// mutation-types.js

export const SOME_MUTATION = 'SOME_MUTATION'

mutations: {

    // 我们可以使用 ES2015 风格的计算属性命名功能来使用一个常量作为函数名

    [SOME_MUTATION] (state) {

      // mutate state

    }

  }
4.记录所有的事件名: mutation-types.js
// 增加总时间或者减少总时间

export const ADD_TOTAL_TIME = 'ADD_TOTAL_TIME';

export const DEC_TOTAL_TIME = 'DEC_TOTAL_TIME';

// 新增和删除一条计划

export const SAVE_PLAN = 'SAVE_PLAN';

export const DELETE_PLAN = 'DELETE_PLAN';
配合上面常量替代 mutation 事件类型的使用
3、初始化部分
入口文件渲染的模版index.html比较简单:
<!DOCTYPE html>

<html>

  <head>

    <meta charset="utf-8">

    <title>vue-notes-demo</title>

  </head>

  <body>

    <div id="app">

      <router-view></router-view>

    </div>

  </body>

</html>
入口文件main.js的代码:
import Vue from 'vue';

import App from './App';

import Home from './components/Home';

import TimeEntries from './components/TimeEntries.vue'

import VueRouter from 'vue-router';

import VueResource from 'vue-resource';

import store from './vuex/index';

// 路由模块和HTTP模块

Vue.use(VueResource);

Vue.use(VueRouter);

 const routes = [

  { path: '/home', component: Home },

  {

    path : '/time-entries',

    component : TimeEntries,

    children : [{

      path : 'log-time',

      // 懒加载

      component : resolve => require(['./components/LogTime.vue'],resolve),

    }]

  },

  { path: '*', component: Home }

]

const router = new VueRouter({

      routes // short for routes: routes

});

// router.start(App, '#app');

const app = new Vue({

      router,

      store,

       ...App,

}).$mount('#app');
代码中
...App 相当于 render:h => h(App)
初始化组件App.vue为:
<!-- // src/App.vue -->

<template>

  <div id="wrapper">

    <nav class="navbar navbar-default">

      <div class="container">

        <a class="navbar-brand" href="#">

          <i class="glyphicon glyphicon-time"></i>

          备忘录

        </a>

        <ul class="nav navbar-nav">

          <li><router-link to="/home">首页</router-link></li>

          <li><router-link to="/time-entries">计划列表</router-link></li>

        </ul>

      </div>

    </nav>

    <div class="container">

      <div class="col-sm-9">

        <router-view></router-view>

      </div>

       <div class="col-sm-3">

         <sidebar></sidebar>

      </div>

    </div>

  </div>

</template>

<script>

  import Sidebar from './components/Sidebar.vue'

  export default {

    components: { 'sidebar': Sidebar },

  }

</script>

<style>

.router-link-active {

  color: red;

}

body {

  margin: 0px;

}

.navbar {

  height: 60px;

  line-height: 60px;

  background: #333;

}

.navbar a {

  text-decoration: none;

}

.navbar-brand {

  display: inline-block;

  margin-right: 20px;

  width: 100px;

  text-align: center;

  font-size: 28px;

  text-shadow: 0px 0px 0px #000;

  color: #fff;

  padding-left: 30px;

}

  .avatar {

    height: 75px;

    margin: 0 auto;

    margin-top: 10px;

    /* margin-bottom: 10px; */

  }

  .text-center {

    margin-top: 0px;

    /* margin-bottom: 25px; */

  }

  .time-block {

    /* padding: 10px; */

    margin-top: 25px;

  }

  .comment-section {

    /* padding: 20px; */

    /* padding-bottom: 15px; */

  }

  .col-sm-9 {

    float: right;

    /* margin-right: 60px; */

    width: 700px;

    min-height: 200px;

    background: #ffcccc;

    padding: 60px;

  }

  .create-plan {

    font-size: 26px;

    color: #fff;

    text-decoration: none;

    display: inline-block;

    width: 100px;

    text-align: center;

    height: 40px;

    line-height: 40px;

    background: #99cc99;

  }

  .col-sm-6 {

    margin-top: 10px;

    margin-bottom: 10px;

  }

  .col-sm-12 {

    margin-bottom: 10px;

  }

  .btn-primary {

    width: 80px;

    text-align: center;

    height: 30px;

    line-height: 30px;

    background: #99cc99;

    border-radius: 4px;

    border: none;

    color: #fff;

    float: left;

    margin-right: 10px;

    font-size: 14px;

  }

  .btn-danger {

    display: inline-block;

    font-size: 14px;

    width: 80px;

    text-align: center;

    height: 30px;

    line-height: 30px;

    background: red;

    border-radius: 4px;

    text-decoration: none;

    color: #fff;

    margin-bottom: 6px;

  }

  .row {

    padding-bottom: 20px;

    border-bottom: 1px solid #333;

    position: relative;

    background: #f5f5f5;

    padding: 10px;

    /* padding-bottom: 0px; */

  }

  .delete-button {

    position: absolute;

    top: 10px;

    right: 10px;

  }

  .panel-default {

    position: absolute;

    top: 140px;

    right: 60px;

  }

</style>
至此,实践结束,一些原理性的东西我还需要多去理解^_^
源代码:【vuex2.0实践】
参考:
http://www.cnblogs.com/lvyongbo/p/5946271.html
Vuex2.0+Vue2.0构建备忘录应用实践的更多相关文章
- 从壹开始前后端分离【 .NET Core2.0 +Vue2.0 】框架之十二 || 三种跨域方式比较,DTOs(数据传输对象)初探
更新反馈 1.博友@落幕残情童鞋说到了,Nginx反向代理实现跨域,因为我目前还没有使用到,给忽略了,这次记录下,为下次补充.此坑已填 2.提示:跨域的姊妹篇——<三十三║ ⅖ 种方法实现完美跨 ...
- 从壹开始前后端分离【 .NET Core2.0 +Vue2.0 】框架之四 || Swagger的使用 3.2
前言 如果想直接在域名的根目录直接加载 swagger 比如访问:localhost:8001 就能访问,可以这样设置: app.UseSwaggerUI(c => { c.SwaggerEnd ...
- webpack2.0+ vue2.0
一 webpack 2.0 及用到的插件安装(默认已经有node环境) 1. package.json文件 (插件安装及插件的功能不详解) { "private": true, & ...
- Thinkphp5.0+Vue2.0前后端分离框架Vuethink
VueThink是一套基于Vue全家桶(Vue2.x + Vue-router2.x + Vuex)+ Thinkphp的前后端分离框架. 脚手架构建也可以通过vue官方的vue-cli脚手架工具构建 ...
- 从壹开始前后端分离【 .NET Core2.0 +Vue2.0 】框架之十三 || DTOs 对象映射使用,项目部署Windows+Linux完整版
更新 很多小伙伴在用 IIS 发布的时候,总是会有一些问题,文章下边 #autoid-6-0-0 我也简单的动图展示了,如何 publish 到 IIS 的过程,如果你能看懂,却发现自己的项目有问题的 ...
- 从壹开始前后端分离【 .NET Core2.0 +Vue2.0 】框架之二 || 后端项目搭建
前言 至于为什么要搭建.Net Core 平台,这个网上的解释以及铺天盖地,想了想,还是感觉重要的一点,跨平台,嗯!没错,而且比.Net 更容易搭建,速度也更快,所有的包均有Nuget提供,不再像以前 ...
- 从壹开始前后端分离【 .NET Core2.0 +Vue2.0 】框架之三 || Swagger的使用 3.1
常见问题 1.经常有小伙伴遇到这个错误 这是因为接口json文档定义和调用不是一个 1.定义: ConfigureServices 方法中的 services.AddSwaggerGen 注册的一个 ...
- 从壹开始前后端分离【 .NET Core2.0 +Vue2.0 】框架之五 || Swagger的使用 3.3 JWT权限验证【必看】
前言 关于JWT一共三篇 姊妹篇,内容分别从简单到复杂,一定要多看多想: 一.Swagger的使用 3.3 JWT权限验证[修改] 二.解决JWT权限验证过期问题 三.JWT完美实现权限与接口的动态分 ...
- 从壹开始前后端分离【 .NET Core2.0 +Vue2.0 】框架之六 || API项目整体搭建 6.1 仓储模式
前言 1.@LearningCoding 小伙伴关于用Sqlsugar在mysql数据库上的研究成果: sqlsugarcore支持mysql等数据库,在DbContext里面只需要设置dbtype为 ...
随机推荐
- 自定义基于 VLC 的视频播放器
前言(蛋疼的背景故事) 前段时间,接了一个小项目,有个需求是要在系统待机一段时间以后,循环播放 MV(类似于 Windows 系统的屏幕保护). 听到这个需求,我首先想到的是 MediaPlayer ...
- NiceMark——我的Markdown编辑器
NiceMark--我的Markdown编辑器 闲来无事,写了一个Markdown编辑器.基于electron,完全采用Web前段技术(Html,css,JavaScript)实现.代码已托管在Git ...
- [APUE]进程控制(上)
一.进程标识 进程ID 0是调度进程,常常被称为交换进程(swapper).该进程并不执行任何磁盘上的程序--它是内核的一部分,因此也被称为系统进程.进程ID 1是init进程,在自举(bootstr ...
- 用scikit-learn学习主成分分析(PCA)
在主成分分析(PCA)原理总结中,我们对主成分分析(以下简称PCA)的原理做了总结,下面我们就总结下如何使用scikit-learn工具来进行PCA降维. 1. scikit-learn PCA类介绍 ...
- 小白解决CENTOS7错误:Cannot find a valid baseurl for repo: base/7/x86_6
刚入手的MacBook想着学点东西,本汪还是决定玩玩CentOS服务器,安装好了VirtualBox + CentOS. 打开一看,懵逼了!命令行! 行吧,先装个图形界面: $sudo yum gro ...
- bzoj3207--Hash+主席树
题目大意: 给定一个n个数的序列和m个询问(n,m<=100000)和k,每个询问包含k+2个数字:l,r,b[1],b[2]...b[k],要求输出b[1]~b[k]在[l,r]中是否出现. ...
- SOLID 设计原则
SOLID 原则基本概念: 程序设计领域, SOLID (单一功能.开闭原则.里氏替换.接口隔离以及依赖反转)是由罗伯特·C·马丁在21世纪早期 引入的记忆术首字母缩略字,指代了面向对象编程和面向对象 ...
- RabbitMQ + PHP (三)案例演示
今天用一个简单的案例来实现 RabbitMQ + PHP 这个消息队列的运行机制. 主要分为两个部分: 第一:发送者(publisher) 第二:消费者(consumer) (一)生产者 (创建一个r ...
- 不要着急改代码,先想想--centos 6.8下编译安装tmux
诸位读者新年好,2017开年第一篇博客,请允许我先问候一下看到这篇博客的诸位.写博客是我2017年定下的目标之一,希望我会坚持下去. 最近打算尝试一下tmux这个神器,于是有了这一篇关于思维方式的Bl ...
- Markdown学习笔记
分为两步: 1.阅读Markdown中文官网的文档 2.下载MarkdownPad2将中文官网中文档的例子敲一遍,其中Markdownpad2为官网中推荐的编辑器 备注: 如果只看中文官网文档,不边看 ...