Http项目转Https项目
Https证书准备
开发环境下,可直接用JDK自带的keytool工具生成一个证书,正式环境可购买一个,配置过程是一样的:
打开cmd命令行,输入以下命令:
命令解释:
- -alias 证书别名
- -keypass 证书密码
- -keyalg 生证书的算法名称,RSA是一种非对称加密算法
- -keysize 密钥长度
- -validity 证书的有效期(单位:天)
- -keystore 生成的证书文件的存储路径
- -storepass 获取keystore信息的密码
keytool -genkey -alias mykeystore -keypass 123456 -keyalg RSA -keysize 1024 -validity 365 -keystore D:/mykeystore.keystore -storepass 123456
根据提示输入相关信息即可:

SpringMVC项目配置:
一.Tomcat服务器配置
打开tomcat路径conf文件夹下server.xml文件,原本如下内容:
<Connector port="8080" protocol="HTTP/1.1" connectionTimeout="20000" redirectPort="8443" />

    <!-- A "Connector" using the shared thread pool-->

    <!--

    <Connector executor="tomcatThreadPool"

               port="8080" protocol="HTTP/1.1"

               connectionTimeout="20000"

               redirectPort="8443" />

    -->

    <!-- Define a SSL/TLS HTTP/1.1 Connector on port 8443

         This connector uses the NIO implementation that requires the JSSE

         style configuration. When using the APR/native implementation, the

         OpenSSL style configuration is required as described in the APR/native

         documentation -->

    <!--

    <Connector port="8443" protocol="org.apache.coyote.http11.Http11NioProtocol"

               maxThreads="150" SSLEnabled="true" scheme="https" secure="true"

               clientAuth="false" sslProtocol="TLS" />

    -->
将8443端口配置注释取消,并添加第一步生成的证书路径及密码,修改后如下所示:
 <Connector port="8080" protocol="HTTP/1.1" connectionTimeout="20000"  redirectPort="8443"/>

    <!-- A "Connector" using the shared thread pool-->

    <!--

    <Connector executor="tomcatThreadPool"

               port="8080" protocol="HTTP/1.1"

               connectionTimeout="20000"

               redirectPort="8443" />

    -->

    <!-- Define a SSL/TLS HTTP/1.1 Connector on port 8443

         This connector uses the NIO implementation that requires the JSSE

         style configuration. When using the APR/native implementation, the

         OpenSSL style configuration is required as described in the APR/native

         documentation -->

    <!-- 开启https访问 -->

    <Connector port="8443" SSLEnabled="true" clientAuth="false"

        keystoreFile="D:\mykeystore.keystore"

        keystorePass="123456"

        maxThreads="150"

        protocol="org.apache.coyote.http11.Http11NioProtocol"

        scheme="https" secure="true" sslProtocol="TLS"/>
二. 配置项目web.xml
打开项目下web.xml,添加如下配置
<security-constraint>

        <!-- Authorization setting for SSL -->

        <web-resource-collection >

            <web-resource-name >SSL</web-resource-name>

            <url-pattern>/*</url-pattern>

        </web-resource-collection>

        <user-data-constraint>

            <transport-guarantee>CONFIDENTIAL</transport-guarantee>

        </user-data-constraint>

 </security-constraint>
至此,SpringMVC项目即完成了https的配置
SpringBoot项目配置:
一. 将第一步生成的证书放进resource文件夹

二. 配置application.yml或者application.properties文件
#修改端口号

server:
##设置https端口

  port: 8444

##设置http端口,访问此端口将被重定向到https端口

  http:

    port: 8080

####定义项目的访问上下文

    context-path: /mySpringBoot

##开启Https协议

  ssl:

    key-store: classpath:mykeystore.keystore

    key-store-password: 123456

    key-store-type: jks

    key-alias: mykeystore
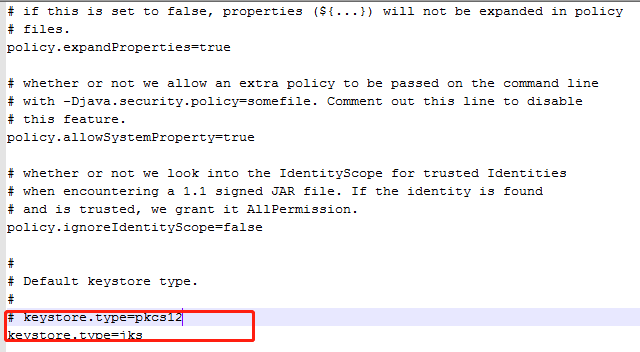
注:此处的key-store-type应设置为部署环境下jre里面对应的keystore.type。打开$JAVA_HOME/jre/lib/security/java.security文件

三. 创建一个WebConfig配置类
 package com.config;

 import org.apache.catalina.Context;

 import org.apache.catalina.connector.Connector;

 import org.apache.tomcat.util.descriptor.web.SecurityCollection;

 import org.apache.tomcat.util.descriptor.web.SecurityConstraint;

 import org.springframework.beans.factory.annotation.Value;

 import org.springframework.boot.web.embedded.tomcat.TomcatServletWebServerFactory;

 import org.springframework.boot.web.servlet.FilterRegistrationBean;

 import org.springframework.context.annotation.Bean;

 import org.springframework.context.annotation.Configuration;

 import org.springframework.web.cors.CorsConfiguration;

 import org.springframework.web.cors.UrlBasedCorsConfigurationSource;

 import org.springframework.web.filter.CorsFilter;

 @Configuration

 public class WebConfig{

     @Value("${server.port}")

     private int serverPort;

     @Value("${server.http.port}")

     private int serverHttpPort;

     /**

      * 解决跨域问题

      * @param registry

      */

     @Bean

     public FilterRegistrationBean<CorsFilter> corsFilter() {

         UrlBasedCorsConfigurationSource source = new UrlBasedCorsConfigurationSource();

         CorsConfiguration config = new CorsConfiguration();

         config.setAllowCredentials(true);

         // 设置你要允许的网站域名,*表示任意域名

         config.addAllowedOrigin("*");

         // 表示你要允许的请求头部信息

         config.addAllowedHeader("*");

         // 设置你要允许的请求方法

         config.addAllowedMethod("GET,POST,PUT,DELETE,HEAD,OPTIONS");

         source.registerCorsConfiguration("/**", config);

         FilterRegistrationBean<CorsFilter> bean = new FilterRegistrationBean<CorsFilter>(new CorsFilter(source));

         // 这个顺序很重要,为避免麻烦请设置在最前

         bean.setOrder(0);

         return bean;

     }

     /**

      * Tomcat配置Https

      * @return

      */

     @Bean

     public TomcatServletWebServerFactory  servletContainer() {

         TomcatServletWebServerFactory  tomcat = new TomcatServletWebServerFactory () {

             @Override

             protected void postProcessContext(Context context) {

                 SecurityConstraint securityConstraint = new SecurityConstraint();

                 securityConstraint.setUserConstraint("CONFIDENTIAL");

                 SecurityCollection collection = new SecurityCollection();

                 collection.addPattern("/*");

                 securityConstraint.addCollection(collection);

                 context.addConstraint(securityConstraint);

             }

         };

         tomcat.addAdditionalTomcatConnectors(initiateHttpConnector());

         return tomcat;

     }

     /**

      * 配置监听端口

      */

     private Connector initiateHttpConnector() {

         Connector connector = new Connector("org.apache.coyote.http11.Http11NioProtocol");

         connector.setScheme("http");

         //Connector监听的http的端口号

         connector.setPort(serverHttpPort);

         connector.setSecure(false);

         //监听到http的端口号后转向到的https的端口号

         connector.setRedirectPort(serverPort);

         return connector;

     }

 }
至此,SpringBoot项目即完成了https的配置
Http项目转Https项目的更多相关文章
- tomcat下的https项目创建与部署
1.1 生成keystore文件及导出证书 步奏1:打开控制台,运行: %JAVA_HOME%\bin\keytool -genkey -alias tomcat -keyalg RSA (如果你已经 ...
- [伟哥开源项目基金会](https://github.com/AspNetCoreFoundation)
伟哥开源项目基金会 GitHub_base=> 伟哥开源项目基金会 该项目作者为伟哥,GitHub地址:https://github.com/amh1979: 该项目维护者为鸟窝,GitHub地 ...
- 项目通过https访问的tomcat相关配置
开发项目已经完成,那么就是要部署项目到服务器上面.我最近把刚完成的项目部署到服务器上面,内网通过http协议进行访问一切正常,但是测试外网通过https协议进行访问的时候就出现了一些js文档找不到的b ...
- springboot项目 配置https
感谢 https://www.jianshu.com/p/1b7b9e0803c6 帮我解决了问题 生成自签名证书 keytool -genkey -storetype PKCS12 -keysiz ...
- 【C#、阿里云、Tomcat、XP系统】c#下使用.NET4.0中HttpWebRequest访问Tomcat中HTTPS项目时,在XP系统中超时
情景: 1.使用Java开发的Web项目,部署在服务器Tomcat中 2.项目使用HTTPS,使用阿里云的PFX证书 阿里云推荐Tomcat配置如下 <Connector port=" ...
- Mui本地打包笔记(一)使用AndroidStudio运行项目 转载 https://blog.csdn.net/baidu_32377671/article/details/79632411
转载 https://blog.csdn.net/baidu_32377671/article/details/79632411 使用AndroidStudio运行HBuilder本地打包的Mui项目 ...
- 使用本地自签名证书为 React 项目启用 https 支持
简介 现在是大前端的时代,我们在本地开发 React 项目非常方便.这不是本文的重点,今天要分享一个话题是,如何为这些本地的项目,添加 https 的支持.为什么要考虑这个问题呢?主要有几个原因 如果 ...
- Android Studio项目转Eclipse项目
Android Studio项目的目录结构和Eclipse项目不同.如何转换? 以FloatingAction 项目为例:实现向上滑动隐藏悬浮按钮,向上滑动显示悬浮按钮. GitHub 地址:http ...
- .net MVC开源项目分享(1) 项目的基本情况
介绍 本项目是mvcsolution框架的分支. 原项目地址:https://github.com/leotsai/mvcsolution/ 本项目地址:https://github.com/hewe ...
随机推荐
- Oracle建立连接的过程分析
Oracle建立连接的过程 如果我们想登陆数据库并在数据库中真正做事情,就必须先建立连接,首先我会介绍如何建立连接,再介绍建立连接的两种方式的原理,以及建立连接的过程中在客户端和服务端都做了些什么. ...
- Celery:Next Steps
参考文档:http://docs.celeryproject.org/en/latest/getting-started/next-steps.html#next-steps
- java-Java实现mysql事务处理操作
数据库事务(简称:事务)是数据库管理系统执行过程中的一个逻辑单位,由一个有限的数据库操作序列构成. 并非任意的对数据库的操作序列都是数据库事务.数据库事务拥有以下四个特性,习惯上被称之为ACID特性. ...
- 非Java程序员转行Java-day01-入门基础
1.学习大纲介绍 课件中的代码及资料:提取码:yexw 学习中的依赖包及安装文件:提取码 :8par 2.数据流向分析 2.1.应用型软件开发本质 增删改查(非常重要,5星) 2.2.大型网站演变历史 ...
- 【DATAGUARD】物理dg在主库丢失归档文件的情况下的恢复(七)
[DATAGUARD]物理dg在主库丢失归档文件的情况下的恢复(七) 一.1 BLOG文档结构图 一.2 前言部分 一.2.1 导读 各位技术爱好者,看完本文后,你可以掌握如下的技能,也可以学到 ...
- Node: 包管理机制
Node.js 的模块机制可以很好地解决业务代码混乱的难题,但对于第三方模块包,就有些力不从心了,因为第三方模块包分散存放在各地,无法集中式管理.这就需要一个包管理机制,在 Node.js 中,Isa ...
- python 列表的属性和方法整理
list属性和方法 补一个超实用的函数 envmerate(列表名, [start=0]) 作用: 将一个可遍历的数据对象(如列表.元组或字符串)组合为一个索引序列,同时列出数据和数据下标,一般用 ...
- mac 使用 brew 安装 nginx 及各种命令
一.安装 brew install nginx 或 sudo brew install nginx 二.启动 brew services start nginx 或 sudo brew service ...
- c++查询特定字符串位置
size_t find (const string& str, size_t pos = 0) const noexcept;(摘自c++官网:std::string::find) size_ ...
- Maven之setting.xml 配置详解
文件存放位置 全局配置: ${M2_HOME}/conf/settings.xml 用户配置: ${user.home}/.m2/settings.xml note:用户配置优先于全局配置.${use ...
