React native中DrawerNavigator,StackNavigator,TabNavigator导航栏使用
- import React from 'react';
- import { View, Text,Button } from 'react-native';
- import { DrawerNavigator,StackNavigator,TabNavigator } from 'react-navigation';
- /*
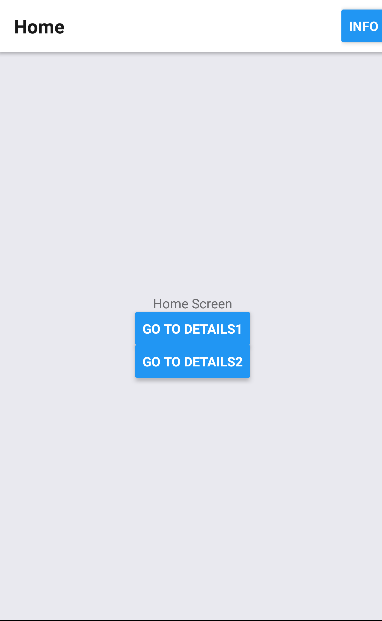
- * 主屏幕,可以跳转至Tab Navigator和DrawerNavigator*/
- const HomeScreen = ({ navigation }) => (
- <View style={{ flex: 1, alignItems: 'center', justifyContent: 'center' }}>
- <Text>Home Screen</Text>
- <Button
- onPress={() => navigation.navigate('Details1')}
- title="Go to details1"
- />
- <Button
- onPress={() => navigation.navigate('Details2')}
- title="Go to details2"
- />
- </View>
- );
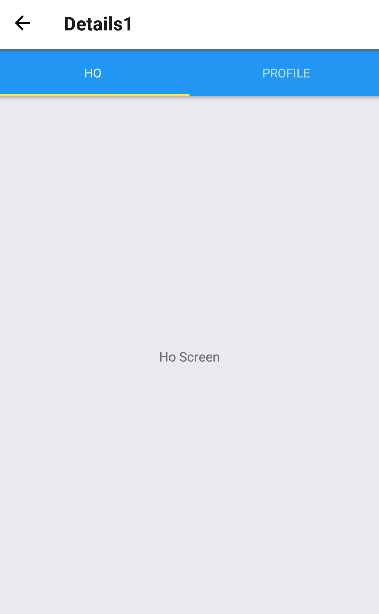
- /*次屏幕一
- * 用于承接TabNavigator
- * */
- const DetailsScreen1 = () => (
- <View style={{ flex: 1, alignItems: 'center', justifyContent: 'center' }}>
- <Text>Details1 Screen</Text>
- </View>
- );
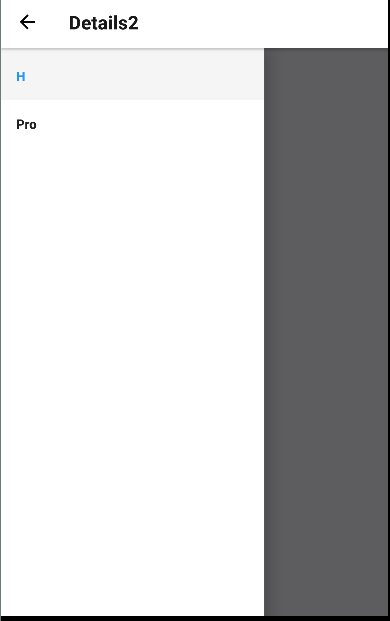
- /*
- * 次屏幕二
- * 用于承接DrawerNavigator
- * */
- const DetailsScreen2 = () => (
- <View style={{ flex: 1, alignItems: 'center', justifyContent: 'center' }}>
- <Text>Details2 Screen</Text>
- </View>
- );
- /*
- * TabNavigator主屏幕
- * */
- const HoScreen = () => (
- <View style={{ flex: 1, alignItems: 'center', justifyContent: 'center' }}>
- <Text>Ho Screen</Text>
- </View>
- );
- /*
- * TabNavigator次屏幕
- * */
- const ProfileScreen = () => (
- <View style={{ flex: 1, alignItems: 'center', justifyContent: 'center' }}>
- <Text>Profile Screen</Text>
- </View>
- );
- /*TabNavigator
- * */
- const RootTabs = TabNavigator({
- Ho: {
- screen: HoScreen,
- },
- Profile: {
- screen: ProfileScreen,
- },
- });
- /*
- * DrawerNavigator主屏幕
- * */
- const HScreen = ({navigation}) => (
- <View style={{ flex: 1, alignItems: 'center', justifyContent: 'center' }}>
- <Text>H Screen</Text>
- <Button
- onPress={() => navigation.navigate('DrawerToggle')}
- title="Open Drawer"
- />
- </View>
- );
- /*
- * DrawerNaivigator
- * 次屏幕
- * */
- const ProScreen = () => (
- <View style={{ flex: 1, alignItems: 'center', justifyContent: 'center' }}>
- <Text>Pro Screen</Text>
- </View>
- );
- /*
- * DrawerNavigator
- * */
- const RootDrawer = DrawerNavigator({
- H: {
- screen: HScreen,
- },
- Pro: {
- screen: ProScreen,
- },
- });
- /*
- *
- * StackNavigator
- * */
- const RootNavigator = StackNavigator({
- Home: {
- screen: HomeScreen,
- navigationOptions: {
- headerTitle: 'Home',
- headerRight: <Button title="Info" />,
- },
- },
- Details1: {
- screen: RootTabs,
- navigationOptions: {
- headerTitle: 'Details1',
- },
- },
- Details2: {
- screen: RootDrawer,
- navigationOptions: {
- headerTitle: 'Details2',
- },
- },
- });
- export default class App extends React.Component {
- render() {
- return <RootNavigator/>;
- }
- }
效果图
React native中DrawerNavigator,StackNavigator,TabNavigator导航栏使用的更多相关文章
- React Native(四)——顶部以及底部导航栏实现方式
效果图: 一步一步慢慢来: 其实刚入手做app的时候,就应该做出简单的顶部以及底部导航栏.无奈又在忙其他事情,导致这些现在才整理出来. 1.顶部导航栏:react-native-scrollable- ...
- React Native 的组件之底部导航栏 TabBarIOS(一)
import React,{Component}from 'react'; import { AppRegistry, StyleSheet, Text, View, TabBarIOS, } fro ...
- react native 中的ListView
ListView 的运用: 1.首先在react native中引入这个组件: 2.初始化的ListView 的相关属性: constructor(props) { super(props); con ...
- React Native 中 CSS 的使用
首先声明,此文原作者为黎 跃春 React Native中CSS 内联样式 对象样式 使用Stylesheet.Create 样式拼接 导出样式对象 下面的代码是index.ios.js中的代码: / ...
- react native中的欢迎页(解决首加载白屏)
参照网页: http://blog.csdn.net/fengyuzhengfan/article/details/52712829 首先是在原生中写一些方法,然后通过react native中js去 ...
- React Native中的网络请求fetch和简单封装
React Native中的网络请求fetch使用方法最为简单,但却可以实现大多数的网络请求,需要了解更多的可以访问: https://segmentfault.com/a/1190000003810 ...
- [转] 「指尖上的魔法」 - 谈谈 React Native 中的手势
http://gold.xitu.io/entry/55fa202960b28497519db23f React-Native是一款由Facebook开发并开源的框架,主要卖点是使用JavaScrip ...
- [转] 在React Native中使用ART
http://bbs.reactnative.cn/topic/306/%E5%9C%A8react-native%E4%B8%AD%E4%BD%BF%E7%94%A8art 前半个月捣腾了一下Rea ...
- react native中使用echarts
开发平台:mac pro node版本:v8.11.2 npm版本:6.4.1 react-native版本:0.57.8 native-echarts版本:^0.5.0 目标平台:android端收 ...
随机推荐
- restore not found的错误(问题2)
最近在写gan,那么就牵扯到在一个session中加载两个图,restore的时候会有问题.如这篇文章写的(http://blog.csdn.net/u014659656/article/detail ...
- IntelliJ IDEA激活
以前一直使用eclipse,直到后来发现了IntelliJ IDEA,就爱上了它. 不过可惜的是,community版本虽然是免费的,不过功能相对较少,而ultimate版本的又需要花钱.但是我穷啊, ...
- 版本控制,django缓存,跨域问题解决
复习 分页: 1. 简单分页 2. 偏移分页 3. 加密分页 解析器:客户处理前端提交来的数据 urlencode: body体中的数据格式: key=value& formdata编码:为区 ...
- 浅谈C++的智能指针
我们使用智能指针来自动运行管理内存,避免对原始指针的使用不当而造成内存泄漏. ------------------------------------------------------------- ...
- secureCRT保存屏幕输出内容
1.有时执行一个mysql语句,屏幕打印行过多,需要设置翻动最大行数 打开Options Session Options–>Terminal–>Emulation,在Scrollback输 ...
- Linux c使用gumbo库解析页面表单信息(二)
一.如何在程序当中使用gumbo? 要想在代码中使用gumbo,仅仅包含gumbo头文件是不够的,必须在编译程序的时候加上-lgumbo选项,编译程序才会链接到gumbo库上面. 这是我编译gumbo ...
- python之路-----前端之html协议一
一.概述 1.1 什么是html语句? 超文本标记语言(Hypertext Markup Language,HTML)通过标签语言来标记要显示的网页中的各个部分.一套规则,浏览器认识的规则 浏览器按顺 ...
- SoapUI之http接口测试
SoapUI是一个开源测试工具,可以进行webservice/http协议的功能.负载.安全性测试.SoapUI pro是SoapUI的商业非开源版本,实现的功能会更多一点.一般的测试场景,用开源版本 ...
- mongodb数据迁移到hbase
mongodb数据迁移到hbase 导入包 # encoding: utf-8 ''' @author: zcc @license: (C) Copyright 2013-2017, Node Sup ...
- 多线程之 Runnable接口
一.多线程实现的第二种方式 1.定义类,实现Runnable接口 2.重写接口中的run方法,要在run方法中定义线程要执行的任务 public class MyRunnableImpl implem ...