[Abp 源码分析]三、依赖注入
0.简要介绍
在 Abp 框架里面,无时无刻不存在依赖注入,关于依赖注入的作用与好处我就不在这里多加赘述了,网上有很多解释的教程。在 [Abp 源码分析]一、Abp 框架启动流程分析 里面已经说过,Abp 本身在框架初始化的时候我们就可以看到它使用 Castle Windsor 将 Asp.Net Core 自带的 IServiceProvider 替换掉了。
1.大体结构
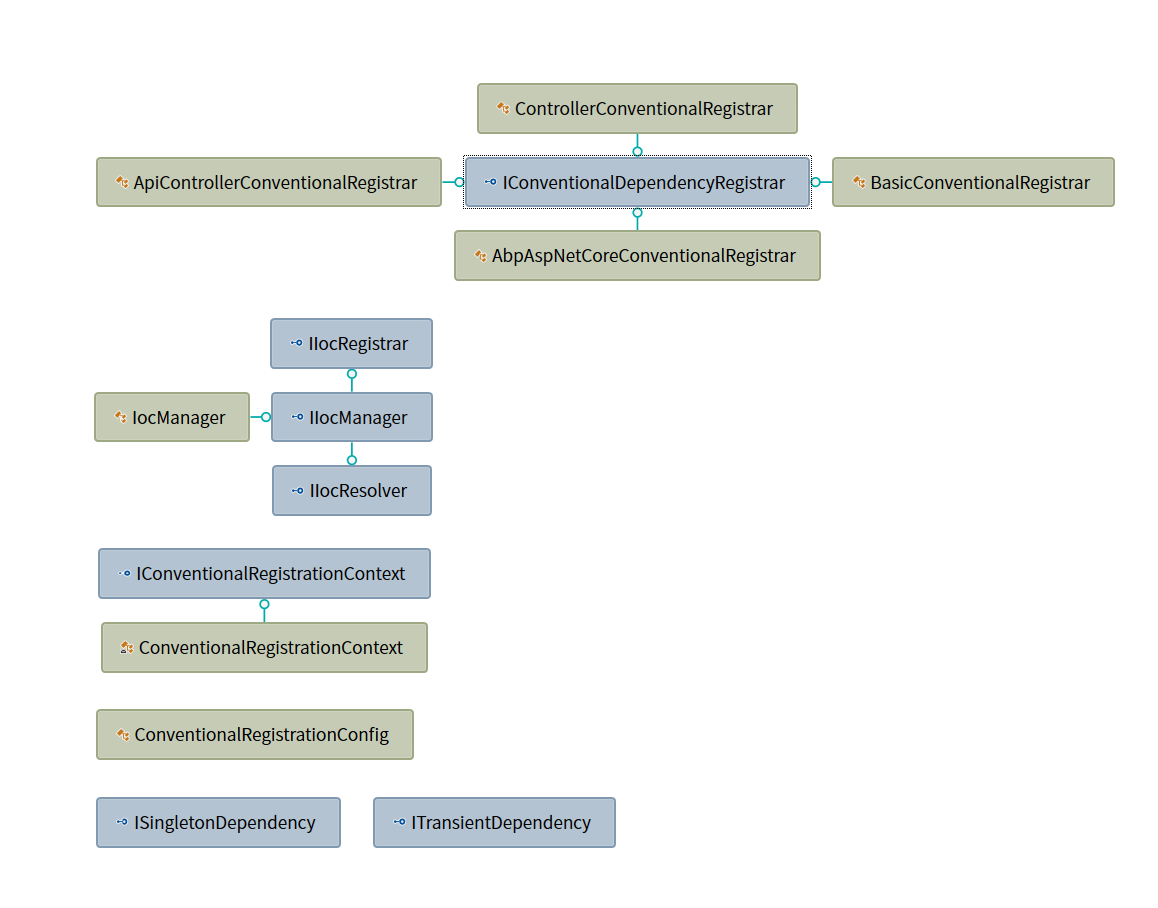
在 Abp 框架当中,它的依赖注入相关的类型基本上都放在 Abp 项目的 Dependency 文件夹里面,下图是他们之间的依赖关系:
2 代码解析
2.1 基本实现
IIocManager 是直接继承 IIocRegistrar 与 IIocResolver 的一个接口,通过名称我们就可以看出来他们的作用,IIocRegistrar 内部提供了组件注册的方法定义,而 IIocResolver 内部则是提供了解析已经注入的组件方法。在 IIocManager 本身则是封装了一个 Castle Windsor 的 Ioc 容器,定义如下:
/// <summary>

/// This interface is used to directly perform dependency injection tasks.

/// </summary>

public interface IIocManager : IIocRegistrar, IIocResolver, IDisposable

{

	/// <summary>

	/// Reference to the Castle Windsor Container.

	/// </summary>

	IWindsorContainer IocContainer { get; }

	/// <summary>

	/// Checks whether given type is registered before.

	/// </summary>

	/// <param name="type">Type to check</param>

	new bool IsRegistered(Type type);

	/// <summary>

	/// Checks whether given type is registered before.

	/// </summary>

	/// <typeparam name="T">Type to check</typeparam>

	new bool IsRegistered<T>();

}
那么我们来看看 IIocManager 的具体实现。
方法虽然看起来挺多,不过更多的只是在 Castle Windsor 上面进行了一层封装而已,可以看到 Register() 这个注册方法在其内部也是直接调用的 IWindsorContainer.Register() 来进行注入。
那么 Abp 为什么还要再包装一层呢,因为对外开放的你在使用的时候都使用的是 IIocManager 提供的注册方法,那么你需要替换 DI 框架的时候可以很快捷的替换掉整个依赖注入框架而不会影响现有代码。
public void Register(Type type, DependencyLifeStyle lifeStyle = DependencyLifeStyle.Singleton)

{

	IocContainer.Register(ApplyLifestyle(Component.For(type), lifeStyle));

}
2.2 规约注入
我们重点说一说它的规约注入,什么是规约注入?
在上面的类图当中,可以看到有一个 IConventionalDependencyRegistrar 接口,并且该接口还拥有四个实现,我们以 BasicConventionalRegistrar 类为例子看看里面做了什么操作。
/// <summary>

/// This class is used to register basic dependency implementations such as <see cref="ITransientDependency"/> and <see cref="ISingletonDependency"/>.

/// </summary>

public class BasicConventionalRegistrar : IConventionalDependencyRegistrar

{

	public void RegisterAssembly(IConventionalRegistrationContext context)

	{

		//Transient

		context.IocManager.IocContainer.Register(

			Classes.FromAssembly(context.Assembly)

				.IncludeNonPublicTypes()

				.BasedOn<ITransientDependency>()

				.If(type => !type.GetTypeInfo().IsGenericTypeDefinition)

				.WithService.Self()

				.WithService.DefaultInterfaces()

				.LifestyleTransient()

			);

		//Singleton

		context.IocManager.IocContainer.Register(

			Classes.FromAssembly(context.Assembly)

				.IncludeNonPublicTypes()

				.BasedOn<ISingletonDependency>()

				.If(type => !type.GetTypeInfo().IsGenericTypeDefinition)

				.WithService.Self()

				.WithService.DefaultInterfaces()

				.LifestyleSingleton()

			);

		//Windsor Interceptors

		context.IocManager.IocContainer.Register(

			Classes.FromAssembly(context.Assembly)

				.IncludeNonPublicTypes()

				.BasedOn<IInterceptor>()

				.If(type => !type.GetTypeInfo().IsGenericTypeDefinition)

				.WithService.Self()

				.LifestyleTransient()

			);

	}

}
在 BasicConventionalRegistrar 内部,他会扫描传入的程序集,并且根据类型所继承的接口来进行自动注入,所以 Abp 定义了两个辅助注入接口,叫做ITransientDependency 和 ISingletonDependency,并且在下面还注入了拦截器。
这样的话,我们自己就不需要频繁的使用 IIocManager.Register() 方法来手动注入,只需要在自己的实现类或者接口上面,继承上述两个接口之一即可。
在 IocManager 内部维护了一个集合 _conventionalRegistrars。
/// <summary>

/// List of all registered conventional registrars.

/// </summary>

private readonly List<IConventionalDependencyRegistrar> _conventionalRegistrars;
这个集合就是已经存在的规约注册器,在 AbpKernelModule 的预加载方法里面就使用 AddConventionalRegistrar() 方法来添加了 BasicConventionalRegistrar 注册器。代码在 AbpKernelModule.cs 的 45 行:
public override void PreInitialize()

{

	IocManager.AddConventionalRegistrar(new BasicConventionalRegistrar());

	// 其他代码

}
之后每当程序调用 IIocManager.RegisterAssemblyByConvention(Assembly assembly) 方法的时候,就会根据传入的 Assembly 来循环调用存放在集合里面注册器的 RegisterAssembly() 方法,当然你也可以随时定义一个 Registrar ,注册约定你也可以自己来编写。
public void RegisterAssemblyByConvention(Assembly assembly, ConventionalRegistrationConfig config)

{

	var context = new ConventionalRegistrationContext(assembly, this, config);

	foreach (var registerer in _conventionalRegistrars)

	{

		registerer.RegisterAssembly(context);

	}

	if (config.InstallInstallers)

	{

		IocContainer.Install(FromAssembly.Instance(assembly));

	}

}
注:一般来说,每个模块都会在它的
Initialize方法当中调用 IocManager.RegisterAssemblyByConvention(),将自己传入该方法当中来注入当前模块程序集所有符合规约的组件。
这里值得注意的是 RegisterAssemblyByConvention() 方法还有一个重载 RegisterAssemblyByConvention(Assembly assembly, ConventionalRegistrationConfig config),他将会传入一个 ConventionalRegistrationConfig 对象,该对象只有一个 bool InstallInstallers 属性,主要是在注册的时候告诉 Abp 框架是否使用该程序集内部的 IWindsorInstaller 接口规则。
2.3 初始化过程
呐,首先呢在我们初始化 AbpBootstrapper 的时候,就已经创建好了我们的 IocManager 实例,我们可以来到 AbpBootstrapper.cs 的构造函数有以下代码:
public IIocManager IocManager { get; }

private AbpBootstrapper([NotNull] Type startupModule, [CanBeNull] Action<AbpBootstrapperOptions> optionsAction = null)

{

	Check.NotNull(startupModule, nameof(startupModule));

	var options = new AbpBootstrapperOptions();

	optionsAction?.Invoke(options);

	if (!typeof(AbpModule).GetTypeInfo().IsAssignableFrom(startupModule))

	{

		throw new ArgumentException($"{nameof(startupModule)} should be derived from {nameof(AbpModule)}.");

	}

	StartupModule = startupModule;

	IocManager = options.IocManager;

	PlugInSources = options.PlugInSources;

	_logger = NullLogger.Instance;

	if (!options.DisableAllInterceptors)

	{

		AddInterceptorRegistrars();

	}

}
可以看到在 new 了一个 AbpBootstrapperOptions 对象,并且在第 17 行将 options 创建好的 IocManager 赋值给 AbpBootstrapper 本身的 IocManager 属性。
那么在 options 内部是如何创建 IIocManager 的呢?
public AbpBootstrapperOptions()

{

    IocManager = Abp.Dependency.IocManager.Instance;

    PlugInSources = new PlugInSourceList();

}
可以看到他直接是使用的 IocManager 这个类所提供的一个静态实例。
也就是在 IocManager 类里面他有一个静态构造函数:
static IocManager()

{

    Instance = new IocManager();

}
就是这种操作,之后在 IocManager 的构造函数里面呢就将自己再注册到了 Castle Windsor 的容器里面,这样其他的组件就可以直接注入使用 IIocManager 了。
public IocManager()

{

	IocContainer = new WindsorContainer();

	_conventionalRegistrars = new List<IConventionalDependencyRegistrar>();

	//Register self!

	IocContainer.Register(

		Component.For<IocManager, IIocManager, IIocRegistrar, IIocResolver>().UsingFactoryMethod(() => this)

		);

}
我们可以回顾一下在替换 Asp.Net Core 自身的 Ioc 容器的时候,在使用的 CreateServiceProvider 就是 Castle Windsor 提供的 IocContainer 对象,该对象就是我们上文在 AbpBootstrapperOptions 里面创建的静态实例。
public static IServiceProvider AddAbp<TStartupModule>(this IServiceCollection services, [CanBeNull] Action<AbpBootstrapperOptions> optionsAction = null)

	where TStartupModule : AbpModule

{

	var abpBootstrapper = AddAbpBootstrapper<TStartupModule>(services, optionsAction);

	ConfigureAspNetCore(services, abpBootstrapper.IocManager);

	return WindsorRegistrationHelper.CreateServiceProvider(abpBootstrapper.IocManager.IocContainer, services);

}
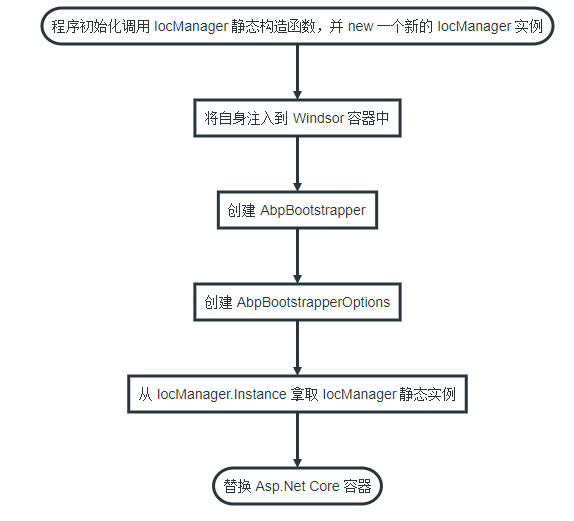
3.初始化流程图
总的来说呢,整个 Abp 框架的依赖注入相关的初始化流程图就像这样。
4.点此跳转到总目录
[Abp 源码分析]三、依赖注入的更多相关文章
- 使用react全家桶制作博客后台管理系统 网站PWA升级 移动端常见问题处理 循序渐进学.Net Core Web Api开发系列【4】:前端访问WebApi [Abp 源码分析]四、模块配置 [Abp 源码分析]三、依赖注入
使用react全家桶制作博客后台管理系统 前面的话 笔者在做一个完整的博客上线项目,包括前台.后台.后端接口和服务器配置.本文将详细介绍使用react全家桶制作的博客后台管理系统 概述 该项目是基 ...
- ABP源码分析三:ABP Module
Abp是一种基于模块化设计的思想构建的.开发人员可以将自定义的功能以模块(module)的形式集成到ABP中.具体的功能都可以设计成一个单独的Module.Abp底层框架提供便捷的方法集成每个Modu ...
- ABP源码分析三十四:ABP.Web.Mvc
ABP.Web.Mvc模块主要完成两个任务: 第一,通过自定义的AbpController抽象基类封装ABP核心模块中的功能,以便利的方式提供给我们创建controller使用. 第二,一些常见的基础 ...
- ABP源码分析三十:ABP.RedisCache
ABP 通过StackExchange.Redis类库来操作Redis数据库. AbpRedisCacheModule:完成ABP.RedisCache模块的初始化(完成常规的依赖注入) AbpRed ...
- ABP源码分析三十九:ABP.Hangfire
ABP对HangFire的集成主要是通过实现IBackgroundJobManager接口的HangfireBackgroundJobManager类完成的. HangfireBackgroundJo ...
- ABP源码分析三十一:ABP.AutoMapper
这个模块封装了Automapper,使其更易于使用. 下图描述了改模块涉及的所有类之间的关系. AutoMapAttribute,AutoMapFromAttribute和AutoMapToAttri ...
- ABP源码分析三十三:ABP.Web
ABP.Web模块并不复杂,主要完成ABP系统的初始化和一些基础功能的实现. AbpWebApplication : 继承自ASP.Net的HttpApplication类,主要完成下面三件事一,在A ...
- ABP源码分析三十五:ABP中动态WebAPI原理解析
动态WebAPI应该算是ABP中最Magic的功能之一了吧.开发人员无须定义继承自ApiController的类,只须重用Application Service中的类就可以对外提供WebAPI的功能, ...
- ABP源码分析三十二:ABP.SignalR
Realtime Realtime是ABP底层模块提供的功能,用于管理在线用户.它是使用SignalR实现给在线用户发送通知的功能的前提 IOnlineClient/OnlineClient: 封装在 ...
随机推荐
- python全栈开发day117-MongoDB,pymongo
1.MongoDB操作 使用了不存在的对象即创建该对象 1.增加: 官方不推荐写法: insert([{},{},{}]) 官方推荐写法: insertOne({}) insertMany([{},{ ...
- 数组中的第K个最大元素leetcode(Top K的问题)
在未排序的数组中找到第 k 个最大的元素.请注意,你需要找的是数组排序后的第 k 个最大的元素,而不是第 k 个不同的元素. 示例 1: 输入: [3,2,1,5,6,4] 和 k = 2 输出: 5 ...
- 我们为什么不用 Select * 吗?
应用程序慢如牛,原因多多,可能是网络的原因.可能是系统架构的原因,还有可能是数据库的原因. 那么如何提高数据库SQL语句执行速度呢?有人会说性能调优是数据库管理员(DBA)的事,然而性能调优跟程序员们 ...
- 转载:ac自动机 dp bzoj1030
https://blog.csdn.net/thchuan2001/article/details/57463291
- Pytorch: cuda runtime error (59) : device-side assert triggered at /pytorch/aten/src/THC/generic/THCTensorMa
更换了数据集, 在计算交叉熵损失时出现错误 : cuda runtime error (59) : device-side assert triggered at /pytorch/aten/src/ ...
- UI分层中使用PageFactory
基于原PO设计模式,需要改变原有的从文件中读取文件,更改为PageFactory模式.做出如下改动: 1 2 public MsysPage(DriverBase driver) { super(dr ...
- Java Concurrency in Practice——读书笔记
Thread Safety线程安全 线程安全编码的核心,就是管理对状态(state)的访问,尤其是对(共享shared.可变mutable)状态的访问. shared:指可以被多个线程访问的变量 mu ...
- 20181125第二章节总结part3
数据-元祖 元祖的是可存放多个值,不可变,有顺序的,从左向右编号. 作用是可以用来存储一些不可以更改的配置文件 基本 语法: #创建新元祖 tuple = (,,,,,) #索引,写法同list tu ...
- 181102 Windows下安装kivy(用python写APP)
了解到Instgram,知乎等APP是用python写的.我也决定学习用python写APP.这里我们需要安装kivy. 环境:win7,python3.6 安装方式:DOS命令窗口 注意事项:目前不 ...
- hibernate框架中注意的几个问题
使用hibernate框架中,session.createSQLQuery创建sql语句的时候遇到的问题 1. select e.id,d.id from emp e,dept d where e. ...