Android注解神器 ButterKnife框架
前言:
本人是一个只有几个月工作经验的码小渣。这是我写的第一篇博客,如有不足之处还请大家不要介意,还请大佬可以指出问题。
在这几个月的实战开发中自己也遇到了很多问题,真的是举步艰难啊!!!
在实战开发中遇到最多的就是findViewById我相信这也是很多和我一样初入安卓行业的码小渣遇到的最多的代码。
现在来给码小渣同志们分享一个非常实用的框架 “ButterKnife”
这是“听着music睡”大佬给我推荐的。大家可以关注一下他,人特别好。我的这篇文章就是参考了他的文章。
废话不多说上图、上代码。
代码写的不规范不要介意。
这是我平时写的最多的,相信你们一开始也是这样写的。
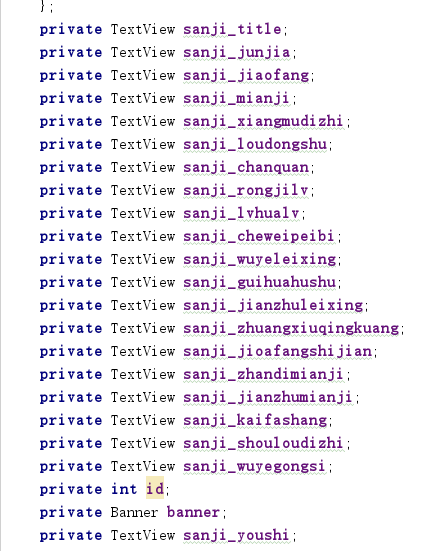

像我这样很多控件的时候代码就显得特别乱,不清晰。
今天我给大家介绍的ButterKnife框架就可以很好的解决这个问题。
使用ButterKnife框架
第一步:在项目中添加依赖
需要在app目录下的 build.gradle文件中添加 :
      implementation'com.jakewharton:butterknife:7.0.1'

 第二步:在Android Studio 中安装插件

  首先在Android Studio主界面中选择 "File" —— "Settings" —— 进入设置
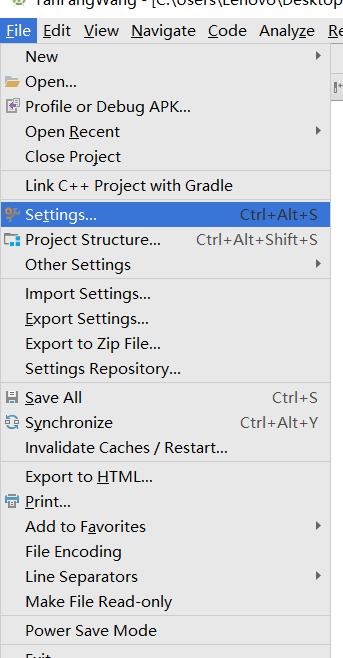
然后找到 "Plugins" 搜索 "Android ButterKnife" 安装插件 “Zelezny” 安装完成后Android Studio 会自动重启

下面就让我们来体验一下把。
新建一个新的布局:
<?xml version="1.0" encoding="utf-8"?>
<LinearLayout xmlns:android="http://schemas.android.com/apk/res/android"
    xmlns:app="http://schemas.android.com/apk/res-auto"
    xmlns:tools="http://schemas.android.com/tools"
    android:layout_width="match_parent"
    android:layout_height="match_parent"
    android:orientation="vertical"
    tools:context="com.example.lenovo.myapplication.MainActivity">

<TextView
    android:id="@+id/textView"
    android:gravity="center"
    android:text="你好"
    android:layout_width="match_parent"
    android:layout_height="50dp" />
    <TextView
        android:id="@+id/textView1"
        android:gravity="center"
        android:text="你是码小渣吗?"
        android:layout_width="match_parent"
        android:layout_height="50dp" />
    <TextView
        android:id="@+id/textView2"
    android:gravity="center"
    android:text="你好"
    android:layout_width="match_parent"
    android:layout_height="50dp" />
    <TextView
        android:id="@+id/textView3"
    android:gravity="center"
    android:text="你是第几个看我博客的码小渣"
    android:layout_width="match_parent"
    android:layout_height="50dp" />
    <TextView
        android:id="@+id/textView4"
    android:gravity="center"
    android:text="你好"
    android:layout_width="match_parent"
    android:layout_height="50dp" />
    <TextView
        android:id="@+id/textView5"
    android:gravity="center"
    android:text="谢谢你看我的博客"
    android:layout_width="match_parent"
    android:layout_height="50dp" />

</LinearLayout>

下面就开始在Activity中使用框架
新建一个Activity 在 Activity的中 右击布局文件 选择Generate...
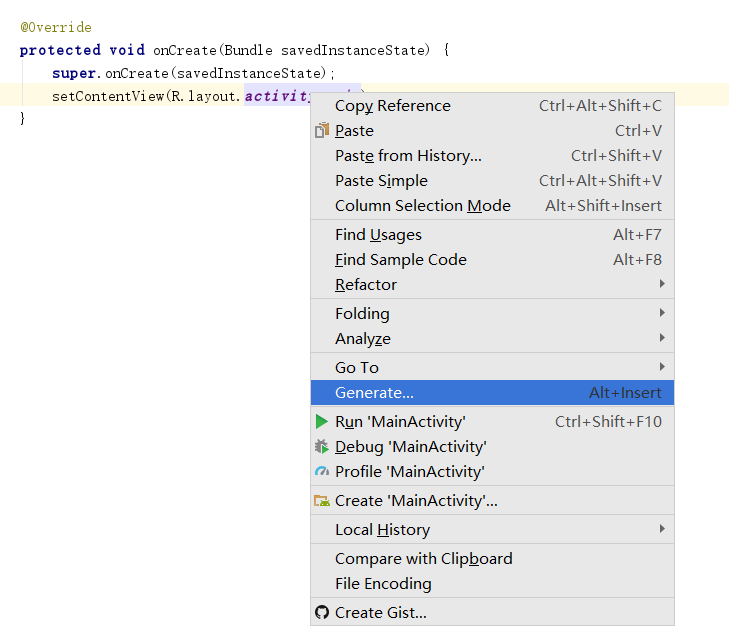
出现新的对话框 点击Generate Butterknife Injections
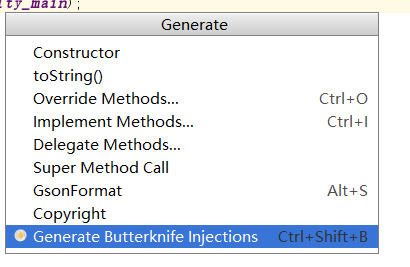
出现新的对话框 再这里我们可以选择 布局文件中的控件
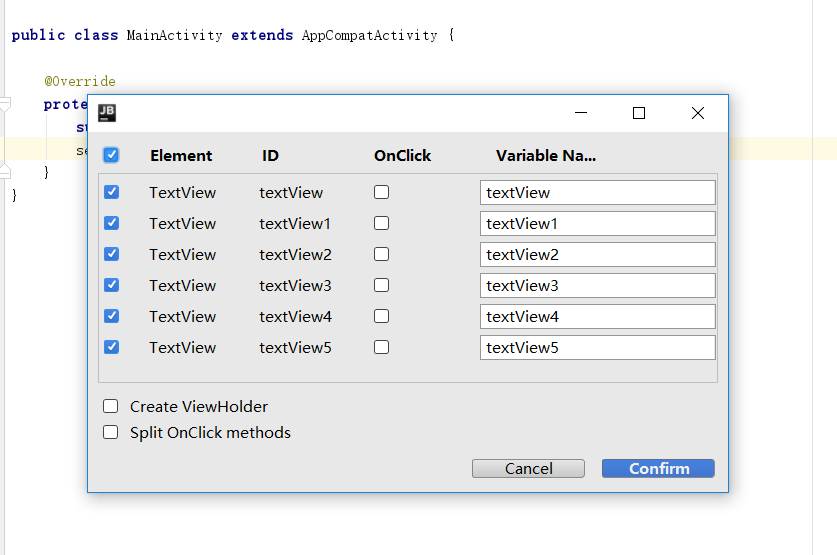
点击 Confirm 会自动帮你生成注解 在onCreate()里多了一行 ButterKnife.bind(this);代码
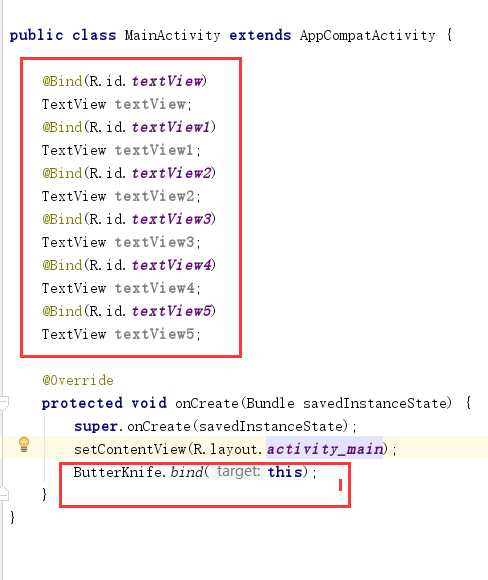
到这里 ButterKnife框架 就基本结束了 是不是很简单而且帮你省了很多事
但是有一部分人在运行项目的时候可能会遇见和我一样的问题

我也是翻遍度娘但是未曾找到解决方法 最后在大佬哪里得到解决办法
在app目录下的 build.gradle文件中的 defaultConfig 中加入下面的这些代码 就OK了。
 javaCompileOptions {

            annotationProcessorOptions {

                includeCompileClasspath = true

                arguments = [moduleName: project.getName()]

            }

        }
运行成功。

到这里 ButterKnife 框架 就结束了是不是很神奇啊。
希望我的这篇文章能为你带来帮助!!!
作者:码小渣

文章地址:https://www.cnblogs.com/nc-183/p/9902442.html

本文版权归作者所有,欢迎转载,但未经作者同意必须保留此段声明,且在文章页面明显位置给出原文链接,否则保留追究法律责任的权利。
Android注解神器 ButterKnife框架的更多相关文章
- Android 注解工具 ButterKnife
Butter Knife 是 Android 视图字段和方法绑定,使用注解处理来生成样板代码. 主要特性: 在字段使用 @FindView消除findViewById调用 使用 @FindViews在 ...
- Android注解使用之通过annotationProcessor注解生成代码实现自己的ButterKnife框架
前言: Annotation注解在Android的开发中的使用越来越普遍,例如EventBus.ButterKnife.Dagger2等,之前使用注解的时候需要利用反射机制势必影响到运行效率及性能,直 ...
- Android注解框架实战-ButterKnife
文章大纲 Android注解框架介绍 ButterKnife实战 项目源码下载 一.框架介绍 为什么要用注解框架? 在Android开发过程中,我们经常性地需要操作组件,操作方法有findVie ...
- Android开发之手把手教你写ButterKnife框架(三)
欢迎转载,转载请标明出处: http://blog.csdn.net/johnny901114/article/details/52672188 本文出自:[余志强的博客] 一.概述 上一篇博客讲了, ...
- Android开发之手把手教你写ButterKnife框架(二)
欢迎转载,转载请标明出处: http://blog.csdn.net/johnny901114/article/details/52664112 本文出自:[余志强的博客] 上一篇博客Android开 ...
- Android 注解框架对比
Java的注解(Annotation)相当于一种标记,在程序中加入注解就等于为程序打上某种标记,标记可以加在包,类,属性,方法,本地变量上.然后你可以写一个注解处理器去解析处理这些注解(人称编译时注解 ...
- 开发自己的山寨Android注解框架
目录 开发自己的山寨Android注解框架 开发自己的山寨Android注解框架 参考 Github黄油刀 Overview 在上一章我们学习了Java的注解(Annotation),但是我想大家可能 ...
- Android Butterknife框架
Android Butterknife框架 注解攻略 时间 2014-02-27 09:28:09 Msquirrel原文 http://www.msquirrel.com/?p=95 一.原理. ...
- Android常用优秀开源框架
Android常用优秀开源框架 https://github.com/Ericsongyl/AOSF AOSF:全称为Android Open Source Framework,即Android优秀开 ...
随机推荐
- [Swift]LeetCode79. 单词搜索 | Word Search
Given a 2D board and a word, find if the word exists in the grid. The word can be constructed from l ...
- [Swift]LeetCode621. 任务调度器 | Task Scheduler
Given a char array representing tasks CPU need to do. It contains capital letters A to Z where diffe ...
- [Swift]LeetCode820. 单词的压缩编码 | Short Encoding of Words
Given a list of words, we may encode it by writing a reference string S and a list of indexes A. For ...
- Redis 设计与实现 (五)--多机数据库的实现
多机数据库的实现 一.复制 slaveof 主服务器ip地址.形成主从关系. 1.同步 从向主服务器发送sync命令. 主服务器收到sync命令执行bgsave,生成rdb文件,缓冲区同时记录从 ...
- HTTP/3 简介
前言 HTTP 2.0是由谷歌SPDY进化而来,现有的实现基本都是走SSL(说是可以不用SSL,但基本没这么干的),传输层使用TCP.HTTP 3.0是由谷歌QUIC进化出来的,QUIC没有大动HTT ...
- 安装需要的第三方库时,命令行输入pip提示不是内部或外部命令
简介 在做Python开发时,安装需要的第三方库时,大多数人喜欢选择在命令行用pip进行安装. 然而有时敲入pip命令会提示‘pip’不是内部或外部命令..如图: 解决办法 1.在python安装目录 ...
- 【Docker】(3)---linux部署Docker、Docker常用命令
linux部署Docker.Docker常用命令 本次部署Linux版本:CentOS 7.4 64位. 说明: 因为Docker是基于Linux 64bit的 所以Docker要求64位的系统且内核 ...
- mac用户丢失管理员身份急救
用了这么久mac,发现居然还存在这么大一个bug.就是如果你曾经编辑mac电脑默认用户资料,比如试图改用户名.试图改HOME路径之类的,有很高比率可能导致该用户丧失管理员权限. 随后悲剧就开始了,所有 ...
- Chapter 5 Blood Type——6
"Yes — giving up trying to be good. I'm just going to do what I want now, and let the chips fal ...
- Docker安装MySQL并配置my.cnf
1.创建一个临时的mysql,以便复制出my.cnf等数据 $ docker run --restart=always -d -v /opt/data/mysql/:/var/lib/mysql -p ...
