DeepLearning.ai-Week3-Autonomous driving-Car detection
1 - Import Packages
import argparse

import os

import matplotlib.pyplot as plt

from matplotlib.pyplot import imshow

import scipy.io

import scipy.misc

import numpy as np

import pandas as pd

import PIL

import tensorflow as tf

from keras import backend as K

from keras.layers import Input, Lambda, Conv2D

from keras.models import load_model, Model

from yolo_utils import read_classes, read_anchors, generate_colors, preprocess_image, draw_boxes, scale_boxes

from yad2k.models.keras_yolo import yolo_head, yolo_boxes_to_corners, preprocess_true_boxes, yolo_loss, yolo_body

%matplotlib inline
2 - Problem Statement
感谢drive.ai提供的数据集,这是一家研究自动驾驶汽车大脑的公司。

这些图像保存在文件夹下面,并且他们都已经被标注上了bounding boxes,这些bounding boxes框出了汽车所在区域,下面是一个样例。

3 - YOLO
YOLO("you only look once")是一个受欢迎的算法,因为他即有高准确率又可以做到实时预测。"only looks once"表示的是只需要一次前向传播,通过非极大值抑制之后,他将识别的物体与bounding boxes一起输出。
3.1 - Model details
模型细节如下:
- 输入为批次图片,其规模为$(m, 608, 608, 3)$
- 输出为bounding boxes列表以及识别类型。每一个bounding box被表示为六元组$(p_c, b_x, b_y, b_h, b_w, c)$,其中$c$是分类类别,既可以用一个整数表示,也可以用一个向量表示。
我们使用5个anchor boxes,所以YOLO的架构可以表示为:IMAGE(m, 608, 608, 3) -> DEEP CNN -> ENCODING(m, 19, 9, 5, 85)。
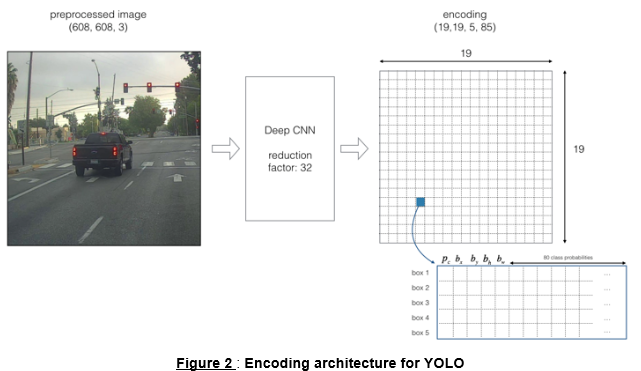
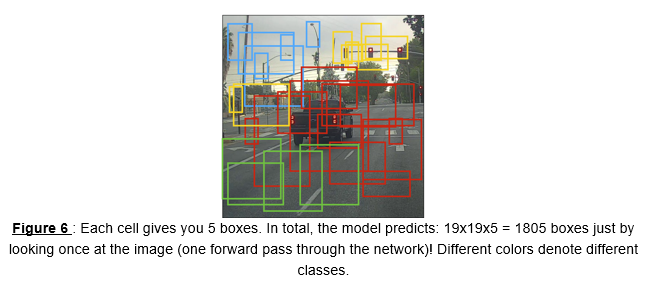
因为使用了5个anchor boxes,因此19×19的每一个单元都包含了5个boxes,为了方便,我们可以将5个boxes展开。如下图所示:
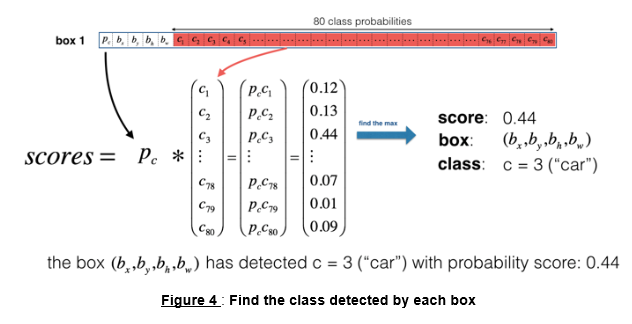
现在,对于每一个单元(每一个box),我们可以计算下述elementwise乘积并提取框中包含某个类别的概率。
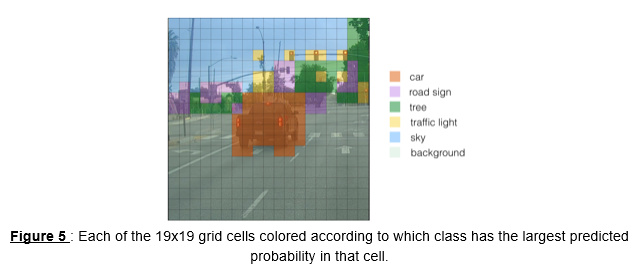
下面给出了可视化YOLO预测过程。
* 对于每一个19×19的网格单元,找出最大可能的分数所属的类别
* 根据预测的该网格的类型染对应颜色
另一种YOLO可视化方法是描画出输出的bounding boxes,只画出概率较高的bounding boxes(但仍然太多,不够准确,可以通过非极大值抑制处理此问题),如下图:
上述方法可以通过两个步骤实现:
- 丢掉得分低的boxes
- 如果有多个box重叠并且识别同一个对象,只选取一个box
3.2 - Filtering with a threshold on class scores
实现函数$yolo\_filter\_boxes()$,提供$box\_confidence$和$boxes$以及$box\_class\_probs$,过滤掉分数低于给定阈值$threshold$的boxes。
# GRADED FUNCTION: yolo_filter_boxes

def yolo_filter_boxes(box_confidence, boxes, box_class_probs, threshold = .6):

    """Filters YOLO boxes by thresholding on object and class confidence.

    Arguments:

    box_confidence -- tensor of shape (19, 19, 5, 1)

    boxes -- tensor of shape (19, 19, 5, 4)

    box_class_probs -- tensor of shape (19, 19, 5, 80)

    threshold -- real value, if [ highest class probability score < threshold], then get rid of the corresponding box

    Returns:

    scores -- tensor of shape (None,), containing the class probability score for selected boxes

    boxes -- tensor of shape (None, 4), containing (b_x, b_y, b_h, b_w) coordinates of selected boxes

    classes -- tensor of shape (None,), containing the index of the class detected by the selected boxes

    Note: "None" is here because you don't know the exact number of selected boxes, as it depends on the threshold.

    For example, the actual output size of scores would be (10,) if there are 10 boxes.

    """

    # Step 1: Compute box scores

    ### START CODE HERE ### (≈ 1 line)

    box_scores = box_confidence * box_class_probs

    ### END CODE HERE ###

    # Step 2: Find the box_classes thanks to the max box_scores, keep track of the corresponding score

    ### START CODE HERE ### (≈ 2 lines)

    box_classes = K.argmax(box_scores, axis=-1)

    box_class_scores = K.max(box_scores, axis=-1, keepdims=False)

    ### END CODE HERE ###

    # Step 3: Create a filtering mask based on "box_class_scores" by using "threshold". The mask should have the

    # same dimension as box_class_scores, and be True for the boxes you want to keep (with probability >= threshold)

    ### START CODE HERE ### (≈ 1 line)

    filtering_mask = box_class_scores >= threshold

    ### END CODE HERE ###

    # Step 4: Apply the mask to scores, boxes and classes

    ### START CODE HERE ### (≈ 3 lines)
# tensorflow 里的一个函数,在做目标检测(YOLO)时常常用到。
# 其中b一般是bool型的n维向量,若a.shape=[3,3,3] b.shape=[3,3]
# 则 tf.boolean_mask(a,b) 将使a (m维)矩阵仅保留与b中“True”元素同下标的部分,并将结果展开到m-1维。
    scores = tf.boolean_mask(box_class_scores, filtering_mask)

    boxes = tf.boolean_mask(boxes, filtering_mask)

    classes = tf.boolean_mask(box_classes, filtering_mask)

    ### END CODE HERE ###

    return scores, boxes, classes
with tf.Session() as test_a:

    box_confidence = tf.random_normal([19, 19, 5, 1], mean=1, stddev=4, seed = 1)

    boxes = tf.random_normal([19, 19, 5, 4], mean=1, stddev=4, seed = 1)

    box_class_probs = tf.random_normal([19, 19, 5, 80], mean=1, stddev=4, seed = 1)

    scores, boxes, classes = yolo_filter_boxes(box_confidence, boxes, box_class_probs, threshold = 0.5)

    print("scores[2] = " + str(scores[2].eval()))

    print("boxes[2] = " + str(boxes[2].eval()))

    print("classes[2] = " + str(classes[2].eval()))

    print("scores.shape = " + str(scores.shape))

    print("boxes.shape = " + str(boxes.shape))

    print("classes.shape = " + str(classes.shape))
Result:

scores[2] = 10.7506

boxes[2] = [ 8.42653275  3.27136683 -0.53134358 -4.94137335]

classes[2] = 7

scores.shape = (?,)

boxes.shape = (?, 4)

classes.shape = (?,)
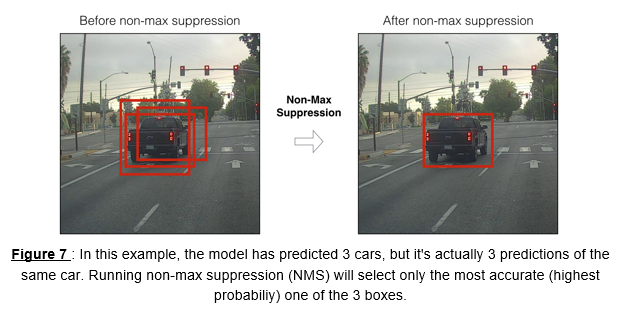
3.3 - Non-max suppression
在阈值过滤boxes之后,会留下一些有重叠的boxes,第二重过滤即是从重叠boxes选择正确的boxes,叫做非极大值抑制(NMS)。
非极大值抑制使用了重要函数"Intersection over Union",即"IoU“。
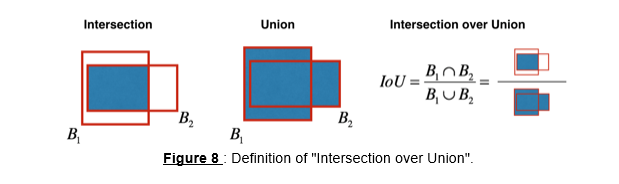
# GRADED FUNCTION: iou

def iou(box1, box2):

    """Implement the intersection over union (IoU) between box1 and box2

    Arguments:

    box1 -- first box, list object with coordinates (x1, y1, x2, y2)

    box2 -- second box, list object with coordinates (x1, y1, x2, y2)

    """

    # Calculate the (y1, x1, y2, x2) coordinates of the intersection of box1 and box2. Calculate its Area.

    ### START CODE HERE ### (≈ 5 lines)

    xi1 = max(max(box1[0], box2[0]), 0)

    yi1 = max(max(box1[1], box2[1]), 0)

    xi2 = max(min(box1[2], box2[2]), 0)

    yi2 = max(min(box1[3], box2[3]), 0)

    inter_area = (xi2-xi1) * (yi2-yi1)

    ### END CODE HERE ###

    # Calculate the Union area by using Formula: Union(A,B) = A + B - Inter(A,B)

    ### START CODE HERE ### (≈ 3 lines)

    box1_area = (box1[2]-box1[0]) * (box1[3]-box1[1])

    box2_area = (box2[2]-box2[0]) * (box2[3]-box2[1])

    union_area = box1_area + box2_area - inter_area

    ### END CODE HERE ###

    # compute the IoU

    ### START CODE HERE ### (≈ 1 line)

    iou = inter_area / union_area

    ### END CODE HERE ###

    return iou
box1 = (2, 1, 4, 3)

box2 = (1, 2, 3, 4)

print("iou = " + str(iou(box1, box2)))
Result:

iou = 0.14285714285714285
# GRADED FUNCTION: yolo_non_max_suppression

def yolo_non_max_suppression(scores, boxes, classes, max_boxes = 10, iou_threshold = 0.5):

    """

    Applies Non-max suppression (NMS) to set of boxes

    Arguments:

    scores -- tensor of shape (None,), output of yolo_filter_boxes()

    boxes -- tensor of shape (None, 4), output of yolo_filter_boxes() that have been scaled to the image size (see later)

    classes -- tensor of shape (None,), output of yolo_filter_boxes()

    max_boxes -- integer, maximum number of predicted boxes you'd like

    iou_threshold -- real value, "intersection over union" threshold used for NMS filtering

    Returns:

    scores -- tensor of shape (, None), predicted score for each box

    boxes -- tensor of shape (4, None), predicted box coordinates

    classes -- tensor of shape (, None), predicted class for each box

    Note: The "None" dimension of the output tensors has obviously to be less than max_boxes. Note also that this

    function will transpose the shapes of scores, boxes, classes. This is made for convenience.

    """

    max_boxes_tensor = K.variable(max_boxes, dtype='int32')     # tensor to be used in tf.image.non_max_suppression()

    K.get_session().run(tf.variables_initializer([max_boxes_tensor])) # initialize variable max_boxes_tensor

    # Use tf.image.non_max_suppression() to get the list of indices corresponding to boxes you keep

    ### START CODE HERE ### (≈ 1 line)

    nms_indices = tf.image.non_max_suppression(boxes, scores, max_boxes, iou_threshold)

    ### END CODE HERE ###

    # Use K.gather() to select only nms_indices from scores, boxes and classes

    ### START CODE HERE ### (≈ 3 lines)

    scores = K.gather(scores, nms_indices)

    boxes = K.gather(boxes, nms_indices)

    classes = K.gather(classes, nms_indices)

    ### END CODE HERE ###

    return scores, boxes, classes
with tf.Session() as test_b:

    scores = tf.random_normal([54,], mean=1, stddev=4, seed = 1)

    boxes = tf.random_normal([54, 4], mean=1, stddev=4, seed = 1)

    classes = tf.random_normal([54,], mean=1, stddev=4, seed = 1)

    scores, boxes, classes = yolo_non_max_suppression(scores, boxes, classes)

    print("scores[2] = " + str(scores[2].eval()))

    print("boxes[2] = " + str(boxes[2].eval()))

    print("classes[2] = " + str(classes[2].eval()))

    print("scores.shape = " + str(scores.eval().shape))

    print("boxes.shape = " + str(boxes.eval().shape))

    print("classes.shape = " + str(classes.eval().shape))
Result:

scores[2] = 6.9384

boxes[2] = [-5.299932    3.13798141  4.45036697  0.95942086]

classes[2] = -2.24527

scores.shape = (10,)

boxes.shape = (10, 4)

classes.shape = (10,)
3.4 - Wrapping up the filtering
有两种边框表示方法,可以通过方法$boxes=yolo\_boxes\_to\_corners(box_{xy}, box_{wh})$将$(x,y,w,h)$转换成$(x_1,y_1,x_2,y_2)$表示。
可以使用$boxes=scale\_boxes(boxes, image\_shape)$放缩图片大小。
# GRADED FUNCTION: yolo_eval

def yolo_eval(yolo_outputs, image_shape = (720., 1280.), max_boxes=10, score_threshold=.6, iou_threshold=.5):

    """

    Converts the output of YOLO encoding (a lot of boxes) to your predicted boxes along with their scores, box coordinates and classes.

    Arguments:

    yolo_outputs -- output of the encoding model (for image_shape of (608, 608, 3)), contains 4 tensors:

                    box_confidence: tensor of shape (None, 19, 19, 5, 1)

                    box_xy: tensor of shape (None, 19, 19, 5, 2)

                    box_wh: tensor of shape (None, 19, 19, 5, 2)

                    box_class_probs: tensor of shape (None, 19, 19, 5, 80)

    image_shape -- tensor of shape (2,) containing the input shape, in this notebook we use (608., 608.) (has to be float32 dtype)

    max_boxes -- integer, maximum number of predicted boxes you'd like

    score_threshold -- real value, if [ highest class probability score < threshold], then get rid of the corresponding box

    iou_threshold -- real value, "intersection over union" threshold used for NMS filtering

    Returns:

    scores -- tensor of shape (None, ), predicted score for each box

    boxes -- tensor of shape (None, 4), predicted box coordinates

    classes -- tensor of shape (None,), predicted class for each box

    """

    ### START CODE HERE ###

    # Retrieve outputs of the YOLO model (≈1 line)

    box_confidence, box_xy, box_wh, box_class_probs = yolo_outputs

    # Convert boxes to be ready for filtering functions

    boxes = yolo_boxes_to_corners(box_xy, box_wh)

    # Use one of the functions you've implemented to perform Score-filtering with a threshold of score_threshold (≈1 line)

    scores, boxes, classes = yolo_filter_boxes(box_confidence, boxes, box_class_probs, score_threshold)

    # Scale boxes back to original image shape.

    boxes = scale_boxes(boxes, image_shape)

    # Use one of the functions you've implemented to perform Non-max suppression with a threshold of iou_threshold (≈1 line)

    scores, boxes, classes = yolo_non_max_suppression(scores, boxes, classes, max_boxes, iou_threshold)

    ### END CODE HERE ###

    return scores, boxes, classes
with tf.Session() as test_b:

    yolo_outputs = (tf.random_normal([19, 19, 5, 1], mean=1, stddev=4, seed = 1),

                    tf.random_normal([19, 19, 5, 2], mean=1, stddev=4, seed = 1),

                    tf.random_normal([19, 19, 5, 2], mean=1, stddev=4, seed = 1),

                    tf.random_normal([19, 19, 5, 80], mean=1, stddev=4, seed = 1))

    scores, boxes, classes = yolo_eval(yolo_outputs)

    print("scores[2] = " + str(scores[2].eval()))

    print("boxes[2] = " + str(boxes[2].eval()))

    print("classes[2] = " + str(classes[2].eval()))

    print("scores.shape = " + str(scores.eval().shape))

    print("boxes.shape = " + str(boxes.eval().shape))

    print("classes.shape = " + str(classes.eval().shape))
Result:

scores[2] = 138.791

boxes[2] = [ 1292.32971191  -278.52166748  3876.98925781  -835.56494141]

classes[2] = 54

scores.shape = (10,)

boxes.shape = (10, 4)

classes.shape = (10,)
3.5 - Summary for YOLO
- Input image (608, 608, 3)
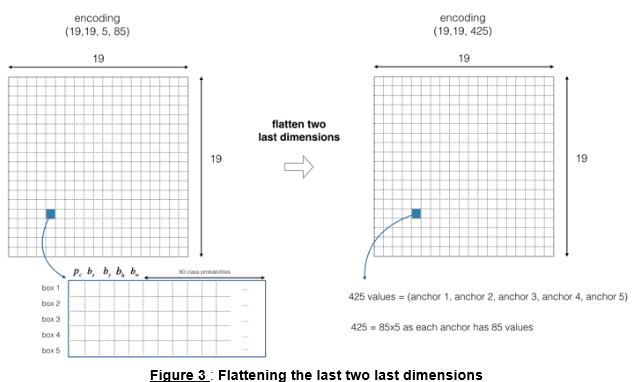
- The input image goes through a CNN, resulting in a (19,19,5,85) dimensional output.
- After flattening the last two dimensions, the output is a volume of shape (19, 19, 425):
- Each cell in a 19x19 grid over the input image gives 425 numbers.
- 425 = 5 x 85 because each cell contains predictions for 5 boxes, corresponding to 5 anchor boxes, as seen in lecture.
- 85 = 5 + 80 where 5 is because $(p_c, b_x, b_y, b_h, b_w)$ has 5 numbers, and and 80 is the number of classes we'd like to detect
- You then select only few boxes based on:
- Score-thresholding: throw away boxes that have detected a class with a score less than the threshold
- Non-max suppression: Compute the Intersection over Union and avoid selecting overlapping boxes
- This gives you YOLO's final output.
4 - Test YOLO pretrained model on images
sess = K.get_session()
4.1 - Defining classes, anchors and image shape
class_names = read_classes("model_data/coco_classes.txt")

anchors = read_anchors("model_data/yolo_anchors.txt")

image_shape = (720., 1280.)
4.2 - Loading a pretrained model
yolo_model = load_model("model_data/yolo.h5")
4.3 - Convert output of the model to usable bounding box tensors
yolo_outputs = yolo_head(yolo_model.output, anchors, len(class_names))
4.4 - Filtering boxes
scores, boxes, classes = yolo_eval(yolo_outputs, image_shape)
4.5 - Run the graph on an image
- yolo_model.input is given to
yolo_model. The model is used to compute the output yolo_model.output - yolo_model.output is processed by
yolo_head. It gives you yolo_outputs - yolo_outputs goes through a filtering function,
yolo_eval. It outputs your predictions: scores, boxes, classes
def predict(sess, image_file):

    """

    Runs the graph stored in "sess" to predict boxes for "image_file". Prints and plots the preditions.

    Arguments:

    sess -- your tensorflow/Keras session containing the YOLO graph

    image_file -- name of an image stored in the "images" folder.

    Returns:

    out_scores -- tensor of shape (None, ), scores of the predicted boxes

    out_boxes -- tensor of shape (None, 4), coordinates of the predicted boxes

    out_classes -- tensor of shape (None, ), class index of the predicted boxes

    Note: "None" actually represents the number of predicted boxes, it varies between 0 and max_boxes.

    """

    # Preprocess your image

    image, image_data = preprocess_image("images/" + image_file, model_image_size = (608, 608))

    # Run the session with the correct tensors and choose the correct placeholders in the feed_dict.

    # You'll need to use feed_dict={yolo_model.input: ... , K.learning_phase(): 0})

    ### START CODE HERE ### (≈ 1 line)

    out_scores, out_boxes, out_classes = sess.run(

                [scores, boxes, classes],

                feed_dict={

                    yolo_model.input: image_data,

                    K.learning_phase(): 0

                })

    ### END CODE HERE ###

    # Print predictions info

    print('Found {} boxes for {}'.format(len(out_boxes), image_file))

    # Generate colors for drawing bounding boxes.

    colors = generate_colors(class_names)

    # Draw bounding boxes on the image file

    draw_boxes(image, out_scores, out_boxes, out_classes, class_names, colors)

    # Save the predicted bounding box on the image

    image.save(os.path.join("out", image_file), quality=90)

    # Display the results in the notebook

    output_image = scipy.misc.imread(os.path.join("out", image_file))

    imshow(output_image)

    return out_scores, out_boxes, out_classes
out_scores, out_boxes, out_classes = predict(sess, "test.jpg")
Result:
5 - Summary
- YOLO is a state-of-the-art object detection model that is fast and accurate
- It runs an input image through a CNN which outputs a 19x19x5x85 dimensional volume.
- The encoding can be seen as a grid where each of the 19x19 cells contains information about 5 boxes.
- You filter through all the boxes using non-max suppression. Specifically:
- Score thresholding on the probability of detecting a class to keep only accurate (high probability) boxes
- Intersection over Union (IoU) thresholding to eliminate overlapping boxes
- Because training a YOLO model from randomly initialized weights is non-trivial and requires a large dataset as well as lot of computation, we used previously trained model parameters in this exercise. If you wish, you can also try fine-tuning the YOLO model with your own dataset, though this would be a fairly non-trivial exercise.
6 - References
https://web.stanford.edu/class/cs230/
DeepLearning.ai-Week3-Autonomous driving-Car detection的更多相关文章
- Autonomous driving - Car detection YOLO
Andrew Ng deeplearning courese-4:Convolutional Neural Network Convolutional Neural Networks: Step by ...
- Coursera机器学习+deeplearning.ai+斯坦福CS231n
日志 20170410 Coursera机器学习 2017.11.28 update deeplearning 台大的机器学习课程:台湾大学林轩田和李宏毅机器学习课程 Coursera机器学习 Wee ...
- tensorfolw配置过程中遇到的一些问题及其解决过程的记录(配置SqueezeDet: Unified, Small, Low Power Fully Convolutional Neural Networks for Real-Time Object Detection for Autonomous Driving)
今天看到一篇关于检测的论文<SqueezeDet: Unified, Small, Low Power Fully Convolutional Neural Networks for Real- ...
- DeepLearning.ai学习笔记汇总
第一章 神经网络与深度学习(Neural Network & Deeplearning) DeepLearning.ai学习笔记(一)神经网络和深度学习--Week3浅层神经网络 DeepLe ...
- Coursera深度学习(DeepLearning.ai)编程题&笔记
因为是Jupyter Notebook的形式,所以不方便在博客中展示,具体可在我的github上查看. 第一章 Neural Network & DeepLearning week2 Logi ...
- Behavior Trees for Path Planning (Autonomous Driving)
Behavior Trees for Path Planning (Autonomous Driving) 2019-11-13 08:16:52 Path planning in self-driv ...
- 泡泡一分钟:BLVD: Building A Large-scale 5D Semantics Benchmark for Autonomous Driving
BLVD: Building A Large-scale 5D Semantics Benchmark for Autonomous Driving BLVD:构建自主驾驶的大规模5D语义基准 Jia ...
- DeepLearning.ai学习笔记(三)结构化机器学习项目--week2机器学习策略(2)
一.进行误差分析 很多时候我们发现训练出来的模型有误差后,就会一股脑的想着法子去减少误差.想法固然好,但是有点headlong~ 这节视频中吴大大介绍了一个比较科学的方法,具体的看下面的例子 还是以猫 ...
- Coursera DeepLearning.ai Logistic Regression逻辑回归总结
既<Machine Learning>课程后,Andrew Ng又推出了新一系列的课程<DeepLearning.ai>,注册了一下可以试听7天.之后每个月要$49,想想还是有 ...
- Deeplearning.ai课程笔记--汇总
从接触机器学习就了解到Andrew Ng的机器学习课程,后来发现又出来深度学习课程,就开始在网易云课堂上学习deeplearning.ai的课程,Andrew 的课真是的把深入浅出.当然学习这些课程还 ...
随机推荐
- 洛谷 P1163"银行贷款"(二分)
传送门 题解: 二分月利率,假设当前判断的月利率为x: 那么如何判断x是大了还是小了呢? 下面来分析一下Check()函数: bool Check(double x) { double tot=a; ...
- 动态样式语言—LESS基础知识
CSS是一门非程序式语言,缺少逻辑性,不便于维护 LESS在CSS现有语法的基础上,为CSS加入程序式语言的特性 引入了变量.混入.运算.函数等功能,大大简化CSS的编写,降低了CSS的维护成本 LE ...
- (去重 sort)nyoj8-一种排序
8-一种排序 内存限制:64MB 时间限制:3000ms 特判: No通过数:235 提交数:749 难度:3 题目描述: 现在要求按照以下方式排序(默认排序都是从小到大) 现在有很多长方形,每一个长 ...
- loopback(回环)
Loopback接口是一个虚拟网络接口,在不同的领域,其含义也大不一样. 1. TCP/IP协议栈中的loopback接口 在TCP/IP中回环设备是一个通过软件实现的虚拟网络接口,它不与任何硬件相 ...
- group by、where、having
where:是利用数据库本来存在的数据在查询,是在group by.having之前执行. group by:是将本来就有的数据按照条件进行分组. having:是将数据库没有的数据,可以理解为gro ...
- linux 用户登陆信息查询
1.查看命令历史 每个用户都有一份命令历史记录 查看$HOME/.bash_history 或者在终端输入: history 2.last命令 查看用户登录历史 此命令会读取 /var/log/wtm ...
- Vue.js 条件与循环
条件判断: v-if: 条件判断使用 v-if 指令: v-else-if:(其实和Java,c,js的语法差不多) v-show:
- centos之Too many open files问题-修改linux最大文件句柄数
linux服务器大并发调优时,往往需要预先调优linux参数,其中修改linux最大文件句柄数是最常修改的参数之一. 在linux中执行ulimit -a 即可查询linux相关的参数,如下所示: [ ...
- STM32学习笔记:【001】时钟树与RCC
导言 如果学过单片机的同学应该不会陌生,学习51单片机时最经常听到的就是“最小系统”. 最小系统里面少不了晶振,否则单片机无法工作. 单片机需要晶振(时钟源)来工作,那么对于STM32芯片同样如此. ...
- hihoCoder #1457 : 后缀自动机四·重复旋律7(后缀自动机 + 拓扑排序)
http://hihocoder.com/problemset/problem/1457 val[i] 表示状态i所表示的所有字符串的十进制之和 ans= ∑ val[i]在后缀自动机上,从起始状态走 ...