第五篇:数据备份、pymysql模块
http://www.cnblogs.com/linhaifeng/articles/7525619.html#_label3
一 IDE工具介绍
生产环境还是推荐使用mysql命令行,但为了方便我们测试,可以使用IDE工具
下载链接:https://pan.baidu.com/s/1bpo5mqj
掌握:

#1. 测试+链接数据库

#2. 新建库

#3. 新建表,新增字段+类型+约束

#4. 设计表:外键

#5. 新建查询

#6. 备份库/表

#注意:

批量加注释:ctrl+?键

批量去注释:ctrl+shift+?键
二 MySQL数据备份
#1. 物理备份: 直接复制数据库文件,适用于大型数据库环境。但不能恢复到异构系统中如Windows。

#2. 逻辑备份: 备份的是建表、建库、插入等操作所执行SQL语句,适用于中小型数据库,效率相对较低。

#3. 导出表: 将表导入到文本文件中。
一、使用mysqldump实现逻辑备份
#语法:

# mysqldump -h 服务器 -u用户名 -p密码 数据库名 > 备份文件.sql

#示例:

#单库备份

mysqldump -uroot -p123 db1 > db1.sql

mysqldump -uroot -p123 db1 table1 table2 > db1-table1-table2.sql

#多库备份

mysqldump -uroot -p123 --databases db1 db2 mysql db3 > db1_db2_mysql_db3.sql

#备份所有库

mysqldump -uroot -p123 --all-databases > all.sql
二、恢复逻辑备份
#方法一:

[root@egon backup]# mysql -uroot -p123 < /backup/all.sql

#方法二:

mysql> use db1;

mysql> SET SQL_LOG_BIN=0;

mysql> source /root/db1.sql

#注:如果备份/恢复单个库时,可以修改sql文件

DROP database if exists school;

create database school;

use school;
三、备份/恢复案例
#数据库备份/恢复实验一:数据库损坏

备份:

1. # mysqldump -uroot -p123 --all-databases > /backup/`date +%F`_all.sql

2. # mysql -uroot -p123 -e 'flush logs' //截断并产生新的binlog

3. 插入数据 //模拟服务器正常运行

4. mysql> set sql_log_bin=0; //模拟服务器损坏

mysql> drop database db;

恢复:

1. # mysqlbinlog 最后一个binlog > /backup/last_bin.log

2. mysql> set sql_log_bin=0;

mysql> source /backup/2014-02-13_all.sql //恢复最近一次完全备份

mysql> source /backup/last_bin.log //恢复最后个binlog文件

#数据库备份/恢复实验二:如果有误删除

备份:

1. mysqldump -uroot -p123 --all-databases > /backup/`date +%F`_all.sql

2. mysql -uroot -p123 -e 'flush logs' //截断并产生新的binlog

3. 插入数据 //模拟服务器正常运行

4. drop table db1.t1 //模拟误删除

5. 插入数据 //模拟服务器正常运行

恢复:

1. # mysqlbinlog 最后一个binlog --stop-position=260 > /tmp/1.sql

# mysqlbinlog 最后一个binlog --start-position=900 > /tmp/2.sql

2. mysql> set sql_log_bin=0;

mysql> source /backup/2014-02-13_all.sql //恢复最近一次完全备份

mysql> source /tmp/1.log //恢复最后个binlog文件

mysql> source /tmp/2.log //恢复最后个binlog文件

注意事项:

1. 完全恢复到一个干净的环境(例如新的数据库或删除原有的数据库)

2. 恢复期间所有SQL语句不应该记录到binlog中
四、实现自动化备份
备份计划:

1. 什么时间 2:00

2. 对哪些数据库备份

3. 备份文件放的位置

备份脚本:

[root@egon ~]# vim /mysql_back.sql

#!/bin/bash

back_dir=/backup

back_file=`date +%F`_all.sql

user=root

pass=123

if [ ! -d /backup ];then

mkdir -p /backup

fi

# 备份并截断日志

mysqldump -u${user} -p${pass} --events --all-databases > ${back_dir}/${back_file}

mysql -u${user} -p${pass} -e 'flush logs'

# 只保留最近一周的备份

cd $back_dir

find . -mtime +7 -exec rm -rf {} \;

手动测试:

[root@egon ~]# chmod a+x /mysql_back.sql

[root@egon ~]# chattr +i /mysql_back.sql

[root@egon ~]# /mysql_back.sql

配置cron:

[root@egon ~]# crontab -l

* * * /mysql_back.sql
五、表的导出和导入
SELECT... INTO OUTFILE 导出文本文件

示例:

mysql> SELECT * FROM school.student1

INTO OUTFILE 'student1.txt'

FIELDS TERMINATED BY ',' //定义字段分隔符

OPTIONALLY ENCLOSED BY '”' //定义字符串使用什么符号括起来

LINES TERMINATED BY '\n' ; //定义换行符

mysql 命令导出文本文件

示例:

# mysql -u root -p123 -e 'select * from student1.school' > /tmp/student1.txt

# mysql -u root -p123 --xml -e 'select * from student1.school' > /tmp/student1.xml

# mysql -u root -p123 --html -e 'select * from student1.school' > /tmp/student1.html

LOAD DATA INFILE 导入文本文件

mysql> DELETE FROM student1;

mysql> LOAD DATA INFILE '/tmp/student1.txt'

INTO TABLE school.student1

FIELDS TERMINATED BY ','

OPTIONALLY ENCLOSED BY '”'

LINES TERMINATED BY '\n';
#可能会报错

mysql> select * from db1.emp into outfile 'C:\\db1.emp.txt' fields terminated by ',' lines terminated by '\r\n';

ERROR 1238 (HY000): Variable 'secure_file_priv' is a read only variable

#数据库最关键的是数据,一旦数据库权限泄露,那么通过上述语句就可以轻松将数据导出到文件中然后下载拿走,因而mysql对此作了限制,只能将文件导出到指定目录

在配置文件中

[mysqld]

secure_file_priv='C:\\' #只能将数据导出到C:\\下

重启mysql

重新执行上述语句
六、数据库迁移
务必保证在相同版本之间迁移

# mysqldump -h 源IP -uroot -p123 --databases db1 | mysql -h 目标IP -uroot -p456
三 pymysql模块
#安装

pip3 install pymysql
一 链接、执行sql、关闭(游标)

import pymysql

conn = pymysql.connect(host='127.0.0.1',port=3306,user='root',passwd='',db='company')

# cursor = conn.cursor() # 默认以元组的形式

cursor = conn.cursor(cursor=pymysql.cursors.DictCursor) # 以字典形式显示数据

sql='select * from employee'

sql2='create TABLE test (id int PRIMARY KEY auto_increment,name varchar(20))'

sql3='drop database test'

# cursor.execute(sql2)

# cursor.execute("insert into test VALUES (1,'zhangsan'),(2,'lisi')")

ret = cursor.execute("select * from test")

print(ret) # 2

# print(cursor.fetchone()) #(1, 'zhangsan')

# print(cursor.fetchmany(2)) # ((1, 'zhangsan'), (2, 'lisi'))

# print(cursor.fetchall())

cursor.scroll(1,mode="relative") # 光标移动

print(cursor.fetchone()) # (2, 'lisi')

conn.commit()

cursor.close()

conn.close()
import pymysql

user=input('用户名: ').strip()

pwd=input('密码: ').strip()

#链接

conn=pymysql.connect(host='localhost',user='root',password='',database='egon',charset='utf8')

#游标

cursor=conn.cursor() #执行完毕返回的结果集默认以元组显示

#cursor=conn.cursor(cursor=pymysql.cursors.DictCursor)

#执行sql语句

sql='select * from userinfo where name="%s" and password="%s"' %(user,pwd) #注意%s需要加引号

print(sql)

res=cursor.execute(sql) #执行sql语句,返回sql查询成功的记录数目

print(res)

cursor.close()

conn.close()

if res:

    print('登录成功')

else:

    print('登录失败')
二 execute()之sql注入
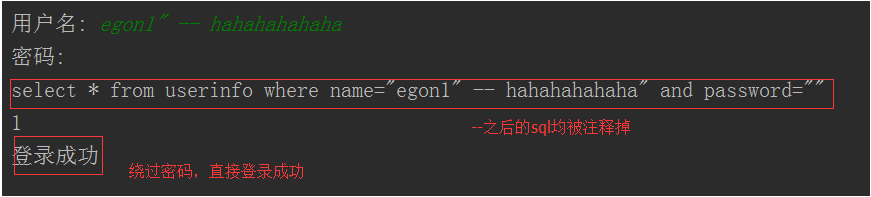
注意:符号--会注释掉它之后的sql,正确的语法:--后至少有一个任意字符
根本原理:就根据程序的字符串拼接name='%s',我们输入一个xxx' -- haha,用我们输入的xxx加'在程序中拼接成一个判断条件name='xxx' -- haha'

最后那一个空格,在一条sql语句中如果遇到select * from t1 where id > 3 -- and name='egon';则--之后的条件被注释掉了 #1、sql注入之:用户存在,绕过密码
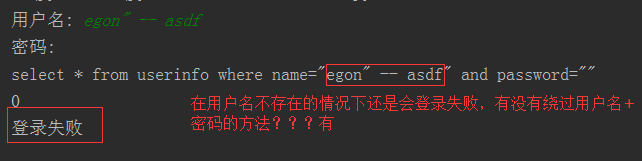
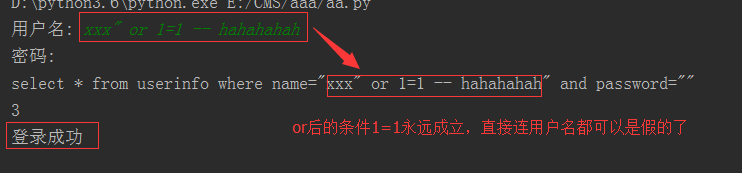
egon' -- 任意字符 #2、sql注入之:用户不存在,绕过用户与密码
xxx' or 1=1 -- 任意字符
解决方法:
# 原来是我们对sql进行字符串拼接

# sql="select * from userinfo where name='%s' and password='%s'" %(user,pwd)

# print(sql)

# res=cursor.execute(sql)

#改写为(execute帮我们做字符串拼接,我们无需且一定不能再为%s加引号了)

sql="select * from userinfo where name=%s and password=%s" #!!!注意%s需要去掉引号,因为pymysql会自动为我们加上

res=cursor.execute(sql,[user,pwd]) #pymysql模块自动帮我们解决sql注入的问题,只要我们按照pymysql的规矩来。
三 增、删、改:conn.commit()
import pymysql

#链接

conn=pymysql.connect(host='localhost',user='root',password='',database='egon')

#游标

cursor=conn.cursor()

#执行sql语句

#part1

# sql='insert into userinfo(name,password) values("root","123456");'

# res=cursor.execute(sql) #执行sql语句,返回sql影响成功的行数

# print(res)

#part2

# sql='insert into userinfo(name,password) values(%s,%s);'

# res=cursor.execute(sql,("root","123456")) #执行sql语句,返回sql影响成功的行数

# print(res)

#part3

sql='insert into userinfo(name,password) values(%s,%s);'

res=cursor.executemany(sql,[("root","123456"),("lhf","12356"),("eee","156")]) #执行sql语句,返回sql影响成功的行数

print(res)

conn.commit() #提交后才发现表中插入记录成功

cursor.close()

conn.close()
四 查:fetchone,fetchmany,fetchall

import pymysql

#链接

conn=pymysql.connect(host='localhost',user='root',password='',database='egon')

#游标

cursor=conn.cursor()

#执行sql语句

sql='select * from userinfo;'

rows=cursor.execute(sql) #执行sql语句,返回sql影响成功的行数rows,将结果放入一个集合,等待被查询

# cursor.scroll(3,mode='absolute') # 相对绝对位置移动

# cursor.scroll(3,mode='relative') # 相对当前位置移动

res1=cursor.fetchone()

res2=cursor.fetchone()

res3=cursor.fetchone()

res4=cursor.fetchmany(2)

res5=cursor.fetchall()

print(res1)

print(res2)

print(res3)

print(res4)

print(res5)

print('%s rows in set (0.00 sec)' %rows)

conn.commit() #提交后才发现表中插入记录成功

cursor.close()

conn.close()

'''

(1, 'root', '123456')

(2, 'root', '123456')

(3, 'root', '123456')

((4, 'root', '123456'), (5, 'root', '123456'))

((6, 'root', '123456'), (7, 'lhf', '12356'), (8, 'eee', '156'))

rows in set (0.00 sec)

'''
五 获取插入的最后一条数据的自增ID
import pymysql

conn=pymysql.connect(host='localhost',user='root',password='',database='egon')

cursor=conn.cursor()

sql='insert into userinfo(name,password) values("xxx","123");'

rows=cursor.execute(sql)

print(cursor.lastrowid) #在插入语句后查看

conn.commit()

cursor.close()

conn.close()
第五篇:数据备份、pymysql模块的更多相关文章
- SpringBoot之旅第五篇-数据访问
一.引言 大部分系统都离不开数据访问,数据库包括SQL和NOSQL,SQL是指关系型数据库,常见的有SQL Server,Oracle,MySQL(开源),NOSQL是泛指非关系型数据库,常见的有Mo ...
- 我们一起学习WCF 第五篇数据协定和消息协定
A:数据协定(“数据协定”是在服务与客户端之间达成的正式协议,用于以抽象方式描述要交换的数据. 也就是说,为了进行通信,客户端和服务不必共享相同的类型,而只需共享相同的数据协定. 数据协定为每个参数或 ...
- Jenkins 进阶篇 - 数据备份
随着我们的长期使用,Jenkins 系统中的内容会越来越多,特别是一些配置相关的东西,不能有任何丢失.这个时候我们就需要定期备份我们的 Jenkins 系统,避免一些误操作不小心删除了某些重要文件,J ...
- MySQL(十五)之数据备份中mysqldump详解
前言 其实前面一篇数据备份已经是非常的详细了,这里我想单独的讲解一下mysqldump,相信很多程序员都是用过这个命令的! 一.MySQL数据库的备份与还原 1.1.MySQL数据库备份 1)语法 m ...
- PyMySQL模块的使用
PyMySQL介绍 PyMySQL是在Python3.x版本中用于连接MySQL服务器的一个库,Python2系列中则使用mysqldb.Django中也可以使用PyMySQL连接MySQL数据库. ...
- Python连接MySQL数据库之pymysql模块使用
安装PyMySQL pip install pymysql PyMySQL介绍 PyMySQL是在python3.x版本中用于连接MySQL服务器的一个库,2中则使用mysqldb. Django中也 ...
- pymysql 模块
Python3连接MySQL 介绍 PyMySQL 是在 Python3.x 版本中用于连接 MySQL 服务器的一个库,Python2中则使用mysqldb. Django中也可以使用PyMySQL ...
- python 连接数据库 pymysql模块的使用
一 Python3连接MySQL 本文介绍Python3连接MySQL的第三方库--PyMySQL的基本使用. 1 PyMySQL介绍 PyMySQL 是在 Python3.x 版本中用于连接 MyS ...
- python:pymysql模块使用
一,基本使用 # 导入pymysql模块 import pymysql # 连接database conn = pymysql.connect(host=“你的数据库地址”, user=“用户名”,p ...
- Mysql(九):Python连接MySQL数据库之pymysql模块使用
Python3连接MySQL 本文介绍Python3连接MySQL的第三方库--PyMySQL的基本使用. PyMySQL介绍 PyMySQL 是在 Python3.x 版本中用于连接 MySQL 服 ...
随机推荐
- scala flatmap、reduceByKey、groupByKey
1.test.txt文件中存放 asd sd fd gf g dkf dfd dfml dlf dff gfl pkdfp dlofkp // 创建一个Scala版本的Spark Context va ...
- python语法糖/装饰器
1.python高阶函数和嵌套函数 1.1高阶函数 def func1(x): return x**2 def func2(x): return x**3 def func(x,y): return ...
- python爬虫之redis环境简单部署
Redis 简介 Redis 是完全开源免费的,遵守BSD协议,是一个高性能的key-value数据库. Redis 与其他 key - value 缓存产品有以下三个特点: Redis支持数据的持久 ...
- tomcat优化实例
———————————————————————————————————— 一.运行模式优化 修改tomcat运行模式为nio<Connector port="80" prot ...
- Navicat Preminum
此软件在连接的时候,需要这样: 新建链接==>连接属性==>编码选择自动==>如果此时点击确定的话,会把整个服务器的所有数据库都打开, 我们也可以只打开指定的数据库, 点击高级==& ...
- java 中的迭代
package cn.zhou.com; import java.util.ArrayList; import java.util.Collection; import java.util.Itera ...
- UVA 12171 Sculpture
https://vjudge.net/problem/UVA-12171 题目 某人设计雕塑,用的是很扯的方法:把一堆长方体拼起来.给出长方体的坐标和长宽高,求外表面积.因为要将这雕塑进行酸洗,需要知 ...
- Java虚拟机加载类的过程
Java虚拟机的类加载,从class文件到内存中的类,按先后顺序需要经过加载/链接/初始化三大步骤. Java语言的类型分为两大类:基本类型(primitive types)和引用类型(referen ...
- mysql 下载地址
新浪的镜像站 http://mirrors.sohu.com/mysql yum安装: 首先要到MySQL yum库的下载页面http://dev.mysql.com/downloads/repo/y ...
- 一个服务器创建两个MySQL
转载:http://www.2cto.com/database/201412/357863.html 将已安装的数据库文件夹复制到另一个目录下 打开复制目录下的my.ini文件修改 [client] ...