XiaomiPushDemo【小米推送集成,基于V3.6.12版本】
版权声明:本文为HaiyuKing原创文章,转载请注明出处!
前言
这个Demo只是记录小米推送的集成,不能运行。
使用步骤
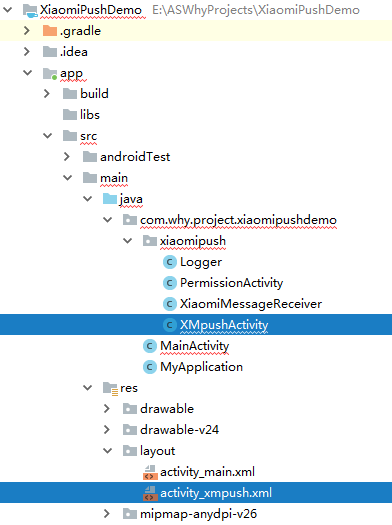
一、项目组织结构图

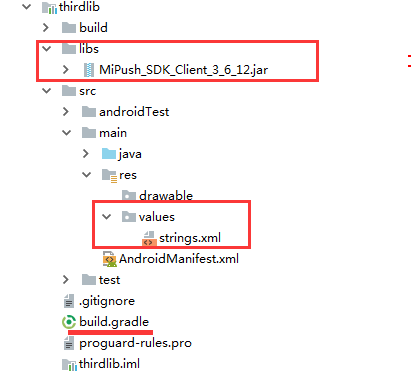
注意事项:
1、 导入类文件后需要change包名以及重新import R文件路径
2、 Values目录下的文件(strings.xml、dimens.xml、colors.xml等),如果项目中存在,则复制里面的内容,不要整个覆盖
二、导入步骤
2.1、接入准备
参考官网《小米推送服务启用指南》
注册小米开发者账号——》启用推送
2.2、下载SDK
下载地址:http://admin.xmpush.xiaomi.com/mipush/downpage/
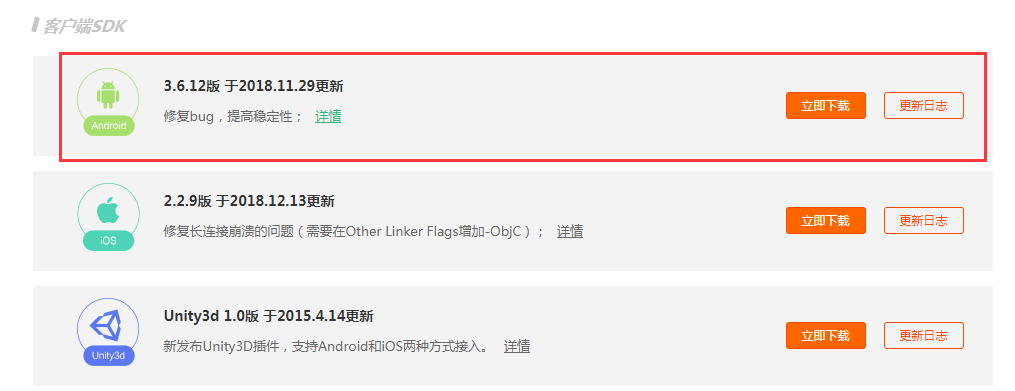
下载后的压缩包解压后的目录:

2.3、集成SDK
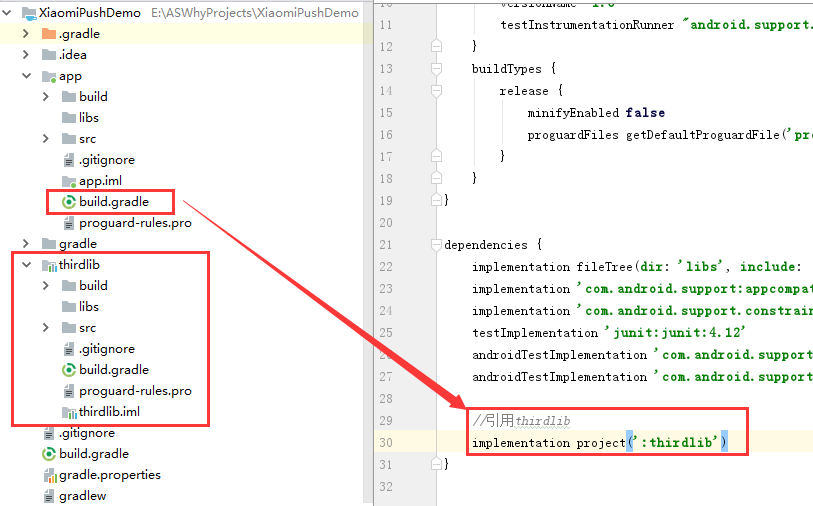
为了便于管理,我在Demo中新建了一个ThirdLib的module,用于集成SDK。
(1)新建ThirdLib的module,并在app的build.gradle中引用
//引用thirdlib

implementation project(':thirdlib')
(2)在ThirdLib这个module中集成SDK
复制MiPush_SDK_Client_x_x_x.jar到工程 libs/ 目录下;
因为是在thirdlib这个module中集成jar包,所以还需要在thirdlib这个module的build.gradle文件中引用libs目录下的jar包。
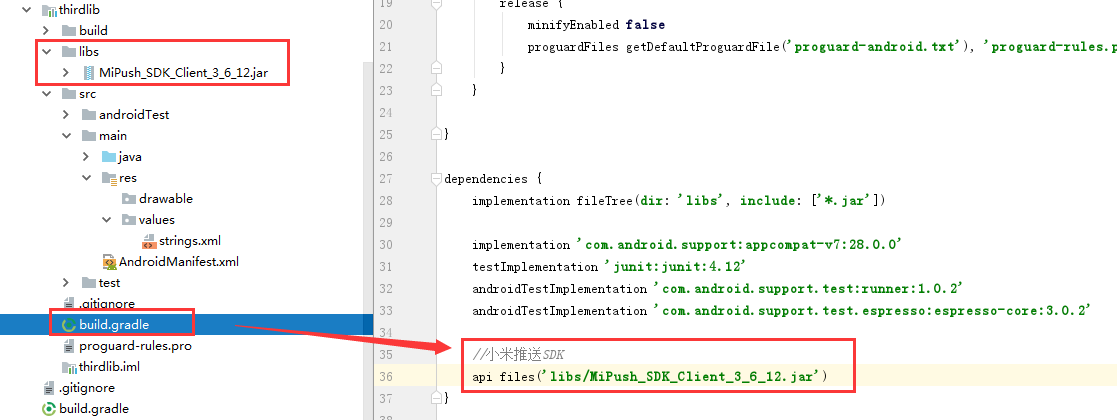
    //小米推送SDK

    api files('libs/MiPush_SDK_Client_3_6_12.jar')
(3)在ThirdLib这个module的res/strings.xml文件中添加以下代码(用于自定义的XiaomiMessageReceiver中调用)
<resources>

    <string name="app_name">ThirdLib</string>

    <!--=====================================小米推送SDK=====================================-->

    <string name="recv_passthrough_message"> Receive a passthrough message. Content is \"%1$s\"</string>

    <string name="click_notification_message"> Clicked a notification message. Content is \"%1$s\"</string>

    <string name="arrive_notification_message"> Arrived a notification message. Content is \"%1$s\"</string>

    <string name="register_success">Register push success.</string>

    <string name="register_fail">Register push fail.</string>

    <string name="set_alias_success"> Set alias \"%1$s\" success.</string>

    <string name="set_alias_fail"> Set alias fail for %1$s.</string>

    <string name="unset_alias_success"> Unset alias \"%1$s\" success.</string>

    <string name="unset_alias_fail"> Unset alias fail for %1$s.</string>

    <string name="set_account_success"> Set account \"%1$s\" success.</string>

    <string name="set_account_fail"> Set account fail for %1$s.</string>

    <string name="unset_account_success"> Unset account \"%1$s\" success.</string>

    <string name="unset_account_fail"> Unset account fail for %1$s.</string>

    <string name="subscribe_topic_success"> Subscribe topic \"%1$s\" success.</string>

    <string name="subscribe_topic_fail"> Subscribe topic fail for %1$s.</string>

    <string name="unsubscribe_topic_success"> Unsubscribe topic \"%1$s\" success.</string>

    <string name="unsubscribe_topic_fail"> Unsubscribe topic fail for %1$s.</string>

    <string name="set_accept_time_success"> Set accept time %1$s - %2$s success.</string>

    <string name="set_accept_time_fail"> Set accept time fail for %1$s.</string>

</resources>
(4)配置 AndroidManifest.xml【注意是app这个module中的,不是thirdlib这个module中的】
注意下面标记橙色代码:
<?xml version="1.0" encoding="utf-8"?>

<manifest xmlns:android="http://schemas.android.com/apk/res/android"

          package="com.why.project.xiaomipushdemo">

    <!-- ======================小米推送SDK====================== -->

    <uses-permission android:name="android.permission.WRITE_EXTERNAL_STORAGE" />

    <uses-permission android:name="android.permission.INTERNET" />

    <uses-permission android:name="android.permission.ACCESS_NETWORK_STATE" />

    <uses-permission android:name="android.permission.ACCESS_WIFI_STATE" />

    <uses-permission android:name="android.permission.READ_PHONE_STATE" />

    <uses-permission android:name="android.permission.GET_TASKS" />

    <!-- the following 2 com.xiaomi.mipushdemo should be changed to your package name -->

    <permission

        android:name="${applicationId}.permission.MIPUSH_RECEIVE"

        android:protectionLevel="signature" />

    <uses-permission android:name="${applicationId}.permission.MIPUSH_RECEIVE" />

    <uses-permission android:name="android.permission.VIBRATE" />

    <application

        android:allowBackup="true"

        android:icon="@mipmap/ic_launcher"

        android:label="@string/app_name"

        android:roundIcon="@mipmap/ic_launcher_round"

        android:supportsRtl="true"

        android:theme="@style/AppTheme">

        <activity android:name=".MainActivity">

            <intent-filter>

                <action android:name="android.intent.action.MAIN"/>

                <category android:name="android.intent.category.LAUNCHER"/>

            </intent-filter>

        </activity>

        <!-- ======================小米推送SDK========================== -->

        <service

            android:name="com.xiaomi.push.service.XMJobService"

            android:enabled="true"

            android:exported="false"

            android:permission="android.permission.BIND_JOB_SERVICE"

            android:process=":pushservice" />

        <service

            android:name="com.xiaomi.push.service.XMPushService"

            android:enabled="true"

            android:process=":pushservice" />

        <service

            android:name="com.xiaomi.mipush.sdk.PushMessageHandler"

            android:enabled="true"

            android:exported="true" />

        <service

            android:name="com.xiaomi.mipush.sdk.MessageHandleService"

            android:enabled="true" />

        <!--自定义一个BroadcastReceiver类:为了接收消息-->

        <receiver

            android:name="com.why.project.xiaomipushdemo.xiaomipush.XiaomiMessageReceiver"

            android:exported="true">

            <intent-filter>

                <action android:name="com.xiaomi.mipush.RECEIVE_MESSAGE" />

            </intent-filter>

            <intent-filter>

                <action android:name="com.xiaomi.mipush.MESSAGE_ARRIVED" />

            </intent-filter>

            <intent-filter>

                <action android:name="com.xiaomi.mipush.ERROR" />

            </intent-filter>

        </receiver>

        <receiver

            android:name="com.xiaomi.push.service.receivers.NetworkStatusReceiver"

            android:exported="true">

            <intent-filter>

                <action android:name="android.net.conn.CONNECTIVITY_CHANGE" />

                <category android:name="android.intent.category.DEFAULT" />

            </intent-filter>

        </receiver>

        <receiver

            android:name="com.xiaomi.push.service.receivers.PingReceiver"

            android:exported="false"

            android:process=":pushservice">

            <intent-filter>

                <action android:name="com.xiaomi.push.PING_TIMER" />

            </intent-filter>

        </receiver>

    </application>

</manifest>
(5)在项目中添加xiaomipush包中的文件

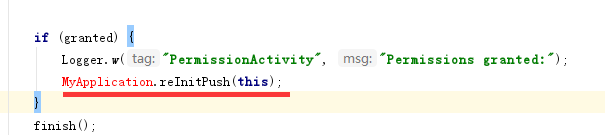
1、PermissionActivity中需要用到自定义MyApplication中的代码,下一步中会增加,这里报错不用管;
2、XiaomiMessageReceiver中使用的到字符串资源在thirdLib中的res/strings.xml文件中定义了;
3、XiaomiMessageReceiver主要通知、消息的回调

(6)初始化SDK
在MyApplication中执行
package com.why.project.xiaomipushdemo;

import android.app.ActivityManager;

import android.app.Application;

import android.content.Context;

import android.os.Process;

import com.xiaomi.mipush.sdk.MiPushClient;

import java.util.List;

/**

 * Created by HaiyuKing

 * Used

 */

public class MyApplication extends Application {

    /*=================小米推送SDK=====================*/

    // user your appid the key.

    private static final String APP_ID = "28823037343464645735";

    // user your appid the key.

    private static final String APP_KEY = "56545654754865";

    @Override

    public void onCreate() {

        super.onCreate();

        initXiaoMiPush();

    }

    //小米推送SDK

    private void initXiaoMiPush(){

        // 注册push服务,注册成功后会向DemoMessageReceiver发送广播

        // 可以从DemoMessageReceiver的onCommandResult方法中MiPushCommandMessage对象参数中获取注册信息

        if (shouldInit()) {

            MiPushClient.registerPush(this, APP_ID, APP_KEY);

        }

    }

    //小米推送SDK【用于PermissionActivity中调用】

    public static void reInitPush(Context ctx) {

        MiPushClient.registerPush(ctx.getApplicationContext(), APP_ID, APP_KEY);

    }

    //小米推送SDK相关

    private boolean shouldInit() {

        ActivityManager am = ((ActivityManager) getSystemService(Context.ACTIVITY_SERVICE));

        List<ActivityManager.RunningAppProcessInfo> processInfos = am.getRunningAppProcesses();

        String mainProcessName = getPackageName();

        int myPid = Process.myPid();

        for (ActivityManager.RunningAppProcessInfo info : processInfos) {

            if (info.pid == myPid && mainProcessName.equals(info.processName)) {

                return true;

            }

        }

        return false;

    }

}
三、使用方法(仅供参考)
package com.why.project.xiaomipushdemo;

import android.os.Bundle;

import android.support.v7.app.AppCompatActivity;

import android.text.TextUtils;

import com.xiaomi.mipush.sdk.MiPushClient;

public class MainActivity extends AppCompatActivity {

    @Override

    protected void onCreate(Bundle savedInstanceState) {

        super.onCreate(savedInstanceState);

        setContentView(R.layout.activity_main);

        /*=======================================小米推送SDK相关=============================================*/

        updateJpushDeviceId();

    }

    /*=======================================小米推送SDK相关=============================================*/

    /**更新设备id接口*/

    private void updateJpushDeviceId(){

        //====小米推送SDK相关====

        String regId = MiPushClient.getRegId(MyApplication.getAppContext());

        requestDeviceId(regId);//判断是请求接口还是弹出对话框

    }

    //请求接口存储设备id或者token的方法

    private void requestDeviceId(String regId) {

        //首要条件是设备id值或者token值不为空,否则下面的判断没有意义了

        //如果没有设置过别名,或者则需要设置别名

        //如果服务器上的deviceID值是空值,表明当前用户还没有绑定任何设备,则直接请求接口,不需要弹出对话框;

        //如果服务器上的deviceID值不为空,并且客户端获取的设备id值和服务器上的deviceID值相同,则不需要弹出对话框,直接请求接口(这个是卸载重新安装的情况)

        //如果服务器上的deviceid值不为空,并且客户端获取的设备id值和服务器上的deviceID值不同,则需要弹出对话框(这个是换设备的情况)

        if (!TextUtils.isEmpty(regId)) {

            //如果已经设置过别名(存储过了设备id值)了,但是当前的别名(设备id值)和服务器上的不一致,则需要重新设置别名(存储设备id值)(这个是其他设备上登录的情况)

        }

        //====小米推送SDK相关====

        //貌似需要每一次都要设置别名

        setAlias(PreferencesUtils.getString(mContext,Globals.USERNAME_KEY));

    }

    // 这是来自 JPush Example 的设置别名的 Activity 里的代码。一般 App 的设置的调用入口,在任何方便的地方调用都可以。

    private void setAlias(String alias) {

        if (TextUtils.isEmpty(alias)) {

            ToastUtil.showShortToast(getResources().getString(R.string.error_alias_empty));//alias别名不能为空

            return;

        }

        if (!ExampleUtil.isValidTagAndAlias(alias)) {

            ToastUtil.showShortToast(getResources().getString(R.string.error_tag_gs_empty));//格式不对

            return;

        }

        //====小米推送SDK相关====

        MiPushClient.setAlias(MyApplication.getAppContext(), alias, null);

    }

}
四、发送消息


五、实现多个通知在通知栏中并存
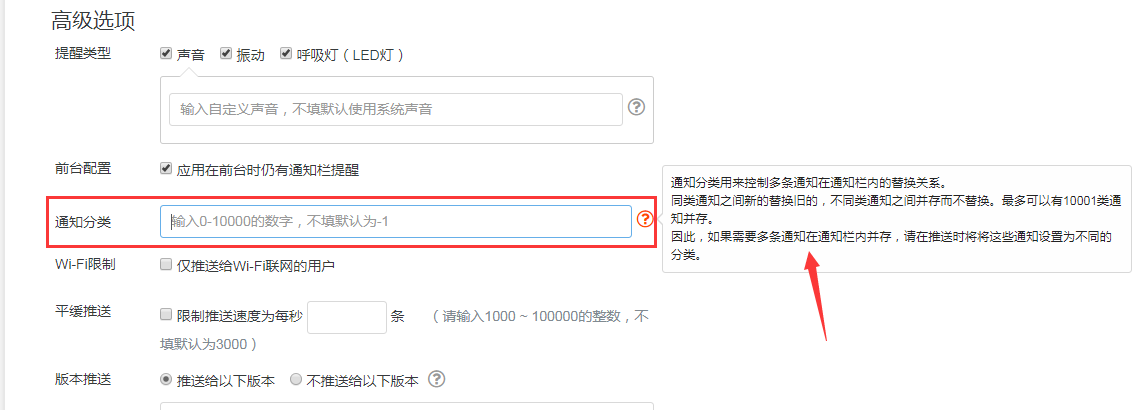
六、实现打开应用内指定页面的效果
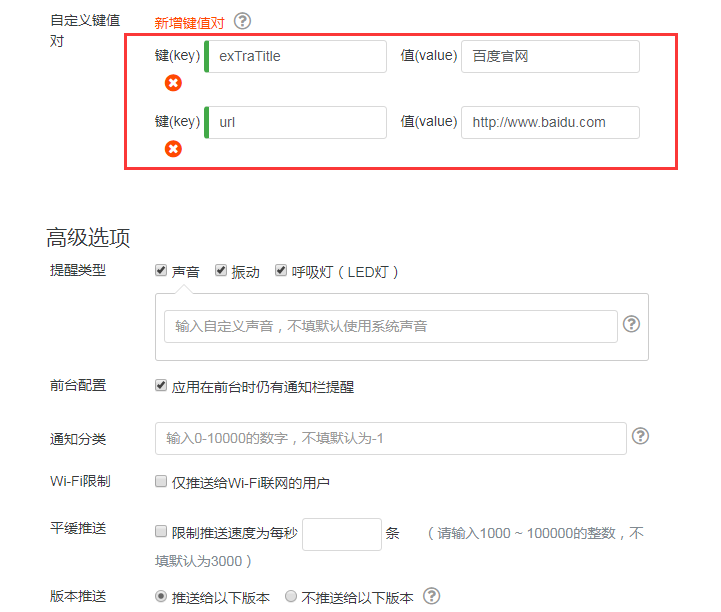
一般由应用客户端自定义即可,但是有可能会想要实现打开应用内指定页面。对应的网页上的设置:

6.1、添加XMPushActivity【一个透明界面,主要用于获取数据,封装数据,传输数据】
package com.why.project.xiaomipushdemo.xiaomipush; import android.app.Activity;
import android.content.Context;
import android.content.Intent;
import android.os.Bundle; import com.why.project.xiaomipushdemo.R;
import com.xiaomi.mipush.sdk.MiPushMessage;
import com.xiaomi.mipush.sdk.PushMessageHelper; import org.json.JSONObject; import cn.jpush.android.api.JPushInterface; /**
* Created by HaiyuKing
* Used 小米推送【打开应用内指定页面】【暂时用不到】
*/
public class XMpushActivity extends Activity {
private static final String TAG = XMpushActivity.class.getSimpleName(); private Context mContext; @Override
protected void onCreate(Bundle savedInstanceState) {
super.onCreate(savedInstanceState);
setContentView(R.layout.activity_xmpush); mContext = this; //获取自定义动作的值
Intent intent = getIntent();
String intentUri = intent.toUri(Intent.URI_INTENT_SCHEME);
LogUtil.e(TAG,"action是:" + intentUri);
//intent:#Intent;launchFlags=0x10000000;package=com.why.project.xiaomipushdemo;component=com.why.project.xiaomipushdemo/.xiaomipush.XMpushActivity;S.messageId=sdm04994545992668152zH;i.eventMessageType=1000;end /*获取自定义键值对的值*/
MiPushMessage msgContent = (MiPushMessage) intent.getSerializableExtra(PushMessageHelper.KEY_MESSAGE); //关闭当前界面,跳转到指定的界面
try {
String title = msgContent.getTitle();
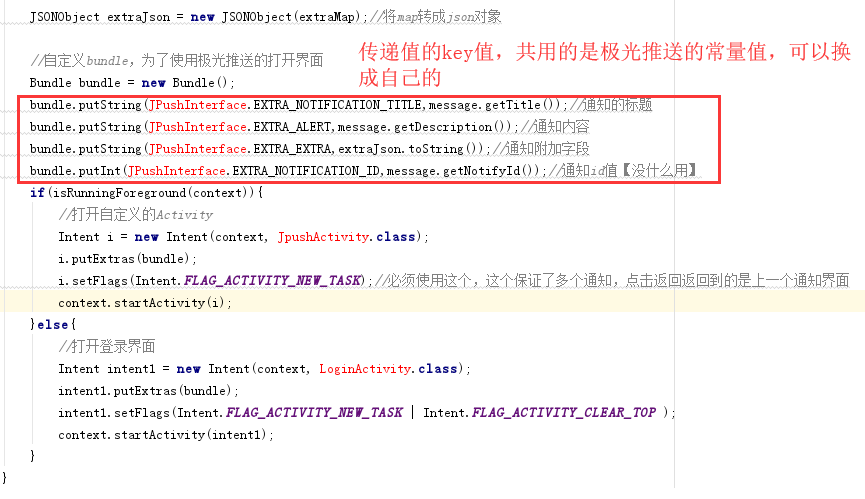
String content = msgContent.getContent(); JSONObject extraJson = new JSONObject(msgContent.getExtra());//将map转成json对象 Bundle bundle = new Bundle();
bundle.putString(JPushInterface.EXTRA_NOTIFICATION_TITLE,title);//通知的标题
bundle.putString(JPushInterface.EXTRA_ALERT,content);//通知内容
bundle.putString(JPushInterface.EXTRA_EXTRA,extraJson.toString());//通知附加字段
bundle.putInt(JPushInterface.EXTRA_NOTIFICATION_ID,msgContent.getNotifyId());//通知id值【没什么用】 Intent i = new Intent(mContext, JpushActivity.class);
i.putExtras(bundle);
i.setFlags(Intent.FLAG_ACTIVITY_NEW_TASK);//必须使用这个,这个保证了多个通知,点击返回返回到的是上一个通知界面
mContext.startActivity(i);
finish(); } catch (Exception e){
e.printStackTrace();
} }
}
XMpushActivity.java
<?xml version="1.0" encoding="utf-8"?>

<!-- ======================小米推送SDK====================== -->

<android.support.constraint.ConstraintLayout

    xmlns:android="http://schemas.android.com/apk/res/android"

    android:layout_width="match_parent"

    android:layout_height="match_parent">

</android.support.constraint.ConstraintLayout>
activity_xmpush.xml
6.2、在AndroidManifest.xml中添加以下代码
<?xml version="1.0" encoding="utf-8"?>

<manifest xmlns:android="http://schemas.android.com/apk/res/android"

          package="com.why.project.xiaomipushdemo">

    <!-- ======================小米推送SDK====================== -->

    <uses-permission android:name="android.permission.WRITE_EXTERNAL_STORAGE" />

    <uses-permission android:name="android.permission.INTERNET" />

    <uses-permission android:name="android.permission.ACCESS_NETWORK_STATE" />

    <uses-permission android:name="android.permission.ACCESS_WIFI_STATE" />

    <uses-permission android:name="android.permission.READ_PHONE_STATE" />

    <uses-permission android:name="android.permission.GET_TASKS" />

    <!-- the following 2 com.xiaomi.mipushdemo should be changed to your package name -->

    <permission

        android:name="${applicationId}.permission.MIPUSH_RECEIVE"

        android:protectionLevel="signature" />

    <uses-permission android:name="${applicationId}.permission.MIPUSH_RECEIVE" />

    <uses-permission android:name="android.permission.VIBRATE" />

    <application

        android:name=".MyApplication"

        android:allowBackup="true"

        android:icon="@mipmap/ic_launcher"

        android:label="@string/app_name"

        android:roundIcon="@mipmap/ic_launcher_round"

        android:supportsRtl="true"

        android:theme="@style/AppTheme">

        <activity android:name=".MainActivity">

            <intent-filter>

                <action android:name="android.intent.action.MAIN"/>

                <category android:name="android.intent.category.LAUNCHER"/>

            </intent-filter>

        </activity>

        <!-- ======================小米推送SDK========================== -->

        <service

            android:name="com.xiaomi.push.service.XMJobService"

            android:enabled="true"

            android:exported="false"

            android:permission="android.permission.BIND_JOB_SERVICE"

            android:process=":pushservice" />

        <service

            android:name="com.xiaomi.push.service.XMPushService"

            android:enabled="true"

            android:process=":pushservice" />

        <service

            android:name="com.xiaomi.mipush.sdk.PushMessageHandler"

            android:enabled="true"

            android:exported="true" />

        <service

            android:name="com.xiaomi.mipush.sdk.MessageHandleService"

            android:enabled="true" />

        <!--自定义一个BroadcastReceiver类:为了接收消息-->

        <receiver

            android:name="com.why.project.xiaomipushdemo.xiaomipush.XiaomiMessageReceiver"

            android:exported="true">

            <intent-filter>

                <action android:name="com.xiaomi.mipush.RECEIVE_MESSAGE" />

            </intent-filter>

            <intent-filter>

                <action android:name="com.xiaomi.mipush.MESSAGE_ARRIVED" />

            </intent-filter>

            <intent-filter>

                <action android:name="com.xiaomi.mipush.ERROR" />

            </intent-filter>

        </receiver>

        <receiver

            android:name="com.xiaomi.push.service.receivers.NetworkStatusReceiver"

            android:exported="true">

            <intent-filter>

                <action android:name="android.net.conn.CONNECTIVITY_CHANGE" />

                <category android:name="android.intent.category.DEFAULT" />

            </intent-filter>

        </receiver>

        <receiver

            android:name="com.xiaomi.push.service.receivers.PingReceiver"

            android:exported="false"

            android:process=":pushservice">

            <intent-filter>

                <action android:name="com.xiaomi.push.PING_TIMER" />

            </intent-filter>

        </receiver>

        <!--小米推送【打开应用内指定页面】【暂时用不到】-->

        <!--intent:#Intent;component=com.why.project.xiaomipushdemo/.xiaomipush.XMpushActivity;end-->

        <activity

            android:name="com.why.project.xiaomipushdemo.xiaomipush.XMpushActivity"

            android:theme="@android:style/Theme.Translucent">

        </activity>

    </application>

</manifest>
6.3、网页发送消息(关键部分)
intent:#Intent;component=com.why.project.xiaomipushdemo/.xiaomipush.XMpushActivity;end

混淆配置
橙色标记的需要换成实际的路径:
#=====================小米推送SDK=====================

#这里com.xiaomi.mipushdemo.DemoMessageRreceiver改成app中定义的完整类名

-keep class com.why.project.xiaomipushdemo.xiaomipush.XiaomiMessageReceiver {*;}

#可以防止一个误报的 warning 导致无法成功编译,如果编译使用的 Android 版本是 23。

-dontwarn com.xiaomi.push.**
参考资料
暂时空缺
项目demo下载地址
链接:https://pan.baidu.com/s/1ClztXBTHIgVgY0vzWwnnFQ 提取码:gne6
XiaomiPushDemo【小米推送集成,基于V3.6.12版本】的更多相关文章
- 小米推送 简介 集成 MD
Markdown版本笔记 我的GitHub首页 我的博客 我的微信 我的邮箱 MyAndroidBlogs baiqiantao baiqiantao bqt20094 baiqiantao@sina ...
- Android 推送集成华为,小米,友盟
公司的 app 一直使用的是极光推送,最近反馈比较多的是推送消息收不到,看来需要找新的推送服务了,在国内目前手机品牌占有率比较多的是华为和小米,且这两家都有自己的推送服务,同时一个合作的友商说他们使用 ...
- springboot+websocket+sockjs进行消息推送【基于STOMP协议】
springboot+websocket+sockjs进行消息推送[基于STOMP协议] WebSocket是在HTML5基础上单个TCP连接上进行全双工通讯的协议,只要浏览器和服务器进行一次握手,就 ...
- Android消息推送(二)--基于MQTT协议实现的推送功能
国内的Android设备,不能稳定的使用Google GCM(Google Cloud Messageing)消息推送服务. 1. 国内的Android设备,基本上从操作系统底层开始就去掉了Googl ...
- iOS 小米推送总结和遇到的坑
极光推送就不赘述了,这里说下小米推送在ios上的坑吧,查了好久也没有查到相关的文章. 极光的强大就不说了,当客户贪图实惠的时候,当人家给你让你用小米推送的时候,我的内心是崩溃的,小米推送???没听过! ...
- idea + springboot 的java后台服务器通过小米推送
public class XiaomiPush { // 1.小米推送(我只推送Android且只应用regId发起推送,所以下面只有推送Android的代码 private static final ...
- 如何删除远端已经推送的Commit记录???(Git版本回退)
如何删除远端已经推送的Commit记录???(Git版本回退) 简单描述 突然事件:刚刚,就在刚刚,发生误了操作. 操作描述:我把修改的文件保存错分支了,已经commit了.并且还push上去了.对, ...
- JPushDemo【极光推送集成,基于v3.1.8版本】
版权声明:本文为HaiyuKing原创文章,转载请注明出处! 前言 这个Demo只是记录极光推送的集成,不能运行. 使用步骤 一.项目组织结构图 注意事项: 1. 导入类文件后需要change包名以 ...
- HWPushDemo【华为推送集成,基于2.6.1.301版本】
版权声明:本文为HaiyuKing原创文章,转载请注明出处! 前言 这个Demo只是记录华为推送的集成,不能运行. 另外,因为可能用到存储权限,所以还需要搭配运行时权限申请功能. 使用步骤 一.项目组 ...
随机推荐
- go语言时间比较
local, _ := time.LoadLocation("Local") starttime, _ := time.ParseInLocation("2006-01- ...
- Spring中IOC和AOP的理解
IOC和AOP是Spring的核心 IOC:控制反转:将创建对象以及维护对象之间的关系由代码交给了spring容器进行管理,也就是创建对象的方式反转了,交由spring容器进行管理. DI:依赖注入: ...
- python笔记:#013#高级变量类型
高级变量类型 目标 列表 元组 字典 字符串 公共方法 变量高级 知识点回顾 Python 中数据类型可以分为 数字型 和 非数字型 数字型 整型 (int) 浮点型(float) 布尔型(bool) ...
- AE的空间分析(转载)
1.1 ITopologicalOperator接口 1.1.1 ITopologicalOperator接口简介ITopologicalOperator接口用来通过对已存在的几何对象做空间拓扑运算以 ...
- 图片滚动(UP)的JS代码详解(offsetTop、scrollTop、offsetHeigh)【转】
源地址 信息技术教材配套的光盘里有一段设置图片滚动的JS代码,与网络上差不多,实现思路:一个设定高度并且隐藏超出它高度的内容的容器demo,里面放demo1和 demo2,demo1是滚动内容,dem ...
- 升讯威微信营销系统开发实践:(4)源代码结构说明 与 安装部署说明( 完整开源于 Github)
GitHub:https://github.com/iccb1013/Sheng.WeixinConstruction因为个人精力时间有限,不会再对现有代码进行更新维护,不过微信接口比较稳定,经测试至 ...
- WBS 与 甘特图
WBS:工作分解结构(Work Breakdown Structure) 创建WBS:创建WBS是把项目 交付成果和项目工作分解成较小的,更易于管理的组成部分的过程. WBS是项目管理重要的专业术语之 ...
- SSM-Spring-18:Spring中aspectJ的XML版
------------吾亦无他,唯手熟尔,谦卑若愚,好学若饥------------- aspectJ的xml版是开发中最常用的: 下面直接已案例入手,毕竟繁琐的日子不多了 案例:两个接口,俩个实现 ...
- mysql物理备份基本操作
Ⅰ.xtrabackup介绍 xtrabackup只能备份innodb引擎的数据,不能备份表结构,percona开源的,强烈推荐最新版本(旧版本bug多) innobackupex可以备份myisam ...
- JAVA PERSISTENCE API (JPA)
13.2.1. About JPA The Java Persistence API (JPA) is the standard for using persistence in Java proje ...