GlideDemo【Glide3.7.0版本的简单使用以及圆角功能】
版权声明:本文为HaiyuKing原创文章,转载请注明出处!
前言
本Demo主要记录Glide3.7.0版本的简单运用和实现圆角方案。
效果图

代码分析
Glide的centerCrop()和fitCenter()的使用效果:
Glide 提供了两个类似的方法 CenterCrop() 和 FitCenter(),CenterCrop() 方法是将图片按比例缩放到足矣填充 ImageView 的尺寸,但是图片可能会显示不完整;而 FitCenter() 则是图片缩放到小于等于 ImageView 的尺寸,这样图片是显示完整了,但是 ImageView 就可能不会填满了。
不论在布局文件中如何设置ImageView控件的android:scaleType值,Glide只要执行了CenterCrop() 或者FitCenter(),那么就会以Glide的设置为准。
使用步骤
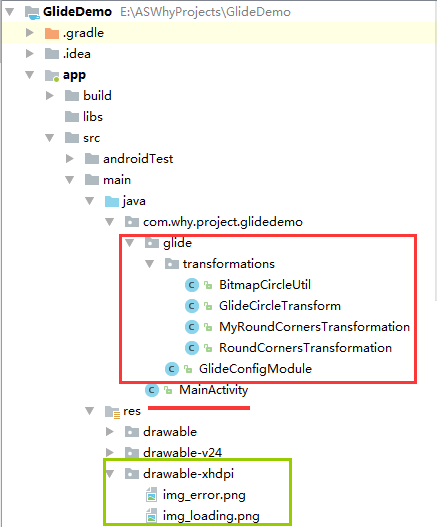
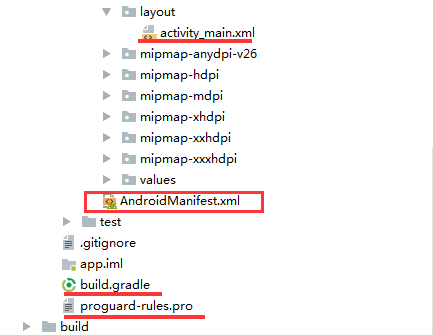
一、项目组织结构图


注意事项:
1、 导入类文件后需要change包名以及重新import R文件路径
2、 Values目录下的文件(strings.xml、dimens.xml、colors.xml等),如果项目中存在,则复制里面的内容,不要整个覆盖
二、导入步骤
(1)在APP的build.gradle中添加Glide依赖
apply plugin: 'com.android.application'

android {

    compileSdkVersion 27

    defaultConfig {

        applicationId "com.why.project.glidedemo"

        minSdkVersion 16

        targetSdkVersion 27

        versionCode 1

        versionName "1.0"

        testInstrumentationRunner "android.support.test.runner.AndroidJUnitRunner"

    }

    buildTypes {

        release {

            minifyEnabled false

            proguardFiles getDefaultProguardFile('proguard-android.txt'), 'proguard-rules.pro'

        }

    }

}

dependencies {

    implementation fileTree(dir: 'libs', include: ['*.jar'])

    implementation 'com.android.support:appcompat-v7:27.1.1'

    implementation 'com.android.support.constraint:constraint-layout:1.1.2'

    testImplementation 'junit:junit:4.12'

    androidTestImplementation 'com.android.support.test:runner:1.0.2'

    androidTestImplementation 'com.android.support.test.espresso:espresso-core:3.0.2'

    //glide引用(虽然多个库中引用属于重复引用,但是只有当前库中引用,当前库才可以使用,所以还是要引用的)

    //(对于第三方库引用的glide版本,尽量不要修改)

    compile 'com.github.bumptech.glide:glide:3.7.0'

    compile 'com.android.support:support-v4:27.1.1'

    //集成 OkHttp 作为 Glide 的网络库

    //https://www.jianshu.com/p/7ce7b02988a4

    //https://stackoverflow.com/questions/37129757/glide-with-okhttp3-integration-java-lang-noclassdeffounderror

    compile 'com.github.bumptech.glide:okhttp-integration:1.4.0@aar'

    compile 'com.squareup.okhttp:okhttp:2.7.5'

    //注意,okHttp和okHttps不一样的配置

//    compile 'com.github.bumptech.glide:okhttp3-integration:1.4.0@aar'

//    compile 'com.squareup.okhttp3:okhttp:3.2.0'

}
(2)将GlideConfigModule.java复制到项目中
package com.why.project.glidedemo.glide;

import android.content.Context;

import com.bumptech.glide.Glide;

import com.bumptech.glide.GlideBuilder;

import com.bumptech.glide.load.DecodeFormat;

import com.bumptech.glide.load.engine.bitmap_recycle.LruBitmapPool;

import com.bumptech.glide.load.engine.cache.LruResourceCache;

import com.bumptech.glide.load.engine.cache.MemorySizeCalculator;

import com.bumptech.glide.module.GlideModule;

/**

 * Used 自定义Glide配置

 */

public class GlideConfigModule implements GlideModule{

    int diskSize = 1024 * 1024 * 100;

    int memorySize = (int) (Runtime.getRuntime().maxMemory()) / 8;  // 取1/8最大内存作为最大缓存

    /* (non-Javadoc)

     * @see com.bumptech.glide.module.GlideModule#applyOptions(android.content.Context, com.bumptech.glide.GlideBuilder)

     */

    @Override

    public void applyOptions(Context context, GlideBuilder builder) {

        // 定义缓存大小和位置

        //builder.setDiskCache(new InternalCacheDiskCacheFactory(context, diskSize));  //内存中

        //builder.setDiskCache(new ExternalCacheDiskCacheFactory(context, "cache", diskSize)); //sd卡中

        // 默认内存和图片池大小

        MemorySizeCalculator calculator = new MemorySizeCalculator(context);

        int defaultMemoryCacheSize = calculator.getMemoryCacheSize(); // 默认内存大小

        int defaultBitmapPoolSize = calculator.getBitmapPoolSize(); // 默认图片池大小

        builder.setMemoryCache(new LruResourceCache(defaultMemoryCacheSize)); // 该两句无需设置,是默认的

        builder.setBitmapPool(new LruBitmapPool(defaultBitmapPoolSize));

        // 自定义内存和图片池大小

        /*builder.setMemoryCache(new LruResourceCache(memorySize));

        builder.setBitmapPool(new LruBitmapPool(memorySize));*/

        // 定义图片格式

        //builder.setDecodeFormat(DecodeFormat.PREFER_ARGB_8888);//与picasso相同

        builder.setDecodeFormat(DecodeFormat.PREFER_RGB_565); // 默认

    }

    /* (non-Javadoc)

     * @see com.bumptech.glide.module.GlideModule#registerComponents(android.content.Context, com.bumptech.glide.Glide)

     */

    @Override

    public void registerComponents(Context arg0, Glide arg1) {

        // TODO Auto-generated method stub

    }

}
(3)在AndroidManifest.xml中添加以下代码【注意GlideConfigModule的路径】【根据实际情况添加权限,有些权限需要申请运行时权限】
<?xml version="1.0" encoding="utf-8"?>

<manifest xmlns:android="http://schemas.android.com/apk/res/android"

          package="com.why.project.glidedemo">

    <!-- Glide -->

    <!--如果你计划从 URL 或一个网络连接中加载数据,你需要添加 INTERNET 和 ACCESS_NETWORK_STATE 权限-->

    <uses-permission android:name="android.permission.INTERNET"/>

    <!--如果你正在从 URL 加载图片,Glide 可以自动帮助你处理片状网络连接:它可以监听用户的连接状态并在用户重新连接到网络时重启之前失败的请求。

    如果 Glide 检测到你的应用拥有 ACCESS_NETWORK_STATE 权限,Glide 将自动监听连接状态而不需要额外的改动。-->

    <uses-permission android:name="android.permission.ACCESS_NETWORK_STATE"/>

    <!--要从本地文件夹或 DCIM 或图库中加载图片,你将需要添加 READ_EXTERNAL_STORAGE 权限-->

    <uses-permission android:name="android.permission.READ_EXTERNAL_STORAGE" />

    <!--而如果要将 Glide 的缓存存储到公有 SD 卡上,你还需要添加 WRITE_EXTERNAL_STORAGE 权限-->

    <uses-permission android:name="android.permission.WRITE_EXTERNAL_STORAGE" />

    <application

        android:allowBackup="true"

        android:icon="@mipmap/ic_launcher"

        android:label="@string/app_name"

        android:roundIcon="@mipmap/ic_launcher_round"

        android:supportsRtl="true"

        android:theme="@style/AppTheme">

        <activity android:name=".MainActivity">

            <intent-filter>

                <action android:name="android.intent.action.MAIN"/>

                <category android:name="android.intent.category.LAUNCHER"/>

            </intent-filter>

        </activity>

        <!-- *************************自定义Glide配置文件************************* -->

        <meta-data

            android:name="com.why.project.glidedemo.glide.GlideConfigModule"

            android:value="GlideModule" />

    </application>

</manifest>
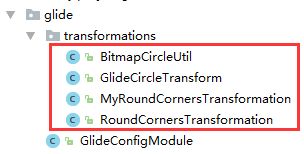
(4)将transformations包(实现圆角方案)复制到项目中【里面一共是四种圆角方案,实际项目中选择其中一个即可】【根据需要复制到项目中】

三、使用方法
(1)布局文件
<?xml version="1.0" encoding="utf-8"?>

<ScrollView

    xmlns:android="http://schemas.android.com/apk/res/android"

    android:layout_width="match_parent"

    android:layout_height="match_parent"

    android:background="#f4f4f4">

    <LinearLayout

        android:layout_width="match_parent"

        android:layout_height="match_parent"

        android:orientation="vertical"

        android:padding="10dp">

        <TextView

            android:layout_width="match_parent"

            android:layout_height="wrap_content"

            android:text="Glide的基础使用(使用fitCenter配合wrap_content显示原图大小):"/>

        <!-- 图片使用src和android:scaleType="centerCrop"、android:adjustViewBounds="true",可以实现宽高等边 -->

        <ImageView

            android:id="@+id/img_base"

            android:layout_width="wrap_content"

            android:layout_height="wrap_content"

            android:adjustViewBounds="true"

            android:contentDescription="@string/app_name"

            android:scaleType="fitCenter"

            android:src="@drawable/img_error"/>

        <TextView

            android:layout_width="match_parent"

            android:layout_height="wrap_content"

            android:text="Glide的重新改变图片大小(使用override):"/>

        <!-- 图片使用src和android:scaleType="centerCrop"、android:adjustViewBounds="true",可以实现宽高等边 -->

        <ImageView

            android:id="@+id/img_override"

            android:layout_width="wrap_content"

            android:layout_height="wrap_content"

            android:adjustViewBounds="true"

            android:contentDescription="@string/app_name"

            android:scaleType="fitCenter"

            android:src="@drawable/img_error"/>

        <TextView

            android:layout_width="match_parent"

            android:layout_height="wrap_content"

            android:text="Glide的圆角效果(使用MyRoundCornersTransformation,fitCenter()和centerCrop()方法会失效,自己设置的android:scaleType也会失效)"/>

        <!-- 图片使用src和android:scaleType="centerCrop"、android:adjustViewBounds="true",可以实现宽高等边 -->

        <ImageView

            android:id="@+id/img_myRound"

            android:layout_width="wrap_content"

            android:layout_height="wrap_content"

            android:adjustViewBounds="true"

            android:contentDescription="@string/app_name"

            android:scaleType="fitCenter"

            android:src="@drawable/img_error"/>

        <TextView

            android:layout_width="match_parent"

            android:layout_height="wrap_content"

            android:text="Glide的圆角效果(使用RoundCornersTransformation,fitCenter()和centerCrop()方法会失效,自己设置的android:scaleType也会失效)"/>

        <!-- 图片使用src和android:scaleType="centerCrop"、android:adjustViewBounds="true",可以实现宽高等边 -->

        <ImageView

            android:id="@+id/img_round"

            android:layout_width="wrap_content"

            android:layout_height="wrap_content"

            android:adjustViewBounds="true"

            android:contentDescription="@string/app_name"

            android:scaleType="fitCenter"

            android:src="@drawable/img_error"/>

        <TextView

            android:layout_width="match_parent"

            android:layout_height="wrap_content"

            android:text="Glide的圆角效果(使用GlideCircleTransform,fitCenter()和centerCrop()方法会失效,自己设置的android:scaleType也会失效)"/>

        <!-- 图片使用src和android:scaleType="centerCrop"、android:adjustViewBounds="true",可以实现宽高等边 -->

        <ImageView

            android:id="@+id/img_circle"

            android:layout_width="wrap_content"

            android:layout_height="wrap_content"

            android:adjustViewBounds="true"

            android:contentDescription="@string/app_name"

            android:scaleType="fitCenter"

            android:src="@drawable/img_error"/>

        <TextView

            android:layout_width="match_parent"

            android:layout_height="wrap_content"

            android:text="Glide的圆角效果(使用BitmapCircleUtil)"/>

        <!-- 图片使用src和android:scaleType="centerCrop"、android:adjustViewBounds="true",可以实现宽高等边 -->

        <ImageView

            android:id="@+id/img_circleUtil"

            android:layout_width="wrap_content"

            android:layout_height="wrap_content"

            android:adjustViewBounds="true"

            android:contentDescription="@string/app_name"

            android:scaleType="fitCenter"

            android:src="@drawable/img_error"/>

    </LinearLayout>

</ScrollView>
(2)代码中写法
package com.why.project.glidedemo;

import android.content.Context;

import android.graphics.Bitmap;

import android.os.Bundle;

import android.support.v7.app.AppCompatActivity;

import android.util.DisplayMetrics;

import android.view.WindowManager;

import android.widget.ImageView;

import com.bumptech.glide.Glide;

import com.bumptech.glide.Priority;

import com.bumptech.glide.load.engine.DiskCacheStrategy;

import com.bumptech.glide.request.target.BitmapImageViewTarget;

import com.why.project.glidedemo.glide.transformations.BitmapCircleUtil;

import com.why.project.glidedemo.glide.transformations.GlideCircleTransform;

import com.why.project.glidedemo.glide.transformations.MyRoundCornersTransformation;

import com.why.project.glidedemo.glide.transformations.RoundCornersTransformation;

public class MainActivity extends AppCompatActivity {

    private Context mContext;

    private ImageView mImgBase;

    private ImageView mImgOverride;

    private ImageView mImgMyRound;

    private ImageView mImgRound;

    private ImageView mImgCircle;

    private ImageView mImgCircleUtil;

    private String imgUrl = "https://pic.cnblogs.com/avatar/93830/20170607145247.png";

    @Override

    protected void onCreate(Bundle savedInstanceState) {

        super.onCreate(savedInstanceState);

        setContentView(R.layout.activity_main);

        mContext = this;

        initViews();

        initDatas();

    }

    private void initViews() {

        mImgBase = findViewById(R.id.img_base);

        mImgOverride = findViewById(R.id.img_override);

        mImgMyRound = findViewById(R.id.img_myRound);

        mImgRound = findViewById(R.id.img_round);

        mImgCircle = findViewById(R.id.img_circle);

        mImgCircleUtil = findViewById(R.id.img_circleUtil);

    }

    private void initDatas() {

        glideBase();

        glideOverride();

        glideRound();

        glideRound2();

        glideRound3();

        glideRound4();

    }

    //Glide的基础使用

    private void glideBase() {

        Glide.with(mContext)

                .load(imgUrl)

                //设置等待时的图片

                .placeholder(R.drawable.img_loading)

                //设置加载失败后的图片显示

                .error(R.drawable.img_error)

                .fitCenter()

                //默认淡入淡出动画

                .crossFade()

                //缓存策略,跳过内存缓存【此处应该设置为false,否则列表刷新时会闪一下】

                .skipMemoryCache(false)

                //缓存策略,硬盘缓存-仅仅缓存最终的图像,即降低分辨率后的(或者是转换后的)

                .diskCacheStrategy(DiskCacheStrategy.RESULT)

                //设置图片加载的优先级

                .priority(Priority.HIGH)

                .into(mImgBase);

    }

    //Glide重新改变图片大小

    private void glideOverride() {

        setColumnNumber(mContext,3);//计算宽度和高度值(1:1.5或者1:1)

        Glide.with(mContext)

                .load(imgUrl)

                //设置等待时的图片

                .placeholder(R.drawable.img_loading)

                //设置加载失败后的图片显示

                .error(R.drawable.img_error)

                .centerCrop()

                .override(imageWidthSize,imageHeightSize)

                //默认淡入淡出动画

                .crossFade()

                //缓存策略,跳过内存缓存【此处应该设置为false,否则列表刷新时会闪一下】

                .skipMemoryCache(false)

                //缓存策略,硬盘缓存-仅仅缓存最终的图像,即降低分辨率后的(或者是转换后的)

                .diskCacheStrategy(DiskCacheStrategy.RESULT)

                //设置图片加载的优先级

                .priority(Priority.HIGH)

                .into(mImgOverride);

    }

    //用于计算图片的宽高值

    private int imageWidthSize;

    private int imageHeightSize;

    private void setColumnNumber(Context context, int columnNumber) {

        WindowManager wm = (WindowManager) context.getSystemService(Context.WINDOW_SERVICE);

        DisplayMetrics metrics = new DisplayMetrics();

        wm.getDefaultDisplay().getMetrics(metrics);

        int widthPixels = metrics.widthPixels;

        imageWidthSize = widthPixels / columnNumber;

        imageHeightSize = (int)(imageWidthSize * 1.5);//长方形样式,二选一

        //imageHeightSize = imageWidthSize;//正方形样式,二选一

    }

    //Glide的圆角效果

    private void glideRound() {

        //该方案不合适,因为图片尺寸有大有小

        Glide.with(mContext)

                .load(imgUrl)

                //设置等待时的图片

                .placeholder(R.drawable.img_loading)

                //设置加载失败后的图片显示

                .error(R.drawable.img_error)

                .centerCrop()

                //默认淡入淡出动画

                .crossFade()

                //缓存策略,跳过内存缓存【此处应该设置为false,否则列表刷新时会闪一下】

                .skipMemoryCache(false)

                //缓存策略,硬盘缓存-仅仅缓存最终的图像,即降低分辨率后的(或者是转换后的)

                .diskCacheStrategy(DiskCacheStrategy.RESULT)

                //设置图片加载的优先级

                .priority(Priority.HIGH)

                .transform(new MyRoundCornersTransformation(mContext,dip2px(mContext,8),

                        MyRoundCornersTransformation.CornerType.TOP))

                .into(mImgMyRound);

    }

    private void glideRound2() {

        Glide.with(mContext)

                .load(imgUrl)

                //设置等待时的图片

                .placeholder(R.drawable.img_loading)

                //设置加载失败后的图片显示

                .error(R.drawable.img_error)

                .centerCrop()

                //默认淡入淡出动画

                .crossFade()

                //缓存策略,跳过内存缓存【此处应该设置为false,否则列表刷新时会闪一下】

                .skipMemoryCache(false)

                //缓存策略,硬盘缓存-仅仅缓存最终的图像,即降低分辨率后的(或者是转换后的)

                .diskCacheStrategy(DiskCacheStrategy.RESULT)

                //设置图片加载的优先级

                .priority(Priority.HIGH)

                .bitmapTransform(new RoundCornersTransformation(mContext,dip2px(mContext,8),

                        RoundCornersTransformation.CornerType.TOP))

                .into(mImgRound);

    }

    private void glideRound3() {

        Glide.with(mContext)

                .load(imgUrl)

                //设置等待时的图片

                .placeholder(R.drawable.img_loading)

                //设置加载失败后的图片显示

                .error(R.drawable.img_error)

                .centerCrop()

                //默认淡入淡出动画

                .crossFade()

                //缓存策略,跳过内存缓存【此处应该设置为false,否则列表刷新时会闪一下】

                .skipMemoryCache(false)

                //缓存策略,硬盘缓存-仅仅缓存最终的图像,即降低分辨率后的(或者是转换后的)

                .diskCacheStrategy(DiskCacheStrategy.RESULT)

                //设置图片加载的优先级

                .priority(Priority.HIGH)

                .transform(new GlideCircleTransform(mContext))

                .into(mImgCircle);

    }

    private void glideRound4() {

        Glide.with(mContext)

                .load(imgUrl)

                .asBitmap()

                //设置等待时的图片

                .placeholder(R.drawable.img_loading)

                //设置加载失败后的图片显示

                .error(R.drawable.img_error)

                .fitCenter()

                //缓存策略,跳过内存缓存【此处应该设置为false,否则列表刷新时会闪一下】

                .skipMemoryCache(false)

                //缓存策略,硬盘缓存-仅仅缓存最终的图像,即降低分辨率后的(或者是转换后的)【设置为ALL,因为打开设置对话框界面的时候还需要展现缩略图】

                .diskCacheStrategy(DiskCacheStrategy.ALL)

                //设置图片加载的优先级

                .priority(Priority.HIGH)

                .into(new BitmapImageViewTarget(mImgCircleUtil){

                    @Override

                    protected void setResource(Bitmap resource) {

                        super.setResource(resource);

                        Bitmap result = new BitmapCircleUtil(dip2px(mContext,8),

                                BitmapCircleUtil.CornerType.TOP).circleCrop(resource);

                        mImgCircleUtil.setImageBitmap(result);

                    }

                });

    }

    /**

     * dp转px

     * 16dp - 48px

     * 17dp - 51px*/

    public static int dip2px(Context context, float dpValue) {

        float scale = context.getResources().getDisplayMetrics().density;

        return (int)((dpValue * scale) + 0.5f);

    }

}
混淆配置
#====Glide====

-keep public class * implements com.bumptech.glide.module.GlideModule

-keep public enum com.bumptech.glide.load.resource.bitmap.ImageHeaderParser$** {

  **[] $VALUES;

  public *;

}

#-keepresourcexmlelements manifest/application/meta-data@value=GlideModule

#====glide-okhttp-integration-1.4.0.jar====

#-libraryjars libs/glide-okhttp-integration-1.4.0.jar

-dontwarn com.bumptech.glide.integration.okhttp.**

-keep class com.bumptech.glide.integration.okhttp.**
参考资料
Glide with okhttp3 integration java.lang.NoClassDefFoundError
Android 关于Glide的拓展(高斯模糊、加载监听、圆角图片)
Android一些容易被忽略的类-RoundedBitmapDrawable
Glide的一些用法(一)(写了一下午,其实几乎涵盖完了,欢迎收藏)
Android Glide加载图片时转换为圆形、圆角、毛玻璃等图片效果
项目demo下载地址
https://github.com/haiyuKing/GlideDemo
GlideDemo【Glide3.7.0版本的简单使用以及圆角功能】的更多相关文章
- GlideNewDemo【Glide4.7.1版本的简单使用以及圆角功能】
版权声明:本文为HaiyuKing原创文章,转载请注明出处! 前言 简单记录下Glide4.7.1版本的使用和实现圆角方案. 注意:关于详细使用请仔细阅读<官方指南>. 效果图 使用步骤 ...
- webpack 4.0 版本的简单使用
webpack 4.0 学习指南 最近前端又要变天了,vue作者推出了vue-cli 3版本,并且里面使用了webpack 4. 但是webpack 3 和webpack 4 二者的使用方式完全不一样 ...
- 【转】cocos2d-x 2.0版本 自适应屏幕分辨率
http://codingnow.cn/cocos2d-x/975.html 我使用的版本是cocos2d-2.0-x-2.0.4,cocos2dx-2.0版本对多分辨率适配提供了很好的支持,使用起来 ...
- 【AngularJS】 2.0 版本发布
[AngularJS] 2.0 版本发布 w5cValidator[AngularJS] 2.0 版本发布 w5cValidator 插件基于angular原有的表单验证,在原有的基础上扩展了一些 ...
- w5cValidator【AngularJS】 2.0 版本发布
w5cValidator 插件基于angular原有的表单验证,在原有的基础上扩展了一些错误提示的功能,让大家不用在每个表单上写一些提示信息的模板,专心的去实现业务逻辑. 代码地址:https://g ...
- LitepalNewDemo【开源数据库ORM框架-LitePal2.0.0版本的使用】
版权声明:本文为HaiyuKing原创文章,转载请注明出处! 前言 本Demo使用的是LitePal2.0.0版本,对于旧项目如何升级到2.0.0版本,请阅读<赶快使用LitePal 2.0版本 ...
- .NET Core 2.0版本预计于2017年春季发布
英文原文: NET Core 2.0 Planned for Spring 2017 微软项目经理 Immo Landwerth 公布了即将推出的 .NET Core 2.0 版本的细节,该版本预计于 ...
- Dapr v1.9.0 版本已发布
Dapr是一套开源.可移植的事件驱动型运行时,允许开发人员轻松立足云端与边缘位置运行弹性.微服务.无状态以及有状态等应用程序类型.Dapr能够确保开发人员专注于编写业务逻辑,而不必分神于解决分布式系统 ...
- geotrellis使用(二十)geotrellis1.0版本新功能及变化介绍
目录 前言 变化情况介绍 总结 一.前言 之前版本是0.9或者0.10.1.0.10.2,最近发现更新成为1.0.0-2077839.1.0应该也能称之为正式版了吧.发现其中有很多变化, ...
随机推荐
- 学习ASP.NET Core Razor 编程系列十——添加新字段
学习ASP.NET Core Razor 编程系列目录 学习ASP.NET Core Razor 编程系列一 学习ASP.NET Core Razor 编程系列二——添加一个实体 学习ASP.NET ...
- Eureka的基本功能和用法
1.基础架构 eueka按逻辑上可以划分为3个模块,eureka-server,service-provider,service-consumereureka-server:服务端,提供服务注册和发现 ...
- 【Teradata SQL】从中文数字字母混合字符串中只提取数字regexp_substr
目标:从中文数字字母的字符串中只提取数字 sel regexp_substr('mint choc中文11国1','\d+')
- 读书笔记:深入理解java虚拟机(二)创建对象的时候需要访问哪几块内存
@TOC 对象在内存中如何储存 对象访问在java语言中无处不在,是最普通的程序行为,但即使是最简单的访问,也会涉及到java栈,java堆,方法去三个最重要的内存区域的关联关系,比如下面这段代码: ...
- ASP.NET Core在Azure Kubernetes Service中的部署和管理
目录 ASP.NET Core在Azure Kubernetes Service中的部署和管理 目标 准备工作 注册 Azure 账户 AKS文档 进入Azure门户(控制台) 安装 Azure Cl ...
- python --- 快速排序算法
在快速排序中引入递归和分治的概念(关于递归和分治的概念会单独写一篇来进行介绍) 问的解决思路: 快速排序的基本思想本身就是分治法,通过分割,将无序序列分成两部分,其中前一部分的元素值都要小于后一部分的 ...
- 【JVM虚拟机】(6)---深入理解Class中访问标志、类索引、父类索引、接口索引
JVM(6)访问标志,类索引 上一篇博客讲[JVM虚拟机](5)---深入理解JVM-Class中常量池 我们知道一个class文件正常可以分为7个部分: 魔数与class文件版本 常量池 访问标志 ...
- Java进阶篇设计模式之六 ----- 组合模式和过滤器模式
前言 在上一篇中我们学习了结构型模式的外观模式和装饰器模式.本篇则来学习下组合模式和过滤器模式. 组合模式 简介 组合模式是用于把一组相似的对象当作一个单一的对象.组合模式依据树形结构来组合对象,用来 ...
- EF Core in Action 中文翻译 第一部分导航
Entityframework Core in action Entityframework Core in action是 Jon P smith 所著的关于Entityframework Core ...
- 贾天昊 - Nick
