HRD Emulator in HTML5
Posted on March 21, 2012 by Moto
Just like MPEG-2 video uses VBV (Video Buffer Verifier), H.264 standard uses HRD (Hypothetical Reference Decoder) to define correctness of streams.
One of the verification provided by HRD is CPB buffer fullness. The idea is simple; feed H.264 stream to HRD and monitor the CPB fullness. Make sure the fullness never goes negative nor above the CPB buffer size. The importance of this buffer fullness requirement was explained here.
HRD defines the CPB fullness in somewhat counter intuitive way. To make it easy, I wrote an interactive HRD emulator in HTML5.
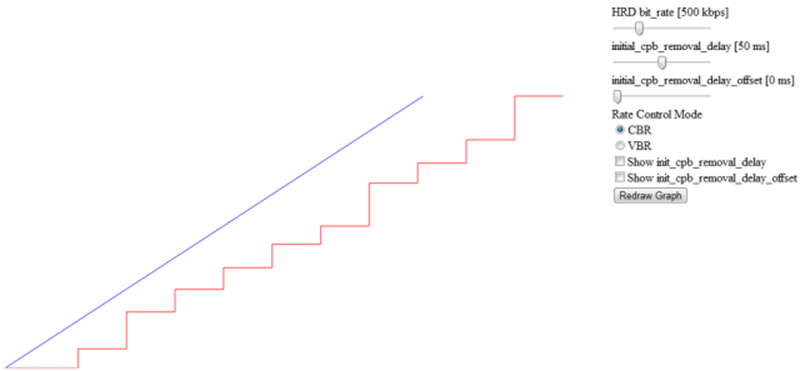
HRD Emulator (CBR)
The blue line the number of bits entered to HRD over time. The input rate is constant in CBR mode, i.e. the blue line is straight. The red line is the number of bits removed (= Decoded) from CPB. Thus, the CPB fullness is the blue line minus the red line for a given time.
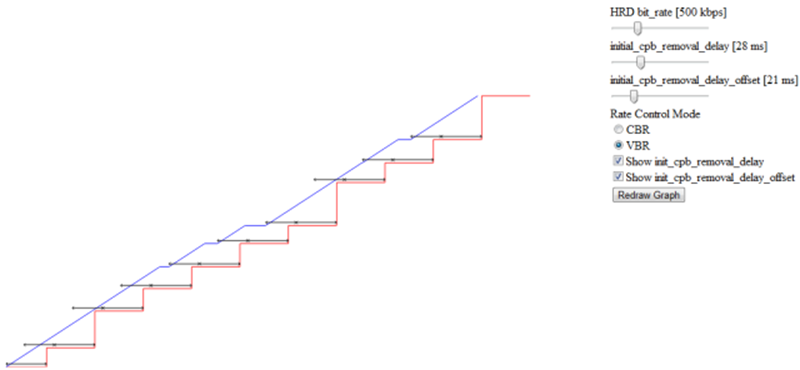
Let’s select the VBR in Rate Control Mode.
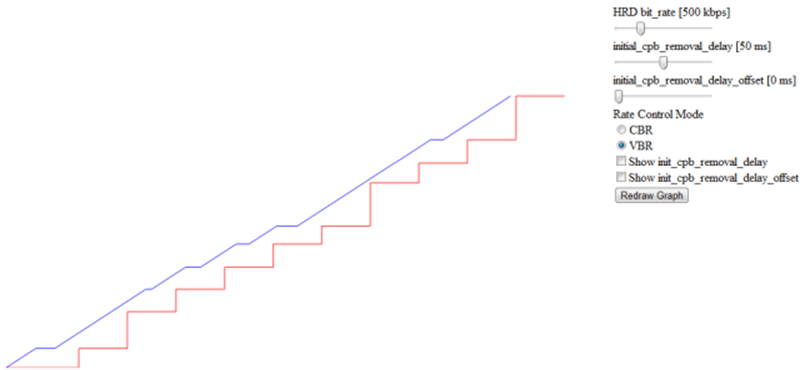
HRD Emulator (VBR)
The blue line now has some periods where the input rate is zero. H.264 standard uses init_cpb_removal_delay to control the period; Bits for a picture N can enter HRD only after the picture decode time minus init_cpb_removal_delay.
To see this rule more clearly, check “Show init_cpb_removal_delay” option. When the last bit of picture N – 1 arrives before the picture N decoding time minus init_cpb_removal_delay, the input rate goes down to zero.
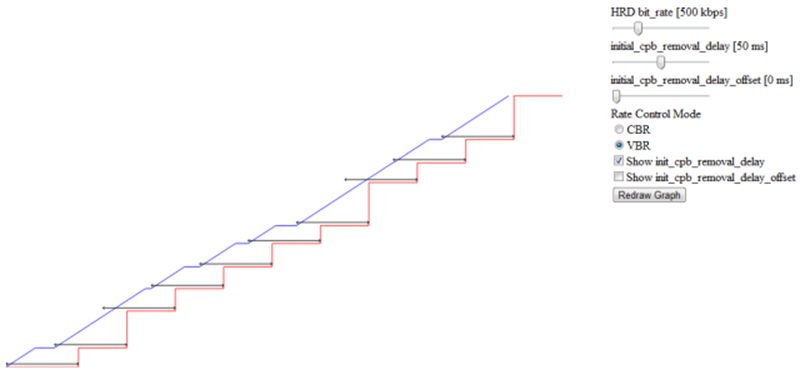
HRD (VBR) with init_cpb_removal_delay
The value of init_cpb_removal_delay also determines the initial decoding delay. It’s currently set to 50 ms. It means the first picture is decoded 50 ms after the first bit of the picture enters HRD.
The initial decoding delay determines the channel switching delay as discussed here. Can we reduce it to make channel switching faster?
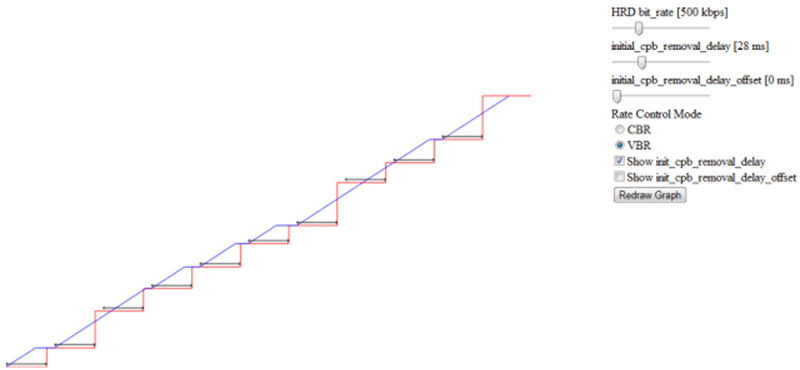
HRD underflow due to the short initial delay
Not really. As shown above, reducing the value of init_cpb_removal_delay resulted in the underflow error (the red line crosses the blue line).
H.264 standard has introduced another parameter to allow the reduction of initial decoding delay at the expense of increased average bit rate. Here we have init_cpb_removal_delay_offset parameter. It’s added to init_cpb_removal_delay for every picture except the first one.
HRD with non-zero init_cpb_removal_delay_offset
H.264 HRD provides these parameters to encoders so that they can choose optimal bit stream configuration for each target devices.
Here are HTML and Java Script of the HRD emulator above.
|
1 2 3 4 5 6 7 8 9 10 11 12 13 14 15 16 17 18 19 20 21 22 23 24 25 26 27 28 29 30 31 32 33 34 35 36 37 38 39 40 41 42 43 44 45 46 47 48 49 50 51 52 53 54 55 56 57 58 59 60 61 62 63 64 65 66 67 68 69 70 |
<html> <head> <title>HRD Emulator</title> <script src="./script.js" type="text/javascript"></script> <style type="text/css"> #plot { float : left } #control-container { float : left } #widget { float : right; width : 10em } #heading { float : left } </style> </head> <body onLoad="init()"> <div id="plot"> <canvas id="canvas" width="800" height="480"></canvas> </div> <div id="control-container"> <div class="control"> <div class="heading">HRD bit_rate [<span id="showBitRate"> </span> kbps]</div> <div class="widget"> <input id="bitRate" onChange="update()" type="range" min="0" max="2000" value="500"/> </div> </div> <div class="control"> <div class="heading">initial_cpb_removal_delay [<span id="showICRD"> </span> ms]</div> <div> <input id="initial_cpb_removal_delay" onChange="update()" type="range" min="0" max="100" value="50"/> </div> </div> <div class="control"> <div class="heading">initial_cpb_removal_delay_offset [<span id="showICRDO"> </span> ms]</div> <div> <input id="initial_cpb_removal_delay_offset" onChange="update()" type="range" min="0" max="100" value="0"/> </div> </div> <div class="control"> <div>Rate Control Mode</div> <div> <input type="radio" name="mode" value="cbr" onClick="setMode('cbr'); update()" checked="checked" />CBR </div> <div> <input type="radio" name="mode" value="vbr" onClick="setMode('vbr'); update()" />VBR </div> </div> <div class="control"> <div> <input type="checkbox" id="isICRDVisible" onClick="update()"/>Show init_cpb_removal_delay </div> </div> <div class="control"> <div> <input type="checkbox" id="isICRDOVisible" onClick="update()"/>Show init_cpb_removal_delay_offset </div> </div> <div class="control"> <input id="reset" type="button" value="Redraw Graph" onClick="resetStream(); update();"/> </div> </div> </body> </html> |
|
1 2 3 4 5 6 7 8 9 10 11 12 13 14 15 16 17 18 19 20 21 22 23 24 25 26 27 28 29 30 31 32 33 34 35 36 37 38 39 40 41 42 43 44 45 46 47 48 49 50 51 52 53 54 55 56 57 58 59 60 61 62 63 64 65 66 67 68 69 70 71 72 73 74 75 76 77 78 79 80 81 82 83 84 85 86 87 88 89 90 91 92 93 94 95 96 97 98 99 100 101 102 103 104 105 106 107 108 109 110 111 112 113 114 115 116 117 118 119 120 121 122 123 124 125 126 127 128 129 130 131 132 133 134 135 136 137 138 139 140 141 142 143 144 145 146 147 148 149 150 151 152 153 154 155 156 157 158 159 160 161 162 163 164 165 166 167 168 169 170 171 172 173 174 175 176 177 178 179 180 181 182 183 184 185 186 187 188 |
// Save this as "script.js" var canvas; var picture = new Array(); var pictureDuration = 900900; var initial_cpb_removal_delay = 900900; var initial_cpb_removal_delay_offset = 90090; var cbr_flag = true; function init() { canvas = document.getElementById('canvas'); resetStream(); update(); } function resetStream() { var bit_rate = document.getElementById('bitRate').value * 1000; var averagePicSize = pictureDuration / 27000000 * bit_rate / 8; for(var i = 0; i < 10; i++){ picture[i] = averagePicSize + (Math.random() - 0.5) * averagePicSize; } } function tickToX(tick) { return tick / 900900 * 64; } function levelToY(level) { return canvas.height - level / 50; } function drawDecodePictures(ctx) { ctx.strokeStyle = 'rgba(255, 0, 0, 255)'; ctx.beginPath(); ctx.moveTo(0, levelToY(0)); ctx.lineTo(tickToX(initial_cpb_removal_delay), levelToY(0)); var prevX = tickToX(initial_cpb_removal_delay) var prevLevel = 0; for(var i = 0; i < 50; i++){ var level = prevLevel + picture[i]; var x1 = prevX; var x2 = prevX + tickToX(pictureDuration) var y = levelToY(level); ctx.lineTo(x1, y); ctx.lineTo(x2, y); prevLevel = level; prevX = x2 } ctx.stroke(); } function levelFromPeriod(period, bitRate) { return period / 27000000.0 * bitRate / 8; } function drawInputData(ctx) { var t_af = new Array(); var t_ai = new Array(); var t_ai_earliest = new Array(); var t_rn = new Array(); var bit_rate = document.getElementById('bitRate').value * 1000; t_ai[0] = 0; t_af[0] = picture[0] * 8 * 27000000 / bit_rate; t_rn[0] = initial_cpb_removal_delay; for(var n = 1; n < picture.length; n++) { t_rn[n] = t_rn[n - 1] + pictureDuration; if(cbr_flag == true) { t_ai[n] = t_af[n - 1]; } else { t_ai_earliest = t_rn[n] - (initial_cpb_removal_delay + initial_cpb_removal_delay_offset); t_ai[n] = Math.max(t_af[n - 1], t_ai_earliest); } t_af[n] = t_ai[n] + picture[n] * 8 * 27000000 / bit_rate; } ctx.strokeStyle = 'rgba(0, 0, 255, 255)'; ctx.beginPath(); ctx.moveTo(tickToX(0), levelToY(0)); var level = 0; for(var n = 0; n < picture.length; n++) { ctx.lineTo(tickToX(t_ai[n]), levelToY(level)); level += picture[n]; ctx.lineTo(tickToX(t_af[n]), levelToY(level)); } ctx.stroke(); level = 0; for(var n = 0; n < picture.length; n++) { var isICRDVisible = document.getElementById("isICRDVisible").checked; if(isICRDVisible){ // draw initial_cpb_removal_delay period var icrd_x1 = tickToX(t_rn[n] - initial_cpb_removal_delay) var icrd_x2 = tickToX(t_rn[n]) var icrd_y = levelToY(level) - 4 ctx.strokeStyle = 'rgba(0, 0, 0, 255)'; ctx.beginPath(); ctx.moveTo(icrd_x1, icrd_y); ctx.lineTo(icrd_x2, icrd_y); ctx.stroke(); ctx.beginPath(); ctx.moveTo(icrd_x1 + 2, icrd_y - 2); ctx.lineTo(icrd_x1, icrd_y); ctx.lineTo(icrd_x1 + 2, icrd_y + 2); ctx.stroke(); ctx.beginPath(); ctx.moveTo(icrd_x2 - 2, icrd_y - 2); ctx.lineTo(icrd_x2, icrd_y); ctx.lineTo(icrd_x2 - 2, icrd_y + 2); ctx.stroke(); } var isICRDOVisible = document.getElementById("isICRDOVisible").checked; if(isICRDOVisible){ // draw initial_cpb_removal_delay period var icrdo_x1 = tickToX(t_rn[n] - initial_cpb_removal_delay - initial_cpb_removal_delay_offset) var icrdo_x2 = icrd_x1 var icrdo_y = levelToY(level) - 4 ctx.strokeStyle = 'rgba(0, 0, 0, 255)'; ctx.beginPath(); ctx.moveTo(icrdo_x1, icrdo_y); ctx.lineTo(icrdo_x2, icrdo_y); ctx.stroke(); ctx.beginPath(); ctx.moveTo(icrdo_x1 + 2, icrdo_y - 2); ctx.lineTo(icrdo_x1, icrdo_y); ctx.lineTo(icrdo_x1 + 2, icrdo_y + 2); ctx.stroke(); ctx.beginPath(); ctx.moveTo(icrdo_x2 - 2, icrdo_y - 2); ctx.lineTo(icrdo_x2, icrdo_y); ctx.lineTo(icrdo_x2 - 2, icrdo_y + 2); ctx.stroke(); } level += picture[n]; } } function setMode(mode) { cbr_flag = mode == "cbr"; } function updateUI(uiName, valueName) { document.getElementById(uiName).innerHTML = document.getElementById(valueName).value } function update() { var ctx = canvas.getContext('2d'); ctx.fillStyle = 'rgba(255, 255, 255, 255)'; ctx.fillRect(0, 0, canvas.width, canvas.height); updateUI("showBitRate", "bitRate"); updateUI("showICRD", "initial_cpb_removal_delay"); updateUI("showICRDO", "initial_cpb_removal_delay_offset"); initial_cpb_removal_delay = document.getElementById('initial_cpb_removal_delay').value * 27000; initial_cpb_removal_delay_offset = document.getElementById('initial_cpb_removal_delay_offset').value * 27000; drawDecodePictures(ctx); drawInputData(ctx); }; |
HRD Emulator in HTML5的更多相关文章
- PhoneJS - HTML5 JavaScript 移动开发框架
大伙儿都知道有很多基于HTML5的移动应用框架.下一代开发工具将帮助开发者远离那些难学和让人费劲的原生SDK语言,如Objective-C,Java等.大家都知道,HTML5代表着交叉平台如移动应用程 ...
- 【javascript】html5中使用canvas编写头像上传截取功能
[javascript]html5中使用canvas编写头像上传截取功能 本人对canvas很是喜欢,于是想仿照新浪微博头像上传功能(前端使用canvas) 本程序目前在谷歌浏览器和火狐浏览器测试可用 ...
- 提高HTML5 canvas性能的几种方法
简介 HTML5 canvas 最初起源于苹果(Apple)的一项实验,现在已经成为了web中受到广泛支持的2D快速模式绘图(2Dimmediate mode graphic)的标准.许多开发者现在利 ...
- 移动web开发前准备知识了解(html5、jquery)笔记
1.经常使用 插件工具 chrome插件: Mobile & Tablet Emulator(用于常见移动端适配):(重点) Mobile Emulator is an useful o ...
- 使用HTML5开发Kinect体感游戏
一.简介 我们要做的是怎样一款游戏? 在前不久成都TGC2016展会上,我们开发了一款<火影忍者手游>的体感游戏,主要模拟手游章节<九尾袭来 >,用户化身四代,与九尾进行对决, ...
- 读书笔记:《HTML5开发手册》--HTML5新的结构元素
读书笔记:<HTML5开发手册> (HTML5 Developer's CookBook) 虽然从事前端开发已有很长一段时间,对HTML5标签也有使用,但在语义化上面理解还不够清晰.之前在 ...
- HTML5 Boilerplate - 让页面有个好的开始
最近看到了HTML5 Boilerplate模版,系统的学习与了解了一下.在各种CSS库.JS框架层出不穷的今天,能看到这么好的HTML模版,感觉甚爽.写篇博客,推荐给大家使用. 一:HTML5 ...
- 戏说HTML5
如果有非技术人员问你,HTML5是什么,你会怎么回答? 新的HTML规范... 给浏览器提供了牛逼能力,干以前不能干的事...(确切地说应该是给浏览器规定了许多新的接口标准,要求浏览器实现牛逼的功能. ...
- nw.js桌面软件开发系列 第0.1节 HTML5和桌面软件开发的碰撞
第0.1节 HTML5和桌面软件开发的碰撞 当我们谈论桌面软件开发技术的时候,你会想到什么?如果不对技术本身进行更为深入的探讨,在我的世界里,有这么多技术概念可以被罗列出来(请原谅我本质上是一个Win ...
随机推荐
- nignx部署Vue单页面刷新路由404问题解决
官网说明: https://router.vuejs.org/zh/guide/essentials/history-mode.html#%E8%AD%A6%E5%91%8A 在linux下搭建ngi ...
- Codeforces 1139D Steps to One dp
Steps to One 啊, 我要死了, 这种垃圾题居然没写出来, 最后十分钟才发现错在哪. 不知道为什么我以为 对于一个数x , 除了它的因子和它的倍数都是和它互质的, 我脑子是抽了吗? 随便瞎d ...
- Linux 常用基本指令
1.ls 参数: -a:列出所有目录(“.”开头的是隐藏文件) -l: 以长格式列出目录下的内容列表 2.cd cd 切换到家目录 cd ~ 切换到家目录 cd .. 切换到上一级目录 3.pwd ...
- 使用entitiy
using System; using System.Collections.Generic; using System.Linq; using System.Text; using System.D ...
- 在Idea中添加自定义补全代码设置(Main方法为例)
一.打开File->setting->Editor->Live Templates 二.注意右边有“+”.“-”号,点击+号选择第二个Template Group...,并输入新组名 ...
- 离线下载安装 NLTK 的 nltk_data 模块
离线下载安装 NLTK 的 nltk_data 模块 转 https://blog.csdn.net/u010167269/article/details/63684137 在 Linux 上使用 N ...
- hdu 1237 简单计算器 (表达式求值)【stack】
<题目链接> 题目大意: 读入一个只包含 +, -, *, / 的非负整数计算表达式,计算该表达式的值. Input测试输入包含若干测试用例,每个测试用例占一行,每行不超过200个字符, ...
- Jenkins环境搭建(1)-下载与安装
Jenkins简介 Jenkins是一个功能强大的应用程序,允许持续集成和持续交付项目,它是一个免费的源代码,可以处理任何类型的构建或持续集成.集成Jenkins可以用于一些测试和部署技术. Jenk ...
- macOS packages安装时的降级处理
一.降级安装 在制作macOS的pkg安装包时,一般新发布的程序版本会比旧版本更高.但是有的时候我们也希望在安装的时候,对程序的某些依赖库进行降级安装.比如高版本依赖库中出现了一些Bug,使用旧版本的 ...
- Hessian的使用以及理解
官网 http://hessian.caucho.com/ Hessian的使用以及理解Hessian版本:3.1.5将包括如下的内容: Hessian的基本使用Hessian的原理Hessian和S ...