1.6 selenium3+firefox环境搭建
1.6 selenium3+firefox环境搭建
有不少小伙伴在安装selenium环境后启动firefox报错,因为现在selenium升级到3.0了,跟2.0的版本还有有一点区别的。
(备注:这里不建议大家用selenium3,坑太多,如果selenium2实在用不了,那就看这篇吧)
安装环境过程中主要会遇到三个坑:
1.'geckodriver' executable needs to be in PATH
2.Expected browser binary location, but unable to find binary in default location
3.Unsupported Marionette protocol version 2, required 3
环境准备:
--python3.6
--selenium3.0
--firefox50
一、安装python
1.安装python这个简单,下载版本后傻瓜式安装就行了。
2.安装好之后,看下这个目录D:\python\Scripts,有没pip.exe和easy_install.exe(一般都有,没有的话得重新安装一次了)
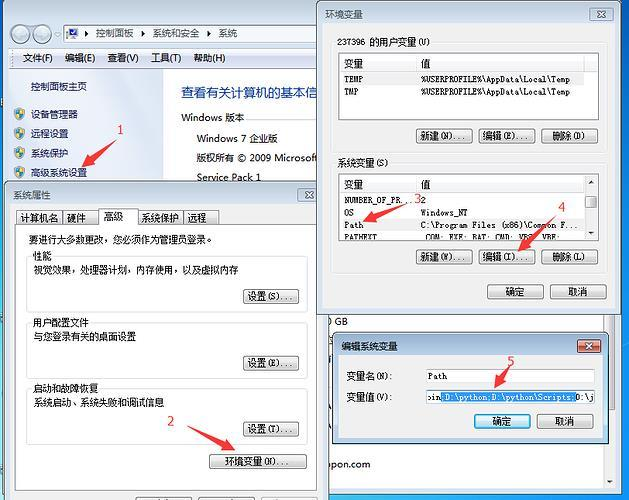
3.将D:\python和D:\python\Scripts,添加到环境变量path下

二、检查pip工具
1.打开cmd,输入:pip,出现如下图界面,说明pip环境OK.
>>pip

三、安装selenium3.0
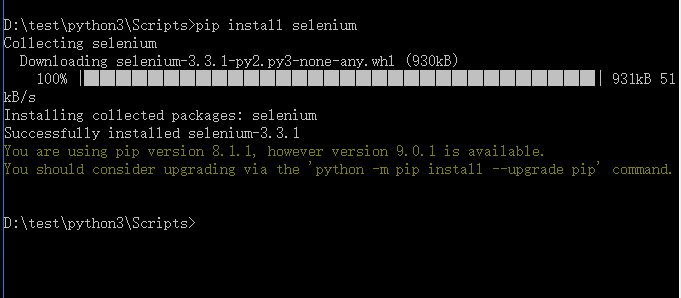
1.cmd输入:pip install selenium
>>pip install selenium
2.首次安装要看到100%完成,中途失败就重新多输入几次安装。

四、检查selenium环境
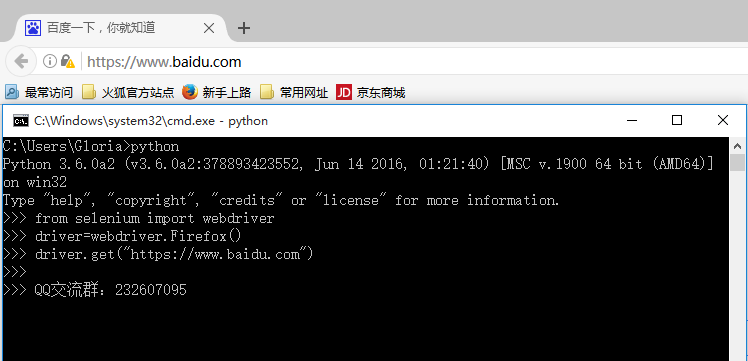
1.在cmd输入如下指令检查环境
>>python
>>from selenium import webdriver
>>driver=webdriver.Firefox()
>>driver.get("https://www.baidu.com")
2.能看到浏览器正常启动,说明环境OK,如果遇到异常就继续看下面解决方案。

五、遇到第一个坑:'geckodriver' executable needs to be in PATH
1.如果启动浏览器过程中报如下错误
Traceback (most recent call last):
File "<stdin>", line 1, in <module>
File "D:\test\python3\lib\site-packages\selenium\webdriver\firefox\webdriver.py", line 145, in __init__
self.service.start()
File "D:\test\python3\lib\site-packages\selenium\webdriver\common\service.py", line 81, in start
os.path.basename(self.path), self.start_error_message)
selenium.common.exceptions.WebDriverException: Message: 'geckodriver' executable needs to be in PATH.
2.这个是因为最新的selenium3.0启动firefox需要geckodriver.exe这个驱动文件。
3.下载之后,配置到环境变量path下(可以直接放python根目录)
六、遇到第二坑:Expected browser binary location, but unable to find binary in default location
1.如果启动浏览器过程中报如下错误:
Traceback (most recent call last):
File "<stdin>", line 1, in <module>
File "D:\test\python3\lib\site-packages\selenium\webdriver\firefox\webdriver.py", line 155, in __init__
keep_alive=True)
File "D:\test\python3\lib\site-packages\selenium\webdriver\remote\webdriver.py", line 92, in __init__
self.start_session(desired_capabilities, browser_profile)
File "D:\test\python3\lib\site-packages\selenium\webdriver\remote\webdriver.py", line 179, in start_session
response = self.execute(Command.NEW_SESSION, capabilities)
File "D:\test\python3\lib\site-packages\selenium\webdriver\remote\webdriver.py", line 238, in execute
self.error_handler.check_response(response)
File "D:\test\python3\lib\site-packages\selenium\webdriver\remote\errorhandler.py", line 193, in check_response
raise exception_class(message, screen, stacktrace)
selenium.common.exceptions.WebDriverException:
Message: Expected browser binary location, but unable to find binary in
default location,
no 'moz:firefoxOptions.binary' capability provided, and no binary flag set on the command line.
2.这个是因为firefox.exe这个文件也需要配置到环境变量path下。
3.这个路径就是安装完firefox后,找到firefox.exe这个文件的地址,加到path下。

七、遇到第三坑:Unsupported Marionette protocol version 2, required 3
1.如果启动浏览器过程中出现如下错误
Traceback (most recent call last):
File "<stdin>", line 1, in <module>
File "D:\test\python3\lib\site-packages\selenium\webdriver\firefox\webdriver.py", line 155, in __init__
keep_alive=True)
File "D:\test\python3\lib\site-packages\selenium\webdriver\remote\webdriver.py", line 92, in __init__
self.start_session(desired_capabilities, browser_profile)
File "D:\test\python3\lib\site-packages\selenium\webdriver\remote\webdriver.py", line 179, in start_session
response = self.execute(Command.NEW_SESSION, capabilities)
File "D:\test\python3\lib\site-packages\selenium\webdriver\remote\webdriver.py", line 238, in execute
self.error_handler.check_response(response)
File "D:\test\python3\lib\site-packages\selenium\webdriver\remote\errorhandler.py", line 193, in check_response
raise exception_class(message, screen, stacktrace)
selenium.common.exceptions.WebDriverException: Message: Unsupported Marionette protocol version 2, required 3
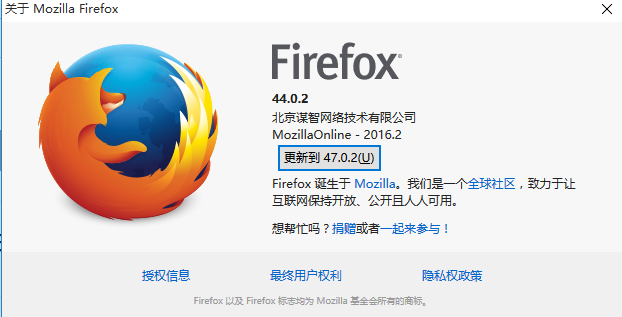
2.这个错误原因是firefox版本过低了,最新的selenium3.0版本支持firefox47以上的版本,升级版本就可以了

总结:整个环境的配置是python3.6+selenium3.0+firefox47以上版本,当然python用2.7版本也是可以的。
1.6 selenium3+firefox环境搭建的更多相关文章
- python3+ selenium3开发环境搭建-手把手教你安装python(详细)
环境搭建 基于python3和selenium3做自动化测试,俗话说:工欲善其事必先利其器:没有金刚钻就不揽那瓷器活,磨刀不误砍柴工,因此你必须会搭建基本的开发环境,掌握python基本的语法和一个I ...
- python3+ selenium3开发环境搭建
环境搭建 基于python3和selenium3做自动化测试,俗话说:工欲善其事必先利其器:没有金刚钻就不揽那瓷器活,磨刀不误砍柴工,因此你必须会搭建基本的开发环境,掌握python基本的语法和一个I ...
- Selenium3+Python3环境搭建
安装python 官网直接下载当前最新版的python Python官网地址:https://www.python.org/ 百度搜索Python3.6安装步骤 Python安装步骤:自行百度,暂不提 ...
- ununtu16.04+python3+selenium+firefox环境搭建
一.初始配置: 1.安装完系统并配置好地址及DNS.2.设置root密码: sudo passwd root 3.更改云源: sudo cp /etc/apt/sources.list /etc/ap ...
- python+selenium自动化软件测试(第1章):环境搭建,你也可以直接用Anaconda!
1.1 环境搭建 1.1.1 selenium简介Selenium 是用于测试 Web 应用程序用户界面 (UI) 的常用框架.它是一款用于运行端到端功能测试的超强工具.您可以使用多个编程语言编写测试 ...
- selenium3+python3+Firefox54环境搭建
之前使用的环境:selenium2.53.6+Firefox44+Python2.7,没有问题,最近想尝试一下新的环境,就搭了个selenium3的环境,过程是挺坎坷的,花费了一天的时间,各种报错,最 ...
- Web自动化测试环境搭建1(基于firefox火狐浏览器)
自动化测试是时代趋势,因此很多测试人员开始研究自动化测试,web自动化测试化测试并不难,但是很多人都是被挡在了环境搭建这一步,后面学习激情全无,这里,韬哥手把手教大家搭建火狐浏览器下的自动化测试环境( ...
- Python3+selenium3环境搭建笔记
系统:win7 64位浏览器:ie9 64位 chrome70 32位 firefox63 64位python版本:3.6.5 Windows x86 executable installersele ...
- 测试自动化:java+selenium3 UI自动化(1) - 环境搭建
1.前言 我大概是在2012年第一次正式接触到自动化测试,那个时候跟随我的团队一起,就当时项目的UI自动化尝试做出了探索. 在我离开那家公司的时候,我们的自动化测试体系仍然难言完美,但是也已经达到了非 ...
随机推荐
- Django-debug-toolbar的使用
Django项目的开发过程中,离不开各种调试,那么,我们今天介绍一个工具,django debug toolbar,该工具为我们提供了更加丰富的调试信息,如提供session信息,SQL查询信息等等. ...
- wait(), notify(), notifyAll()等方法介绍
在Object.java中,定义了wait(), notify()和notifyAll()等接口.wait()的作用是让当前线程进入等待状态,同时,wait()也会让当前线程释放它所持有的锁.而not ...
- 腾讯出品的一个超棒的 Android UI 库
腾讯出品的一个超棒的 Android UI 库 相信做 Android 久了大家都会有种体会,那就是 Android 开发相对于前端开发来说统一的 UI 开源库比较少.造成这种现象的原因一方面是大多数 ...
- Springboot 上传excel并解析文件内容
最近在做一个物业的系统,需要通过excel上传业主的信息,解析并入库. 参考:https://www.cnblogs.com/jyyjava/p/8074322.html 话不多说,直接上核心代码 i ...
- Spring Boot Log4j2 日志学习
简介 Java 中比较常用的日志工具类,有: Log4j. SLF4j. Commons-logging(简称jcl). Logback. Log4j2(Log4j 升级版). Jdk Logging ...
- CodeForces 518E Arthur and Questions(贪心 + 思维)题解
题意:给你a1~an,k,要求a1 + ... + ak < a2 + .... + ak+1 < a3 + ... + ak+2 <...,然后这里的ai有可能是?,要求你填?的数 ...
- Learning-Python【24】:面向对象之组合
组合的概念 一个类的对象具备某一个属性,该属性的值是来自于另外一个类的对象,称之为组合,组合也是用来解决类与类之间代码冗余的问题 组合的使用 在继承中,举了一个属性查找顺序方式一的例子,最终的实现成果 ...
- 使用flask搭建服务端
---恢复内容开始--- 本文默认采用python3 一.虚拟环境 创建环境 mkdir myproject cd myproject python3 -m venv venv //Windows平台 ...
- CSS--交互效果
动画过渡效果 //vue <div class="search-list" v-show="searches.length"> <transi ...
- 《Practical Vim》第八章:利用动作命令在文档中移动
面向单词的移动 定义: Vim 提供了面向单词的动作命令,用于将光标正向/反向移动一个单词; 功能 命令 正向移动到下一单词开头 w 反向移动到上一单词的开头 b 正向移动到下一单词(当前单词)的结尾 ...
