Spring AOP 的实现方式(以日志管理为例)
一、AOP的概念
AOP(Aspect Oriented Programming),是面向切面编程的技术。AOP基于IoC基础,是对OOP的有益补充,流行的AOP框架有Sping AOP、AspectJ
AOP技术它利用一种称为“横切”的技术,剖解开封装的对象内部,并将那些影响了多个类的公共行为封装到一个可重用模块,并将其命名为”Aspect”,即切面。所谓”切面”,简单说就是那些与业务无关,却为业务模块所共同调用的逻辑或责任封装起来,便于减少系统的重复代码,降低模块之间的耦合度,并有利于未来的可操作性和可维护性
二、相关概念:
1、切面(aspect)
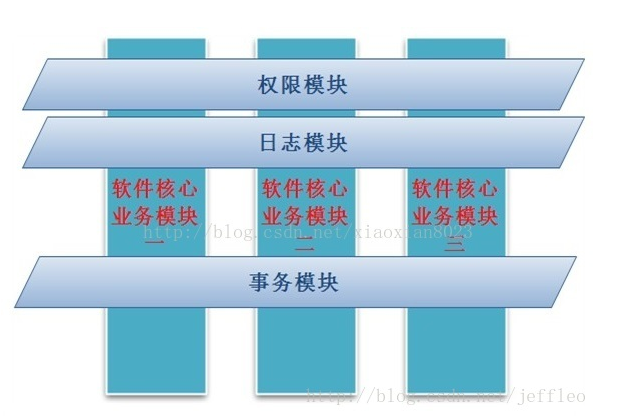
散落在系统各处的通用的业务逻辑代码,如上图中的日志模块,权限模块,事务模块等,切面用来装载pointcut和advice
2、通知(advice)
所谓通知指的就是指拦截到连接点之后要执行的代码,通知分为前置、后置、异常、最终、环绕通知五类
3、连接点(joinpoint)
被拦截到的点,因为Spring只支持方法类型的连接点,所以在Spring中连接点指的就是被拦截到的方法,实际上连接点还可以是字段或者构造器
4、切入点(pointcut)
拦截的方法,连接点拦截后变成切入点
6、目标对象(Target Object)
代理的目标对象,指要织入的对象模块,如上图的模块一、二、三
7、织入(weave)
通过切入点切入,将切面应用到目标对象并导致代理对象创建的过程
8、AOP代理(AOP Proxy)
AOP框架创建的对象,包含通知。在Spring中,AOP代理可以是JDK动态代理或CGLIB代理
三、五种类型的通知
Before advice:在某连接点(JoinPoint)之前执行的通知,但这个通知不能阻止连接点前的执行。
< aop:before>After advice:当某连接点退出的时候执行的通知(不论是正常返回还是异常退出)。
< aop:after>After returnadvice:在某连接点正常完成后执行的通知,不包括抛出异常的情况。
< aop:after-returning>Around advice:包围一个连接点的通知,类似Web中Servlet规范中的Filter的doFilter方法。可以在方法执行的前后实现逻辑,也可以选择不执行方法
< aop:around>Afterthrowing advice:在方法抛出异常退出时执行的通知。
< aop:after-throwing>
四、Spring AOP的3种实现方式
配置之前注意配置文件要加上命名空间:xmlns:aop="http://www.springframework.org/schema/aop"
1.基于xml配置的实现
spring-mvc.xml
 <!-- 使用xml配置aop -->

 <!-- 强制使用cglib代理,如果不设置,将默认使用jdk的代理,但是jdk的代理是基于接口的 -->

 <aop:config proxy-target-class="true" />

 <aop:config>

 <!--定义切面-->

     <aop:aspect id="logAspect" ref="logInterceptor">

     <!-- 定义切入点 (配置在com.gray.user.controller下所有的类在调用之前都会被拦截)-->

     <aop:pointcut expression="execution(* com.gray.user.controller.*.*(..))" id="logPointCut"/>

     <!--方法执行之前被调用执行的-->

     <aop:before method="before" pointcut-ref="logPointCut"/><!--一个切入点的引用-->

     <aop:after method="after" pointcut-ref="logPointCut"/><!--一个切入点的引用-->

     </aop:aspect>

 </aop:config>
LogInterceptor.java
     package com.gray.interceptor;

     import org.springframework.stereotype.Component;

     import org.slf4j.Logger;

     import org.slf4j.LoggerFactory;

     @Component

     public class LogInterceptor {

         private final Logger logger = LoggerFactory.getLogger(LogInterceptor.class);

         public void before(){

             logger.info("login start!");

         }

         public void after(){

             logger.info("login end!");

         }

     }
在这里我没有配bean是因为我在之前的配置文件里面写了自动扫描组件的配置了
要加入日志管理逻辑的地方
 @RequestMapping("/dologin.do") //url

 public String dologin(User user, Model model){

     logger.info("login ....");

     String info = loginUser(user);

     if (!"SUCC".equals(info)) {

         model.addAttribute("failMsg", "用户不存在或密码错误!");

         return "/jsp/fail";

     }else{

         model.addAttribute("successMsg", "登陆成功!");//返回到页面说夹带的参数

         model.addAttribute("name", user.getUsername());

         return "/jsp/success";//返回的页面

     }

   }
结果截图:

2.基于注解的实现
spring-mvc.xml
 <aop:aspectj-autoproxy proxy-target-class="true">

 </aop:aspectj-autoproxy>
LogInterceptor.java
 @Aspect

 @Component

 public class LogInterceptor {

     private final Logger logger = LoggerFactory.getLogger(LogInterceptor.class);

     @Before(value = "execution(* com.gray.user.controller.*.*(..))")

     public void before(){

         logger.info("login start!");

     }

     @After(value = "execution(* com.gray.user.controller.*.*(..))")

     public void after(){

         logger.info("login end!");

     }

 }
要加入逻辑的地方同上。
结果截图:

3.基于自定义注解的实现
基于注解,所以spring-mvc.xml也是和上面的一样的。
LogInterceptor.java(这里我只加入前置日志)
     package com.gray.interceptor;

     import java.lang.reflect.Method;

     import org.aspectj.lang.JoinPoint;

     import org.aspectj.lang.annotation.Aspect;

     import org.aspectj.lang.annotation.Before;

     import org.aspectj.lang.annotation.Pointcut;

     import org.aspectj.lang.reflect.MethodSignature;

     import org.slf4j.Logger;

     import org.slf4j.LoggerFactory;

     import org.springframework.stereotype.Component;

     import com.gray.annotation.Log;

     @Aspect

     @Component

     public class LogInterceptor {

         private final Logger logger = LoggerFactory.getLogger(LogInterceptor.class);

         @Pointcut("@annotation(com.gray.annotation.Log)")

         public void controllerAspect() {

         }

         @Before("controllerAspect()")

         public void before(JoinPoint joinPoint){

             logger.info(getOper(joinPoint));

         }

         private String getOper(JoinPoint joinPoint) {

             MethodSignature methodName = (MethodSignature)joinPoint.getSignature();

             Method method = methodName.getMethod();

             return method.getAnnotation(Log.class).oper();

         }

     }
同时,加入逻辑的地方需要加入Log注解
 @RequestMapping("/dologin.do") //url

 @Log(oper="user login")

 public String dologin(User user, Model model){

     logger.info("login ....");

     String info = loginUser(user);

     if (!"SUCC".equals(info)) {

         model.addAttribute("failMsg", "用户不存在或密码错误!");

         return "/jsp/fail";

     }else{

         model.addAttribute("successMsg", "登陆成功!");//返回到页面说夹带的参数

         model.addAttribute("name", user.getUsername());

         return "/jsp/success";//返回的页面

     }

   }
结果截图:

五、基于Schema的Spring AOP实例
1、定义具体业务逻辑模块(目标对象)
两个业务逻辑模块都是基于接口
TestAOPDaoImpl .java
 public class TestAOPDaoImpl implements TestAOPDao{

     @Override

     public void addUser() {

         System.out.println("添加成功");

     }

 }
TestAOPServiceImpl.java
 public class TestAOPServiceImpl implements TestAOPService{

     @Autowired

     private TestAOPDao testAOPDao;

     @Override

     public void addUser() {

         testAOPDao.addUser();

     }

 }
2、 定义切面(即实现通知逻辑)
JointPoint是连接点,aop创建代理后会返回一个连接点,然后在通知中可以通过该连接点实现我们的切面逻辑
日志切面
 public class LogAdivice{

     public void myBeforeAdivice(JoinPoint joinPoint){

         String classname = joinPoint.getTarget().getClass().getSimpleName();

         String methodname = joinPoint.getSignature().getName();

         System.out.println(classname + " ——前置通知——" + methodname);

     }

     public void myAfterAdivice(JoinPoint joinPoint){

         String classname = joinPoint.getTarget().getClass().getSimpleName();

         String methodname = joinPoint.getSignature().getName();

         System.out.println(classname + " ——后置通知——" + methodname);

     }

     /**

      * 环绕通知将决定要不要执行连接点

      * @throws Throwable

      */

     public void myAroundAdivice(ProceedingJoinPoint point) throws Throwable{

         System.out.println("环绕通知,执行代码前");

         //选择执行

         point.proceed();

         System.out.println("环绕通知,执行代码后");

     }

 }
时间切面:
 public class TimeAdvice {

     public void timeBefore(){

         System.out.println("beforeTime = " + System.currentTimeMillis());

     }

     public void timeAfter(){

         System.out.println("afterTime = " + System.currentTimeMillis());

     }

 }
在applicationContext中配置切面:
 <context:annotation-config/>

     <bean id="testAOPDao" class="com.ssh.dao.impl.TestAOPDaoImpl"/>

     <bean id="testAOPService" class="com.ssh.service.impl.TestAOPServiceImpl"/>

     <bean id="logAdivice" class="com.ssh.adivice.LogAdivice"/>

     <bean id="timeAdvice" class="com.ssh.adivice.TimeAdvice"/>

     <aop:config>

        <!-- 配置一个切面 -->

        <aop:aspect id="logaop" ref="logAdivice" order="2">

            <!-- 定义切入点,表示对service的所有方法都进行拦截 -->

            <aop:pointcut expression="execution(* com.ssh.service.TestAOPService.*(..))" id="testpointcut"/>

            <!-- 定义前置通知 -->

            <aop:before method="myBeforeAdivice" pointcut-ref="testpointcut"/>

            <!-- 定义后置通知 -->

            <aop:after-returning method="myAfterAdivice" pointcut-ref="testpointcut"/>

            <!-- 定义环绕通知 -->

            <aop:around method="myAroundAdivice" pointcut-ref="testpointcut"/>

        </aop:aspect>

        <!-- 定义另一个切面 -->

        <aop:aspect id="timeaop" ref="timeAdvice" order="1">

            <!-- 定义切入点,表示对service的所有方法都进行拦截 -->

            <aop:pointcut expression="execution(* com.ssh.service.TestAOPService.*(..))" id="testpointcut"/>

            <!-- 定义前置通知 -->

            <aop:before method="timeBefore" pointcut-ref="testpointcut"/>

            <!-- 定义后置通知 -->

            <aop:after-returning method="timeAfter" pointcut-ref="testpointcut"/>

        </aop:aspect>

     </aop:config>
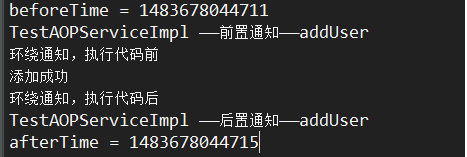
当有多个切面时,Spring默认是按照切面定义的顺序来执行,也可以通过order属性来配置切面的执行属性,order=1 早于 order=2执行
测试结果
 public class AOPTest {

     public static void main(String[] args) {

         ApplicationContext context = new ClassPathXmlApplicationContext("applicationContext.xml");

         TestAOPService service = (TestAOPService) context.getBean("testAOPService");

         service.addUser();

     }

 }
六、基于@AspectJ注解的AOP实现
1、定义具体业务逻辑模块(目标对象)-----同上
2、定义切面(即实现通知逻辑)
重点是定义切入点
 @Aspect

 public class LogAdivice{

     //定义一个方法作为切入点id

     @Pointcut("execution(* com.ssh.service.TestAOPService.*(..))")

     private void allMethod(){}

     @Before("allMethod()")

     public void myBeforeAdivice(JoinPoint joinPoint){

         String classname = joinPoint.getTarget().getClass().getSimpleName();

         String methodname = joinPoint.getSignature().getName();

         System.out.println(classname + " ——前置通知——" + methodname);

     }

     @AfterReturning("allMethod()")

     public void myAfterAdivice(JoinPoint joinPoint){

         String classname = joinPoint.getTarget().getClass().getSimpleName();

         String methodname = joinPoint.getSignature().getName();

         System.out.println(classname + " ——后置通知——" + methodname);

     }

     /**

      * 环绕通知将决定要不要执行连接点

      * @throws Throwable

      */

     @Around("allMethod()")

     public void myAroundAdivice(ProceedingJoinPoint point) throws Throwable{

         System.out.println("环绕通知,执行代码前");

         //执行

         point.proceed();

         System.out.println("环绕通知,执行代码后");

     }

 }
在applicationContext的配置:
 <!-- 打开自动扫描(隐式打开注解管理器) -->

     <!-- <context:component-scan base-package="com.ssh"/> -->

     <context:annotation-config/>

     <bean id="testAOPDao" class="com.ssh.dao.impl.TestAOPDaoImpl"/>

     <bean id="testAOPService" class="com.ssh.service.impl.TestAOPServiceImpl"/>

     <bean id="logAdivice" class="com.ssh.adivice.LogAdivice"/>

     <bean id="timeAdvice" class="com.ssh.adivice.TimeAdvice"/>

     <!-- 打开aop注解管理器 -->

     <aop:aspectj-autoproxy/>
七、Java代码使用AOP
 public class TestControlFlowPointcut {

     public static void main(String[] args) {

         //只有TargetCaller中的方法才会被拦截

         ControlFlowPointcut pointcut = new ControlFlowPointcut(TargetCaller.class);

         BeforeAdvice beforeAdvice = new MethodBeforeAdvice() {

             public void before(Method method, Object[] objects, Object o) throws Throwable {

                 System.out.println(method.getClass().getSimpleName() + ":" +

                         method.getName() + " - before logic ");

             }

         };

         // Spring 中的 Aspect,装载pointcut和advice

         PointcutAdvisor advisor = new DefaultPointcutAdvisor(pointcut, beforeAdvice);

         // Spring 基本织入器weaver

         ProxyFactory weaver = new ProxyFactory();

         weaver.setTarget(new TargetObject());   //指定代理目标对象

         weaver.addAdvisor(advisor);  //指定方面

         Object proxy = weaver.getProxy();

         //直接调用Targetobject的方法不会被拦截

         ((TargetObject)proxy).targetMethod();

         //使用ControlFlowPointcut指定的类中的方法才会被拦截

         TargetCaller caller = new TargetCaller();

         caller.setTarget((TargetObject)proxy);

         caller.callMethod();

     }

 }
Spring AOP 的实现方式(以日志管理为例)的更多相关文章
- spring AOP自定义注解方式实现日志管理
今天继续实现AOP,到这里我个人认为是最灵活,可扩展的方式了,就拿日志管理来说,用Spring AOP 自定义注解形式实现日志管理.废话不多说,直接开始!!! 关于配置我还是的再说一遍. 在appli ...
- Spring AOP 自定义注解实现统一日志管理
一.AOP的基本概念: AOP,面向切面编程,常用于日志,事务,权限等业务处理.AOP是OOP的延续,是软件开发中的一个热点,也是Spring框架中的一个重要内容(Spring核心之一),是函数式编程 ...
- 运用Spring Aop,一个注解实现日志记录
运用Spring Aop,一个注解实现日志记录 1. 介绍 我们都知道Spring框架的两大特性分别是 IOC (控制反转)和 AOP (面向切面),这个是每一个Spring学习视频里面一开始都会提到 ...
- 我使用Spring AOP实现了用户操作日志功能
我使用Spring AOP实现了用户操作日志功能 今天答辩完了,复盘了一下系统,发现还是有一些东西值得拿出来和大家分享一下. 需求分析 系统需要对用户的操作进行记录,方便未来溯源 首先想到的就是在每个 ...
- spring aop 使用注解方式总结
spring aop的注解方式:和xml的配置方式略有区别,详细如下: 1.首先还是建立需要的切面类:切面类里面定义好切点配置,以及所有的需要实现的通知方法. /** * */ package com ...
- Spring AOP 不同配置方式产生的冲突问题
Spring AOP的原理是 JDK 动态代理和CGLIB字节码增强技术,前者需要被代理类实现相应接口,也只有接口中的方法可以被JDK动态代理技术所处理:后者实际上是生成一个子类,来覆盖被代理类,那么 ...
- 利用Spring AOP和自定义注解实现日志功能
Spring AOP的主要功能相信大家都知道,日志记录.权限校验等等. 用法就是定义一个切入点(Pointcut),定义一个通知(Advice),然后设置通知在该切入点上执行的方式(前置.后置.环绕等 ...
- 【Spring Boot学习之五】切面日志管理
环境 eclipse 4.7 jdk 1.8 Spring Boot 1.5.2 一.log4j 常见方式:log4j.properties + org.apache.log4j.Logger比如:l ...
- 【Spring AOP】Spring AOP的使用方式【Q】
Spring AOP的三种使用方式 经典AOP使用方式 改进XML配置方式 基于注解的方式 第1种方式可以作为理解spring配置AOP的基础,是最原始的配置方式,也体现了spring处理的过程. 使 ...
随机推荐
- JAVASCRIPT 浏览器兼容性问题及解决方案列表
JAVASCRIPT 浏览器兼容性问题及解决方案列表(1)获取HTML元素只兼容IE:document.all.hello hello 兼容所有: document.getElementById(“h ...
- laravel 调试模式及日志配置
1)调试模式和日志的配置都在 config/app.php 配置文件中 2)打开调试模式 'debug' => env('APP_DEBUG', true) 3)laravel的日志默认已经打开 ...
- 使用javascript来访问本地文件夹
常用的.net 的aspx文件由于运行在服务器端,并不具有访问用户本地文件夹的权限,导致类似于<a href="file:///d:/backup" > open fo ...
- java面向对象、构造方法 之内部类
UML类图 UML Unified Modeling Language (UML)又称统一建模语言或标准建模语言 在一个类中 属性表示这类事物的性质(描述它的数据) 方法表示这类 ...
- Python--paramiko库:连接远程服务器操作文件
import paramikofrom loggingutils.mylogger import logger as log class SSHConnection(object): def __in ...
- JSP中的内置对象和Struts中的Web资源的详解
JSP中的内置对象有如下几种: request :继承于HttpServletRequest, HttpServletRequest继承ServletRequest, 获得的Request对象的方法: ...
- ZOJ 3607 Lazier Salesgirl (枚举)
Lazier Salesgirl Time Limit: 2 Seconds Memory Limit: 65536 KB Kochiya Sanae is a lazy girl who makes ...
- #include <sys/epoll.h> epoll - I/O event notification facility 服务器端 epoll(7) - Linux manual page http://www.man7.org/linux/man-pages/man7/epoll.7.html
epoll使用详解(精髓) - Boblim - 博客园 https://www.cnblogs.com/fnlingnzb-learner/p/5835573.html epoll使用详解(精髓) ...
- multi-paradigm
w范式 https://developer.mozilla.org/en-US/docs/Web/JavaScript https://developer.mozilla.org/zh-CN/docs ...
- Ubuntu下载及安装
Ubuntu(友帮拓.优般图.乌班图)是一个以桌面应用为主的开源GNU/Linux操作系统,Ubuntu 是基于DebianGNU/Linux,支持x86.amd64(即x64)和ppc架构,由全球化 ...