matlab手写神经网络实现识别手写数字
实验说明
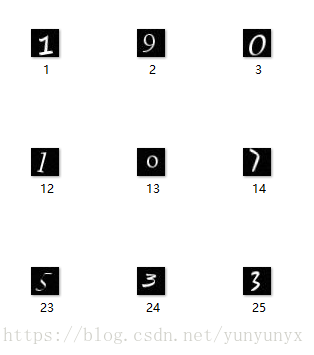
一直想自己写一个神经网络来实现手写数字的识别,而不是套用别人的框架。恰巧前几天,有幸从同学那拿到5000张已经贴好标签的手写数字图片,于是我就尝试用matlab写一个网络。
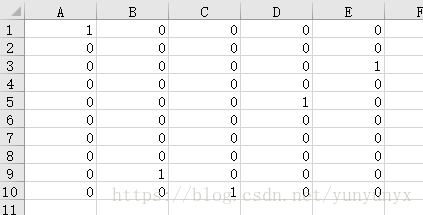
实验数据:5000张手写数字图片(.jpg),图片命名为1.jpg,2.jpg…5000.jpg。还有一个放着标签的excel文件。
数据处理:前4000张作为训练样本,后1000张作为测试样本。
图片处理:用matlab的imread()函数读取图片的灰度值矩阵(28,28),然后把每张图片的灰度值矩阵reshape为(28*28,1),然后把前4000张图片的灰度值矩阵合并为x_train,把后1000张图片的灰度值矩阵合并为x_test。
神经网络设计
网络层设计:一层隐藏层,一层输出层
输入层:一张图片的灰度值矩阵reshape后的784个数,也就是x_train中的某一列
输出层:(10,1)的列向量,其中列向量中最大的数所在的索引就是预测的数字
激励函数:sigmoid函数(公式)
更新法则:后向传播算法(参考)
一点说明:这里的训练我分别用了普通梯度下降法和mini_batch(batch size 为10)梯度下降法来实现
测试:用了两种方式表示正确率,一是统计预测正确的个数,而是利用matlab的plotconfusion函数
网络实现
全部实现包括5个函数(gedata.m / layerout.m / mytrain.m / mytrain_mini.m / test.m)和一个main.m文件。
读取数据(getdata.m)
function[x_train,y_train,x_test,y_test]=getdata()

%把图片变成像素矩阵

%path :图片路径

% x_train:训练样本像素矩阵(784,4000)

%y_train:训练样本标签(10,4000)

%x_test:测试样本像素矩阵(784,1000)

%y_test:测试样本标签(10,1000)

% photopath = './photo/';

% snames=dir([photopath  '*' '.jpg'])%get all filenames in photopath

% l = length(snames)

%

% %get x_ data

% x_train = [];

% x_test = [];

%

% for i=1:4000

%     iname=[photopath snames(i).name] %the path of jpg

%     x = imread(iname);  % the shape of x is (28,28)

%     x = reshape(x,784,1);  %reshape x to (784,1)

%     x_train = [x_train,x];

% end

%

% for k=4001:5000

%     kname=[photopath snames(k).name];  %the path of jpg

%     x = imread(kname);   %the shape of x is (28,28)

%     x = reshape(x,784,1);  %reshape x  to (784,1)

%     x_test = [x_test,x];

% end

x_train=[];

for i=1:4000

      x=im2double(imread(strcat(num2str(i),'.jpg')));

      x=reshape(x,784,1);

      x_train=[x_train,x];

end

x_test =[];

for k=4001:5000

      x=im2double(imread(strcat(num2str(k),'.jpg')));

      x=reshape(x,784,1);

      x_test=[x_test,x];

end

data=xlsread('label.xlsx');

y_train=data(:,1:4000);

y_test = data(:,4001:5000);

x_train;

y_train;

x_test;

y_test;

end
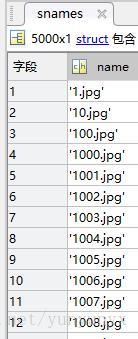
这里踩了一个坑。我本来读取图片,是按目录来读取的,然后训练出来的效果一直不好。一度怀疑自己的更新函数写错了,改了很久,才发现按目录读取的图片顺序是错误的!按目录读取的图片并不是按1,2,3…这样读的,而是按下面的顺序读取的,这样就和label对不上了!!!
layerout函数
function [y] = layerout(w,b,x)

%output function

y = w*x + b;

n = length(y);

for i =1:n

    y(i)=1.0/(1+exp(-y(i)));

end

y;

end
训练一(mytrain.m)
function[w,b,w_h,b_h]=mytrain(x_train,y_train)

%train function:设置一个隐藏层,784-->隐藏层神经元个数-->10

%x_train:训练样本的像素数据

%y_train:训练样本的标签

%w:输出层权重

%b:输出层偏置

%w_h:隐藏层权重

%b_h:隐藏层偏置

%step:循环步数

step=input('迭代步数:');

a=input('学习因子:');

in = 784; %输入神经元个数

hid = input('隐藏层神经元个数:');%隐藏层神经元个数

out = 10; %输出层神经元个数

o =1;

w = randn(out,hid);

b = randn(out,1);

w_h =randn(hid,in);

b_h = randn(hid,1);

for i=0:step

    %打乱训练样本

    r=randperm(4000);

    x_train = x_train(:,r);

    y_train = y_train(:,r);

    for j=1:4000

        x = x_train(:,j);

        y = y_train(:,j);

        hid_put = layerout(w_h,b_h,x);

        out_put = layerout(w,b,hid_put);

        %更新公式的实现

        o_update = (y-out_put).*out_put.*(1-out_put);

        h_update = ((w')*o_update).*hid_put.*(1-hid_put);

        outw_update = a*(o_update*(hid_put'));

        outb_update = a*o_update;

        hidw_update = a*(h_update*(x'));

        hidb_update = a*h_update;

        w = w + outw_update;

        b = b+ outb_update;

        w_h = w_h +hidw_update;

        b_h =b_h +hidb_update;

    end

end

end
训练二(mytrain_mini.m)
function[w,b,w_h,b_h]=mytrain_mini(x_train,y_train)

%train function:设置一个隐藏层,784-->隐藏层神经元个数-->10

%x_train:训练样本的像素数据

%y_train:训练样本的标签

%w:输出层权重

%b:输出层偏置

%w_h:隐藏层权重

%b_h:隐藏层偏置

%step:循环步数

step=ipout('迭代步数:');

a=input('学习因子:');

in = 784; %输入神经元个数

hid = input('隐藏层神经元个数:');%隐藏层神经元个数

out = 10; %输出层神经元个数

o =1;

w = randn(out,hid);

b = randn(out,1);

w_h =randn(hid,in);

b_h = randn(hid,1);

for i=0:step

    %打乱训练样本

    r=randperm(4000);

    x_train = x_train(:,r);

    y_train = y_train(:,r);

    %mini_batch

    for jj=0:399

        %取batch为10  更新取10次的平均值

        for j=jj*10+1:(jj+1)*10

            x = x_train(:,j);

            y = y_train(:,j);

            hid_put = layerout(w_h,b_h,x);

            out_put = layerout(w,b,hid_put);

            %更新公式的实现

            o_update = (y-out_put).*out_put.*(1-out_put);

            h_update = ((w')*o_update).*hid_put.*(1-hid_put);

            if j==1

                outw_update = (double(a)/10)*(o_update*(hid_put'));

                outb_update = (double(a)/10)*o_update;

                hidw_update = (double(a)/10)*(h_update*(x'));

                hidb_update = (double(a)/10)*h_update;

            end

            if j~=1

                outw_update = outw_update + (double(a)/10)*(o_update*(hid_put'));

                outb_update = outb_update -(double(a)/10)*o_update;

                hidw_update = hidw_update + (double(a)/10)*(h_update*(x'));

                hidb_update = hidb_update -(double(a)/10)*h_update;

            end

        end

        w = w + outw_update;

        b = b+ outb_update;

        w_h = w_h +hidw_update;

        b_h =b_h +hidb_update;

    end

end

end
测试(mytest.m)
function[]= mytest(x_test,y_test,w,b,w_h,b_h)

%x_test:测试样本的像素数据

%y_test:测试样本的标签

%w:输出层权重

%b:输出层偏置

%w_h:隐藏层权重

%b_h:隐藏层偏置

test = zeros(10,1000);

for k=1:1000

    x = x_test(:,k);

    hid = layerout(w_h,b_h,x);

    test(:,k)=layerout(w,b,hid);

    %正确率表示方式一:输出正确个数

    [t,t_index]=max(test);

    [y,y_index]=max(y_test);

    sum = 0;

    for p=1:length(t_index)

        if t_index(p)==y_index(p)

            sum =sum+1;

        end

    end

end

fprintf('正确率: %d/1000\n',sum);

%正确率表示方式二:用plotconfusion函数

plotconfusion(y_test,test);

end
main.m
[x_train,y_train,x_test,y_test]=getdata();

%归一化

x_train = mapminmax(x_train,0,1);

x_test =mapminmax(x_test,0,1);

[w1,b1,w_h1,b_h1]=mytrain(x_train,y_train);

fprintf('mytrain正确率:\n');

mytest(x_test,y_test,w1,b1,w_h1,b_h1);

[w2,b2,w_h2,b_h2]=mytrain(x_train,y_train);

fprintf('mytrain_mini正确率:\n');

mytest(x_test,y_test,w2,b2,w_h2,b_h2);
实验结果
直接运行main.m,且两个训练方式都输入相同参数,得到结果如下:
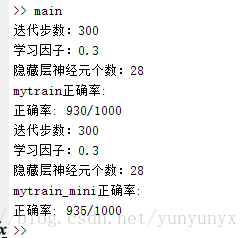
下面是mini_batch的plotconfusion结果,mytrain的也差不多。其中绿色的为正确率:
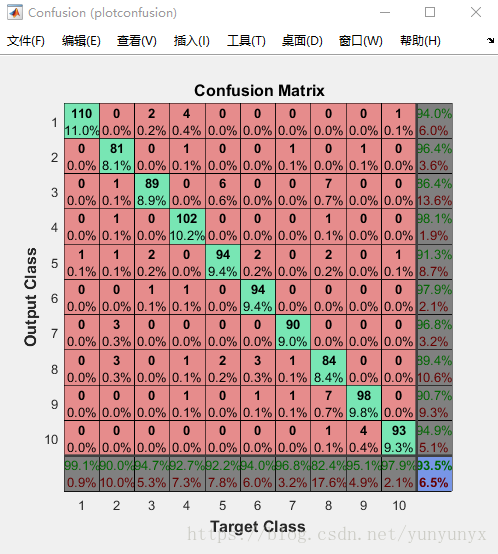
直观感觉min_batch方式的训练会快一丢丢。由于这里数据不多,所以两者的差别看不大出来!
matlab手写神经网络实现识别手写数字的更多相关文章
- python手写神经网络实现识别手写数字
写在开头:这个实验和matlab手写神经网络实现识别手写数字一样. 实验说明 一直想自己写一个神经网络来实现手写数字的识别,而不是套用别人的框架.恰巧前几天,有幸从同学那拿到5000张已经贴好标签的手 ...
- 如何用卷积神经网络CNN识别手写数字集?
前几天用CNN识别手写数字集,后来看到kaggle上有一个比赛是识别手写数字集的,已经进行了一年多了,目前有1179个有效提交,最高的是100%,我做了一下,用keras做的,一开始用最简单的MLP, ...
- 使用神经网络来识别手写数字【译】(三)- 用Python代码实现
实现我们分类数字的网络 好,让我们使用随机梯度下降和 MNIST训练数据来写一个程序来学习怎样识别手写数字. 我们用Python (2.7) 来实现.只有 74 行代码!我们需要的第一个东西是 MNI ...
- Python实现神经网络算法识别手写数字集
最近忙里偷闲学习了一点机器学习的知识,看到神经网络算法时我和阿Kun便想到要将它用Python代码实现.我们用了两种不同的方法来编写它.这里只放出我的代码. MNIST数据集基于美国国家标准与技术研究 ...
- NN:神经网络实现识别手写的1~9的10个数字—Jason niu
import numpy as np from sklearn.datasets import load_digits from sklearn.metrics import confusion_ma ...
- C#中调用Matlab人工神经网络算法实现手写数字识别
手写数字识别实现 设计技术参数:通过由数字构成的图像,自动实现几个不同数字的识别,设计识别方法,有较高的识别率 关键字:二值化 投影 矩阵 目标定位 Matlab 手写数字图像识别简介: 手写 ...
- stanford coursera 机器学习编程作业 exercise 3(使用神经网络 识别手写的阿拉伯数字(0-9))
本作业使用神经网络(neural networks)识别手写的阿拉伯数字(0-9) 关于使用逻辑回归实现多分类问题:识别手写的阿拉伯数字(0-9),请参考:http://www.cnblogs.com ...
- Tensorflow搭建卷积神经网络识别手写英语字母
更新记录: 2018年2月5日 初始文章版本 近几天需要进行英语手写体识别,查阅了很多资料,但是大多数资料都是针对MNIST数据集的,并且主要识别手写数字.为了满足实际的英文手写识别需求,需要从训练集 ...
- Pytorch1.0入门实战一:LeNet神经网络实现 MNIST手写数字识别
记得第一次接触手写数字识别数据集还在学习TensorFlow,各种sess.run(),头都绕晕了.自从接触pytorch以来,一直想写点什么.曾经在2017年5月,Andrej Karpathy发表 ...
随机推荐
- C++ 运算符重载四(自定义数组类)
//自定义数组类 #include<iostream> using namespace std; //分析:能获取数组长度,添加元素,删除元素,修改元素 //要求重载[],=,==,!=运 ...
- Softmax vs. Softmax-Loss VS cross-entropy损失函数 Numerical Stability(转载)
http://freemind.pluskid.org/machine-learning/softmax-vs-softmax-loss-numerical-stability/ 卷积神经网络系列之s ...
- 第二百六十五节,xss脚本攻击介绍
xss脚本攻击介绍 Cross-Site Scripting(XSS)是一类出现在 web 应用程序上的安全弱点,攻击者可以通过 XSS 插入一 些代码,使得访问页面的其他用户都可以看到,XSS 通常 ...
- 出错的方法有可能是JDK,也可能是程序员写的程序,无论谁写的,抛出一定用throw
应对未检查异常就是养成良好的检查习惯. 已检查异常是不可避免的,对于已检查异常必须实现定义好应对的方法. 已检查异常肯定跨越出了虚拟机的范围.(比如“未找到文件”) 如何处理已检查异常(对于所有的已检 ...
- ERROR: openstack Error finding address for http://10.16.37.215:9292/v1/images: [Errno 32] Broken pipe
Try to set: no_proxy=10.16.37.215 this should help 转自: http://askubuntu.com/questions/575938/error-i ...
- git 怎么看某个commit 修改的代码
详细的更改: git show commitid 只列出文件名:git show --pretty="format:" --name-only commitid 转自: http: ...
- iOS自动化测试需求实现(iOS按键精灵类似)
需求分析: 作为以需求为驱动的IT公司,有再奇怪的需求都不奇怪,所以“24小时循测第三方应用”这样的需求也可以接受.业务需求重点为: 1.24小时循测 2.无人值守,自动完成 3.自动界面操作(点击. ...
- hdu 1180:诡异的楼梯(BFS广搜)
诡异的楼梯 Time Limit: 2000/1000 MS (Java/Others) Memory Limit: 131072/65536 K (Java/Others)Total Subm ...
- Mongodb默认开启与关闭
默认启动: $ ./mongodb 默认数据保存路径:/data/db/ 默认端口:27017 修改默认路径: --dbpath $ ./mongdb --dbpath /mongod ...
- DecimalFormat 四舍五入Float类型的坑
今天又踩了一个坑,使用DecimalFormat来完毕四舍五入.可是传入的是float类型,几轮測试才发现一个问题,传入的float会被转为double类型.大家都知道float是4位,double是 ...