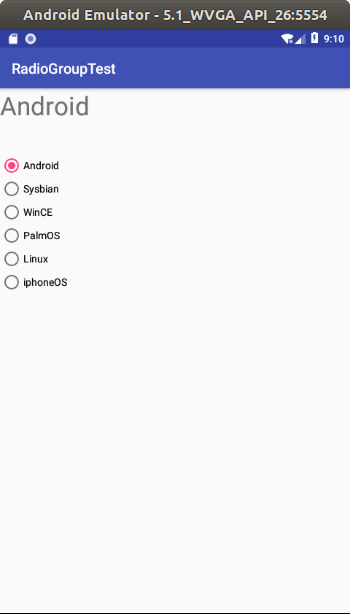
第十七篇-使用RadioGroup实现单项选择
上效果图

首先进行控件布局,一个textview,6个radiobutton,
main_activity.xml
<?xml version="1.0" encoding="utf-8"?>

<android.support.constraint.ConstraintLayout xmlns:android="http://schemas.android.com/apk/res/android"

    xmlns:app="http://schemas.android.com/apk/res-auto"

    xmlns:tools="http://schemas.android.com/tools"

    android:layout_width="match_parent"

    android:layout_height="match_parent"

    tools:context=".MainActivity">

    <TextView

        android:id="@+id/textView"

        android:layout_width="233dp"

        android:layout_height="74dp"

        android:textSize="35sp"

        tools:ignore="MissingConstraints"

        tools:layout_editor_absoluteX="0dp"

        tools:layout_editor_absoluteY="25dp" />

    <RadioGroup

        android:id="@+id/RG"

        android:layout_width="264dp"

        android:layout_height="202dp"

        android:layout_marginTop="16dp"

        app:layout_constraintStart_toStartOf="parent"

        app:layout_constraintTop_toBottomOf="@+id/textView"

        tools:ignore="MissingConstraints">

        <RadioButton

            android:id="@+id/RB1"

            android:layout_width="wrap_content"

            android:layout_height="wrap_content"

            android:text="@string/radiobutton1"

            tools:ignore="MissingConstraints"

            tools:layout_editor_absoluteX="62dp"

            tools:layout_editor_absoluteY="87dp" />

        <RadioButton

            android:id="@+id/RB2"

            android:layout_width="wrap_content"

            android:layout_height="wrap_content"

            android:text="@string/radiobutton2"

            tools:ignore="MissingConstraints"

            tools:layout_editor_absoluteX="62dp"

            tools:layout_editor_absoluteY="143dp" />

        <RadioButton

            android:id="@+id/RB3"

            android:layout_width="wrap_content"

            android:layout_height="wrap_content"

            android:text="@string/radiobutton3"

            tools:ignore="MissingConstraints"

            tools:layout_editor_absoluteX="62dp"

            tools:layout_editor_absoluteY="214dp" />

        <RadioButton

            android:id="@+id/RB4"

            android:layout_width="wrap_content"

            android:layout_height="wrap_content"

            android:text="@string/radiobutton4"

            tools:ignore="MissingConstraints"

            tools:layout_editor_absoluteX="62dp"

            tools:layout_editor_absoluteY="278dp" />

        <RadioButton

            android:id="@+id/RB5"

            android:layout_width="wrap_content"

            android:layout_height="wrap_content"

            android:text="@string/radiobutton5"

            tools:ignore="MissingConstraints"

            tools:layout_editor_absoluteX="62dp"

            tools:layout_editor_absoluteY="356dp" />

        <RadioButton

            android:id="@+id/RB6"

            android:layout_width="wrap_content"

            android:layout_height="wrap_content"

            android:text="@string/radiobutton6"

            tools:ignore="MissingConstraints"

            tools:layout_editor_absoluteX="61dp"

            tools:layout_editor_absoluteY="429dp" />

    </RadioGroup>

</android.support.constraint.ConstraintLayout>
MainActivity.java
package com.example.aimee.radiogrouptest;

import android.support.v7.app.AppCompatActivity;

import android.os.Bundle;

import android.view.MotionEvent;

import android.widget.RadioButton;

import android.widget.RadioGroup;

import android.widget.TextView;

import android.widget.Toast;

public class MainActivity extends AppCompatActivity {

    TextView textview;

    RadioGroup RG;

    RadioButton RB1;

    RadioButton RB2;

    RadioButton RB3;

    RadioButton RB4;

    RadioButton RB5;

    RadioButton RB6;

    @Override

    protected void onCreate(Bundle savedInstanceState) {

        super.onCreate(savedInstanceState);

        setContentView(R.layout.activity_main);

        textview=findViewById(R.id.textView);

        RG=findViewById(R.id.RG);

        RB1=findViewById(R.id.RB1);

        RB2=findViewById(R.id.RB2);

        RB3=findViewById(R.id.RB3);

        RB4=findViewById(R.id.RB4);

        RB5=findViewById(R.id.RB5);

        RB6=findViewById(R.id.RB6);

        RG.setOnCheckedChangeListener(ChangeRadioGroup);

    }

    private RadioGroup.OnCheckedChangeListener ChangeRadioGroup=new RadioGroup.OnCheckedChangeListener() {

        @Override

        public void onCheckedChanged(RadioGroup group, int checkedId) {

            if(checkedId==RB1.getId()&&RB1.isChecked()){

                textview.setText(RB1.getText());

                Toast.makeText(MainActivity.this,RB1.getText()+"被选择",Toast.LENGTH_SHORT).show();

            }

            else if(checkedId==RB2.getId()&&RB2.isChecked()){

                textview.setText(RB2.getText());

                Toast.makeText(MainActivity.this,RB2.getText()+"被选择",Toast.LENGTH_SHORT).show();

            }

            else if(checkedId==RB3.getId()&&RB3.isChecked()){

                textview.setText(RB3.getText());

                Toast.makeText(MainActivity.this,RB3.getText()+"被选择",Toast.LENGTH_SHORT).show();

            }

            else if(checkedId==RB4.getId()&&RB4.isChecked()){

                textview.setText(RB4.getText());

                Toast.makeText(MainActivity.this,RB4.getText()+"被选择",Toast.LENGTH_SHORT).show();

            }

            else if(checkedId==RB5.getId()&&RB5.isChecked()){

                textview.setText(RB5.getText());

                Toast.makeText(MainActivity.this,RB5.getText()+"被选择",Toast.LENGTH_SHORT).show();

            }

            else if(checkedId==RB6.getId()&&RB6.isChecked()){

                textview.setText(RB6.getText());

                Toast.makeText(MainActivity.this,RB6.getText()+"被选择",Toast.LENGTH_SHORT).show();

            }

        }

    };

}
/res/values/string.xml
<resources>

    <string name="app_name">RadioGroupTest</string>

    <string name="radiobutton1">Android</string>

    <string name="radiobutton2">Sysbian</string>

    <string name="radiobutton3">WinCE</string>

    <string name="radiobutton4">PalmOS</string>

    <string name="radiobutton5">Linux</string>

    <string name="radiobutton6">iphoneOS</string>

</resources>
第十七篇-使用RadioGroup实现单项选择的更多相关文章
- 解剖SQLSERVER 第十七篇 使用 OrcaMDF Corruptor 故意损坏数据库(译)
解剖SQLSERVER 第十七篇 使用 OrcaMDF Corruptor 故意损坏数据库(译) http://improve.dk/corrupting-databases-purpose-usin ...
- Python之路【第十七篇】:Django【进阶篇 】
Python之路[第十七篇]:Django[进阶篇 ] Model 到目前为止,当我们的程序涉及到数据库相关操作时,我们一般都会这么搞: 创建数据库,设计表结构和字段 使用 MySQLdb 来连接 ...
- Python之路【第十七篇】:Django之【进阶篇】
Python之路[第十七篇]:Django[进阶篇 ] Model 到目前为止,当我们的程序涉及到数据库相关操作时,我们一般都会这么搞: 创建数据库,设计表结构和字段 使用 MySQLdb 来连接 ...
- Python之路【第十七篇】:Django【进阶篇】
Python之路[第十七篇]:Django[进阶篇 ] Model 到目前为止,当我们的程序涉及到数据库相关操作时,我们一般都会这么搞: 创建数据库,设计表结构和字段 使用 MySQLdb 来连接 ...
- 单项选择RadioButton和多项选择CheckBox的使用
在Android中,可以通过RadioButton和RadioGroup的组合来实现单项选择的效果.而多项选择则是通过CheckBox来实现的. 1.单项选择RadioButton 我们知道,一 ...
- 阅读《Android 从入门到精通》(10)——单项选择
单项选择(RadioGroup) RadioGroup 是 LinearLayout 的子类,继承关系例如以下: android.view.ViewGroup android.widget.Linea ...
- 跟我学SpringCloud | 第十七篇:服务网关Zuul基于Apollo动态路由
目录 SpringCloud系列教程 | 第十七篇:服务网关Zuul基于Apollo动态路由 Apollo概述 Apollo相比于Spring Cloud Config优势 工程实战 示例代码 Spr ...
- Egret入门学习日记 --- 第十七篇(书中 7.4~8.2节 内容)
第十七篇(书中 7.4~8.2节 内容) 昨天看到 7.3 节,那么今天. 开始 7.4节. 好吧,这些其他的服务器运行知识,就不搞了... 至此,7.4节 内容结束. 开始 7.5节 内容. ...
- 微信小程序实战篇:商品属性联动选择(案例)
本期的微信小程序实战篇来做一个电商网站经常用到的-商品属性联动选择的效果,素材参考了一点点奶茶. 效果演示: 商品属性联动.gif 代码示例 1.commodity.xml <!-- < ...
随机推荐
- zabbix模板
https://github.com/xm-y/zabbix-community-repos https://monitoringartist.github.io/zabbix-searcher/
- 一、ABP框架框架摘要
ABP框架几点说明: 一.什么是ABP ABP是一个建立在最新的ASP.NET的MVC和Web API技术的应用框架.它可以很容易地使用依赖注入.日志记录.验证.异常处理.本地化等,也使用流行的框架和 ...
- Lodop提示安装或升级的注意事项
LODOP的LodopFuncs.js文件里,自动判断浏览器类型提示下载哪个,根据版本号比较判断提示升级.此文章是以前写的,图示可能过旧,新版提示不同,但是LodopFuncs.js里各个方面变动不大 ...
- Asp.Net Core get client IP
不废话,直接上代码,你懂得. public string GetRequestIP(bool tryUseXForwardHeader = true) { string ip = null; // t ...
- codeforces740B
Alyona and flowers CodeForces - 740B Little Alyona is celebrating Happy Birthday! Her mother has an ...
- int,String转换
int -> String 第一种方法:s=i+""; //会产生两个String对象 第二种方法:s=String.valueOf(i); //直接使用String类的静态 ...
- windows电脑连接蓝牙耳机的正确步骤
前言 我使用的是小米运动蓝牙耳机,操作系统为win7,废话少说直接上教程 是否支持蓝牙功能 按住win+R,打开[运行],输入devmgmt.msc,回车. 只要有Bluetooth 无线电收发器,那 ...
- PHP——base64的图片转为文件图片
前言 网上很多,真的是有毒吧,一个那么简单至于写的乱七八糟的嘛,醉了. 代码 具体都写注释中了,不懂的可以评论或者私信我 public function upload() { //接收前台的值 $ba ...
- Cetos 7 防火墙设置
1.关闭防火墙: # systemctl stop firewalld.service 2.开启防火墙: # systemctl start firewalld.service 3.关闭开机启动: # ...
- Dividing POJ - 1014 多重背包二进制优化
多重背包模型 写的时候漏了一个等号找了半天 i<<=1 !!!!!! #include<iostream> #include<cstdio> #include&l ...
