kubernetes下安装mysql
参考文档:https://blog.csdn.net/sealir/article/details/81177747
注:有mysql安装在k8s集群内,集群外且通过k8s service endpoint代理外部mysql服务供内k8s内部集群访问两种方式,本文为第二种
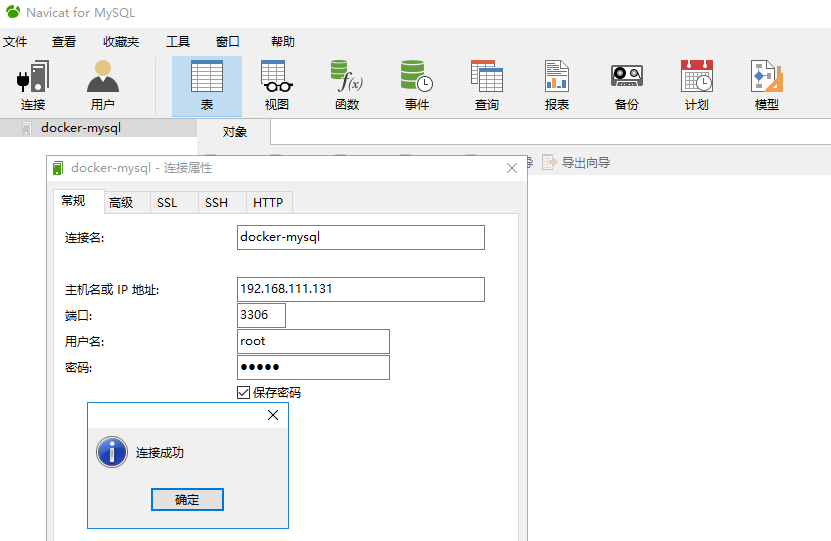
一,先在k8s-node上docker安装mysql,并远程连接可用
1.下载mysql镜像
如果很慢请参考docker pull centos慢问题的解决方案
[root@k8s-node1 ~]# docker pull mysql:5.7

5.7: Pulling from library/mysql

27833a3ba0a5: Pull complete

864c283b3c4b: Pull complete

cea281b2278b: Pull complete

8f856c14f5af: Pull complete

9c4f38c23b6f: Pull complete

1b810e1751b3: Pull complete

5479aaef3d30: Pull complete

1d924ec3d520: Pull complete

1ab7ae63ac60: Pull complete

08aa5f3680e9: Pull complete

a832d0a0972a: Pull complete

Digest: sha256:dba5fed182e64064b688ccd22b2f9cad4ee88608c82f8cff21e17bab8da72b81

Status: Downloaded newer image for mysql:5.7

[root@k8s-node1 ~]# docer images

-bash: docer: 未找到命令

[root@k8s-node1 ~]# docker images

REPOSITORY                           TAG                 IMAGE ID            CREATED             SIZE

mytomcat                             v8                  f1332ae3f570         days ago         463MB

mytomcat                             v9                  f1332ae3f570         days ago         463MB

tomcat                                                  f1332ae3f570         days ago         463MB

mysql                                5.7                 98455b9624a9         weeks ago         372MB

k8s.gcr.io/kube-proxy                v1.14.0             5cd54e388aba         weeks ago         .1MB

k8s.gcr.io/kube-controller-manager   v1.14.0             b95b1efa0436         weeks ago         158MB

k8s.gcr.io/kube-scheduler            v1.14.0             00638a24688b         weeks ago         .6MB

k8s.gcr.io/kube-apiserver            v1.14.0             ecf910f40d6e         weeks ago         210MB

quay.io/coreos/flannel               v0.11.0-amd64       ff281650a721         months ago        .6MB

k8s.gcr.io/coredns                   1.3.               eb516548c180         months ago        .3MB

k8s.gcr.io/etcd                      3.3.              2c4adeb21b4f         months ago        258MB

k8s.gcr.io/pause                     3.1                 da86e6ba6ca1         months ago       742kB

[root@k8s-node1 ~]#
2.启动,-v <dir>:/var/lib/mysql,将宿主机目录dir挂载到容器中
[root@k8s-node1 mysql]# docker run -d -p : -v /var/local/mysql:/var/lib/mysql -e MYSQL_ROOT_PASSWORD=mysql --name docker-mysql mysql:5.7

87b7410ea379136b3743e194bb312b1bb6fe02abe73e706e04c68856aecc507a

[root@k8s-node1 mysql]#
进入mysql container
[root@k8s-node1 mysql]# docker ps -a

CONTAINER ID        IMAGE                  COMMAND                  CREATED              STATUS                     PORTS                               NAMES

87b7410ea379        mysql:5.7              "docker-entrypoint.s…"   About a minute ago   Up About a minute          0.0.0.0:->/tcp, /tcp   docker-mysql

[root@k8s-node1 mysql]# docker exec -it 87b7410ea379 /bin/bash

root@87b7410ea379:/# mysql -uroot -pmysql

mysql: [Warning] Using a password on the command line interface can be insecure.

Welcome to the MySQL monitor.  Commands end with ; or \g.

Your MySQL connection id is

Server version: 5.7. MySQL Community Server (GPL)

Copyright (c) , , Oracle and/or its affiliates. All rights reserved.

Oracle is a registered trademark of Oracle Corporation and/or its

affiliates. Other names may be trademarks of their respective

owners.

Type 'help;' or '\h' for help. Type '\c' to clear the current input statement.

mysql>
mysql> exit
Bye
root@87b7410ea379:/# exit
exit
[root@k8s-node1 mysql]#
3.远程连接

二,到k8s master创建server,endpoint代理访问
1.到k8s-master上验证是否可以连接,前提是已安装mysql客户端(如果没有centos7安装mysql客户端)
[root@k8s-master master]# mysql -h192.168.111. -P3306 -uroot -pmysql

Welcome to the MariaDB monitor.  Commands end with ; or \g.

Your MySQL connection id is

Server version: 5.7. MySQL Community Server (GPL)

Copyright (c) , , Oracle, MariaDB Corporation Ab and others.

Type 'help;' or '\h' for help. Type '\c' to clear the current input statement.

MySQL [(none)]> exit

Bye

[root@k8s-master master]#
2.创建mysql-out.svc.yaml文件
[root@k8s-master ~]# cat mysql-out-svc.yaml

apiVersion: v1

kind: Service

metadata:

  name: mysql-out-svc

spec:

  ports:

    - port:

      protocol: TCP

      targetPort:

---

apiVersion: v1

kind: Endpoints

metadata:

  name: mysql-out-svc

subsets:

  - addresses:

      - ip: "192.168.111.131"

    ports:

      - port:

[root@k8s-master ~]#
在service中,各项配置意义
spec:
type: NodePort #这里代表是NodePort类型的,另外还有ingress,LoadBalancer
ports:
- port: 80 #这里的端口和clusterIP(kubectl describe service service-hello中的IP的port)对应,即在集群中所有机器上curl 10.98.166.242:80可访问发布的应用服务。
targetPort: 8080 #端口一定要和container暴露出来的端口对应,nodejs暴露出来的端口是8081,所以这里也应是8081
protocol: TCP
nodePort: 31111 # 所有的节点都会开放此端口,此端口供外部调用。
selector:
run: hello #这里选择器一定要选择容器的标签,之前写name:kube-node是错的。
3.启动service
[root@k8s-master ~]# kubectl create -f mysql-out-svc.yaml

service/mysql-out-svc created

endpoints/mysql-out-svc created

[root@k8s-master ~]# kubectl get services -o wide

NAME            TYPE        CLUSTER-IP       EXTERNAL-IP   PORT(S)        AGE   SELECTOR

kubernetes      ClusterIP   10.96.0.1        <none>        /TCP        8d    <none>

mysql-out-svc   ClusterIP   10.111.241.185   <none>        /TCP       18s   <none>

service-hello   NodePort    10.98.166.242    <none>        :/TCP   8d    run=hello

[root@k8s-master ~]# kubectl get endpoints -o wide

NAME            ENDPOINTS                           AGE

kubernetes      192.168.111.130:                8d

mysql-out-svc   192.168.111.131:                37s

service-hello   10.244.1.36:,10.244.1.37:   8d
因为使用的是k8s集群外部mysql服务,然后用service代理,让k8s集群内的其它service(如service-hello)可通过 cluster-ip:port(10.111.241.185:3306)来访问外部的mysql服务
所以此外并没有生成mysql 的pod
[root@k8s-master ~]# kubectl get pods -o wide

NAME                     READY   STATUS    RESTARTS   AGE     IP            NODE        NOMINATED NODE   READINESS GATES

hello-5cd4456b66-gstq6   /     Running             7d17h   10.244.1.36   k8s-node1   <none>           <none>

hello-5cd4456b66-sb5px   /     Running             7d17h   10.244.1.37   k8s-node1   <none>           <none>
4.在k8s-master上也可以通过 cluster-ip:port(10.111.241.185:3306)来访问外部的mysql服务
[root@k8s-master ~]# mysql -h10.111.241. -P3306 -uroot -pmysql

Welcome to the MariaDB monitor.  Commands end with ; or \g.

Your MySQL connection id is

Server version: 5.7. MySQL Community Server (GPL)

Copyright (c) , , Oracle, MariaDB Corporation Ab and others.

Type 'help;' or '\h' for help. Type '\c' to clear the current input statement.

MySQL [(none)]>
到此,k8s上安装msyql完成
kubernetes下安装mysql的更多相关文章
- Linux下安装 MySQL
Ubuntu环境 使用二进制安装包安装,相对简单绿色 1.到官网下载二进制压缩包http://dev.mysql.com/downloads/mysql/ 2.选择需要的版本 目前最新为5.7.之后选 ...
- Ubuntu 下安装 Mysql
这里讲用Ubuntu下安装MySql ubuntu上安装mysql非常简单只需要几条命令就可以完成. 1. sudo apt-get install mysql-server 2. apt-get ...
- ubuntu 下安装mysql,以及配置远程登录
安装MysQL 在Ubuntu14.04下安装MySQL比较简单,只需下面这条命令就行了: 1.输入 sudo apt-get install mysql-server 2.继续执行后,需要设定MyS ...
- CentOS7下安装Mysql和Memcached 以及 使用C#操作Mysql和Memcached
我本身是学.net的,但是现在很多主流SQL和NOSQL都是部置在linux下,本着好学的精神,前段时间装了个虚拟机,在其装上CentOS64位的服务器系统,对于英文0基础,linux0基础的我来说, ...
- RPM方式安装MySQL5.6和windows下安装mysql解压版
下载地址: http://cdn.MySQL.com/archives/mysql-5.6/MySQL-server-5.6.13-1.el6.x86_64.rpmhttp://cdn.mysql.c ...
- centos 6.5下安装mysql+nginx+redmine 3.1.0 笔记
centos 6.5下安装mysql+nginx+redmine 3.1.0 笔记 目录[-] 过程 1.安装RVM 2.利用rvm安装 Ruby 1.9.3 并设为默认 3.安装rails 4.安装 ...
- Centos下安装mysql 总结
一.MySQL安装 Centos下安装mysql 请点开:http://www.centoscn.com/CentosServer/sql/2013/0817/1285.html 二.MySQL的几个 ...
- Win7-64bit系统下安装mysql的ODBC驱动
安装过mysql数据库后,有些软件在调用mysql数据库时不会直接调用,需要安装mysql数据库的ODBC驱动,再来调用.这里就介绍下,如何在win7系统下安装mysql的ODBC驱动. Win7系统 ...
- win7下安装MYSQL报错:"MYSQL 服务无法启动"的3534问题
上午在win7下安装MYSQL,只到“net start mysql”这一步报错:3534的错误: 于是在百度中搜索关键字“mysql服务无法启动3534”. 参考以下两个链接中的方法,解决了3534 ...
随机推荐
- tomcat源码 StandardService
在执行StandardServer的initInternal的时候会执行StandardService#init,然后会调到initInternal protected void startInter ...
- web环境中微信JS-SDK配置
一.公众号相关设置 首先,在公众号中进行JS安全域名的设置,在公众号设置-功能设置中选择JS接口安全域名,点击设置进入设置对话框.按照要求逐步进行,完成设置. 二.页面请求发送与处理 引入所需js: ...
- [转][C#]单例模式之懒加载
private static ILog log = LogManager.GetLogger(System.Reflection.MethodBase.GetCurrentMethod().Decla ...
- [UE4]时序问题
时序问题 有依赖关系的两段代码,执行时间不确定,所引起的问题. 举例 1.Shooter引用了Weapon,Weapon引用了Shooter.射击者需要持有枪,枪需要判断是否有主人(枪的持有者).在枪 ...
- [UE4]Math Expression计算数学公式,可以接受参数
- MySQL 设置密码有效时间
mysql> alter user 'xuaiqi'@'%' PASSWORD EXPIRE INTERVAL 30 DAY;
- Dataset,DataTable
public DataTable test(int id) { var dt = GetLanguageDataTable(pfAppId); dt.AsEnumerable().ToList().F ...
- boost 学习笔记 1: lexical_cast
参考原著地址:http://einverne.github.io/post/2015/12/boost-learning-note-1.html 转换对象要求 lexical_cast 对转换对象有如 ...
- c语言数据类型(二)
char 类型 1.char 变量 常量 char c; 定义一个char变量 c = ‘a’ 'a'字符常量 char 的本质就是一个整数,只有一个字节大小的整数 2.printf 输出char ...
- CS229 2.深入梯度下降(Gradient Descent)算法
1 问题的引出 对于上篇中讲到的线性回归,先化一个为一个特征θ1,θ0为偏置项,最后列出的误差函数如下图所示: 手动求解 目标是优化J(θ1),得到其最小化,下图中的×为y(i),下面给出TrainS ...
