Linux CPU亲缘性详解
前言
在淘宝开源自己基于nginx打造的tegine服务器的时候,有这么一项特性引起了笔者的兴趣。“自动根据CPU数目设置进程个数和绑定CPU亲缘性”。当时笔者对CPU亲缘性没有任何概念,当时作者只是下意识的打开了google并输入CPU亲缘性(CPU Affinity)简单了做了个了解。
后来,在笔者参加实际工作以后,就碰到了这么两个问题。
问题一:如何在SMP的系统中,保证某个特定进程即使在其他进程都很忙的情况下都能够获得足够的CPU资源?解决的思路主要有以下两种:
- 提高进程的处理优先级
- 从SMP系统中,专门划拨出某一个CPU用于运行该程序。 而将其他进程划拨到其他的CPU上进行运行。
问题二:通过每日监控数据,我们发现服务器的CPU使用率出现这样子的情况,除了CPU0,其他CPU的负载都很低。
我们选择了通过设置CPU亲缘性的方式进行优化,在完成相关优化后,我们的应用程序性能得到了一定的提高。(大致有10%的性能提升)
此次,笔者借着博文的机会将“CPU亲缘性”这一特性的学习过程整理下来,以备日后查验。注意,本文所提到的CPU亲缘性均基于Linux。
什么是CPU亲缘性
所谓CPU亲缘性可以分为两大类:软亲缘性和硬亲缘性。
Linux 内核进程调度器天生就具有被称为 CPU 软亲缘性(soft affinity) 的特性,这意味着进程通常不会在处理器之间频繁迁移。这种状态正是我们希望的,因为进程迁移的频率小就意味着产生的负载小。但不代表不会进行小范围的迁移。
CPU 硬亲缘性是指通过Linux提供的相关CPU亲缘性设置接口,显示的指定某个进程固定的某个处理器上运行。本文所提到的CPU亲缘性主要是指硬亲缘性。
使用CPU亲缘性的好处
目前主流的服务器配置都是SMP架构,在SMP的环境下,每个CPU本身自己会有缓存,缓存着进程使用的信息,而进程可能会被kernel调度到其他CPU上(即所谓的core migration),如此,CPU cache命中率就低了。设置CPU亲缘性,程序就会一直在指定的cpu运行,防止进程在多SMP的环境下的core migration,从而避免因切换带来的CPU的L1/L2 cache失效。从而进一步提高应用程序的性能。
Linux CPU亲缘性的使用
我们有两种办法指定程序运行的CPU亲缘性。
- 通过Linux提供的taskset工具指定进程运行的CPU。
- 方式二,glibc本身也为我们提供了这样的接口,借来的内容主要为大家讲解如何通过编程的方式设置进程的CPU亲缘性。
相关接口
利用glibc库中的sched_getaffinity接口,我们获取应用程序当前的cpu亲缘性,而通过sched_setaffinity接口则可以把应用程序绑定到固定的某个或某几cpu上运行。相关定义如下:
 #include <sched.h>

 void CPU_ZERO(cpu_set_t *set);

 void CPU_CLR(int cpu, cpu_set_t *set);

 void CPU_SET(int cpu, cpu_set_t *set);

 int CPU_ISSET(int cpu, cpu_set_t *set);

 int sched_getaffinity(pid_t pid, unsigned int cpusetsize, cpu_set_t *mask);

 int sched_setaffinity(pid_t pid, unsigned int cpusetsize, cpu_set_t *mask);
其中的cpu_set_t结构体的具体定义:
  /*/usr/include/bits/sched.h*/

 # define __CPU_SETSIZE

 # define __NCPUBITS ( * sizeof (__cpu_mask))

 /* Type for array elements in 'cpu_set'.  */

 typedef unsigned long int __cpu_mask;

 typedef struct

 {

   __cpu_mask __bits[__CPU_SETSIZE / __NCPUBITS];

 } cpu_set_t;
可以看到其用每一bit位表示一个cpu的状态,最多可以表示1024个cpu的亲缘状态,这在目前来说足够用了.
在 Linux 内核中,所有的进程都有一个相关的数据结构,称为 task_struct。这个结构非常重要,原因有很多;其中与 亲缘性(affinity)相关度最高的是 cpus_allowed 位掩码。这个位掩码由 n 位组成,与系统中的 n 个逻辑处理器一一对应。 具有 4 个物理 CPU 的系统可以有 4 位。如果这些 CPU 都启用了超线程,那么这个系统就有一个 8 位的位掩码。
如果为给定的进程设置了给定的位,那么这个进程就可以在相关的 CPU 上运行。因此,如果一个进程可以在任何 CPU 上运行,并且能够根据需要在处理器之间进行迁移,那么位掩码就全是 1。实际上,这就是 Linux 中进程的缺省状态。相关内核调度代码如下:
 static inline

 int select_task_rq(struct task_struct *p, int sd_flags, int wake_flags)

 {

     int cpu = p->sched_class->select_task_rq(p, sd_flags, wake_flags);

     /*

      * In order not to call set_task_cpu() on a blocking task we need

      * to rely on ttwu() to place the task on a valid ->cpus_allowed

      * cpu.

      *

      * Since this is common to all placement strategies, this lives here.

      *

      * [ this allows ->select_task() to simply return task_cpu(p) and

      *   not worry about this generic constraint ]

      */

     if (unlikely(!cpumask_test_cpu(cpu, &p->cpus_allowed) ||

                  !cpu_online(cpu)))

         cpu = select_fallback_rq(task_cpu(p), p);

     return cpu;

 }
另外的几个宏CPU_CLR\CPU_ISSET\CPU_SET\CPU_ZERO定义也都定义在头文件/usr/include/bits/sched.h内:
 /* Access functions for CPU masks.  */

 # define __CPU_ZERO(cpusetp) \

   do {                                        \

     unsigned int __i;                                 \

     cpu_set_t *__arr = (cpusetp);                         \

     for (__i = ; __i < sizeof (cpu_set_t) / sizeof (__cpu_mask); ++__i)      \

       __arr->__bits[__i] = ;                              \

   } while ()

 # define __CPU_SET(cpu, cpusetp) \

   ((cpusetp)->__bits[__CPUELT (cpu)] |= __CPUMASK (cpu))

 # define __CPU_CLR(cpu, cpusetp) \

   ((cpusetp)->__bits[__CPUELT (cpu)] &= ~__CPUMASK (cpu))

 # define __CPU_ISSET(cpu, cpusetp) \

   (((cpusetp)->__bits[__CPUELT (cpu)] & __CPUMASK (cpu)) != )

 #endif
利用这几个宏方便我们操作指定cpu的对应bit位,比如清零,置位等。看一个完整的demo程序:
 /**

  * FileName: affinity_demo.c

  */

 #define _GNU_SOURCE

 #include <stdint.h>

 #include <stdio.h>

 #include <sched.h>

 #include <pthread.h>

 #include <stdlib.h>

 static inline void print_cpu_mask(cpu_set_t cpu_mask)

 {

     unsigned char flag = ;

     printf("Cpu affinity is ");

     for (unsigned int i = ; i < sizeof(cpu_set_t); i ++)

     {

         if (CPU_ISSET(i, &cpu_mask))

         {

             if (flag == )

             {

                 flag = ;

                 printf("%d", i);

             }

             else

             {

                 printf(",%d", i);

             }

         }

     }

     printf(".\n");

 }

 static inline void get_cpu_mask(pid_t pid, cpu_set_t *mask)

 {

     if (sched_getaffinity(pid, sizeof(cpu_set_t), mask) == -)

     {

         perror("get cpu affinity failed.\n");

         abort();

     }

 }

 static inline void set_cpu_mask(pid_t pid, cpu_set_t *mask)

 {

     if (sched_setaffinity(pid, sizeof(cpu_set_t), mask) == -)

     {

         perror("set cpu affinity failed.\n");

         abort();

     }

 }

 int main(int argc, char *argv[])

 {

     unsigned int active_cpu = ;

     cpu_set_t cpu_mask;

     get_cpu_mask(, &cpu_mask);

     print_cpu_mask(cpu_mask);

     CPU_ZERO(&cpu_mask);

     CPU_SET(active_cpu, &cpu_mask);

     set_cpu_mask(, &cpu_mask);

     get_cpu_mask(, &cpu_mask);

     print_cpu_mask(cpu_mask);

     for(;;)

     {

         ;

     }

     return ;

 }
编译,并运行
gcc affinity_demo.c -o demo -std=c99

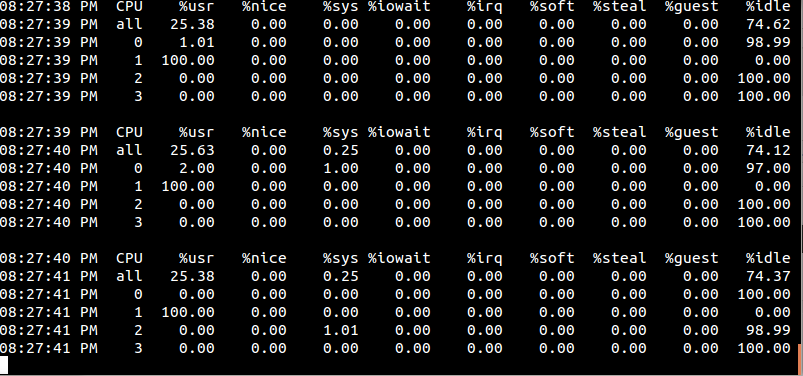
程序卡死在死循环,让我们另开一个终端来看看当前系统cpu使用率:
mpstat -P ALL

0号cpu占用率为百分之百,而其它cpu基本完全空闲。我们再来试试把活动cpu设置为1的情况, 我们将上面程序的第56行修改为:
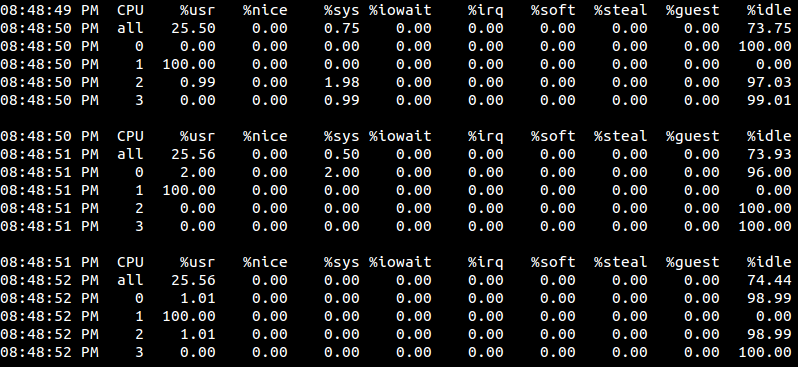
unsigned int active_cpu = 1;
编译并运行,同时观察一下此时我们的系统CPU使用率发生了什么变化:

值得注意的是,cpu affinity会被传递给子线程。
 /**

  * FileName: affinity_demo.c

  */

 #define _GNU_SOURCE

 #include <stdint.h>

 #include <stdio.h>

 #include <sched.h>

 #include <pthread.h>

 #include <stdlib.h>

 static inline void print_cpu_mask(cpu_set_t cpu_mask)

 {

     unsigned char flag = ;

     printf("Cpu affinity is ");

     for (unsigned int i = ; i < sizeof(cpu_set_t); i ++)

     {

         if (CPU_ISSET(i, &cpu_mask))

         {

             if (flag == )

             {

                 flag = ;

                 printf("%d", i);

             }

             else

             {

                 printf(",%d", i);

             }

         }

     }

     printf(".\n");

 }

 static inline void get_cpu_mask(pid_t pid, cpu_set_t *mask)

 {

     if (sched_getaffinity(pid, sizeof(cpu_set_t), mask) == -)

     {

         perror("get cpu affinity failed.\n");

         abort();

     }

 }

 static inline void set_cpu_mask(pid_t pid, cpu_set_t *mask)

 {

     if (sched_setaffinity(pid, sizeof(cpu_set_t), mask) == -)

     {

         perror("set cpu affinity failed.\n");

         abort();

     }

 }

 void *thread_func(void *param)

 {

     cpu_set_t cpu_mask;

     get_cpu_mask(, &cpu_mask);

     printf("Slave thread ");

     print_cpu_mask(cpu_mask);

     while ();

 }

 int main(int argc, char *argv[])

 {

     unsigned int active_cpu = ;

     cpu_set_t cpu_mask;

     pthread_t thread;

     get_cpu_mask(, &cpu_mask);

     print_cpu_mask(cpu_mask);

     CPU_ZERO(&cpu_mask);

     CPU_SET(active_cpu, &cpu_mask);

     set_cpu_mask(, &cpu_mask);

     get_cpu_mask(, &cpu_mask);

     printf("Master thread ");

     print_cpu_mask(cpu_mask);

     if (pthread_create(&thread, NULL, thread_func, NULL) != )

     {

         perror("pthread_create failed.\n");

     }

     pthread_join(thread, NULL);

     return ;

 }
当然,我们可以在子线程主函数thread_func再设置CPU亲缘性
 void *thread_func(void *param)

 {

     cpu_set_t cpu_mask;

     get_cpu_mask(, &cpu_mask);

     printf("Slave thread ");

     print_cpu_mask(cpu_mask);

     CPU_ZERO(&cpu_mask);

     CPU_SET(, &cpu_mask);

     CPU_SET(, &cpu_mask);

     set_cpu_mask(, &cpu_mask);

     get_cpu_mask(, &cpu_mask);

     printf("Slave thread ");

     print_cpu_mask(cpu_mask);

     for (;;)

     {

         ;

     }

 }
编译并运行:
是吧

我们发现只有有1号cpu的利用率为百分之百?这是因为线程的执行代码太简单了,只有一个空的循环,而且当前系统也很空闲,即便是分配了两个cpu,进程调度程序也根本就没去调度它,所以它就随机的在某一个cpu上固定的死耗。当然,如果有其它程序要使用cpu1,那么此种情况下demo就可能会被调度到cpu2上去执行。可以试试,开两个终端都执行demo,此时看到的情况就是这样了:

在上面调用sched_getaffinity和sched_setaffinity时,我们传递的第一个参数pid都为0,这意味着修改的亲缘性就是针对当前调用该函数的线程,这也是最方便的,大多数情况下都这么用,除非你确实想修改其它线程的cpu亲缘性。
还有另外相关接口,可以用来指定某个线程的CPU亲缘性:
 #define _GNU_SOURCE

 #include <pthread.h>

 int pthread_setaffinity_np(pthread_t thread, size_t cpusetsize, const cpu_set_t *cpuset);

 int pthread_getaffinity_np(pthread_t thread, size_t cpusetsize, cpu_set_t *cpuset);
在利用NPTL创建出来的线程代码里,为了更好的兼容性,建议使用pthread_getaffinity_np和pthread_setaffinity_np,此时第一个参数不能再传0,可改成pthread_self()即可。而在其它情况下,当然还是使用sched_getaffinity和sched_setaffinity。
 /**

  * FileName: affinity_demo.c

  */

 #define _GNU_SOURCE

 #include <stdint.h>

 #include <stdio.h>

 #include <sched.h>

 #include <pthread.h>

 #include <stdlib.h>

 static inline void print_cpu_mask(cpu_set_t cpu_mask)

 {

     unsigned char flag = ;

     printf("Cpu affinity is ");

     for (unsigned int i = ; i < sizeof(cpu_set_t); i ++)

     {

         if (CPU_ISSET(i, &cpu_mask))

         {

             if (flag == )

             {

                 flag = ;

                 printf("%d", i);

             }

             else

             {

                 printf(",%d", i);

             }

         }

     }

     printf(".\n");

 }

 static inline void get_cpu_mask(pthread_t tid, cpu_set_t *mask)

 {

     if (pthread_getaffinity_np(tid, sizeof(cpu_set_t), mask) == -)

     {

         perror("get cpu affinity failed.\n");

         abort();

     }

 }

 static inline void set_cpu_mask(pthread_t tid, cpu_set_t *mask)

 {

     if (pthread_setaffinity_np(tid, sizeof(cpu_set_t), mask) == -)

     {

         perror("set cpu affinity failed.\n");

         abort();

     }

 }

 void *thread_func(void *param)

 {

     cpu_set_t cpu_mask;

     get_cpu_mask(pthread_self(), &cpu_mask);

     printf("Slave thread ");

     print_cpu_mask(cpu_mask);

     CPU_ZERO(&cpu_mask);

     CPU_SET(, &cpu_mask);

     CPU_SET(, &cpu_mask);

     set_cpu_mask(pthread_self(), &cpu_mask);

     get_cpu_mask(pthread_self(), &cpu_mask);

     printf("Slave thread ");

     print_cpu_mask(cpu_mask);

     for (;;)

     {

         ;

     }

 }

 int main(int argc, char *argv[])

 {

     unsigned int active_cpu = ;

     cpu_set_t cpu_mask;

     pthread_t thread;

     get_cpu_mask(pthread_self(), &cpu_mask);

     print_cpu_mask(cpu_mask);

     CPU_ZERO(&cpu_mask);

     CPU_SET(active_cpu, &cpu_mask);

     set_cpu_mask(pthread_self(), &cpu_mask);

     get_cpu_mask(pthread_self(), &cpu_mask);

     printf("Master thread ");

     print_cpu_mask(cpu_mask);

     if (pthread_create(&thread, NULL, thread_func, NULL) != )

     {

         perror("pthread_create failed.\n");

     }

     pthread_join(thread, NULL);

     return ;

 }
备注
本文中有相当份量的内容参考借鉴了网络上各位网友的热心分享,特别是一些带有完全参考的文章,其后附带的链接内容更直接、更丰富,笔者只是做了一下归纳&转述,在此一并表示感谢。
参考
《生成CPU使用率 sin 曲线 控制cpu使用率 编程之美》
Linux CPU亲缘性详解的更多相关文章
- Linux dts 设备树详解(一) 基础知识
Linux dts 设备树详解(一) 基础知识 Linux dts 设备树详解(二) 动手编写设备树dts 文章目录 1 前言 2 概念 2.1 什么是设备树 dts(device tree)? 2. ...
- Linux下ps命令详解 Linux下ps命令的详细使用方法
http://www.jb51.net/LINUXjishu/56578.html Linux下的ps命令比较常用 Linux下ps命令详解Linux上进程有5种状态:1. 运行(正在运行或在运行队列 ...
- linux 开机启动过程详解
Linux开机执行内核后会启动init进程,该进程根据runlevel(如x)执行/etc/rcx.d/下的程序,其下的程序是符号链接,真正的程序放在/etc/init.d/下.开机启动的程序(服务等 ...
- Linux命令工具 top详解
Linux命令工具 top详解 top命令是Linux下常用的性能分析工具,能够实时显示系统中各个进程的资源占用状况,类似于Windows的任务管理器.top是一个动态显示过程,即可以通过用户按键来不 ...
- Linux开机启动程序详解
Linux开机启动程序详解我们假设大家已经熟悉其它操作系统的引导过程,了解硬件的自检引导步骤,就只从Linux操作系统的引导加载程序(对个人电脑而言通常是LILO)开始,介绍Linux开机引导的步骤. ...
- Linux开机启动程序详解[转]
Linux开机启动程序详解 我们假设大家已经熟悉其它操作系统的引导过程,了解硬件的自检引导步骤,就只从Linux操作系统的引导加载程序(对个人电脑而言通常是LILO)开始,介绍Linux开机引导的步骤 ...
- linux系统设置服务开机启动3种方法,Linux开机启动程序详解
linux系统设置服务开机启动 方法1:.利用ntsysv伪图形进行设置,利用root登陆 终端命令下输入ntsysv 回车:如下图 方法2:利用命令行chkconfig命令进行设置 简要说明 ...
- Linux内核异常处理体系结构详解(一)【转】
转自:http://www.techbulo.com/1841.html 2015年11月30日 ⁄ 基础知识 ⁄ 共 6653字 ⁄ 字号 小 中 大 ⁄ Linux内核异常处理体系结构详解(一)已 ...
- Linux下top命令详解
Linux下top命令详解 top命令是Linux下常用的性能分析工具,能够实时显示系统中各个进程的资源占用状况,类似于Windows的任务管理器.top是一个动态显示过程,即可以通过用户按键来不断刷 ...
随机推荐
- create tablespace 与 heap_insert 函数
先说 heap_insert 函数: /* * heap_insert - insert tuple into a heap * * The new tuple is stamped with cur ...
- Flex 自动获取焦点 监听全局键盘事件
在mxml里监听addedToStage事件 protected function application1_addedToStageHandler(event:Event):void { this. ...
- HT518V311
HT518V311.rar
- [AngularJS] Using AngularJS interceptors with $http
Sometimes you might need to modify HTTP requests and responses. This could be for a variety of reaso ...
- android学习日记19--四大组件之BroadcastReciver(广播接收者)
二.BroadcastReciver(广播接收者) 1.简述 BroadcastReciver位于android.content包下,主要用于对广播消息(Intent)的过滤并响应的控件.可以理解为全 ...
- C 二叉树
二叉树表示法 P127页 /* typedef struct BiTNode { int data; struct BiTNode *lchild, *rchild; }BiTNode, *BiTre ...
- [Effective C++ --023]宁以non-member、non-friend替换member函数
作者在这一节中花了大幅度的篇幅来介绍为什么最好使用non-member.non-friend函数. 思路如下: 场景:如果有一个class用来表示网页浏览器,那么清楚缓存及历史记录的时候,我们可能定义 ...
- excel vba 打印设置(转)
FROM: http://hi.baidu.com/kdlipm/blog/item/0897dd16ffc03e59f3de32ab.html PageSetup 函式就會記錄時, 設定的記錄三個部 ...
- 一、 Socket之UDP异步传输文件
用SCOKET 发送文件是一个不太好处理的问题,网上的例子也都是很简单的,我准备写一个比较完善的例子,这个就算是开始吧,以后的都会在这个例子的基础上进行修改,准备实现多线程传输.断点传输和文件传输的完 ...
- Asp.Net 5使用Area及自定义Area
Asp.Net Mvc里有一个叫做Area的技术,就是可以把不同逻辑组件的controller, view等放到不同的文件夹里.比如所有管理相关的都放到Admin area里.其实之前我一直对这个功能 ...