Instant Buy Android API Tutorial
转自:https://developers.google.com/wallet/instant-buy/android/tutorial
This tutorial guides you through integrating Instant Buy into a purchase flow, in the context of an example bike store. The tutorial provides details and complete source code to help you complete the the integration steps summarized in the integration overview, with the end goal of reproducing a flow similar to the Instant Buy API Process Flow. If you'd like to review the sample app first, you can download the APK file.
A significant portion of the Instant Buy API's functionality is provided as part of Google Play Services, the core services for developing on Android. For the purposes of this tutorial, we'll assume that you are familiar with the basic concepts and skills of application development for the Android platform. If you need to learn about Android development before getting started, work through some lessons in the Training for Android Developers.
Note: With the integration described here, merchants can process payments using their existing payment infrastructure. If you are looking for a solution where Google processes payments for you, use the Android In-App Billing SDK.
Contents
- Set up the tutorial
- About WalletFragment
- Create a masked wallet request
- Add a Buy with Google button and request the masked wallet
- Confirm the purchase and set the masked wallet
- Request the full wallet
- Initialize the Google API client
- Retrieve the full wallet
- Notify Google Wallet of your Transaction Processing
- Handle errors
- Enable Wallet optimization in your manifest
Set up the tutorial
To get started with this tutorial, create a client ID for your project, download and review the source code, and set up Google Play services.
Obtain credentials and a client ID for your app
To access the Instant Buy Android API, you'll need to obtain a client ID for OAuth 2.0 authorization in the Google Developers Console. The client ID is generated automatically when you register your app.. You'll also need the SHA1 fingerprint in your developer's key to generate a client ID.
- Go to the Google Developers Console.
- Select a project, or create a new one.
- In the sidebar on the left, select APIs & auth.
- In the sidebar on the left, select Credentials.
- To register your certificate, you need to get the certificate's SHA1 fingerprint, by switching to a terminal window and running the the Keytool utility:
keytool -exportcert -alias androiddebugkey -keystore path_to_debug_or_production_keystore -list -v
Note: For Eclipse, the debug keystore is typically located at
~/.android/debug.keystore.For the debug keystore, the password is android.
The Keytool prints the fingerprint to the shell. For example:
$ keytool -exportcert -alias androiddebugkey -keystore ~/.android/debug.keystore -list -v

Enter keystore password: Type "android" if using debug.keystore

Alias name: androiddebugkey

Creation date: Aug ,

Entry type: PrivateKeyEntry

Certificate chain length:

Certificate[]:

Owner: CN=Android Debug, O=Android, C=US

Issuer: CN=Android Debug, O=Android, C=US

Serial number: 503bd581

Valid from: Mon Aug  :: PDT  until: Wed Aug  :: PDT

Certificate fingerprints:

   MD5:  1B:2B:2D::E1:CE::8B:A0:F0:::3C:A3::DD

   SHA1: D8:AA::::EE:C5:::6A::EE:1C::8E:F4:F0:C8::C8

   SHA256: F3:6F:::9A:DF:C3::4E::4B:0F::E3:3C:6A:A0::DC:0A:3F:B2:D2:E1:FE:::F5:EB:AC::

   Signature algorithm name: SHA1withRSA

   Version:
Copy the SHA1 fingerprint, which is highlighted in the example above.
Important: When you prepare to release your app to your users, you will follow these steps again and create a new OAuth 2.0 client ID for your production app. For production apps, you will use your own private key to sign the production app's .apk file. For more information, see Signing your applications.
- Back in the Console, do the following:
- Click Create New Client ID.
- Select Installed application and Android.
- In the Package name field, enter your Android's app's package name.
- Paste the SHA1 fingerprint into the Signing certificate fingerprint text box.
- Click Create Client ID.
Note: You'll need to create two separate sets of OAuth 2.0 credentials: one set for developing and testing in the sandbox, and another set when you go to production.
Set up the sample and Google Play Services
Follow these setup instructions to import both the Google Play Services library as well as the Google Wallet Instant Buy sample. You can find the sample at android-sdk/extras/google/google_play_services/samples/wallet. If you don't already have it, you'll need to get the Android SDK.
About WalletFragment
This tutorial demonstrates typical usage of the WalletFragment class. The Instant Buy Android API provides this class to handle user events and to automate key parts of the purchase lifecycle. As illustrated in this tutorial and sample, an app would typically use instances of the wallet fragment class in two key areas of the purchase flow:
- A purchase fragment (defined by
WalletFragmentMode.BUY_BUTTON), which displays a Buy with Google button and sets a masked wallet request to send to Google Wallet. - A confirmation fragment (defined by
WalletFragmentMode.SELECTION_DETAILS) , which displays "change" buttons to let users optionally modify the masked wallet, and sets the masked wallet.
Note: Though this tutorial invokes the the wallet fragment programatically, you also can add it to an activity layout via XML. For more information, see WalletFragment.
The final calls for loading the full wallet are not included in the automated functionality of the WalletFragment class. Instead, these calls are encapsulated in the FullWalletConfirmationButtonFragment class of the sample app. Relevant calls are described in detail in Retrieve the Full Wallet.
Create a masked wallet request
You'll need to create an instance of MaskedWalletRequest to invoke the Instant Buy Android API to retrieve the masked wallet information (such as shipping address, masked backing instrument number, and cart items). The MaskedWalletRequest object must be passed in when you initialize the purchase wallet fragement in the next section.
At this point, you won't have the user's chosen shipping address, so you'll need to create an estimate of the shipping costs and tax. If you set the shopping cart as shown below (highly recommended), make sure the cart total matches the sum of the line items added to the cart.
Currently, InstantBuy does not support non-US transactions. The only valid value for currencyCode is CURRENCY_CODE_USD.
Here is an example of creating the masked wallet request using the builder pattern:
MaskedWalletRequest maskedWalletRequest =

  MaskedWalletRequest.newBuilder()

  .setMerchantName(Constants.MERCHANT_NAME)

  .setPhoneNumberRequired(true)

  .setShippingAddressRequired(true)

  .setCurrencyCode("USD")

  .setShouldRetrieveWalletObjects(true)

  .setCart(Cart.newBuilder()

      .setCurrencyCode(Constants.CURRENCY_CODE_USD)

      .setTotalPrice("150.00")

      .addLineItem(LineItem.newBuilder()

              .setCurrencyCode(Constants.CURRENCY_CODE_USD)

              .setDescription(itemInfo.name)

              .setQuantity("1")

              .setUnitPrice(toDollars(context, itemInfo.priceMicros))

              .setTotalPrice("130.00")

              .build())

      .addLineItem(LineItem.newBuilder()

              .setCurrencyCode(Constants.CURRENCY_CODE_USD)

              .setDescription(Constants.DESCRIPTION_LINE_ITEM_SHIPPING)

              .setRole(LineItem.Role.SHIPPING)

              .setTotalPrice("13.00")

              .build())

      .addLineItem(LineItem.newBuilder()

              .setCurrencyCode(Constants.CURRENCY_CODE_USD)

              .setDescription(Constants.DESCRIPTION_LINE_ITEM_TAX)

              .setRole(LineItem.Role.TAX)

              .setTotalPrice("7.00")

              .build())

      .build())

  .setEstimatedTotalPrice("150.00")

  .build();
This masked wallet object is the first parameter taken by the loadMaskedWallet call described in the next section.
Note: In this step, you're requesting just the masked information and not the actual credit card information. The total amount in this request is the order amount exclusive of tax and shipping.
Add a Buy with Google button and request the masked wallet
Next, construct an instance of WalletFragment to add to your checkout activity. This fragment, when configured in BUY_BUTTON mode with the appropriate button text as shown below, displays the Buy with Google button and handles click events for your app:
private void createAndAddWalletFragment() {

    WalletFragmentStyle walletFragmentStyle = new WalletFragmentStyle()

            .setBuyButtonText(BuyButtonText.BUY_WITH_GOOGLE)

            .setBuyButtonWidth(Dimension.MATCH_PARENT);

    WalletFragmentOptions walletFragmentOptions = WalletFragmentOptions.newBuilder()

            .setEnvironment(WalletConstants.ENVIRONMENT_SANDBOX)

            .setFragmentStyle(walletFragmentStyle)

            .setTheme(WalletConstants.THEME_HOLO_LIGHT)

            .setMode(WalletFragmentMode.BUY_BUTTON)

            .build();

    mWalletFragment = SupportWalletFragment.newInstance(walletFragmentOptions);
When you initialize the purchase fragment, pass in the maskedWalletRequest that you created in the previous step, as well as the code REQUEST_CODE_MASKED_WALLET used to uniquely identify this call in the onActivityResult() callback:
String accountName = ((BikestoreApplication) getApplication()).getAccountName();

  MaskedWalletRequest maskedWalletRequest =

          WalletUtil.createMaskedWalletRequest(Constants.ITEMS_FOR_SALE[mItemId]);

  WalletFragmentInitParams.Builder startParamsBuilder = WalletFragmentInitParams.newBuilder()

          .setMaskedWalletRequest(maskedWalletRequest)

          .setMaskedWalletRequestCode(REQUEST_CODE_MASKED_WALLET)

          .setAccountName(accountName);

  mWalletFragment.initialize(startParamsBuilder.build());

  // add Wallet fragment to the UI

  getSupportFragmentManager().beginTransaction()

          .replace(R.id.dynamic_wallet_button_fragment, mWalletFragment)

          .commit();
When the user clicks the buy button, the masked wallet is retrieved and returned in the onActivityResult of the enclosing activity as shown below. If the user has not preauthorized this app to retrieve Wallet information, Google Wallet presents a chooser dialog, handles preauthorization, and returns control to the app.
@Override

public void onActivityResult(int requestCode, int resultCode, Intent data) {

    // retrieve the error code, if available

    int errorCode = -1;

    if (data != null) {

        errorCode = data.getIntExtra(WalletConstants.EXTRA_ERROR_CODE, -1);

    }

    switch (requestCode) {

        case REQUEST_CODE_MASKED_WALLET:

            switch (resultCode) {

                case Activity.RESULT_OK:

                    MaskedWallet maskedWallet =

                            data.getParcelableExtra(WalletConstants.EXTRA_MASKED_WALLET);

                    launchConfirmationPage(maskedWallet);

                    break;

                case Activity.RESULT_CANCELED:

                    break;

                default:

                    handleError(errorCode);

                    break;

            }

            break;
Confirm the purchase and set the masked wallet
After the app obtains the masked wallet, it should present a confirmation page showing the total cost of the items purchased in the transaction. To do this, construct an instance of WalletFragment in Mode.SELECTION_DETAILS as shown:
WalletFragmentStyle walletFragmentStyle = new WalletFragmentStyle()

        .setMaskedWalletDetailsTextAppearance(

                R.style.BikestoreWalletFragmentDetailsTextAppearance)

        .setMaskedWalletDetailsHeaderTextAppearance(

                R.style.BikestoreWalletFragmentDetailsHeaderTextAppearance)

        .setMaskedWalletDetailsBackgroundColor(

                getResources().getColor(R.color.bikestore_white))

        .setMaskedWalletDetailsButtonBackgroundResource(

                R.drawable.bikestore_btn_default_holo_light)

        .setMaskedWalletDetailsLogoTextColor(

                getResources().getColor(R.color.wallet_dark_grey));

WalletFragmentOptions walletFragmentOptions = WalletFragmentOptions.newBuilder()

        .setEnvironment(WalletConstants.ENVIRONMENT_SANDBOX)

        .setFragmentStyle(walletFragmentStyle)

        .setTheme(WalletConstants.THEME_HOLO_LIGHT)

        .setMode(WalletFragmentMode.SELECTION_DETAILS)

        .build();

mWalletFragment = SupportWalletFragment.newInstance(walletFragmentOptions);
Note that this method also sets a number of WalletFragmentStyleoptions controlling the appearance of the following screen:
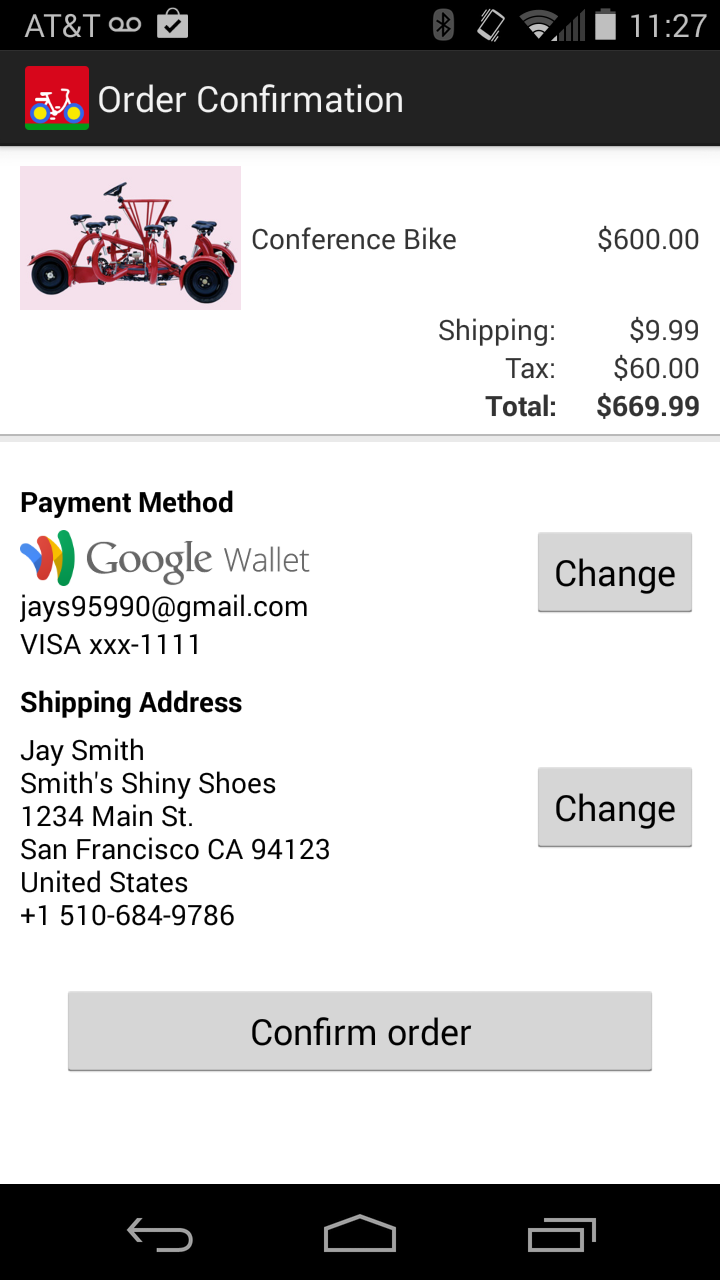
At this point the app has the shipping address and billing address, so it can calculate exact total purchase price and display it. This activity also allows the user to change the Google Wallet payment instrument and change the shipping address for the purchase.
The “Change” buttons are particularly important for preauthorized users, who proceed directly to this confirmation page when they click the Buy with Google button. If the user clicks a “Change” button, the fragment returns a new masked wallet in onActivityResult of the enclosing activity.
Request the full wallet
When the user confirms the order, you are ready to request the full wallet. The full wallet Request should have the total charge that you are requesting including exact shipping, handling and tax. You must include the GoogleTransactionId that you received in the masked wallet response.
Create a FullWalletRequest object that contains the various line items (including tax and shipping if necessary) and a Cart object.
FullWalletRequest fullWalletRequest = FullWalletRequest.newBuilder()

  .setGoogleTransactionId(googleTransactionId)

  .setCart(Cart.newBuilder()

          .setCurrencyCode(Constants.CURRENCY_CODE_USD)

          .setTotalPrice(toDollars(context, itemInfo.getTotalPrice()))

          .addLineItem(LineItem.newBuilder()

                  .setCurrencyCode(Constants.CURRENCY_CODE_USD)

                  .setDescription(itemInfo.name)

                  .setQuantity("1")

                  .setUnitPrice(toDollars(context, itemInfo.priceMicros))

                  .setTotalPrice(toDollars(context, itemInfo.priceMicros))

                  .build())

          .addLineItem(LineItem.newBuilder()

                  .setCurrencyCode(Constants.CURRENCY_CODE_USD)

                  .setDescription(Constants.DESCRIPTION_LINE_ITEM_SHIPPING)

                  .setRole(LineItem.Role.SHIPPING)

                  .setTotalPrice(toDollars(context, itemInfo.shippingPriceMicros))

                  .build())

          .addLineItem(LineItem.newBuilder()

                  .setCurrencyCode(Constants.CURRENCY_CODE_USD)

                  .setDescription(Constants.DESCRIPTION_LINE_ITEM_TAX)

                  .setRole(LineItem.Role.TAX)

                  .setTotalPrice(toDollars(context, itemInfo.taxMicros))

                  .build())

          .build())

  .build();
Currently, InstantBuy does not support non-US transactions. The only valid value for currencyCode is CURRENCY_CODE_USD.
Initialize the Google API client
The GoogleApiClient object wraps a ServiceConnection to Google Play services and is used to communicate with the Instant Buy API. Though it is not required when working with WalletFragment, you'll need to initialize it to retrieve the full wallet.
The GoogleApiClient becomes functional after the asynchronous connection has been established with the service, indicating that:
- Google Play services is running on the device and your
Activitysuccessfully bound the service connection, - the user has selected an account that they wish to use with your app, and
- the user's account has granted the permissions that your app is requesting.
The following code snippet (from a fragment) illustrates how to instantiate a Google API client for your Instant Buy app and then connect:
@Override

public void onCreate(Bundle savedInstanceState) {

    super.onCreate(savedInstanceState);

    ...

mGoogleApiClient = new GoogleApiClient.Builder(getActivity())

        .addConnectionCallbacks(this)

        .addOnConnectionFailedListener(this)

        .setAccountName(accountName)

        .addApi(Wallet.API, new Wallet.WalletOptions.Builder()

            .setEnvironment(Constants.WALLET_ENVIRONMENT)

            .setTheme(WalletConstants.THEME_HOLO_LIGHT)

            .build())

        .build();

      ...

@Override

public void onStart() {

    super.onStart();

    // Connect to Google Play Services

    mGoogleApiClient.connect();

}
Environmentis a parameter in WalletOptions whose value indicates the environment (production or sandbox) in which the server supporting the app is running. Its value may beWalletConstants.ENVIRONMENT_PRODUCTIONorWalletConstants.ENVIRONMENT_SANDBOXFor testing and development always use only the sandbox environment.Themeis anotherWalletOptionsparameter to set the UI theme for the app. A value ofWalletConstants.THEME_HOLO_LIGHToptionally sets a light UI theme instead of the default dark theme (WalletConstants.THEME_HOLO_DARK).accountNameis an optional string containing the Google account name (email address).connectionCallBacksis an object that implements the interfacecom.google.android.gms.common.GooglePlayServicesClient.ConnectionCallbacks. Android calls theonActivityResultmethod of the object to notify the app when it connects and disconnects with Google Play Services.OnconnectionFailedListeneris an object that implements the interfacecom.google.android.gms.common.GooglePlayServicesClient.OnConnectionFailedListener. Android calls theonActivityResultmethod of the object to notify the app of a failed attempt to connect with Google Play Services.
This call results in a callback to one of two methods: OnConnectionCallbackListener.onConnected if the connection succeeded, or OnConnectionFailedListener.onConnectionFailed if the connection failed. The callback receives an error code which describes the reason for the failure.
Retrieve the full wallet
Once you have constructed the full wallet request instance, call the loadFullWallet method. When the full wallet request is completed, Google calls the onActivityResult method, passing the intent result.
private void getFullWallet() {

    Wallet.Payments.loadFullWallet(mGoogleApiClient,

            WalletUtil.createFullWalletRequest(mItemInfo,

                    mMaskedWallet.getGoogleTransactionId()),

            REQUEST_CODE_RESOLVE_LOAD_FULL_WALLET);

...

public void onActivityResult(int requestCode, int resultCode, Intent data) {

    mProgressDialog.hide();

    int errorCode = -1;

    if (data != null) {

        errorCode = data.getIntExtra(WalletConstants.EXTRA_ERROR_CODE, -1);

    }

    switch (requestCode) {

        case REQUEST_CODE_RESOLVE_ERR:

            if (resultCode == Activity.RESULT_OK) {

                mGoogleApiClient.connect();

            } else {

                handleUnrecoverableGoogleWalletError(errorCode);

            }

            break;

        case REQUEST_CODE_RESOLVE_LOAD_FULL_WALLET:

            switch (resultCode) {

                case Activity.RESULT_OK:

                    if (data.hasExtra(WalletConstants.EXTRA_FULL_WALLET)) {

                        FullWallet fullWallet =

                                data.getParcelableExtra(WalletConstants.EXTRA_FULL_WALLET);

                        fetchTransactionStatus(fullWallet);
Once you have retrieved the full wallet in the onActivityResult() callback, you have enough information to proceed to payment processing for this transaction. The ProxyCard is a valid payment card, except it is distinct from the user’s actual payment instrument in Google Wallet. You can access the details in the ProxyCard from the full wallet as shown below:
String accountNumber  =  fullWallet.getProxyCard().getPan();

String securityCvv  = fullWallet.getProxyCard().getCvn();

int expirationYear = fullWallet.getExpirationYear();

int expirationMonth = fullWallet.getExpirationMonth();

Address billingAddress = fullWallet.getBillingAddress();

Address shippingAddress = fullWallet.getShippingAddress();
With this, you can charge this card in the amount that you requested in the full wallet request, just as you would charge any other credit card received in your app in non Google Wallet flow.
Notify Google Wallet of your Transaction Processing
Once you have obtained the payment instrument information from the ProxyCard and processed the payment, notify Google Wallet of the success or failure of the payment. Based on the response from your server, create the NotifyTransactionStatusRequest object.
Wallet.Payments.notifyTransactionStatus(mGoogleApiClient,

        WalletUtil.createNotifyTransactionStatusRequest(fullWallet.getGoogleTransactionId(),

                NotifyTransactionStatusRequest.Status.SUCCESS));
Note: Make sure to send the transaction status in real time, only when the payment is actually processed. In special use cases with deferred processing, don't send the status until you have completed payment processing.
Finally, you may want to clean up by calling the Google API Client’s disconnect method. This is typically done in the onStop() method of your Activity.
@Override

public void onStop() {

  super.onStop();

  mGoogleApiClient.disconnect();

}
Handle errors
Since a typical activity or fragment can call multiple Google API methods, it's advisable to have a common code block in onActivityResult()that fetches error codes.
    int errorCode = -1;

    if (data != null) {

        errorCode = data.getIntExtra(

            WalletConstants.EXTRA_ERROR_CODE, -1);

    }
After you fetch the codes, you can handle errors in the default block of a switch/case statement by calling handleError(errorCode):
void handleError(int errorCode) {

    switch (errorCode) {

        case WalletConstants.ERROR_CODE_SPENDING_LIMIT_EXCEEDED:

            Toast.makeText(getActivity(),

                    getString(R.string.spending_limit_exceeded, errorCode),

                    Toast.LENGTH_LONG).show();

            break;

        case WalletConstants.ERROR_CODE_INVALID_PARAMETERS:

        case WalletConstants.ERROR_CODE_AUTHENTICATION_FAILURE:

        case WalletConstants.ERROR_CODE_BUYER_ACCOUNT_ERROR:

        case WalletConstants.ERROR_CODE_MERCHANT_ACCOUNT_ERROR:

        case WalletConstants.ERROR_CODE_SERVICE_UNAVAILABLE:

        case WalletConstants.ERROR_CODE_UNSUPPORTED_API_VERSION:

        case WalletConstants.ERROR_CODE_UNKNOWN:

        default:

            // unrecoverable error

            mGoogleWalletDisabled = true;

            displayGoogleWalletErrorToast(errorCode);

            break;

    }

}
You can augment this implementation to handle your app's specific needs. For example, if you support multiple payment methods, you can choose to use another payment method for unrecoverable errors.
Enable Wallet optimization in your manifest
You can greatly improve your users' first-time experience by enabling Wallet optimization in your app manifest. This option signals to Google Play Services that your app uses Google Wallet, which can then perform optimizations when the user first launches your app.
To enable Wallet optimization, add the following broadcast receiver to your app manifest:
    <receiver

        android:name="com.google.android.gms.wallet.EnableWalletOptimizationReceiver"

        android:exported="false">

        <intent-filter>

            <action android:name="com.google.android.gms.wallet.ENABLE_WALLET_OPTIMIZATION" />

        </intent-filter>

    </receiver>
Enabling Wallet optimization is optional, but highly recommended for its enhancement of performance and user experience for your app.
Instant Buy Android API Tutorial的更多相关文章
- 【译】Android API 规范
[译]Android API 规范 译者按: 修改R代码遇到Lint tool的报错,搜到了这篇文档,aosp仓库地址:Android API Guidelines. 58e9b5f Project ...
- Android 如何在Eclipse中查看Android API源码 及 support包源码
当我们阅读android API开发文档时候,上面的每个类,以及类的各个方法都是已经写好的方法和控件,可是我们只是在搬来使用,不知道它的原理,它是如何被实现的.android系统是开源的,所以谷歌官方 ...
- 搜索 录音功能 Android api
搜索 录音功能 Android api http://www.oschina.net/android/47/ http://m.blog.csdn.net/blog/u011309801/406523 ...
- Android API Guides 学习笔记---Application Fundamentals(一)
今天开始学习google官网上的API guides ,主要读了Application Fundamentals这一章节,此章节介绍了一个App的基本组成,共包括四大部分内容. 1. App ...
- 【Android Api 翻译3】android api 完整翻译之Application Fundamentals (学习android必须知道的)
Android应用程序是用Java编程语言编写的.Android SDK工具把应用程序的代码.数据和资源文件一起编译到一个Android程序包中(这个程序包是以.apk为后缀的归档文件),一个Andr ...
- 【Android Api 翻译1】Android Texting(2)Testing Fundamentals 测试基础篇
Testing Fundamentals The Android testing framework, an integral part of the development environment, ...
- Xamarin.Android 入门之:Android API版本设置
一.引言 Xamarin.Android有几个Android API级别设置,确定多个版本的Android应用程序的兼容性.本博客解释了这些设置意味着什么,如何配置它们,以及它们在运行时对您的应用程序 ...
- 【转】Android 如何在Eclipse中查看Android API源码 及 support包源码
原文网址:http://blog.csdn.net/vipzjyno1/article/details/22954775 当我们阅读android API开发文档时候,上面的每个类,以及类的各个方法都 ...
- Android 编程下 java.lang.NoClassDefFoundError: cn.jpush.android.api.JPushInterface 报错
使用了极光推送的 jar 包项目在从 SVN 中检出后,假设不又一次对 jar 包和 Bulid Path 进行配置就会抛出 java.lang.NoClassDefFoundError: cn.jp ...
随机推荐
- MyEclipse8.5注册码 到2015年
Subscriber: onechenProduct ID: E3MP (MyEclipse Professional Subscription)License version: 3.0Full Ma ...
- Linux获取时间日期方法
linux中用shell获取昨天.明天或多天前的日期:在Linux中对man date -d 参数说的比较模糊,以下举例进一步说明:# -d, --date=STRING display time d ...
- Monitor traffic to localhost from IE or .NET
原文:http://docs.telerik.com/fiddler/Configure-Fiddler/Tasks/MonitorLocalTraffic Monitor traffic to lo ...
- python 映射列表 学习
列表映射是个非常有用的方法,通过对列表的每个元素应用一个函数来转换数据,可以使用一种策略或者方法来遍历计算每个元素. 例如: ? 1 2 3 4 5 6 7 8 9 10 11 12 13 14 15 ...
- php 高效分页
mysql.php 获取数据库中的记录,完全个人经验总结,仅供参考!<?php/***PHP+MYSQL数据库基本功能*http://blog.csdn.net/yown*/########## ...
- Delphi 延迟函数 比sleep 要好的多
转自:http://www.cnblogs.com/Bung/archive/2011/05/17/2048867.html //延迟函数:方法一 procedure delay(msecs:inte ...
- Bluebird-Collections
Promise实例方法和Promise类核心静态方法用于处理promise或者混合型(mixed)promise和值的集合. 所有的集合实例方法都等效于Promise对象中的静态方法,例如:someP ...
- Hadoop概述
本章内容 什么是Hadoop Hadoop项目及其结构 Hadoop的体系结构 Hadoop与分布式开发 Hadoop计算模型—MapReduce Hadoop的数据管理 小结 1.1 什么是Hado ...
- HDU ACM 3177 Crixalis's Equipment
Crixalis's Equipment Time Limit: 2000/1000 MS (Java/Others) Memory Limit: 32768/32768 K (Java/Oth ...
- SCAU 10690 分面包
10690 分面包 时间限制:1000MS 内存限制:65535K 题型: 编程题 语言: 无限制 Description 在大一的时候,XCC还在stu union打酱油~~~~和十三还有奶子 ...