分布式FastDfs+nginx缓存高可用集群构建
介绍:
FastDFS:开源的高性能分布式文件系统;主要功能包括:文件存储,文件同步和文件访问,以及高容量和负载平衡
FastDFS:角色:跟踪服务器(Tracker Server)、存储服务器(Storage Server)和客户端(Client)
- Tracker Server: 跟踪服务器,主要做调度工作,起到均衡的作用;负责管理所有的storage server和group,每个storage在启动后会连接 Tracker,告知自己所属 group 等信息,并保持周期性心跳。多个Tracker之间是对等关系,不存在单点故障
- Storage Server: 存储服务器,主要提供容量和备份服务;以 group 为单位,每个 group 内可以有多台 storage server(高可用),组内的storage server上的数据互为备份
- Client:客户端,上传下载数据的服务器
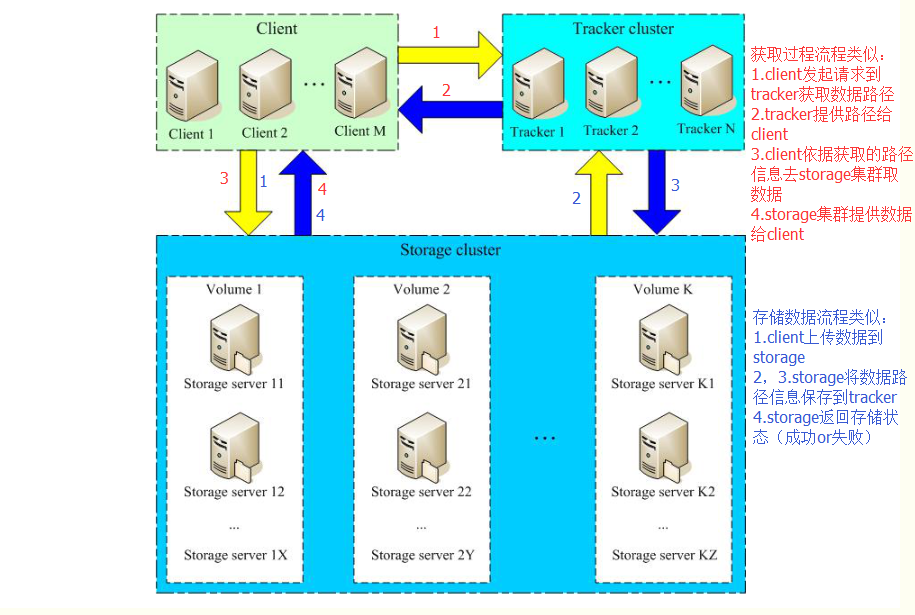
FastDfs+nginx缓存高可用集群环境流程示意图:
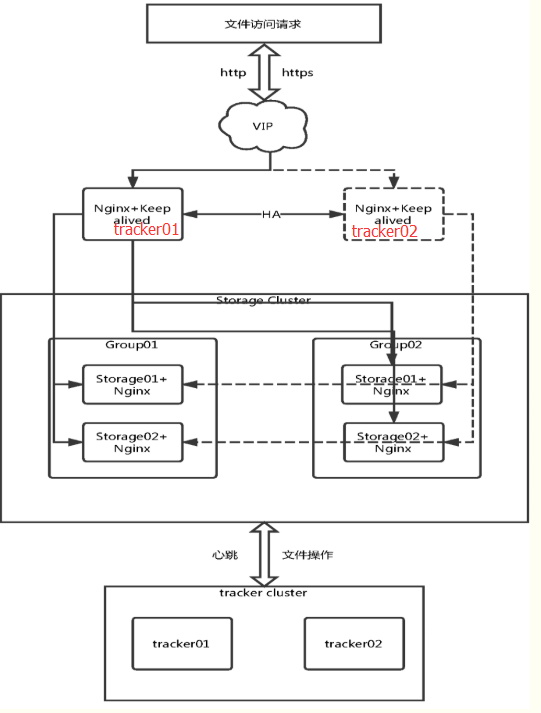
实验环境机器说明:
| 机器名称 | IP地址 | 应用 | 说明 |
| tracker01、nginx01 | 192.168.109.137 | FastDFS,libfastcommon,nginx,keepalived | CentOS Linux release 7.6.1810 (Core) |
| tracker02、nginx02 | 192.168.109.138 | FastDFS,libfastcommon,nginx,keepalived | CentOS Linux release 7.6.1810 (Core) |
| storage01_group01 | 192.168.109.139 | FastDFS,libfastcommon,nginx,fastdfs-nginx-module | CentOS Linux release 7.6.1810 (Core) |
| storage02_group01 | 192.168.109.140 | FastDFS,libfastcommon,nginx,fastdfs-nginx-module | CentOS Linux release 7.6.1810 (Core) |
| storage03_group02 | 192.168.109.141 | FastDFS,libfastcommon,nginx,fastdfs-nginx-module | CentOS Linux release 7.6.1810 (Core) |
| storage04_group02 | 192.168.109.142 | FastDFS,libfastcommon,nginx,fastdfs-nginx-module | CentOS Linux release 7.6.1810 (Core) |
| VIP | 192.168.109.143 | 无 | 无 |
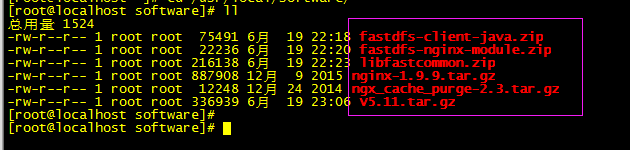
软件需求:
部署流程:
参考:
FastDFS官方网站:https://sourceforge.net/projects/fastdfs/ (Last Update: 2016-02-04)
下载地址:https://github.com/happyfish100/fastdfs/releases
6台机器共同操作部分:
mkdir -p /usr/local/software
cd /usr/local/software
wget https://github.com/happyfish100/fastdfs/archive/V5.11.tar.gz
wget https://github.com/happyfish100/fastdfs-client-java/archive/master.zip
mv master.zip fastdfs-client-java.zip
wget https://github.com/happyfish100/fastdfs-nginx-module/archive/master.zip
mv master.zip fastdfs-nginx-module.zip
wget https://github.com/happyfish100/libfastcommon/archive/master.zip
mv master.zip libfastcommon.zip
wget http://nginx.org/download/nginx-1.9.9.tar.gz
安装gcc:
yum -y install make cmake gcc gcc-c++
安装 libfastcommon:
解压到/usr/local/fast/
unzip libfastcommon.zip -d /usr/local/fast/
编译、安装
cd /usr/local/fast/libfastcommon-master
./make.sh
./make.sh install

进行软件创建,FastDFS主程序设置的目录为/usr/local/lib/,所以我们需要创建/usr/lib64/下的一些核心执行程序软链接文件
ln -s /usr/lib64/libfastcommon.so /usr/local/lib/libfastcommon.so
忽略浅色(自行查看校验)
ln -s /usr/lib64/libfastcommon.so /usr/lib/libfastcommon.so 已存在
ln -s /usr/lib64/libfdfsclient.so /usr/local/lib/libfdfsclient.so 没有这个文件
ln -s /usr/lib64/libfdfsclient.so /usr/lib/libfdfsclient.so 没有这个文件

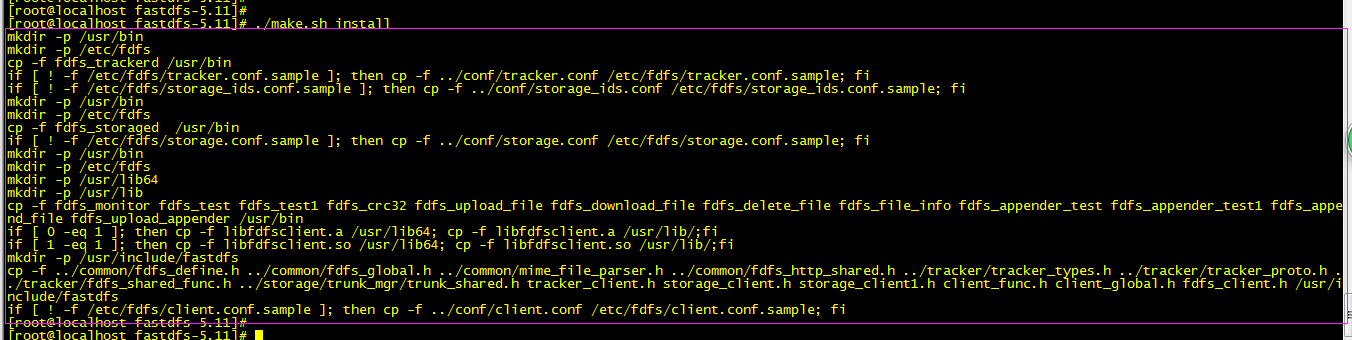
安装 FastDFS:
tar -zxf V5.11.tar.gz -C /usr/local/fast/
cd /usr/local/fast/fastdfs-5.11
./make.sh
./make.sh install
cp -f ./conf/client.conf /etc/fdfs/
忽略,我当前版本脚本环境正确,有些版本可能需要更改,自行查看
因为 FastDFS 服务脚本设置的bin目录为 /usr/local/bin/下,实际安装在/usr/bin/下面,所以需要修改配置文件中路径
vim /etc/init.d/fdfs_storaged
进行全局替换: %s+/usr/local/bin+/usr/bin
vim /etc/init.d/fdfs_trackerd
进行全局替换: %s+/usr/local/bin+/usr/bin
以下是部分单独操作:
tracker server:(192.168.109.137;192.168.109.138)
修改配置文件::
cd /etc/fdfs/
cp tracker.conf.sample tracker.conf
vim tracker.conf
修改为自己的路径地址:base_path=/fastdfs/tracker
store_lookup=2 实验可以改为0轮询,(0轮询,1指定上传组,2负载均衡选择要上载文件的最大空闲空间组)
生成中绑定IP地址(bind_addr=)
创建:mkdir -pv /fastdfs/tracker
启动跟踪器:/etc/init.d/fdfs_trackerd start
tail -f /fastdfs/tracker/logs/trackerd.log

以下是部分单独操作:
storage server:(192.168.109.139;192.168.109.140; 和 192.168.109.141;192.168.109.142;)
修改配置文件:
cd /etc/fdfs/
cp storage.conf.sample storage.conf
vim storage.conf
disabled=false #启用配置文件
group_name=group1 #4台机器分成2组(group1:192.168.109.139,140和group2:192.168.109.141,142)
port=23000 #storage 端口号,同一个组的 storage 端口号必须一致
base_path=/fastdfs/storage #设置 storage 的日志目录
store_path_count=1 #默认就为1,(存储路径个数,需要和 store_path个数匹配)
store_path0=/fastdfs/storage #设置存储路径
tracker_server=192.168.109.137:22122 #tracker 服务的IP和端口,多个就添加多条记录,如下一条
tracker_server=192.168.109.138:22122
http.server_port=8888 #设置http端口号
创建目录:mkdir -pv /fastdfs/storage
我们这个4台机器分成2组(group1:192.168.109.139,140和group2:192.168.109.141,142)配置文件组名注意下
启动 storage:
/etc/init.d/fdfs_storaged start
tail -f /fastdfs/storage/logs/storaged.log
至此FastDFS集群已经可以使用但不支持http
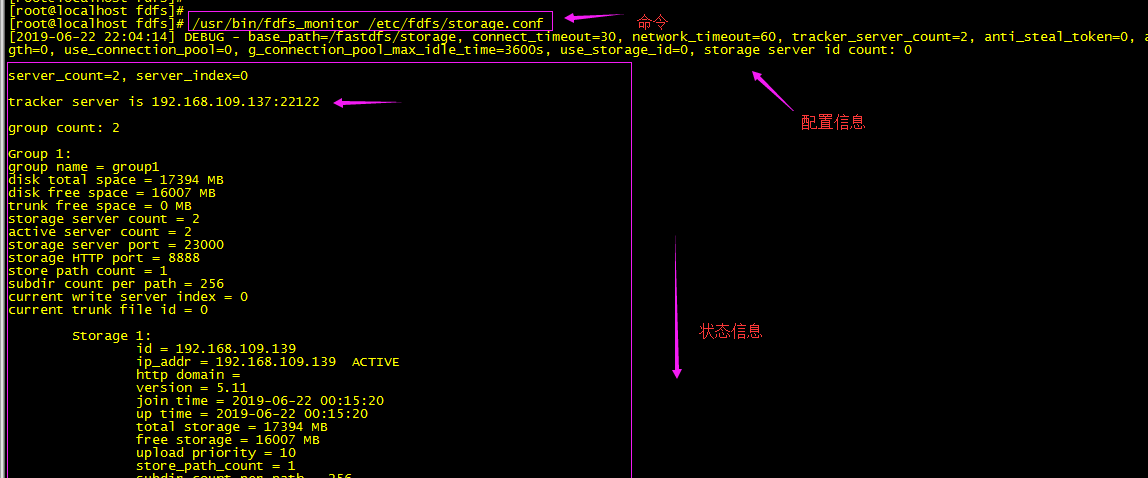
查看集群配置信息:
命令(任意一台storage服务器上执行):/usr/bin/fdfs_monitor /etc/fdfs/storage.conf
6台中可以随意找一台做客户端测试下:修改客户端配置文件
vim /etc/fdfs/client.conf 修改如下地方:
base_path=/fastdfs/tracker #tracker服务器文件路径
tracker_server=192.168.109.137:22122 #tracker服务器IP地址和端口号
tracker_server=192.168.109.138:22122
http.tracker_server_port=8888 # tracker 服务器的 http端口号,必须和tracker的设置对应起来
/usr/bin/fdfs_upload_file /etc/fdfs/client.conf /home/111/1.jpg #你上传的图片路径(linux上的)
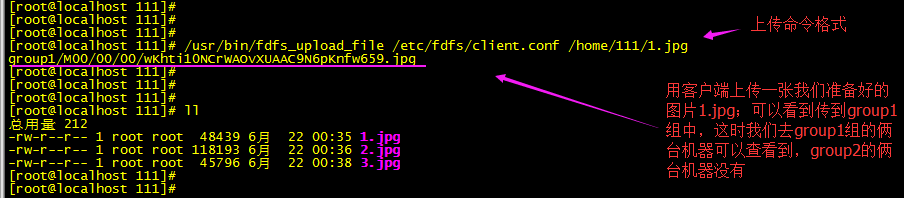
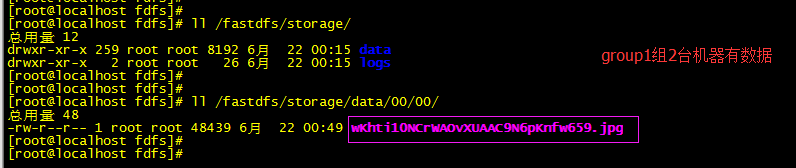
查看:

多传几次可以看到上面设置的轮询效果
配置FastDFS集群支持http
支持http请求,安装nginx(4个storage节点安装nginx,首先安装fastdfs-nginx-module,fastdfs与nginx集成模块)
cd /usr/local/software/
unzip fastdfs-nginx-module.zip -d /usr/local/fast/
安装前先修改路径,如下
cd /usr/local/fast/fastdfs-nginx-module-master/src
修改:vim /usr/local/fast/fastdfs-nginx-module-master/src/config 修改是为nginx能编译进这个第三方模块,具体修改我们先看下nginx编译安装报错信息
依懒
yum -y install pcre pcre-devel
yum -y install zlib zlib-devel
yum -y install openssl openssl-devel
cd /usr/local/software
tar -zxf nginx-1.9.9.tar.gz -C /usr/local/
cd /usr/local/nginx-1.9.9
./configure --add-module=/usr/local/fast/fastdfs-nginx-module-master/src/
make
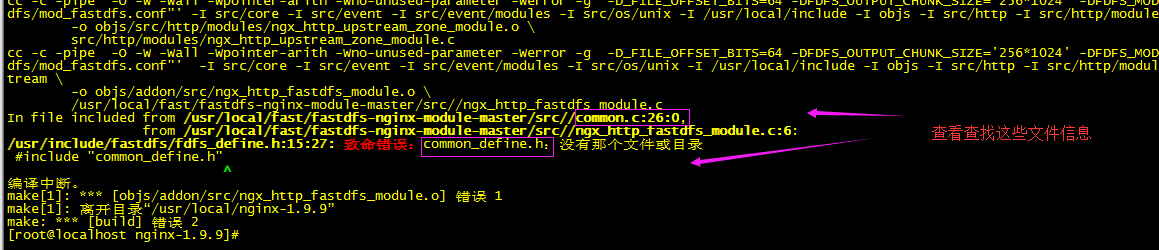
依据提示查看
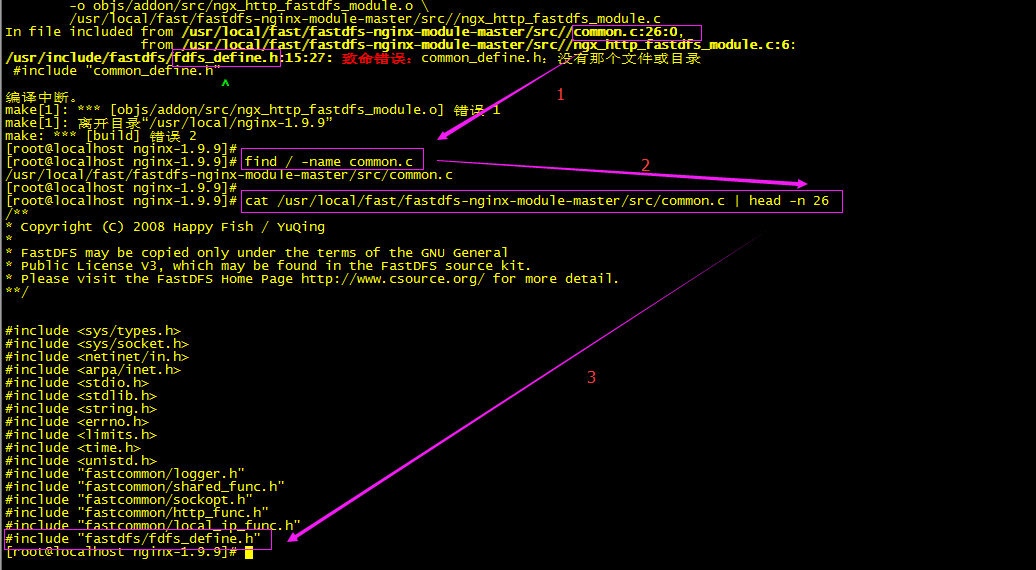
make失败是因为没有加载到fdfs_define.h文件,这时我们回到上面第三方模块(fastdfs-nginx-module-master/src)我们没有修改的配置文件查看
vim /usr/local/fast/fastdfs-nginx-module-master/src/config
ngx_module_incs="/usr/local/include" 模块加载的路径是/usr/local/include,但在这个目录下是找不到上面编译安装失败的头文件

vim /usr/local/fast/fastdfs-nginx-module-master/src/config
ngx_module_incs="/usr/local/include" 修改为 ngx_module_incs="/usr/include/fastdfs /usr/include/fastcommon"
CORE_INCS="$CORE_INCS /usr/local/include"修改为 CORE_INCS="$CORE_INCS /usr/include/fastdfs /usr/include/fastcommon"
cd /usr/local/nginx-1.9.9
再次编译安装前先make clean清理一下

./configure --add-module=/usr/local/fast/fastdfs-nginx-module-master/src/
make

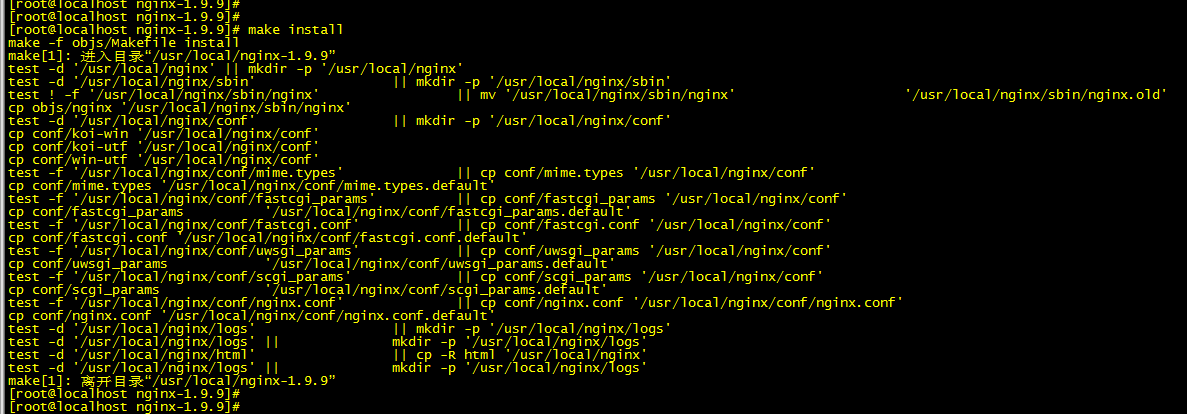
现在就可以make install 安装了
cd /usr/local/fast/fastdfs-nginx-module-master/src/
cp mod_fastdfs.conf /etc/fdfs/
vim /etc/fdfs/mod_fastdfs.conf 修改
connect_timeout=20 #超时时间
#tracker_server=tracker:22122 改为下面
tracker_server=192.168.109.137:22122
tracker_server=192.168.109.138:22122
storage_server_port=23000
group_name=group1 #注意:第一组(192.168.109.139;140为group1);第二组(192.168.109.141;142为group2)
url_have_group_name = true #改为这里的true
store_path0=/fastdfs/storage #修改
group_count = 2 #改为我们这定义的2个组
#追加俩个组的配置如下:
[group1]
group_name=group1
storage_server_port=23000
store_path_count=1
store_path0=/fastdfs/storage
[group2]
group_name=group2
storage_server_port=23000
store_path_count=1
store_path0=/fastdfs/storage
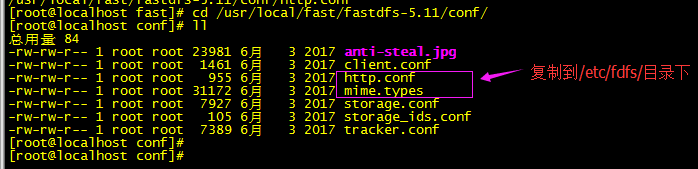
复制FastDFS(fastdfs-5.11)里的2个文件到/etc/fdfs/目录下,如下:
cd /usr/local/fast/fastdfs-5.11/conf/
cp http.conf mime.types /etc/fdfs/
创建一个软链接,在/fastdfs/storage 文件存储目录下创建软链接,将其链接到实际存放数据的目录
ln -s /fastdfs/storage/data/ /fastdfs/storage/data/M00
修改nginx配置文件(所以storage节点都一致)如下所示:
cd /usr/local/nginx/conf/
vim nginx.conf
listen 8888; #80改为8888,这里的8888是storage.conf中配置的一致
#location / {} 修改如下:
location ~/group([0-9])/M00 {
#alias /fastdfs/storage/data;
ngx_fastdfs_module;
}
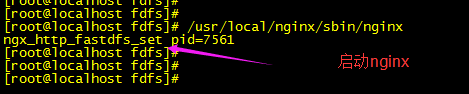
启动nginx:
启动命令:/usr/local/nginx/sbin/nginx
上传图片,网页http测试:(橙色为测试分析)

可以看到数据存储路径在group1组:group1/M00/00/00/wKhtjF0NDviATu47AACy5BY7SZU357.jpg
用4台storage上的nginx分别拼接地址http访问测试:
group1组有数据正常访问
http://192.168.109.139:8888/group1/M00/00/00/wKhtjF0NDviATu47AACy5BY7SZU357.jpg
http://192.168.109.140:8888/group1/M00/00/00/wKhtjF0NDviATu47AACy5BY7SZU357.jpg
group2组无数据无法访问(预想)
http://192.168.109.141:8888/group1/M00/00/00/wKhtjF0NDviATu47AACy5BY7SZU357.jpg
http://192.168.109.142:8888/group1/M00/00/00/wKhtjF0NDviATu47AACy5BY7SZU357.jpg
问题:预想的不一致
那可能是缓存,查看nginx日志有提示304,页面缓存,但我清了页面缓存,并取消了nginx缓存设置,继续访问还是能访问到...(郁闷nginx并未配置代理)
group2组也能显示与预期不符,分析:
192.168.109.141_storage_group2_01 机器抓包
tcpdump -i any -A -nn port 8888 > 123.txt

继续往下看抓的信息,看到了服务器(192.168.109.141)向group1组的(192.168.109.140:8888)请求数据,为什么??:
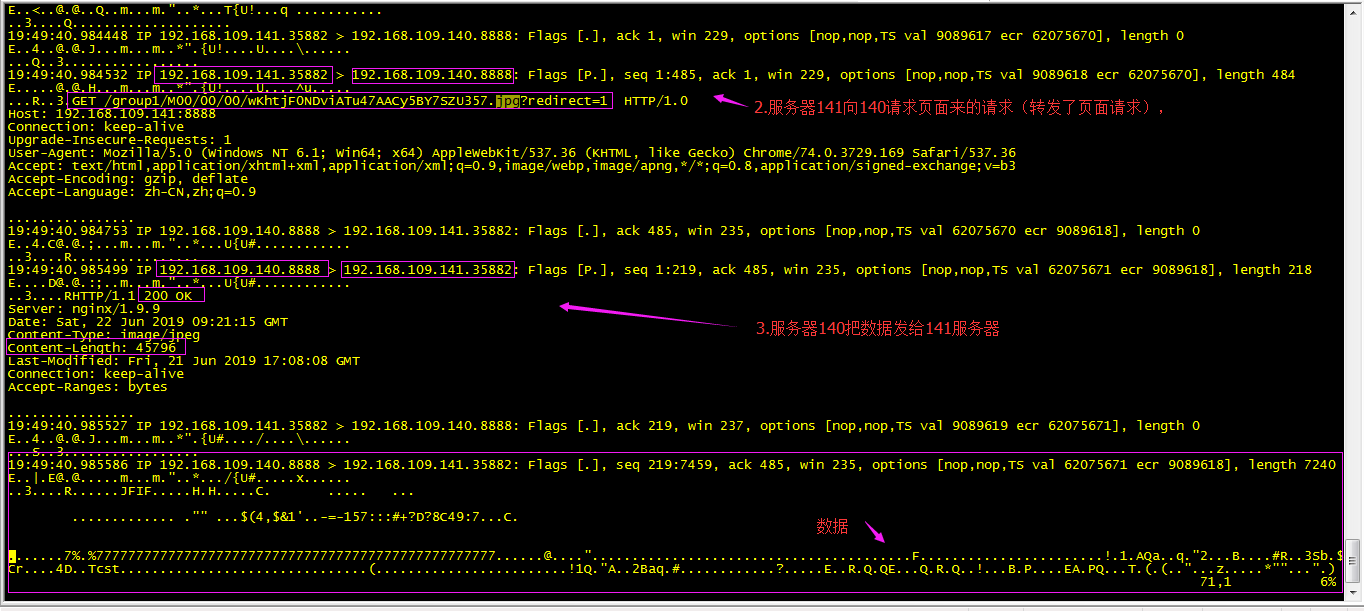
继续往下看抓取的信息,可以看到141将从140获取的数据,转发给客户端,只就是为什么group2组的(192.168.109.141)本地没有数据,网页访问居然能获取到图片的原因:
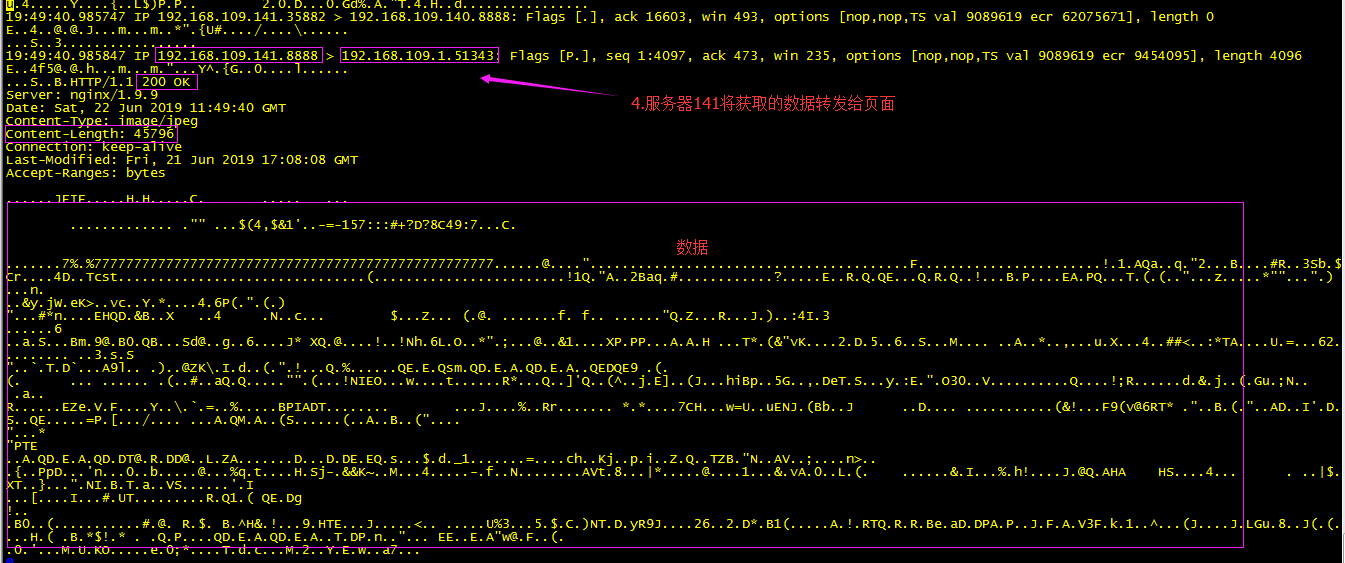
分析:数据获取是真真切切的没毛病,但我nginx配置文件并没有配置代理转发;为什么转发,这时想到可能是第三方模块的原因,查看第三方模块的配置:mod_fastdfs.conf


本地文件系统中不存在文件时的响应模式
代理:从其他存储服务器获取内容,然后发送到客户机
## redirect:重定向到原始存储服务器(HTTP头是位置)
综上所述预想错误不成立,没有理解透fastdfs-nginx-module模块,fastdfs-nginx-module很好的解决了分布式访问问题,通过tracker获取storage上的数据
tracker server 上安装 nginx(缓存:加ngx_cache_purge模块) + keepalived 做高可用:
安装nginx:
tar -zxf ngx_cache_purge-2.3.tar.gz -C /usr/local/fast/
依懒
yum -y install pcre pcre-devel
yum -y install zlib zlib-devel
yum -y install openssl openssl-devel
cd /usr/local/software
tar -zxf nginx-1.9.9.tar.gz -C /usr/local/
cd /usr/local/nginx-1.9.9
./configure --add-module=/usr/local/fast/ngx_cache_purge-2.3
make
make install
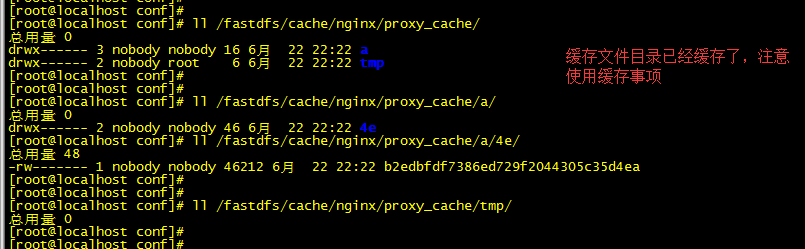
创建缓存目录(来自nginx配置文件):mkdir -pv /fastdfs/cache/nginx/proxy_cache
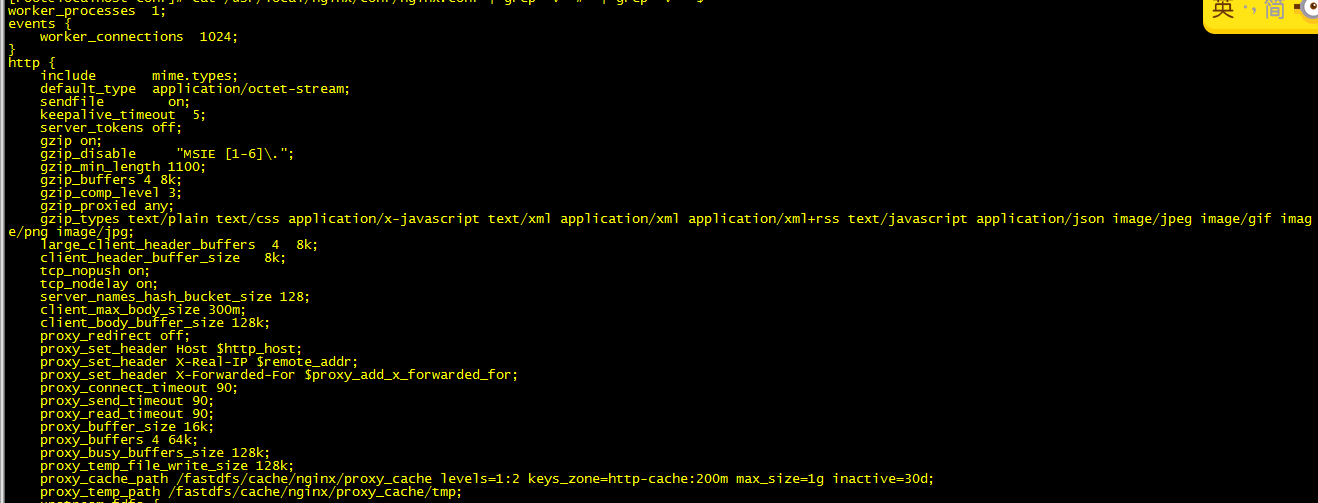
修改nginx配置文件:
cd /usr/local/nginx/conf/
vim /usr/local/nginx/conf/nginx.conf
worker_processes 1;
events {
worker_connections 1024;
}
http {
include mime.types;
default_type application/octet-stream;
sendfile on;
keepalive_timeout 5;
server_tokens off;
gzip on;
gzip_disable "MSIE [1-6]\.";
gzip_min_length 1100;
gzip_buffers 4 8k;
gzip_comp_level 3;
gzip_proxied any;
gzip_types text/plain text/css application/x-javascript text/xml application/xml application/xml+rss text/javascript application/json image/jpeg image/gif imag
e/png image/jpg;
large_client_header_buffers 4 8k;
client_header_buffer_size 8k;
tcp_nopush on;
tcp_nodelay on;
server_names_hash_bucket_size 128;
client_max_body_size 300m;
client_body_buffer_size 128k;
proxy_redirect off;
proxy_set_header Host $http_host;
proxy_set_header X-Real-IP $remote_addr;
proxy_set_header X-Forwarded-For $proxy_add_x_forwarded_for;
proxy_connect_timeout 90;
proxy_send_timeout 90;
proxy_read_timeout 90;
proxy_buffer_size 16k;
proxy_buffers 4 64k;
proxy_busy_buffers_size 128k;
proxy_temp_file_write_size 128k;
proxy_cache_path /fastdfs/cache/nginx/proxy_cache levels=1:2 keys_zone=http-cache:200m max_size=1g inactive=30d;
proxy_temp_path /fastdfs/cache/nginx/proxy_cache/tmp;
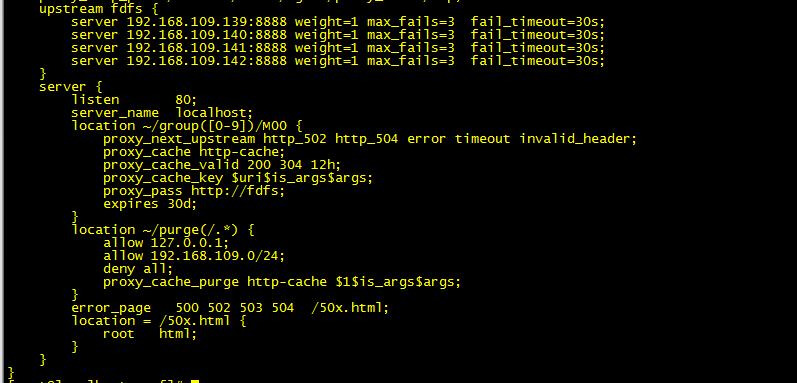
upstream fdfs {
server 192.168.109.139:8888 weight=1 max_fails=3 fail_timeout=30s;
server 192.168.109.140:8888 weight=1 max_fails=3 fail_timeout=30s;
server 192.168.109.141:8888 weight=1 max_fails=3 fail_timeout=30s;
server 192.168.109.142:8888 weight=1 max_fails=3 fail_timeout=30s;
}
server {
listen 80;
server_name localhost;
location ~/group([0-9])/M00 {
proxy_next_upstream http_502 http_504 error timeout invalid_header;
proxy_cache http-cache;
proxy_cache_valid 200 304 12h;
proxy_cache_key $uri$is_args$args;
proxy_pass http://fdfs;
expires 30d;
}
location ~/purge(/.*) {
allow 127.0.0.1;
allow 192.168.109.0/24;
deny all;
proxy_cache_purge http-cache $1$is_args$args;
}
error_page 500 502 503 504 /50x.html;
location = /50x.html {
root html;
}
}
}
启动nginx:/usr/local/nginx/sbin/nginx
测试:
http://192.168.109.137/group1/M00/00/00/wKhtjF0NDviATu47AACy5BY7SZU357.jpg
http://192.168.109.138/group1/M00/00/00/wKhtjF0NDviATu47AACy5BY7SZU357.jpg

下面只要配置keepalived做高可用就好:
yum -y install keepalived
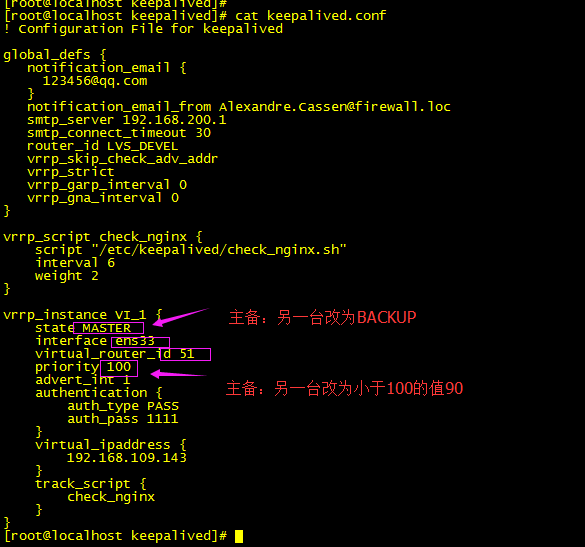
删了vrrp_strict (vip 绑上了ping不通过,抓包发现数据进来 出不去:1.防火墙(排除);2.不在一个域广播)
配置健康检查脚本:
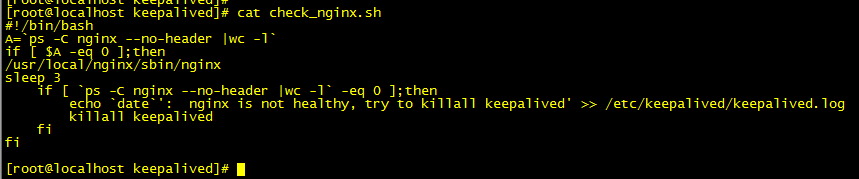
赋予执行权限:chmod +x /etc/keepalived/check_nginx.sh
启动keepalived:systemctl start keepalived
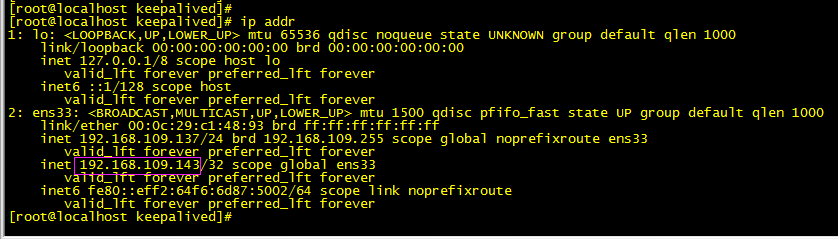
用VIP访问测试:
http://192.168.109.143/group1/M00/00/00/wKhtjF0NDviATu47AACy5BY7SZU357.jpg
正常

分布式FastDfs+nginx缓存高可用集群构建的更多相关文章
- Nginx+Keepalived高可用集群应用实践
Nginx+Keepalived高可用集群应用实践 1.Keepalived高可用软件 1.1 Keepalived服务的三个重要功能 1.1.1管理LVS负载均衡软件 早期的LVS软件,需要通过命令 ...
- Nginx 笔记(四)nginx 原理与优化参数配置 与 nginx 搭建高可用集群
个人博客网:https://wushaopei.github.io/ (你想要这里多有) 一.nginx 原理与优化参数配置 master-workers 的机制的好处 首先,对于每个 ...
- RabbitMQ从零到集群高可用(.NetCore5.0) -高可用集群构建落地
系列文章: RabbitMQ从零到集群高可用(.NetCore5.0) - RabbitMQ简介和六种工作模式详解 RabbitMQ从零到集群高可用(.NetCore5.0) - 死信队列,延时队列 ...
- Nginx-keepalived+Nginx实现高可用集群
Keepalived+Nginx 高可用集群(主从模式) 集群架构图: 说明:Keepalived机器同样是nginx负载均衡器. 1)实验环境准备(此处都是使用的centos7系统) # cat / ...
- Nginx入门篇(七)之Nginx+keepalived高可用集群
一.keepalived介绍 keepalived软件最开始是转为负载均衡软件LVS而设计,用来管理和监控LVS集群系统中各个服务节点的状态,后来又加入了可实现高可用的VRRP功能.所以Keepali ...
- CentOS 7.2搭建FastDFS 分布式文件系统,实现高可用集群
分布式集群搭建结构 双Tracker 2组Group 轮询存储策略 Keepalived+Nginx高可用 Nginx缓存 4个存储节点 一. 集群规划清单 1.安装清单 软件名称 版本 百度云盘存放 ...
- nginx Keepalived高可用集群
一.Keepalived高可用 1.简介 Keepalived软件起初是专为LvS负载均衡软件设计的,用来管理并监控LVS集群系统中各个服务节点的状态,后来又加入了可以实现高可用的VRRP功能.因此, ...
- keepalive + nginx 搭建高可用集群动态网站
环境准备: 两台节点部署keepalived,并且设为互为主从,实现高可用. 两台从节点部署nginx以及相关组件,作为真实服务器实现动态网站上线. 一.MASTER(BACKUP)节点下载keepa ...
- nginx的高可用集群
1,阿里云:SLB 2, 硬件负载均衡器(如:F5,RedWare ) 3,软件实现高可用或负载均衡.keepalived
随机推荐
- bootstrap editable初始化后表单可修改数据
function loadData() { var url = "${ctx }/sys/marketing/product/page"; $('#tablepager').boo ...
- npm 错误记录
npm run dev iview-weapp@1.1.0 dev /Users/Jovins/Desktop/小程序/iview-weapp gulp --gulpfile build/build- ...
- maven 改本地仓库
Maven缺省的本地仓库路径为${user.home}/.m2/repository. 本地仓库是远程仓库的一个缓冲和子集,当你构建Maven项目的时候,首先会从本地仓库查找资源,如果没有,那么Mav ...
- flask环境布署--废弃不用,只留作备份
[前置条件] 创建1个flask-demo,生成requirement.txt文件(下载好gunicorn),上传至git.创建demo参照:创建一个flask api-demo(响应体显示中文) g ...
- Apache监控调优
apache是一款对静态资源处理得比较好的中间件,但是对动态请求处理得不是很好,tomcat则正好相反. apache运用得比较多得工作模式主要是Prefork和Worker两种模式 1.Prefor ...
- Spring MVC 中RequestContextHolder获取request和response
1.最简单方式:处理方法入参 例如: @RequestMapping("/test") @ResponseBody public void saveTest(HttpServlet ...
- 【Qt开发】【Linux开发】调试记录:QFontDatabase::loadFromCache Error
最近做嵌入式的Qt界面,在移植成功后遇到了一个问题:QFontDatabase::loadFromCache: Font path doesn't match.后面跟着便是两个路径. 解决方案就是对比 ...
- DOM练习(邓邓版)
先来图片: 今天直接粘代码: 下面是html: <h4>01.图片切换</h4> <img width = "100" src = "../ ...
- 第四周总结 and 实验二
课堂总结 一.课堂笔记总览 1.String类两种实例方法区别 String str1 = "hello";String str2 = "hello"; ...
- 循环Gray码的生成(非递归)
#!/usr/bin/env python #coding:utf-8 import sys def gray_code(n): if n < 1: return [] n += 1 array ...