Spring基础17——使用注解来配置Bean
1.组件扫描
组件扫描(component scanning):Spring能够从classpath下自动扫描,侦测和实例化具有特定的注解的组件。
特定组件包括:
—@Component:基本注解,标识了一个受Spring管理的组件
—@Respository:标识持久层组件,具有将数据库操作抛出的原生异常翻译转化为Spring的持久层异常的功能。
—@Service:标识服务层(业务层)组件
—@Controller:标识表示层组
对于扫描到的组件,Spring有默认的命名策略:使用非限定类名,第一个字母小写,也可以在注解中通过value属性表示组件的名称@Repository(value = "userRepository")。比如UserService创建Bean默认的名字就是userService。
2.具体实现
下面来编写具体的实现代码:
TestObject类使用@Compent注解:
- @Component
- public class TestObject {
- }
UserService类使用@Service注解
- @Service
- public class UserService {
- public void add() {
- System.out.println("UserService add...");
- }
- }
UserRepository接口
- public interface UserRepository {
- public void save();
- }
UserRepositoryImpl实现类使用@Repository
- @Repository
- public class UserRepositoryImpl implements UserRepository {
- public void save() {
- System.out.println("UserRepository Save。。。。");
- }
- }
UserController使用@Controller
- @Controller
- public class UserController {
- public void execute() {
- System.out.println("UserController execute....");
- }
- }
在类上加完注解之后,SpringIOC容器并不能直接去管理我们的bean,因为注解本身和xml一样只是起一个配置作用,Spring需要对指定类路径下的包进行扫描:
- <context:component-scan base-package="com.wzy.annotation"/>
编写一个测试类,来测试标识了这些注解的类是否被添加到SpringIOC容器中:
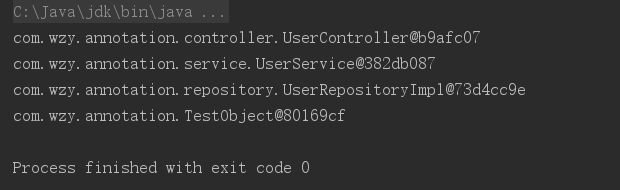
- public static void main(String[] args) {
- ApplicationContext ctx = new ClassPathXmlApplicationContext("beans-annotation.xml");
- UserController userController = (UserController) ctx.getBean("userController");
- System.out.println(userController);
- UserService userService = (UserService) ctx.getBean("userService");
- System.out.println(userService);
- UserRepository userRepository = (UserRepository) ctx.getBean("userRepositoryImpl");
- System.out.println(userRepository);
- TestObject testObject = (TestObject) ctx.getBean("testObject");
- System.out.println(testObject);
- }
输出结果:我们可以观察到可以打印出这些bean,并且也可以验证他们的bean的id确实是,类的名字第一个字母小写。
在使用<context:component-scan>注意一下几个关键点:
—base-package属性指定一个需要扫描的基类包,Spring容器将会扫描这个基类包里及其子包中的所有类。
—当需要扫描多个包时,可以使用逗号分隔。
—如果仅希望扫描特定的类而非基类包下的所有类,可以使用resource-pattern属性过滤特定的类。
- <context:component-scan base-package="com.wzy.annotation" resource-pattern="repository/*.class">
- </context:component-scan>
3.包含和移除bean(过滤)
在<context:component-scan>标签下有两个子标签:<context:include-filter>和<context:exclude-filter>:
<context:include-filter> :子节点表示要包含的目标类
<context:exclude-filter>: 子节点表示要排除在外的目标类
<context:component-scan>下可以拥有若干个<context:include-filter> <context:exclude-filter> 子节点,两个子标签支持多种类型的过滤表达式,以下五种模式:最常用的是前两种。
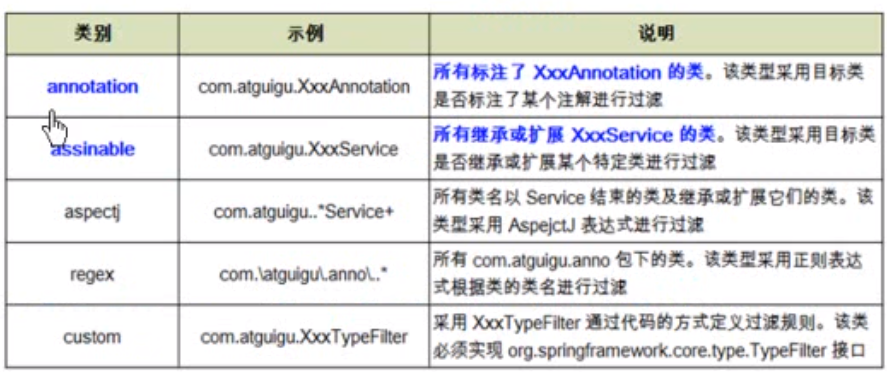
首先来看annotation过滤表达式的用法,首先看这个表达式的名字,说明它过滤的是注解,也就包含或者不包含某种注解,这里要注意的是指定包含哪些子节点的组件,该子节点需要user-default-filters 配合使用,否则是使用默认的过滤器,会扫描全部的组件。
- <!--不包含什么: <context:exclude-filter子节点指定排除哪些指定表达式的组件-->
- <context:component-scan base-package="com.wzy.annotation">
- <!--不包含repository-->
- <context:exclude-filter type="annotation" expression="org.springframework.stereotype.Repository"/>
- </context:component-scan>
- <!--<context:include-filter 指定包含哪些子节点的组件,该子节点需要user-default-filters 配合使用,否则是使用默认的过滤器,会扫描全部的组件-->
- <context:component-scan base-package="com.wzy.annotation"
- use-default-filters="false">
- <!--包含repository-->
- <context:include-filter type="annotation" expression="org.springframework.stereotype.Repository"/>
- </context:component-scan>
下面来看assignable表达式的用法,它过滤的是某个类以及它的子类,如果设置没有扫描某种bean,我们依然从容器中获取,那么就会抛出异常。
- <context:component-scan base-package="com.wzy.annotation">
- <!--不包含repository-->
- <context:exclude-filter type="assignable" expression="com.wzy.annotation.repository.UserRepository"/>
- </context:component-scan>
- <context:component-scan base-package="com.wzy.annotation" use-default-filters="false">
- <!--只包含repository-->
- <context:include-filter type="assignable" expression="com.wzy.annotation.repository.UserRepository"/>
- </context:component-scan>
Spring基础17——使用注解来配置Bean的更多相关文章
- 跟着刚哥学习Spring框架--通过注解方式配置Bean(四)
组件扫描:Spring能够从classpath下自动扫描,侦测和实例化具有特定注解的组件. 特定组件包括: 1.@Component:基本注解,识别一个受Spring管理的组件 2.@Resposit ...
- spring学习笔记 星球日two - 注解方式配置bean
注解要放在要注解的对象的上方 @Autowired private Category category; <?xml version="1.0" encoding=" ...
- Spring框架学习(6)使用ioc注解方式配置bean
内容源自:使用ioc注解方式配置bean context层 : 上下文环境/容器环境 applicationContext.xml 1 ioc注解功能 注解 简化xml文件配置 如 hibernate ...
- Spring--通过注解来配置bean【转】
Spring通过注解配置bean 基于注解配置bean 基于注解来配置bean的属性在classpath中扫描组件 组件扫描(component scanning):Spring能够从classpat ...
- Spring--通过注解来配置bean
Spring通过注解配置bean 基于注解配置bean 基于注解来配置bean的属性 在classpath中扫描组件 组件扫描(component scanning):Spring能够从classpa ...
- spring:自定义限定符注解@interface, 首选bean
spring:自定义限定符注解@interface, 首选bean 1.首选bean 在声明bean的时候,通过将其中一个可选的bean设置为首选(primary)bean能够避免自动装配时的歧义性. ...
- Spring基础18——通过注解配置bean之间的关联关系
1.组件装配 <context:component-scan>元素还会自动注册AutowiredAnnotaionBeanPostProcessor实例,这是一个bean的后置处理器,该实 ...
- spring笔记--通过注解(annotation)配置Bean
Spring能够在classpath下自动扫描,侦测和实例化具有特定注解的组件,这在Spring中成为组件扫描(Component scanning). 特定组件的注解包括: @Component:基 ...
- MyBatis学习(二):与Spring整合(非注解方式配置MyBatis)
搭建SpringMVC的-->传送门<-- 一.环境搭建: 目录结构: 引用的JAR包: 如果是Maven搭建的话,pom.xml的配置如下: <?xml version=" ...
随机推荐
- 接口自动化request库入门
requests库7个主要方法 r= requsts.get(),主要属性: r.raise_for_status()方法内部判断r.status_code是否等于200不需要增加额外的if语句,该语 ...
- 综合KPI报表历史明细数据查询
一.综合计划部KPI明细数据查询--xigu用户要求:需显示第三季度,即789三个月的明细数据解决方法:1.查看SSISC:\Users\Administrator\Documents\Visual ...
- yii 1.1简单文件缓存
缓存组件配置在config\main.php文件,简单配置下文件缓存 'components'=>array( 'cache' => array( 'class' => 'syste ...
- for aws associate exam
Topics which I read based on the previous forum discussions Amazon DynamoDB January 2016 Day at the ...
- Deepin 系统下设置Apache虚拟主机站点
1,在 var/www/html 文件夹中创建一个文件夹,命名为 a ,用来作为我们的PHP项目文件夹. 2,找到 etc/apache2/sites-available 文件夹,在文件夹中创建一个站 ...
- ES6 暂时性死区
在ES6中,声明变量新增了两个关键字:let命令和const命令 如果在区块中存在let或者const命令时,任何变量都必须在声明之前使用,无论是区块外部的全局变量或者是区块内部的变量: /* 区块外 ...
- 清北学堂2019.7.18 & 清北学堂2019.7.19
Day 6 钟皓曦 经典题目:石子合并 可以合并任意两堆,代价为数量的异或(^)和 f[s]把s的二进制所对应石子合并成一堆所花代价 枚举s的子集 #include<iostream> u ...
- Python locals() 的陷阱
转载自https://segmentfault.com/a/1190000012724861 在工作中, 有时候会遇到一种情况: 动态地进行变量赋值, 不管是局部变量还是全局变量, 在我们绞尽脑汁的时 ...
- Jmeter接口测试系列之测试用例编写和调用
在使用Jmeter进行接口测试时,首先需要根据接口定义,编写响应的接口测试用例,在编写接口测试用例时,我们根据测试的侧重点不同,使用不同的方式编译测试用例. 一种是:整个请求参数作为一个变量,进行测试 ...
- 现有1~100 共一百个自然数,已随机放入一个有98个元素的数组a[98].要求写出一个尽量简单的方案找出没有被放入数组的那2个数,并在屏幕上打印这2个数
void test7() { try { ]; ]; ]; ; ; int i; ; i < num.Length; i++) { num[i] = i + ; num1[i] = i + ;/ ...