将ibatis迁移到mybatis3的过程记录
将ibatis迁移到mybatis3的过程记录
场景:有些以前的老项目是使用ibatis开发的,现在有转换成mybatis3的需求。
环境准备:需要安装Ant,以下是本人的安装版本,具体怎么安装不再赘述,就是下载解压配环境变量,和maven等安装过程类似,可百度。

工具:ibatis2mybatis 地址:https://github.com/mybatis/ibatis2mybatis
注意下载最新的版本。不要下载release版本,最新版本功能多一点
该工具可以帮你将ibatis 2.x sqlmap文件转换为myBatis 3.x mapper文件,该工具是使用了Ant构建任务进行XSTL转换和一些语法文字替换
该工具下载下来使用非常简单,把你要转换的所有sqlmap文件放到source文件夹,然后在当前目录直接运行ant命令即可,转换成功的mapper文件放在了destination文件夹下。


当然,还需要进行一些个性化配置。
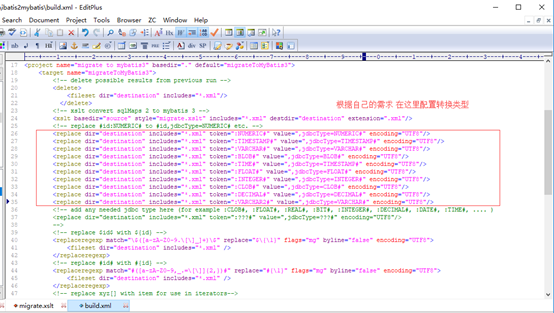
比如根据自己的需要在build.xml文件中配置转换类型;
|
<!-- replace #id:NUMERIC# to #id,jdbcType=NUMERIC# etc. --> <replace dir="destination" includes="*.xml" token=":NUMERIC#" value=",jdbcType=NUMERIC#" encoding="UTF8"/> <replace dir="destination" includes="*.xml" token=":TIMESTAMP#" value=",jdbcType=TIMESTAMP#" encoding="UTF8"/> <replace dir="destination" includes="*.xml" token=":VARCHAR#" value=",jdbcType=VARCHAR#" encoding="UTF8"/> <replace dir="destination" includes="*.xml" token=":BLOB#" value=",jdbcType=BLOB#" encoding="UTF8"/> <replace dir="destination" includes="*.xml" token=":TIME#" value=",jdbcType=TIMESTAMP#" encoding="UTF8"/> <replace dir="destination" includes="*.xml" token=":FLOAT#" value=",jdbcType=FLOAT#" encoding="UTF8"/> <replace dir="destination" includes="*.xml" token=":INTEGER#" value=",jdbcType=INTEGER#" encoding="UTF8"/> <replace dir="destination" includes="*.xml" token=":CLOB#" value=",jdbcType=CLOB#" encoding="UTF8"/> <replace dir="destination" includes="*.xml" token=":DECIMAL#" value=",jdbcType=DECIMAL#" encoding="UTF8"/> <replace dir="destination" includes="*.xml" token=":VARCHAR2#" value=",jdbcType=VARCHAR#" encoding="UTF8"/> <!-- add any needed jdbc type here (for example :CLOB#, :FLOAT#, :REAL#, :BIT#, :INTEGER#, :DECIMAL#, :DATE#, :TIME#, .... ) <replace dir="destination" includes="*.xml" token=":???#" value=",jdbcType=???#" encoding="UTF8"/> |

还有需要在migrate.xstl文件中做一些个性化配置,具体可以查阅XSLT相关语法。
比如针对dynamic做一些处理,当前面有where 1=1 和没有where 1=1 存在时转换方法是不一样的。


|
<xsl:template match="dynamic"> <xsl:choose> <xsl:when test="contains(@prepend, 'where')"> <xsl:element name="where"> <xsl:apply-templates/> </xsl:element> </xsl:when> <xsl:otherwise > <xsl:apply-templates/> </xsl:otherwise> </xsl:choose> </xsl:template> |

还有针对isNotEqual的处理要自己补充:

|
<xsl:template match="isNotEqual"> <xsl:element name="if"> <xsl:attribute name="test"> <xsl:value-of select="@property" /><xsl:text> != '</xsl:text> <xsl:value-of select="@compareValue" /><xsl:text>'.toString()</xsl:text> </xsl:attribute> <xsl:value-of select="@prepend" /> <xsl:apply-templates/> </xsl:element> </xsl:template> |
当出现如下情况时isEmpty isNotEmpty分为两种情况,一种是多参数时的转换,一种是只有一个默认参数时的转换,一个参数时的情况如下

需要配置如下代码:
|
<xsl:template match="isNotEmpty"> <xsl:element name="if"> <xsl:attribute name="test"> <xsl:if test="substring-before(@property, '.')"> <xsl:value-of select="substring-before(@property, '.')" /><xsl:text> != null and </xsl:text> </xsl:if> <xsl:choose> <xsl:when test="not(@property)"> <xsl:text>_parameter</xsl:text> </xsl:when> <xsl:otherwise > <xsl:value-of select="@property" /> </xsl:otherwise> </xsl:choose> <xsl:text> != null and </xsl:text> <xsl:choose> <xsl:when test="not(@property)"> <xsl:text>_parameter</xsl:text> </xsl:when> <xsl:otherwise > <xsl:value-of select="@property" /> </xsl:otherwise> </xsl:choose> <xsl:text> != ''</xsl:text> </xsl:attribute> <xsl:value-of select="@prepend" /> <xsl:apply-templates/> </xsl:element> </xsl:template> <xsl:template match="isEmpty"> <xsl:element name="if"> <xsl:attribute name="test"> <xsl:if test="substring-before(@property, '.')"> <xsl:value-of select="substring-before(@property, '.')" /><xsl:text> != null and </xsl:text> </xsl:if> <xsl:choose> <xsl:when test="not(@property)"> <xsl:text>_parameter</xsl:text> </xsl:when> <xsl:otherwise > <xsl:value-of select="@property" /> </xsl:otherwise> </xsl:choose> <xsl:text> == null or </xsl:text> <xsl:choose> <xsl:when test="not(@property)"> <xsl:text>_parameter</xsl:text> </xsl:when> <xsl:otherwise > <xsl:value-of select="@property" /> </xsl:otherwise> </xsl:choose> <xsl:text> == ''</xsl:text> </xsl:attribute> <xsl:value-of select="@prepend" /> <xsl:apply-templates/> </xsl:element> </xsl:template> |
Xstl中关于是否是null的判断语法格式如下:
|
<xsl:if test=" USERNAME "> USERNAME is not null </xsl:if> <xsl:if test="not(USERNAME)"> USERNAME is null </xsl:if> <xsl:if test="USERNAME =''"> USERNAME is empty string </xsl:if> <xsl:if test="USERNAME!=''"> USERNAME is not empty string </xsl:if> |
另外遇到mybatis中传参数的几个小问题:
1 当MyBatis 判断条件为等于的时候,常量需要加 .toString() 来转换,因为mybatis会把' '解析为Char,而传入的是String类型,java是强类型语言,所以不等。
以下8,2,3,4,5均可以,6 直接报语法错误,也不会执行。
|
<if test='tblx != null and tblx== "8" '> AND tblx = #{tblx,jdbcType=VARCHAR} </if> <if test="unitId!=null and unitId == '1' "> AND unit_id=#{unitId,jdbcType=INTEGER} </if> <if test="jctbisreturn!=null and jctbisreturn == '2'.toString()" > AND jctbisreturn=#{jctbisreturn,jdbcType=INTEGER} </if> <if test="userId!=null and userId == 3 "> AND user_id=#{userId,jdbcType=INTEGER} </if> <if test="townCode!=null and townCode!='4'.toString()"> AND town_code=#{townCode,jdbcType=VARCHAR} </if> <if test="xzqdm!=null and xzqdm=='5'.toString()"> AND xzqdm=#{xzqdm,jdbcType=VARCHAR} </if> <if test="xmc!=null and xmc==6.toString()"> AND xmc=#{xmc,jdbcType=VARCHAR} </if> <if test="jcbh != null and jcbh == '7' "> AND jcbh = #{jcbh,jdbcType=VARCHAR}, </if> <if test="townCode!=null and townCode!='9'"> AND town_code=#{townCode,jdbcType=VARCHAR} </if> |
另外:
|
<if test="townCode!=null and townCode==''"> AND town_code=#{townCode,jdbcType=VARCHAR} </if> <if test="townCode!=null and townCode==''.toString()"> AND town_code=#{townCode,jdbcType=VARCHAR} </if> 当输入 String townCode="" 上面的两个语句都可以执行,当为空字符串时可以不用''.toString(),可以简写为''即可 |
2 MyBatis在使用单个参数进行if条件判断的时候,如果直接使用参数本身,则会报出:There is no getter for property named ... 的异常,比如
|
<select id="testStringParam2" resultMap="BaseResultMap"> SELECT * FROM j_jctb <where> <if test="tblx!= null and tblx!= ''"> AND tblx = #{value,jdbcType=VARCHAR} </if> </where> </select> |
正确的方法是应该用"_parameter"来代替需要判断的参数:
|
<select id="testStringParam2" resultMap="BaseResultMap"> SELECT * FROM j_jctb <where> <if test="_parameter != null and _parameter != ''"> AND tblx = #{value,jdbcType=VARCHAR} </if> </where> </select> |
当然,还有一种方法就是在Mapper接口中给定参数名,如:
|
JJctb testStringParam2(String tblx) throws Exception ; 改为: JJctb testStringParam2(@Param("tblx") String tblx) throws Exception ; |
中途遇到关于mybatis传递多个实体参数的问题,可采用如下写法:以@Param绑定,以对象名.(点)对象属性名的方式调用就可以了。
|
abstract JJctb testStringParam3( @Param("jctb") JJctb jctb , @Param("yuser") YUser yuser, @Param("tblx") String tblx) throws Exception ; <select id="testStringParam3" resultMap="BaseResultMap"> SELECT * FROM j_jctb <where> <if test="jctb.jcbh != null and jctb.jcbh != ''"> AND jcbh = #{jctb.jcbh,jdbcType=VARCHAR} </if> <if test="yuser.username != null and yuser.username != ''"> AND username = #{yuser.username,jdbcType=VARCHAR} </if> <if test="tblx != null and tblx != ''"> AND tblx = #{tblx,jdbcType=VARCHAR} </if> </where> </select> |
参考博文:http://blog.csdn.net/lanxuezaipiao/article/details/52902074
http://blog.csdn.net/shenzhenNBA/article/details/46673327
将ibatis迁移到mybatis3的过程记录的更多相关文章
- 金蝶Apusic中间件适配JetSpeed2过程记录
金蝶Apusic中间件适配JetSpeed2过程记录: 1.安装金蝶并配置域,确保域运行正常. 2.参考<JetSpeed2部署至Apusic操作步骤记录>进行应用迁移. https:// ...
- 升级Windows 10 正式版过程记录与经验
升级Windows 10 正式版过程记录与经验 [多图预警]共50张,约4.6MB 系统概要: 预装Windows 8.1中文版 64位 C盘Users 文件夹已经挪动到D盘,并在原处建立了符号链接. ...
- 双系统Ubuntu分区扩容过程记录
本人电脑上安装了Win10 + Ubuntu 12.04双系统.前段时间因为在Ubuntu上做项目要安装一个比较大的软件,导致Ubuntu根分区的空间不够了.于是,从硬盘又分出来一部分空间,分给Ubu ...
- .NET 4.5+项目迁移.NET Core的问题记录
.NET 4.5+项目迁移.NET Core的问题记录 这几天试着把目前的开发框架迁移到新的.net core平台,中间遇到的问题在这里简单记录一下. 迁移过程遇到的最大的问题IOC容器.我目前使用的 ...
- SVN迁移到Git的过程(+ 一些技巧)
SVN迁移到Git的过程(+ 一些技巧) 李顺利 Key Words SVN,Git,Clone,Conversion,Tips,VCS,Pro Git 关于在VCS中SVN和Git之间的迁移(Clo ...
- CentOS 5.5 下安装Countly Web Server过程记录
CentOS 5.5 下安装Countly Web Server过程记录 1. 系统更新与中文语言包安装 2. 基本环境配置: 2.1. NodeJS安装 依赖项安装 yum -y install g ...
- linux-i386(ubuntu)下编译安装gsoap_2.8.17过程记录
过程记录 : 1.下载gsoap_2.8.17.zip 并 解压 : $unzip gsoap_2.8.17.zip 2.进入解压后的目录gsoap-2.8 3.自动配置编译环境: $ ...
- 【转】android 最新 NDK r8 在window下开发环境搭建 安装配置与使用 详细图文讲解,完整实际配置过程记录(原创)
原文网址:http://www.cnblogs.com/zdz8207/archive/2012/11/27/android-ndk-install.html android 最新 NDK r8 在w ...
- 升级到 ExtJS 5的过程记录
升级到 ExtJS 5的过程记录 最近为公司的一个项目创建了一个 ExtJS 5 的分支,顺便记录一下升级到 ExtJS 5 所遇到的问题以及填掉的坑.由于 Sencha Cmd 的 sencha ...
随机推荐
- phpStorm 配置PHP_CodeSniffer自动检查代码
环境 ubuntu18.4 phpstorm php7.2 最正确安装方法 sudo apt-get install php-codesniffer 一.composer安装PHP_CodeSniff ...
- flask之表单
一:表单 表单用于注册,修改用户数据等场景. flask-wtf提供了一个包,可以创建表单:pip install flask-wtf 为了防止跨域请求,flask_wtf自己生成一个秘钥,用秘钥生成 ...
- @property属性装饰器
顾名思义,@property就是一个跟属性相关的装饰器, 使用了它之后,取值和赋值操作都变得简洁 from datetime import date, datetime class User: def ...
- HTTP请求时候总是设置的两个参数ConnectionTimeOut和SocketTimeOut
在HTTP请求时候总是设置两个参数,就是连接超时和Socket超时 public static final String SO_TIMEOUT = "http.socket.timeout& ...
- (转)GIS理论知识(三)之ArcGIS平台、SuperMap超图平台和开源平台
3.1.ArcGIS平台 ArcGIS为美国ESRI公司研发的产品,为用户提供一个可伸缩的,全面的GIS平台.ArcObjects包含了许多的可编程组件,从细粒度的对象(例如单个的几何对象)到粗粒度的 ...
- (转)pycharm autopep8配置
转:https://blog.csdn.net/BobYuan888/article/details/81943808 1.pip下载安装: 在命令行下输入以下命令安装autopep8 pip ins ...
- 洛谷P1242 新汉诺塔(dfs,模拟退火)
洛谷P1242 新汉诺塔 最开始的思路是贪心地将盘子从大到小依次从初始位置移动到目标位置. 方法和基本的汉诺塔问题的方法一样,对于盘子 \(i\) ,将盘子 \(1\to i-1\) 放置到中间柱子上 ...
- jsc2019_qualE Card Collector
题目大意 给你n个点的坐标和权值 问先在每一行选一个点再在每一列选一个没选过的点 求最大权值和 分析 可以想到将点转化为边,将两个坐标对应两个点 所以问题转化为选H+W个边 使得所有边的度都不为0 则 ...
- Bulk synchronous parallel
https://en.wikipedia.org/wiki/Bulk_synchronous_parallel https://zh.wikipedia.org/wiki/整体同步计算模型 超级步(S ...
- docker 保存镜像 加载镜像
1.保存镜像 docker save -o 保存的文件名 来源镜像 2.加载镜像 docker load -i 保存的文件名
