Redis ASP.NET 配置链接
对于安装Redis后 很是不明白如何建立Redis 和 .net 的链接配置 于是查找了很多的资料
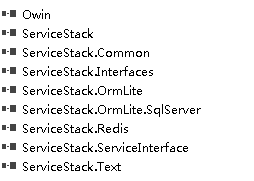
首先第一步:安装ASP.NET NuGet 包 (ServiceStack.Redis) 安装好后 查看引用如下:

这时候 首先在 ASP.NET Web.Config中<appSettings>节点中配置如下
<!--Redis 配置-->

    <add key="redis_server_write" value="Admin2018@127.0.0.1:6379" />

    <add key="redis_server_read" value="Admin2018@127.0.0.1:6379" />

    <add key="redis_max_read_pool" value="3" />

    <add key="redis_max_write_pool" value="1" />

<!--Redis 配置-->
第二步:就开始配置链接Redis的链接了:
1>自定义创建一个RedisCacheHelper的配置类,代码如下:
public class RedisCacheHelper : ConfigurationSection

    {

        //读取Redis接口

        private static string GetRedis = ConfigurationManager.AppSettings["redis_server_read"];

        //读取数量

        private static int GetRedisNum =Convert.ToInt32(ConfigurationManager.AppSettings["redis_max_read_pool"]);

        //写入Redis接口

        private static string SetRedis = ConfigurationManager.AppSettings["redis_server_write"];

        //写入数量

        private static int SetRedisNum = Convert.ToInt32(ConfigurationManager.AppSettings["redis_max_write_pool"]);

        //定义连接池

        private static readonly PooledRedisClientManager Pool = null;

        //定义构造函数

         static RedisCacheHelper()

        {

            string [] GetRedisHost = GetRedis.Split(',');

            string [] SetRedisHost = SetRedis.Split(',');

            if(GetRedisHost.Length>0&&SetRedisHost.Length>0)

            {

                Pool = new PooledRedisClientManager(GetRedisHost, SetRedisHost, new RedisClientManagerConfig()

                {

                    MaxWritePoolSize = SetRedisNum,

                    MaxReadPoolSize = GetRedisNum,

                    AutoStart = true

                });

            }

        }

        /// <summary>

        /// 添加缓存

        /// </summary>

        /// <typeparam name="T"></typeparam>

        /// <param name="key"></param>

        /// <param name="value"></param>

        public static void Add<T>(string key,List<T> value)

        {

            if (value == null)

                return;

            try

            {

                if (Pool != null)

                {

                    using (var r = Pool.GetClient())

                    {

                        if (r != null)

                        {

                            r.SendTimeout = 1000;

                            r.Set<List<T>>(key, value);

                        }

                    }

                }

            }

            catch (Exception ex)

            {

                ErrorLog.WriteLog(ex);

            }

        }

        /// <summary>

        /// 查询单挑

        /// </summary>

        /// <typeparam name="T"></typeparam>

        /// <param name="key"></param>

        /// <returns></returns>

        public static T Get<T>(string key)

        {

            if(key==null)

                return default(T);

            try

            {

                if (Pool != null)

                {

                    using (var r = Pool.GetClient())

                    {

                        if (r != null)

                        {

                            r.SendTimeout = 1000;

                            return r.Get<T>(key);

                        }

                    }

                }

            }

            catch (Exception ex)

            {

                ErrorLog.WriteLog(ex);

            }

            return default(T);

        }

        /// <summary>

        /// 查询多条数据

        /// </summary>

        /// <typeparam name="T"></typeparam>

        /// <param name="key"></param>

        /// <returns></returns>

        public static List<T> GetAll<T>(string key)

        {

            if (key == null)

                return null;

            try

            {

                if (Pool != null)

                {

                    using (var r = Pool.GetClient())

                    {

                        if (r != null)

                        {

                            r.SendTimeout = 1000;

                            return r.Get<List<T>>(key);

                        }

                    }

                }

            }

            catch (Exception ex)

            {

                ErrorLog.WriteLog(ex);

            }

            return null;

        }

        /// <summary>

        /// 删除指定key缓存

        /// </summary>

        /// <param name="key"></param>

        public static void Remove(string key)

        {

            if (key == null)

                return;

            try

            {

                if (Pool != null)

                {

                    using (var r = Pool.GetClient())

                    {

                        if (r != null)

                        {

                            r.SendTimeout = 1000;

                            r.Remove(key);

                        }

                    }

                }

            }

            catch (Exception)

            {

                throw;

            }

        }

        /// <summary>

        /// 判断缓存是否存在

        /// </summary>

        /// <param name="key"></param>

        /// <returns></returns>

        public static bool Exists(string key)

        {

            if (key == null)

                return false;

            try

            {

                if (Pool != null)

                {

                    using (var r = Pool.GetClient())

                    {

                        if (r != null)

                        {

                            r.SendTimeout = 1000;

                            return  r.ContainsKey(key);

                        }

                    }

                }

            }

            catch (Exception ex)

            {

                ErrorLog.WriteLog(ex);

            }

            return false;

        }

    }
在调用的时候 我们还可以在自定义一个Key键的类 用于方便操作存储已经修改。
Redis ASP.NET 配置链接的更多相关文章
- IIS/IIS Express/Asp.net配置片段记录
事情的起因是,我们在项目中使用了URLRewriter.dll作为实现伪静态的工具,在VS2010及之前的开发环境中,该功能运行正常,但在VS Express 2012 for Web中就不起作用了, ...
- 实现Redis的主从复制配置
实现Redis的主从复制配置比较简单,而且容易明白. 下图是要配置的主从复制结构图: 1.说明 Redis主从复制中一个主服务可以有多个从服务,一个从服务可以有多个从服务. 配置比较简单,只需要更改r ...
- efcore 配置链接sqlserver 记录
本文将在asp.net core api 项目中使用efcore corefirst模式 简单配置链接sqlserver数据库,以及简单的数据库迁移操作 一 新建项目 1. 首先我们先用vs2017 ...
- Linux下Redis的安装配置
环境: centos7 PHP7 1.切到准备安装的目录 cd /usr/local 2.下载Redis wget http://download.redis.io/redis-stable.tar ...
- 关于asp.net中链接数据库的问题
学习了asp.net 有web服务器控件和C#代码两部分 那么在做页面时候,需要用到数据库和asp.net的链接 课本上只是说明了和SQL server的链接,本文介绍如何在.net中链接 Acces ...
- docker+redis安装与配置,主从+哨兵模式
docker+redis安装与配置 docker安装redis并且使用redis挂载的配置启动 1.拉取镜像 docker pull redis:3.2 2.准备准备挂载的目录和配置文件 首先在/do ...
- efcore 配置链接sqlserver
本文将在asp.net core api 项目中使用efcore corefirst模式 简单配置链接sqlserver数据库,以及简单的数据库迁移操作 一 新建项目 1. 首先我们先用vs2017 ...
- Redis安装以及配置
下载 http://redis.io/download 解压 tar zxvf redis-2.8.17.tar.gz 编译并安装 1 2 3 4 cd redis-2.8.17 make cd sr ...
- redis的安装配置
主要讲下redis的安装配置,以及以服务的方式启动redis 1.下载最新版本的redis-3.0.7 到http://redis.io/download中下载最新版的redis-3.0.7 下载后 ...
随机推荐
- canvas---从基础到实战
canvas是H5新增的一个元素,可以用来描绘各种你想描绘的东西. canvas本身没有绘制能力,你可以把它当做一个容器,需要我们用脚本,也就是js来给他灌满水. 兼容性 1. IE9版本以上.Fir ...
- C语言实现Windows下获取IP和MAC地址。
C语言实现Windows下获取IP和MAC地址. #include <winsock2.h> #include <stdio.h> #include <stdlib.h& ...
- PROXY——代理模式
代理,说白了就是中介.假设有俩对象A和B,A想访问B,但是根据迪米特法则,我们不能喝陌生人说话,简而言之就是A要减少知道B的相关情况,要降低A与B的耦合度.这时我们使用中介C,而C拥有B的相关情况,A ...
- Spring整合Struts2的配置与测试
整合目的 让Spring的IOC容器管理Struts2的Action 整合步骤 1.新建一个Web项目 2.加入Spring的jar包和添加Spring的配置文件 3.在Web.xml中配置Conte ...
- 浅谈Java反射与框架
Java反射 1.示例 1.用户类 package com.lf.entity; import com.lf.annotation.SetProperty; import com.lf.annotat ...
- html打开子窗口
第一个参数是打开的链接,第二个参数是窗口的名字,第三个参数是窗口的属性 window.open ("page.html", "newwindow", " ...
- 【Python CheckiO 题解】SP
题目描述 [Speech Module]:输入一个数字,将其转换成英文表达形式,字符串中的所有单词必须以一个空格字符分隔. [输入]:一个数字(int) [输出]:代表数字的英文字符串(str) [前 ...
- Delphi UTF编码 UTF8Encode、UTF8Decode、URLEncode、URLDecode
一.URL简介 URL是网页的地址,比如 http://www.cnblogs.com.Web 浏览器通过 URL 从 web 服务器请求页面. 由于URL字符串常常会包含非ASCII字符 ...
- Who Saw My Blog
I found that my blog has visitors!!! I wonder who has watched my blog and what did they feel at that ...
- Kali Linux下运行nfc工具测试!
由于Kali本身就集成了很多nfc工具,用起来很方便,再加上一个acr122u读卡器,来尝试PJ学校水卡! 首先安装驱动,到龙杰官网下载Linux的,解压后进入自己Linux发行版,Kali的是Deb ...
