kubernetes 1.15.1 高可用部署 -- 从零开始
这是一本书!!!
一本写我在容器生态圈的所学!!!
第1章 从零开始
重点先知:
1. centos 7.6安装优化
2. k8s 1.15.1 高可用部署
3. 网络插件calico
4. dashboard 插件
5. metrics-server 插件
6. kube-state-metrics 插件
原文分享:http://note.youdao.com/noteshare?id=c9f647765493d11099a939d7e5e102c9&sub=A837AA253CA54660AABADEF435A40714
1.1 前言
一直想写点内容,来记录我在IT这条路上的旅程。这个念头持续了很久。终于在2019年的7月21日成行。
我将我在IT这条路上的所学、所做、所闻当作旅途中的所看、所听、所感,一一记录下来。
IT是一条不归路。高手之上还有高手。而我单单的希望和越来越强的前辈过招。
我将我的IT方向,轨到容器开发。容器是容器生态圈的简称,开发是Go语言开发的简称。
我个人认为运维的趋势是容器化运维,开发的趋势是容器化开发。所以我走的是容器开发的路。
今年是相对悠闲的一年,可以沉下心来做两件大事:1. 我的容器生态圈之旅 2.Go语言从小白到大神之旅
我希望的是用时6个月初步达到容器开发的级别,因为我具备一定的基础,应该还是可以的。
我希望的是在2020年的5月份时,可以初步完成这两件大事。
I can do it because I'm young !
笔落心坚。拭目以待。
1.2 内容介绍
- 容器引擎:docker
- 容器编排:kubernetes
- 容器存储:ceph
- 容器监控:prometheus
- 日志分析:elk
- 服务网络: istio
1.3 资源
所需软件分享链接: 链接:https://pan.baidu.com/s/1IvUG_hdqDvReDJS9O1k9OA 提取码:7wfh
内容来源:官网、博文、其他
1.3.1 物理机
硬件性能

从上图可以看出来:硬件内存达到24.0GB,所以可以支持开启众多虚拟机,更有效的模拟真实生成环境。
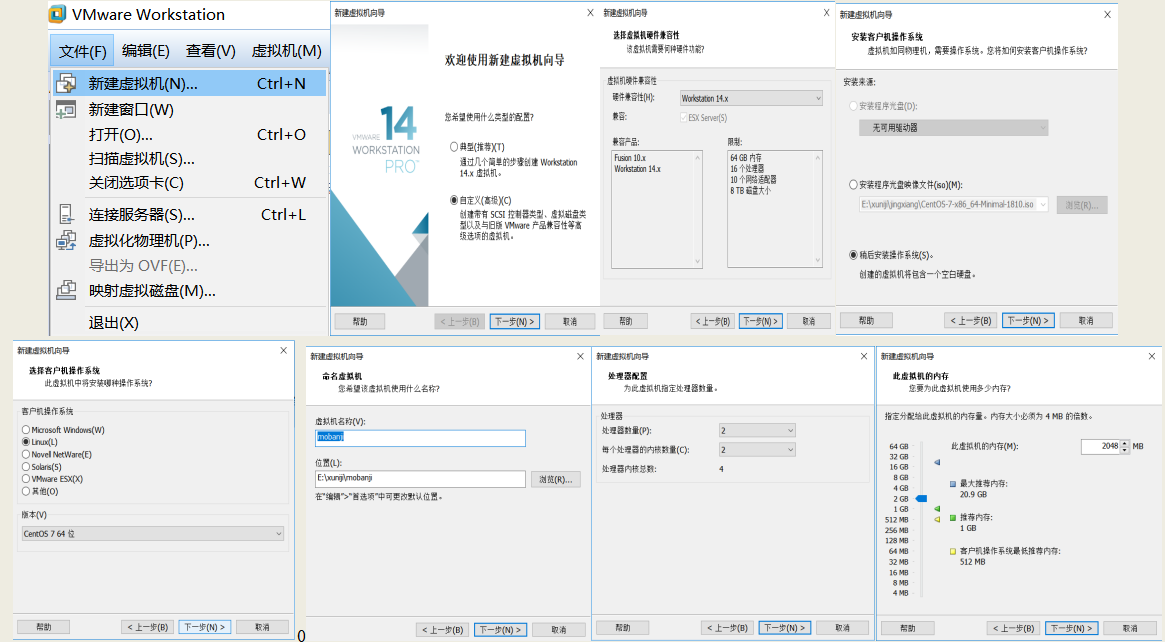
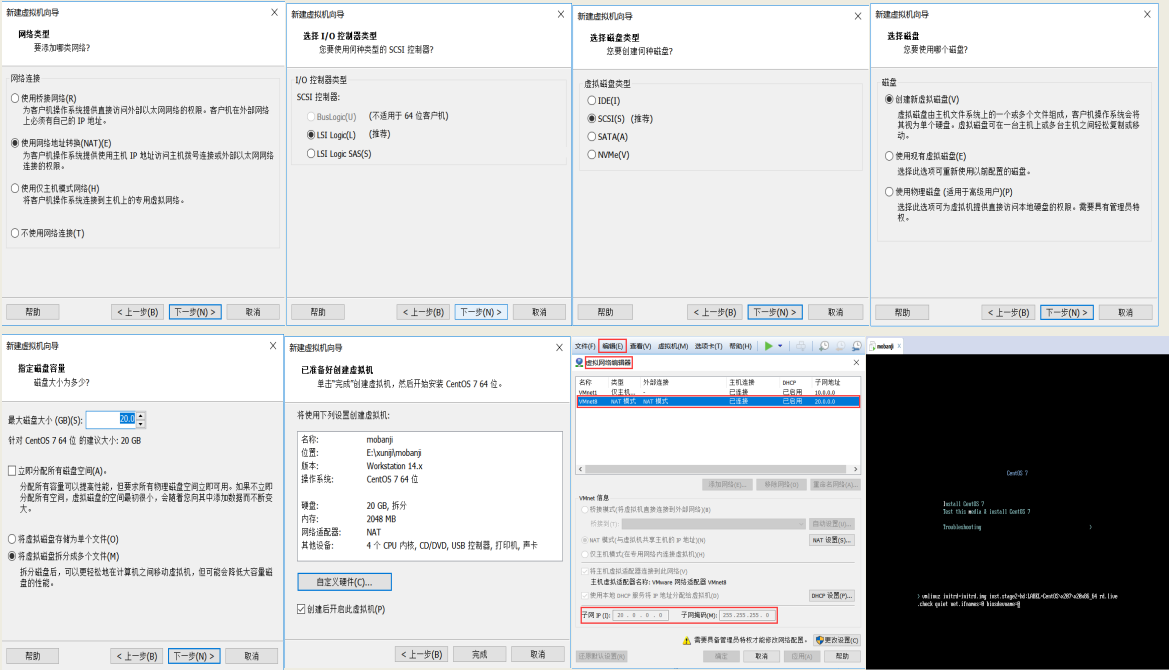
1.3.2 虚拟机工具
VMware Workstation Pro 14
VMware Workstation(中文名“威睿工作站”)是一款功能强大的桌面虚拟计算机软件,提供用户可在单一的桌面上同时运行不同的操作系统,和进行开发、测试 、部署新的应用程序的最佳解决方案。VMware Workstation可在一部实体机器上模拟完整的网络环境,以及可便于携带的虚拟机器,其更好的灵活性与先进的技术胜过了市面上其他的虚拟计算机软件。对于企业的 IT开发人员和系统管理员而言, VMware在虚拟网路,实时快照,拖曳共享文件夹,支持 PXE 等方面的特点使它成为必不可少的工具。
VMware Workstation允许操作系统(OS)和应用程序(Application)在一台虚拟机内部运行。虚拟机是独立运行主机操作系统的离散环境。在 VMware Workstation 中,你可以在一个窗口中加载一台虚拟机,它可以运行自己的操作系统和应用程序。你可以在运行于桌面上的多台虚拟机之间切换,通过一个网络共享虚拟机(例如一个公司局域网),挂起和恢复虚拟机以及退出虚拟机,这一切不会影响你的主机操作和任何操作系统或者其它正在运行的应用程序。
1.3.3 远程链接工具
Xshell是一个强大的安全终端模拟软件,它支持SSH1, SSH2, 以及Microsoft Windows 平台的TELNET 协议。Xshell 通过互联网到远程主机的安全连接以及它创新性的设计和特色帮助用户在复杂的网络环境中享受他们的工作。
Xshell可以在Windows界面下用来访问远端不同系统下的服务器,从而比较好的达到远程控制终端的目的。除此之外,其还有丰富的外观配色方案以及样式选择。
1.4 虚机
1.4.1 centos 7.6 系统安装


1.4.2 模板机优化
查看系统版本和内核
[root@mobanji ~]# cat /etc/redhat-release

CentOS Linux release 7.6. (Core)

[root@mobanji ~]# uname -r

3.10.-.el7.x86_64
别名设置
#进入网络配置文件

[root@mobanji ~]# yum install -y vim

[root@mobanji ~]# alias vimn="vim /etc/sysconfig/network-scripts/ifcfg-eth0"

[root@mobanji ~]# vim ~/.bashrc

alias vimn="vim /etc/sysconfig/network-scripts/ifcfg-eth0"
网络优化
[root@mobanji ~]# vimn

TYPE=Ethernet

BOOTPROTO=none

NAME=eth0

DEVICE=eth0

ONBOOT=yes

IPADDR=20.0.0.5

PREFIX=

GATEWAY=20.0.0.2

DNS1=233.5.5.5

DNS2=8.8.8.8

DNS3=119.29.29.29

DNS4=114.114.114.114
更新yum源及必要软件安装
[root@mobanji ~]# yum install -y wget

[root@mobanji ~]# cp -r /etc/yum.repos.d /etc/yum.repos.d.bak

[root@mobanji ~]# rm -f /etc/yum.repos.d/*.repo

[root@mobanji ~]# wget -O /etc/yum.repos.d/CentOS-Base.repo http://mirrors.aliyun.com/repo/Centos-7.repo \

 && wget -O /etc/yum.repos.d/epel.repo http://mirrors.aliyun.com/repo/epel-7.repo

[root@mobanji ~]# yum clean all && yum makecache

[root@mobanji ~]# yum install  bash-completion lrzsz  nmap  nc  tree  htop iftop  net-tools ntpdate  lsof screen tcpdump conntrack ntp ipvsadm ipset jq sysstat libseccomp nmon iptraf mlocate strace nethogs iptraf iftop bridge-utils bind-utils nc nfs-tuils rpcbind dnsmasq python python-devel tree telnet git sshpass bind-utils -y
配置时间
#配置时间同步

[root@mobanji ~]# ntpdate -u pool.ntp.org

[root@mobanji ~]# crontab -e

#dingshi time

*/ * * * * /usr/sbin/ntpdate -u pool.ntp.org >/dev/null >&

#调整系统TimeZone

[root@mobanji ~]# timedatectl set-timezone Asia/Shanghai

#将当前的 UTC 时间写入硬件时钟

[root@mobanji ~]# timedatectl set-local-rtc 0

# 重启依赖于系统时间的服务

[root@mobanji ~]# systemctl restart rsyslog

[root@mobanji ~]# systemctl restart crond
ssh优化
[root@mobanji ~]# sed  -i  '79s@GSSAPIAuthentication yes@GSSAPIAuthentication no@;115s@#UseDNS yes@UseDNS no@' /etc/ssh/sshd_config

[root@mobanji ~]# systemctl restart sshd
关闭防火墙和SElinux
#关闭防火墙,清理防火墙规则,设置默认转发策略

[root@mobanji ~]# systemctl stop firewalld

[root@mobanji ~]# systemctl disable firewalld

Removed symlink /etc/systemd/system/multi-user.target.wants/firewalld.service.

Removed symlink /etc/systemd/system/dbus-org.fedoraproject.FirewallD1.service.

[root@mobanji ~]# iptables -F && iptables -X && iptables -F -t nat && iptables -X -t nat

[root@mobanji ~]# iptables -P FORWARD ACCEPT

[root@mobanji ~]#  firewall-cmd --state

not running

关闭SELinux,否则后续K8S挂载目录时可能 setenforce

报错 Permission denied

[root@mobanji ~]# setenforce

[root@mobanji ~]# sed -i 's/^SELINUX=.*/SELINUX=disabled/' /etc/selinux/config
关闭无关的服务
[root@mobanji ~]# systemctl list-unit-files |grep "enabled"

[root@mobanji ~]#  systemctl status postfix &&  systemctl stop postfix && systemctl disable postfix
设置limits.conf
[root@mobanji ~]# cat >> /etc/security/limits.conf <<EOF

# End of file

* soft nofile

* hard nofile

* soft nproc

* hard nproc

EOF
升级系统内核
CentOS 7.x系统自带的3.10.x内核存在一些Bugs,导致运行的Docker、Kubernetes不稳定,例如:
-> 高版本的 docker(1.13 以后) 启用了3.10 kernel实验支持的kernel memory account功能(无法关闭),当节点压力大如频繁启动和停止容器时会导致 cgroup memory leak;
-> 网络设备引用计数泄漏,会导致类似于报错:"kernel:unregister_netdevice: waiting for eth0 to become free. Usage count = 1";
解决方案如下:
-> 升级内核到 4.4.X 以上;
-> 或者,手动编译内核,disable CONFIG_MEMCG_KMEM 特性;
-> 或者安装修复了该问题的 Docker 18.09.1 及以上的版本。但由于 kubelet 也会设置 kmem(它 vendor 了 runc),所以需要重新编译 kubelet 并指定 GOFLAGS="-tags=nokmem";
[root@mobanji ~]# uname -r

3.10.-.el7.x86_64

[root@mobanji ~]# yum update -y

[root@mobanji ~]# rpm --import https://www.elrepo.org/RPM-GPG-KEY-elrepo.org

[root@mobanji ~]# rpm -Uvh http://www.elrepo.org/elrepo-release-7.0-3.el7.elrepo.noarch.rpm

[root@mobanji ~]# yum --disablerepo="*" --enablerepo="elrepo-kernel" list available

kernel-lt.x86_64                               4.4.-.el7.elrepo              elrepo-kernel     <---长期文档版

......

kernel-ml.x86_64                               5.2.-.el7.elrepo                elrepo-kernel     <---最新主线稳定版

......

#安装内核源文件

[root@mobanji ~]# yum --enablerepo=elrepo-kernel install kernel-lt-devel kernel-lt -y
为了让新安装的内核成为默认启动选项
需要如下修改 GRUB 配置,打开并编辑 /etc/default/grub 并设置 GRUB_DEFAULT=0
意思是 GRUB 初始化页面的第一个内核将作为默认内核.
#查看默认启动顺序

[root@mobanji ~]# awk -F\' '$1=="menuentry " {print $2}' /etc/grub2.cfg

CentOS Linux (4.4.185-1.el7.elrepo.x86_64) 7 (Core)

CentOS Linux (3.10.0-957.21.3.el7.x86_64) 7 (Core)

CentOS Linux (3.10.0-957.el7.x86_64) 7 (Core)

CentOS Linux (0-rescue-b4c601a613824f9f827cb9787b605efb) 7 (Core)
由上面可以看出新内核(4.4.185)目前位置在0,原来的内核(3.10.0)目前位置在1,所以如果想生效最新的内核,还需要我们修改内核的启动顺序为0
#编辑/etc/default/grub文件

[root@mobanji ~]# vim /etc/default/grub

GRUB_DEFAULT=0   <--- saved改为0

#运行grub2-mkconfig命令来重新创建内核配置

#重启系统

[root@mobanji ~]# reboot
关闭NUMA
[root@mobanji ~]# cp /etc/default/grub{,.bak}

[root@mobanji ~]# vim /etc/default/grub

.........

GRUB_CMDLINE_LINUX="...... numa=off"      # 即添加"numa=0ff"内容

重新生成 grub2 配置文件:

# cp /boot/grub2/grub.cfg{,.bak}

# grub2-mkconfig -o /boot/grub2/grub.cfg
设置rsyslogd 和systemd journald
systemd 的 journald 是 Centos 7 缺省的日志记录工具,它记录了所有系统、内核、Service Unit 的日志。相比 systemd,journald 记录的日志有如下优势:
-> 可以记录到内存或文件系统;(默认记录到内存,对应的位置为 /run/log/jounal);
-> 可以限制占用的磁盘空间、保证磁盘剩余空间;
-> 可以限制日志文件大小、保存的时间;
-> journald 默认将日志转发给 rsyslog,这会导致日志写了多份,/var/log/messages 中包含了太多无关日志,不方便后续查看,同时也影响系统性能。
[root@mobanji ~]# mkdir /var/log/journal     <---#持久化保存日志的目录

[root@mobanji ~]# mkdir /etc/systemd/journald.conf.d

[root@mobanji ~]# cat > /etc/systemd/journald.conf.d/-prophet.conf <<EOF

> [Journal]

> # 持久化保存到磁盘

> Storage=persistent

>

> # 压缩历史日志

> Compress=yes

>

> SyncIntervalSec=5m

> RateLimitInterval=30s

> RateLimitBurst=

>

> # 最大占用空间 10G

> SystemMaxUse=10G

>

> # 单日志文件最大 200M

> SystemMaxFileSize=200M

>

> # 日志保存时间  周

> MaxRetentionSec=2week

>

> # 不将日志转发到 syslog

> ForwardToSyslog=no

> EOF

[root@mobanji ~]# systemctl restart systemd-journald

[root@mobanji ~]# systemctl status systemd-journald
加载内核模块
[root@mobanji ~]# cat > /etc/sysconfig/modules/ipvs.modules <<EOF

> #!/bin/bash

> modprobe -- ip_vs

> modprobe -- ip_vs_rr

> modprobe -- ip_vs_wrr

> modprobe -- ip_vs_sh

> modprobe -- nf_conntrack_ipv4

> modprobe -- br_netfilter

> EOF

/etc/sysconfig/modules/ipvs.modules[root@mobanji ~]#

[root@mobanji ~]# chmod  /etc/sysconfig/modules/ipvs.modules && bash /etc/sysconfig/modules/ipvs.modules

[root@mobanji ~]# lsmod  | grep br_netfilter

br_netfilter

bridge                   br_netfilter
优化内核参数
[root@mobanji ~]# cat << EOF | tee /etc/sysctl.d/k8s.conf

net.bridge.bridge-nf-call-iptables=

net.bridge.bridge-nf-call-ip6tables=

net.ipv4.ip_forward=

net.ipv4.tcp_tw_recycle=  #由于tcp_tw_recycle与kubernetes的NAT冲突,必须关闭!否则会导致服务不通。

vm.swappiness=            #禁止使用 swap 空间,只有当系统 OOM 时才允许使用它

vm.overcommit_memory=     #不检查物理内存是否够用

vm.panic_on_oom=          #开启 OOM

fs.inotify.max_user_instances=

fs.inotify.max_user_watches=

fs.file-max=

fs.nr_open=

net.ipv6.conf.all.disable_ipv6=  #关闭不使用的ipv6协议栈,防止触发docker BUG.

net.netfilter.nf_conntrack_max=

EOF

[root@mobanji ~]# sysctl -p /etc/sysctl.d/k8s.conf
注:
必须关闭 tcp_tw_recycle,否则和 NAT 冲突,会导致服务不通;
关闭 IPV6,防止触发 docker BUG;
个性vim配置
https://blog.csdn.net/zisefeizhu/article/details/89407487
[root@mobanji ~]# cat ~/.vimrc

set nocompatible

filetype on

set paste

set rtp+=~/.vim/bundle/Vundle.vim

call vundle#begin()

" 这里根据自己需要的插件来设置,以下是我的配置 "

"

" YouCompleteMe:语句补全插件

set runtimepath+=~/.vim/bundle/YouCompleteMe

autocmd InsertLeave * if pumvisible() == |pclose|endif "离开插入模式后自动关闭预览窗口"

let g:ycm_collect_identifiers_from_tags_files =            " 开启 YCM基于标签引擎

let g:ycm_collect_identifiers_from_comments_and_strings =  " 注释与字符串中的内容也用于补全

let g:syntastic_ignore_files=[".*\.py$"]

let g:ycm_seed_identifiers_with_syntax =                   " 语法关键字补全

let g:ycm_complete_in_comments =

let g:ycm_confirm_extra_conf =                             " 关闭加载.ycm_extra_conf.py提示

let g:ycm_key_list_select_completion = ['<c-n>', '<Down>']  " 映射按键,没有这个会拦截掉tab, 导致其他插件的tab不能用.

let g:ycm_key_list_previous_completion = ['<c-p>', '<Up>']

let g:ycm_complete_in_comments =                           " 在注释输入中也能补全

let g:ycm_complete_in_strings =                            " 在字符串输入中也能补全

let g:ycm_collect_identifiers_from_comments_and_strings =  " 注释和字符串中的文字也会被收入补全

let g:ycm_global_ycm_extra_conf='~/.vim/bundle/YouCompleteMe/third_party/ycmd/cpp/ycm/.ycm_extra_conf.py'

let g:ycm_show_diagnostics_ui =                            " 禁用语法检查

inoremap <expr> <CR> pumvisible() ? "\<C-y>" : "\<CR>"             " 回车即选中当前项

nnoremap <c-j> :YcmCompleter GoToDefinitionElseDeclaration<CR>     " 跳转到定义处

let g:ycm_min_num_of_chars_for_completion=                 " 从第2个键入字符就开始罗列匹配项

"

" github 仓库中的插件 "

Plugin 'VundleVim/Vundle.vim'

Plugin 'vim-airline/vim-airline'

"vim-airline配置:优化vim界面"

"let g:airline#extensions#tabline#enabled = 1

" airline设置

" 显示颜色

set t_Co=

set laststatus=

" 使用powerline打过补丁的字体

let g:airline_powerline_fonts =

" 开启tabline

let g:airline#extensions#tabline#enabled =

" tabline中当前buffer两端的分隔字符

let g:airline#extensions#tabline#left_sep = ' '

" tabline中未激活buffer两端的分隔字符

let g:airline#extensions#tabline#left_alt_sep = ' '

" tabline中buffer显示编号

let g:airline#extensions#tabline#buffer_nr_show =

" 映射切换buffer的键位

nnoremap [b :bp<CR>

nnoremap ]b :bn<CR>

" 映射<leader>num到num buffer

map <leader> :b <CR>

map <leader> :b <CR>

map <leader> :b <CR>

map <leader> :b <CR>

map <leader> :b <CR>

map <leader> :b <CR>

map <leader> :b <CR>

map <leader> :b <CR>

map <leader> :b <CR>

" vim-scripts 中的插件 "

Plugin 'taglist.vim'

"ctags 配置:F3快捷键显示程序中的各种tags,包括变量和函数等。

map <F3> :TlistToggle<CR>

let Tlist_Use_Right_Window=

let Tlist_Show_One_File=

let Tlist_Exit_OnlyWindow=

let Tlist_WinWidt=

Plugin 'The-NERD-tree'

"NERDTree 配置:F2快捷键显示当前目录树

map <F2> :NERDTreeToggle<CR>

let NERDTreeWinSize=

Plugin 'indentLine.vim'

Plugin 'delimitMate.vim'

" 非 github 仓库的插件"

" Plugin 'git://git.wincent.com/command-t.git'

" 本地仓库的插件 "

call vundle#end()

"""""""""""""""""""""""""""""""""""""""""""""""""""""""""""""""""""""""""""""""""""""""""""""""""

"""""新文件标题

""""""""""""""""""""""""""""""""""""""""""""""""""""""""""""""""""""""""""""""""""""""""""""""""

"新建.c,.h,.sh,.java文件,自动插入文件头

autocmd BufNewFile *.sh,*.yaml exec ":call SetTitle()"

""定义函数SetTitle,自动插入文件头

func SetTitle()

"如果文件类型为.sh文件

if &filetype == 'sh'

call setline(, "##########################################################################")

        call setline(,"#Author:                     zisefeizhu")

        call setline(,"#QQ:                         2********0")

        call setline(,"#Date:                       ".strftime("%Y-%m-%d"))

        call setline(,"#FileName:                   ".expand("%"))

        call setline(,"#URL:                        https://www.cnblogs.com/zisefeizhu/")

        call setline(,"#Description:                The test script")

        call setline(,"#Copyright (C):              ".strftime("%Y")." All rights reserved")

call setline(, "##########################################################################")

call setline(, "#!/bin/bash")

call setline(,"PATH=/usr/local/sbin:/usr/local/bin:/usr/sbin:/usr/bin:/root/bin")

call setline(, "export $PATH")

call setline(, "")

endif

if &filetype == 'yaml'

call setline(, "##########################################################################")

        call setline(,"#Author:                     zisefeizhu")

        call setline(,"#QQ:                         2********0")

        call setline(,"#Date:                       ".strftime("%Y-%m-%d"))

        call setline(,"#FileName:                   ".expand("%"))

        call setline(,"#URL:                        https://www.cnblogs.com/zisefeizhu/")

        call setline(,"#Description:                The test script")

        call setline(,"#Copyright (C):              ".strftime("%Y")." All rights reserved")

call setline(, "###########################################################################")

call setline(, "")

endif

"新建文件后,自动定位到文件末尾

autocmd BufNewFile * normal G

endfunc

""""""""""""""""""""""""""""""""""""""""""""""""""""""""""""""""""""""""""""""""""""""""""""""""""""""

"键盘命令

""""""""""""""""""""""""""""""""""""""""""""""""""""""""""""""""""""""""""""""""""""""""""""""""""""""

nmap <leader>w :w!<cr>

nmap <leader>f :find<cr>

" 映射全选+复制 ctrl+a

map <C-A> ggVGY

map! <C-A> <Esc>ggVGY

map <F12> gg=G

" 选中状态下 Ctrl+c 复制

vmap <C-c> "+y

""""""""""""""""""""""""""""""""""""""""""""""""""""""""""""""""""""""""""""""""""""""""""""""""""""""

""实用设置

"""""""""""""""""""""""""""""""""""""""""""""""""""""""""""""""""""""""""""""""""""""""""""""""""""""

" 设置当文件被改动时自动载入

set autoread

" quickfix模式

autocmd FileType c,cpp map <buffer> <leader><space> :w<cr>:make<cr>

"代码补全

set completeopt=preview,menu

"允许插件

filetype plugin on

"共享剪贴板

set clipboard=unnamed

"从不备份

set nobackup

"make 运行

:set makeprg=g++\ -Wall\ \ %

"自动保存

set autowrite

set ruler                   " 打开状态栏标尺

set cursorline              " 突出显示当前行

set magic                   " 设置魔术

set guioptions-=T           " 隐藏工具栏

set guioptions-=m           " 隐藏菜单栏

"set statusline=\ %<%F[%1*%M%*%n%R%H]%=\ %y\ %0(%{&fileformat}\ %{&encoding}\ %c:%l/%L%)\

" 设置在状态行显示的信息

set foldcolumn=

set foldmethod=indent

set foldlevel=

set foldenable              " 开始折叠

" 不要使用vi的键盘模式,而是vim自己的

set nocompatible

" 语法高亮

set syntax=on

" 去掉输入错误的提示声音

set noeb

" 在处理未保存或只读文件的时候,弹出确认

set confirm

" 自动缩进

set autoindent

set cindent

" Tab键的宽度

set tabstop=

" 统一缩进为2

set softtabstop=

set shiftwidth=

" 不要用空格代替制表符

set noexpandtab

" 在行和段开始处使用制表符

set smarttab

" 显示行号

" set number

" 历史记录数

set history=

"禁止生成临时文件

set nobackup

set noswapfile

"搜索忽略大小写

set ignorecase

"搜索逐字符高亮

set hlsearch

set incsearch

"行内替换

set gdefault

"编码设置

set enc=utf-

set fencs=utf-,ucs-bom,shift-jis,gb18030,gbk,gb2312,cp936

"语言设置

set langmenu=zh_CN.UTF-

set helplang=cn

" 我的状态行显示的内容(包括文件类型和解码)

set statusline=%F%m%r%h%w\ [FORMAT=%{&ff}]\ [TYPE=%Y]\ [POS=%l,%v][%p%%]\ %{strftime(\"%d/%m/%y\ -\ %H:%M\")}

set statusline=[%F]%y%r%m%*%=[Line:%l/%L,Column:%c][%p%%]

" 总是显示状态行

set laststatus=

" 命令行(在状态行下)的高度,默认为1,这里是2

set cmdheight=

" 侦测文件类型

filetype on

" 载入文件类型插件

filetype plugin on

" 为特定文件类型载入相关缩进文件

filetype indent on

" 保存全局变量

set viminfo+=!

" 带有如下符号的单词不要被换行分割

set iskeyword+=_,$,@,%,#,-

" 字符间插入的像素行数目

set linespace=

" 增强模式中的命令行自动完成操作

set wildmenu

" 使回格键(backspace)正常处理indent, eol, start等

set backspace=

" 允许backspace和光标键跨越行边界

set whichwrap+=<,>,h,l

" 可以在buffer的任何地方使用鼠标(类似office中在工作区双击鼠标定位)

set mouse=a

set selection=exclusive

set selectmode=mouse,key

" 通过使用: commands命令,告诉我们文件的哪一行被改变过

set report=

" 在被分割的窗口间显示空白,便于阅读

set fillchars=vert:\ ,stl:\ ,stlnc:\

" 高亮显示匹配的括号

set showmatch

" 匹配括号高亮的时间(单位是十分之一秒)

set matchtime=

" 光标移动到buffer的顶部和底部时保持3行距离

set scrolloff=

" 为C程序提供自动缩进

set smartindent

" 高亮显示普通txt文件(需要txt.vim脚本)

 au BufRead,BufNewFile *  setfiletype txt

"自动补全

:inoremap ( ()<ESC>i

:inoremap ) <c-r>=ClosePair(')')<CR>

":inoremap { {<CR>}<ESC>O

":inoremap } <c-r>=ClosePair('}')<CR>

:inoremap [ []<ESC>i

:inoremap ] <c-r>=ClosePair(']')<CR>

:inoremap " ""<ESC>i

:inoremap ' ''<ESC>i

function! ClosePair(char)

if getline('.')[col('.') - ] == a:char

return "\<Right>"

else

return a:char

endif

endfunction

filetype plugin indent on

"打开文件类型检测, 加了这句才可以用智能补全

set completeopt=longest,menu

"""""""""""""""""""""""""""""""""""""""""""""""""""""""""""""""""""""""""""""""""""""""""""""""""
设置sysctl.conf
[root@mobanji ~]# [ ! -e "/etc/sysctl.conf_bk" ] && /bin/mv /etc/sysctl.conf{,_bk} \

> && cat > /etc/sysctl.conf << EOF

> fs.file-max=

> fs.nr_open=

> net.ipv4.tcp_max_tw_buckets =

> net.ipv4.tcp_sack =

> net.ipv4.tcp_window_scaling =

> net.ipv4.tcp_rmem =

> net.ipv4.tcp_wmem =

> net.ipv4.tcp_max_syn_backlog =

> net.core.netdev_max_backlog =

> net.core.somaxconn =

> net.core.wmem_default =

> net.core.rmem_default =

> net.core.rmem_max =

> net.core.wmem_max =

> net.ipv4.tcp_timestamps =

> net.ipv4.tcp_fin_timeout =

> net.ipv4.tcp_synack_retries =

> net.ipv4.tcp_syn_retries =

> net.ipv4.tcp_syncookies =

> #net.ipv4.tcp_tw_len =

> net.ipv4.tcp_tw_reuse =

> net.ipv4.tcp_mem =

> net.ipv4.tcp_max_orphans =

> net.ipv4.ip_local_port_range =

> #net.nf_conntrack_max =

> #net.netfilter.nf_conntrack_max =

> #net.netfilter.nf_conntrack_tcp_timeout_close_wait =

> #net.netfilter.nf_conntrack_tcp_timeout_fin_wait =

> #net.netfilter.nf_conntrack_tcp_timeout_time_wait =

> #net.netfilter.nf_conntrack_tcp_timeout_established =

> EOF

[root@mobanji ~]# sysctl -p
科目目录
#脚本目录

[root@mobanji ~]#mkdir -p /service/scripts
至此:模板机优化完毕
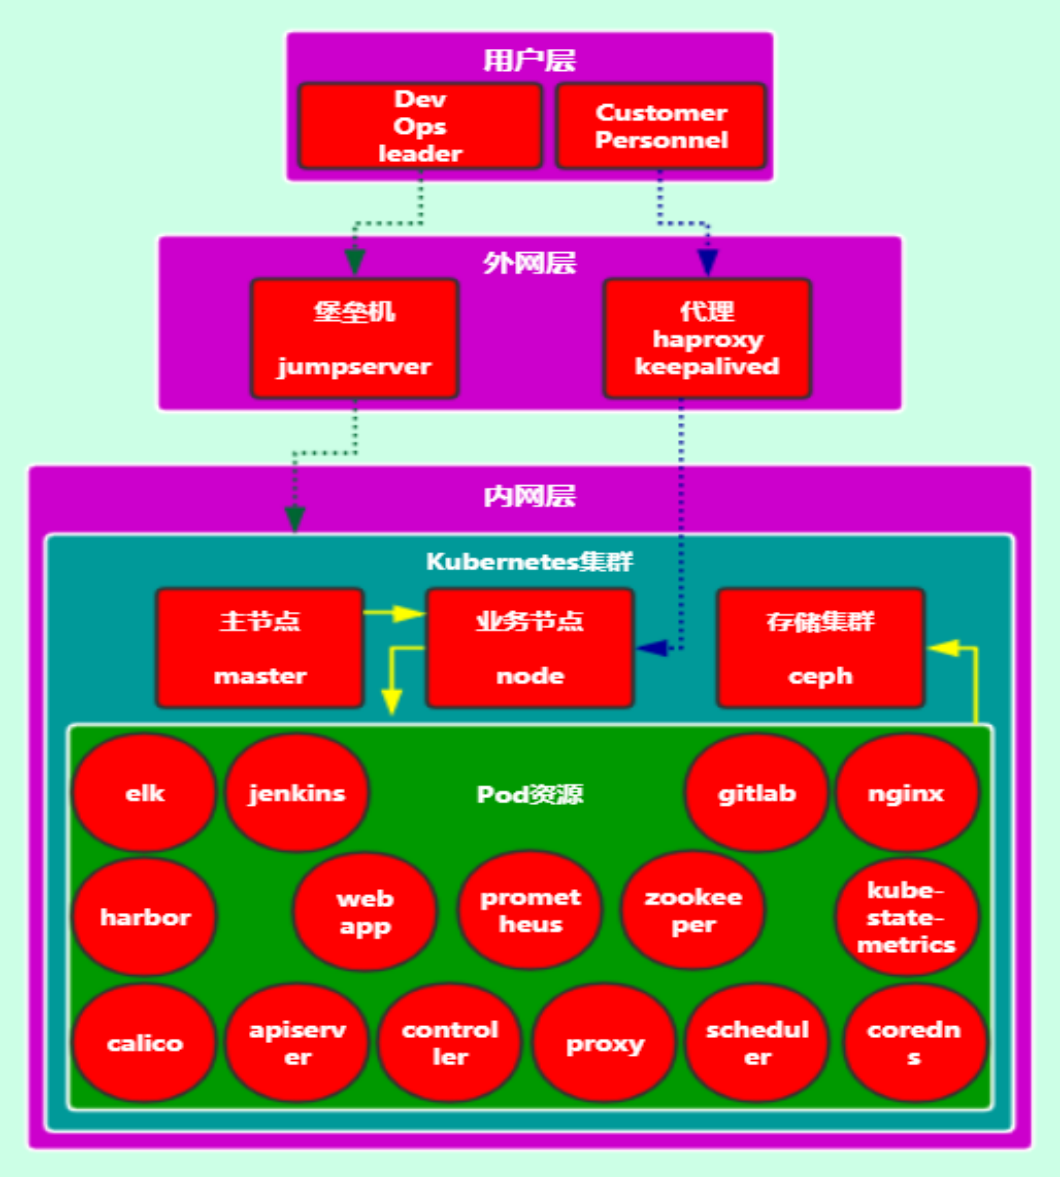
1.4.3 虚机准备
|
节点名称 |
IP |
安装软件 |
角色 |
|
|
jumpserver |
20.0.0.200 |
jumpserver |
堡垒机 |
|
|
k8s-master01 |
20.0.0.201 |
kubeadm、kubelet、kubectl、docker、etcd |
master节点 |
|
|
k8s-master02 |
20.0.0.202 |
|||
|
ceph |
||||
|
k8s-master03 |
20.0.0.203 |
|||
|
k8s-node01 |
20.0.0.204 |
kubeadm、kubelet、kubectl、docker |
业务节点 |
|
|
k8s-node02 |
20.0.0.205 |
|||
|
k8s-node03 |
20.0.0.206 |
|||
|
k8s-ha01 |
20.0.0.207 20.0.0.208 |
VIP:20.0.0.250 |
haproxy、keepalived、ceph |
VIP |
|
k8s-ha02 |
||||
|
k8s-ceph |
20.0.0.209 |
ceph |
存储节点 |
|
以k8s-master01为例
#改主机名

[root@mobanji ~]# hostnamectl set-hostname k8s-master01

[root@mobanji ~]# bash

[root@k8s-master01 ~]#

#改IP

[root@k8s-master01 ~]# vimn

TYPE=Ethernet

BOOTPROTO=none

NAME=eth0

DEVICE=eth0

ONBOOT=yes

IPADDR=20.0.0.201

PREFIX=

GATEWAY=20.0.0.2

DNS1=223.5.5.5

[root@k8s-master01 ~]# systemctl restart network

[root@k8s-master01 ~]# ping www.baidu.com

PING www.baidu.com (61.135.169.121) () bytes of data.

 bytes from 61.135.169.121 (61.135.169.121): icmp_seq= ttl= time=43.3 ms

^C

--- www.baidu.com ping statistics ---

 packets transmitted,  received, % packet loss, time 0ms

rtt min/avg/max/mdev = 43.348/43.348/43.348/0.000 ms

[root@k8s-master01 ~]# hostname -I

20.0.0.201

注:

init    -->  快照
至此:虚机准备完毕
1.5 集群
1.5.1 部署负载均衡高可用
以k8s-ha01为例
1.5.1.1 软件安装

#k8s-ha01和k8s-ha02

[root@k8s-ha01 ~]#  yum -y install keepalived haproxy -y

1.5.1.2 部署keepalived

#k8s-ha01和k8s-ha02

[root@k8s-ha01 ~]# cp /etc/keepalived/keepalived.conf{,.bak}

[root@k8s-ha01 ~]# > /etc/keepalived/keepalived.conf

#k8s-ha01

[root@k8s-ha01 ~]# cat /etc/keepalived/keepalived.conf

! Configuration File for keepalived

global_defs {

notification_email {

lhmp@zisefeizhu.cn

devops@zisefeizhu.cn

}

notification_email_from lhmp@zisefeizhi.cn

smtp_server 127.0.0.1

smtp_connect_timeout

router_id master-node

}

vrrp_script chk_haproxy_port {

    script "/service/scripts/chk_hapro.sh"

    interval

    weight -

    fall

    rise

}

vrrp_instance VI_1 {

    state MASTER

    interface eth0

    virtual_router_id

    priority

    advert_int

unicast_src_ip 20.0.0.207

    unicast_peer {

      20.0.0.208

    }

    authentication {

        auth_type PASS

        auth_pass

    }

    virtual_ipaddress {

        20.0.0.250 dev eth0 label eth0:

    }

track_script {

       chk_haproxy_port

}

}

[root@k8s-ha01 ~]# scp /etc/keepalived/keepalived.conf 20.0.0.208:/etc/keepalived/keepalived.conf

#k8s-ha02

[root@k8s-ha02 ~]# vim /etc/keepalived/keepalived.conf

! Configuration File for keepalived

global_defs {

notification_email {

lhmp@zisefeizhu.cn

devops@zisefeizhu.cn

}

notification_email_from lhmp@zisefeizhi.cn

smtp_server 127.0.0.1

smtp_connect_timeout

router_id master-node

}

vrrp_script chk_http_port {

    script "/service/scripts/chk_hapro.sh"

    interval

    weight -

    fall

    rise

}

vrrp_instance VI_1 {

    state MASTER

    interface eth0

    virtual_router_id

    priority

    advert_int

unicast_src_ip 20.0.0.208

    unicast_peer {

      20.0.0.207

    }

    authentication {

        auth_type PASS

        auth_pas s

    }

    virtual_ipaddress {

        20.0.0.250 dev eth0 label eth0:

    }

track_script {

       check_haproxy

}

}

1.5.1.3 部署haproxy

#k8s-ha01和k8s-ha02

[root@k8s-ha01 ~]# cp /etc/haproxy/haproxy.cfg{,.bak}

[root@k8s-ha01 ~]# > /etc/haproxy/haproxy.cfg

#k8s-ha01

[root@k8s-ha01 ~]# vim /etc/haproxy/haproxy.cfg

[root@k8s-ha01 ~]# cat /etc/haproxy/haproxy.cfg

#---------------------------------------------------------------------

# Global settings

#---------------------------------------------------------------------

global

maxconn

#chroot /var/haproxy/lib/haproxy

#stats socket /var/lib/haproxy/haproxy.sock mode  level admin

uid

gid

daemon

nbproc

cpu-map

cpu-map

#pidfile /var/haproxy/run/haproxy.pid

log 127.0.0.1 local3 info

defaults

option http-keep-alive

option  forwardfor

maxconn

mode http

timeout connect 300000ms

timeout client  300000ms

timeout server  300000ms

listen stats

 mode http

 bind 0.0.0.0:

 stats enable

 log global

 stats uri     /haproxy-status

 stats auth    admin:zisefeizhu

#K8S-API-Server

frontend K8S_API

    bind *:

    mode tcp

    default_backend k8s_api_nodes_6443

backend k8s_api_nodes_6443

    mode tcp

    balance leastconn

    server 20.0.0.201  20.0.0.201:  check inter  fall  rise

    server 20.0.0.202  20.0.0.202:  check inter  fall  rise

    server 20.0.0.203  20.0.0.203:  check inter  fall  rise

#k8s-ha02

[root@k8s-ha01 ~]# scp /etc/haproxy/haproxy.cfg 20.0.0.208:/etc/haproxy/haproxy.cfg

1.5.1.4 设置服务启动顺序及依赖关系

#k8s-ha01和k8s-ha02

[root@k8s-ha01 ~]# vim /usr/lib/systemd/system/keepalived.service

[Unit]

Description=LVS and VRRP High Availability Monitor

After=syslog.target network-online.target haproxy.service

Requires=haproxy.service

......

1.5.1.5 检查脚本

[root@k8s-ha01 ~]# vim /service/scripts/chk_hapro.sh

[root@k8s-ha01 ~]# cat /service/scripts/chk_hapro.sh

##########################################################################

#Author:                     zisefeizhu

#QQ:                         ********

#Date:                       --

#FileName:                   /service/scripts/chk_hapro.sh

#URL:                        https://www.cnblogs.com/zisefeizhu/

#Description:                The test script

#Copyright (C):               All rights reserved

##########################################################################

#!/bin/bash

counts=$(ps -ef|grep -w "haproxy"|grep -v grep|wc -l)

if [ "${counts}" = "" ]; then

    systemctl restart keepalived.service

    sleep

    counts=$(ps -ef|grep -w "haproxy"|grep -v grep|wc -l)

    if [ "${counts}" = "" ]; then

        systemctl stop keepalived.service

    fi

fi

1.5.1.6 启动服务

[root@k8s-ha01 ~]# systemctl enable keepalived && systemctl start keepalived && systemctl enable haproxy && systemctl start haproxy && systemctl status keepalived && systemctl status haproxy
1.5.1.7 测试

[root@k8s-ha01 ~]# systemctl stop keepalived

#刷新浏览器

[root@k8s-ha01 ~]# systemctl start keepalived

[root@k8s-ha01 ~]# systemctl stop haproxy

#刷新浏览器
1.5.2 部署kubernetes集群
1.5.2.1 虚机初始化
以k8s-master01为例

为每台虚机添加host解析记录
[root@k8s-master01 ~]# cat >> /etc/hosts << EOF

> 20.0.0.201  k8s-master01

> 20.0.0.202  k8s-master02

> 20.0.0.203  k8s-master03

> 20.0.0.204  k8s-node01

> 20.0.0.205  k8s-node02

> 20.0.0.206  k8s-node03

> EOF
免密钥登陆
[root@k8s-master01 ~]# vim /service/scripts/ssh-copy.sh

##########################################################################

#Author:                     zisefeizhu

#QQ:                         ********

#Date:                       --

#FileName:                   /service/scripts/ssh-copy.sh

#URL:                        https://www.cnblogs.com/zisefeizhu/

#Description:                The test script

#Copyright (C):               All rights reserved

##########################################################################

#!/bin/bash

#目标主机列表

IP="

20.0.0.201

k8s-master01

20.0.0.202

k8s-master02

20.0.0.203

k8s-master03

20.0.0.204

k8s-node01

20.0.0.205

k8s-node02

20.0.0.206

k8s-node03

"

for node in ${IP};do

  sshpass -p  ssh-copy-id  ${node}  -o StrictHostKeyChecking=no

  if [ $? -eq  ];then

    echo "${node} 秘钥copy完成"

  else

    echo "${node} 秘钥copy失败"

  fi

done

[root@k8s-master01 ~]# ssh-keygen -t rsa

[root@k8s-master01 ~]# sh /service/scripts/ssh-copy.sh
关闭交换分区
[root@k8s-master01 ~]# swapoff -a

[root@k8s-master01 ~]# yes | cp /etc/fstab /etc/fstab_bak

[root@k8s-master01 ~]# cat /etc/fstab_bak |grep -v swap > /etc/fstab
添加k8s源
[root@k8s-master01 ~]# cat << EOF > /etc/yum.repos.d/kubernetes.repo

> [kubernetes]

> name=Kubernetes

> baseurl=https://mirrors.aliyun.com/kubernetes/yum/repos/kubernetes-el7-x86_64/

> enabled=

> gpgcheck=

> repo_gpgcheck=

> gpgkey=https://mirrors.aliyun.com/kubernetes/yum/doc/yum-key.gpg https://mirrors.aliyun.com/kubernetes/yum/doc/rpm-package-key.gpg

> EOF
1.5.2.2 安装docker
k8s-master01为例

安装必要的一些系统工具
[root@k8s-master01 ~]# yum install -y yum-utils device-mapper-persistent-data lvm2
安装docker
[root@k8s-master01 ~]# yum-config-manager --add-repo http://mirrors.aliyun.com/docker-ce/linux/centos/docker-ce.repo

[root@k8s-master01 ~]# yum list docker-ce --showduplicates | sort -r

[root@k8s-master01 ~]# yum -y install docker-ce-18.06..ce-.el7
配置daemon.json
#获取镜像加速

阿里云

   打开网址:https://cr.console.aliyun.com/#/accelerator

        注册、登录、设置密码

        然后在页面上可以看到加速器地址,类似于:https://123abc.mirror.aliyuncs.com

腾讯云(非腾讯云主机不可用)

加速地址:https://mirror.ccs.tencentyun.com

#配置

[root@k8s-master01 ~]# mkdir -p /etc/docker/ \

&& cat > /etc/docker/daemon.json << EOF

{

     "registry-mirrors":[

         "https://c6ai9izk.mirror.aliyuncs.com"

     ],

     "max-concurrent-downloads":,

     "data-root":"/data/docker",

     "log-driver":"json-file",

     "log-opts":{

         "max-size":"100m",

         "max-file":""

     },

     "max-concurrent-uploads":,

     "storage-driver":"overlay2",

     "storage-opts": [

     "overlay2.override_kernel_check=true"

   ],

  "live-restore": true,       <--- 保证 docker daemon重启,但容器不重启

    "exec-opts": [

    "native.cgroupdriver=systemd"

    ]

 }

 EOF
启动检查docker
[root@k8s-master01 ~]# systemctl enable docker \

> && systemctl restart docker \

> && systemctl status docker
注:daemon.json详解
{

    "authorization-plugins": [],   //访问授权插件

    "data-root": "",   //docker数据持久化存储的根目录

    "dns": [],   //DNS服务器

    "dns-opts": [],   //DNS配置选项,如端口等

    "dns-search": [],   //DNS搜索域名

    "exec-opts": [],   //执行选项

    "exec-root": "",   //执行状态的文件的根目录

    "experimental": false,   //是否开启试验性特性

    "storage-driver": "",   //存储驱动器

    "storage-opts": [],   //存储选项

    "labels": [],   //键值对式标记docker元数据

    "live-restore": true,   //dockerd挂掉是否保活容器(避免了docker服务异常而造成容器退出)

    "log-driver": "",   //容器日志的驱动器

    "log-opts": {},   //容器日志的选项

    "mtu": ,   //设置容器网络MTU(最大传输单元)

    "pidfile": "",   //daemon PID文件的位置

    "cluster-store": "",   //集群存储系统的URL

    "cluster-store-opts": {},   //配置集群存储

    "cluster-advertise": "",   //对外的地址名称

    "max-concurrent-downloads": ,   //设置每个pull进程的最大并发

    "max-concurrent-uploads": ,   //设置每个push进程的最大并发

    "default-shm-size": "64M",   //设置默认共享内存的大小

    "shutdown-timeout": ,   //设置关闭的超时时限(who?)

    "debug": true,   //开启调试模式

    "hosts": [],   //监听地址(?)

    "log-level": "",   //日志级别

    "tls": true,   //开启传输层安全协议TLS

    "tlsverify": true,   //开启输层安全协议并验证远程地址

    "tlscacert": "",   //CA签名文件路径

    "tlscert": "",   //TLS证书文件路径

    "tlskey": "",   //TLS密钥文件路径

    "swarm-default-advertise-addr": "",   //swarm对外地址

    "api-cors-header": "",   //设置CORS(跨域资源共享-Cross-origin resource sharing)头

    "selinux-enabled": false,   //开启selinux(用户、进程、应用、文件的强制访问控制)

    "userns-remap": "",   //给用户命名空间设置 用户/组

    "group": "",   //docker所在组

    "cgroup-parent": "",   //设置所有容器的cgroup的父类(?)

    "default-ulimits": {},   //设置所有容器的ulimit

    "init": false,   //容器执行初始化,来转发信号或控制(reap)进程

    "init-path": "/usr/libexec/docker-init",   //docker-init文件的路径

    "ipv6": false,   //开启IPV6网络

    "iptables": false,   //开启防火墙规则

    "ip-forward": false,   //开启net.ipv4.ip_forward

    "ip-masq": false,   //开启ip掩蔽(IP封包通过路由器或防火墙时重写源IP地址或目的IP地址的技术)

    "userland-proxy": false,   //用户空间代理

    "userland-proxy-path": "/usr/libexec/docker-proxy",   //用户空间代理路径

    "ip": "0.0.0.0",   //默认IP

    "bridge": "",   //将容器依附(attach)到桥接网络上的桥标识

    "bip": "",   //指定桥接ip

    "fixed-cidr": "",   //(ipv4)子网划分,即限制ip地址分配范围,用以控制容器所属网段实现容器间(同一主机或不同主机间)的网络访问

    "fixed-cidr-v6": "",   //(ipv6)子网划分

    "default-gateway": "",   //默认网关

    "default-gateway-v6": "",   //默认ipv6网关

    "icc": false,   //容器间通信

    "raw-logs": false,   //原始日志(无颜色、全时间戳)

    "allow-nondistributable-artifacts": [],   //不对外分发的产品提交的registry仓库

    "registry-mirrors": [],   //registry仓库镜像

    "seccomp-profile": "",   //seccomp配置文件

    "insecure-registries": [],   //非https的registry地址

    "no-new-privileges": false,   //禁止新优先级(??)

    "default-runtime": "runc",   //OCI联盟(The Open Container Initiative)默认运行时环境

    "oom-score-adjust": -,   //内存溢出被杀死的优先级(-1000~1000)

    "node-generic-resources": ["NVIDIA-GPU=UUID1", "NVIDIA-GPU=UUID2"],   //对外公布的资源节点

    "runtimes": {   //运行时

        "cc-runtime": {

            "path": "/usr/bin/cc-runtime"

        },

        "custom": {

            "path": "/usr/local/bin/my-runc-replacement",

            "runtimeArgs": [

                "--debug"

            ]

        }

    }

}
1.5.2.3 使用kubeadm部署kubernetes
以k8s-master01为例

安装必备软件
[root@k8s-master01 ~]# yum list  kubelet kubeadm kubectl --showduplicates | sort -r

[root@k8s-master01 ~]# yum install -y kubelet-1.15. kubeadm-1.15. kubectl-1.15. ipvsadm ipset

##设置kubelet开机自启动,注意:这一步不能直接执行 systemctl start kubelet,会报错,成功初始化完后kubelet会自动起来

[root@k8s-master01 ~]# systemctl enable kubelet

#kubectl命令补全

[root@k8s-master01 ~]# source /usr/share/bash-completion/bash_completion

[root@k8s-master01 ~]# source <(kubectl completion bash)

[root@k8s-master01 ~]# echo "source <(kubectl completion bash)" >> ~/.bashrc
修改初始化配置
使用kubeadm config print init-defaults > kubeadm-init.yaml 打印出默认配置,然后在根据自己的环境修改配置

注意

需要修改advertiseAddress、controlPlaneEndpoint、imageRepository、serviceSubnet、kubernetesVersion

advertiseAddress为master01的ip

controlPlaneEndpoint为VIP+8443端口

imageRepository修改为阿里的源

serviceSubnet找网络组要一段没有使用的IP段

kubernetesVersion和上一步的版本一致

[root@k8s-master01 ~]# cd /data/

[root@k8s-master01 data]# ll

[root@k8s-master01 data]# mkdir tmp

[root@k8s-master01 data]# cd tmp

[root@k8s-master01 tmp]# kubeadm config print init-defaults > kubeadm-init.yaml

[root@k8s-master01 tmp]# cp kubeadm-init.yaml{,.bak}

[root@k8s-master01 tmp]# vim kubeadm-init.yaml

[root@k8s-master01 tmp]# diff kubeadm-init.yaml{,.bak}

12c12

<   advertiseAddress: 20.0.0.201

---

>   advertiseAddress: 1.2.3.4

26d25

< controlPlaneEndpoint: "20.0.0.250:8443"

33c32

< imageRepository: registry.cn-hangzhou.aliyuncs.com/google_containers

---

> imageRepository: k8s.gcr.io

35c34

< kubernetesVersion: v1.15.1

---

> kubernetesVersion: v1.14.0

38c37

<   serviceSubnet: 10.0.0.0/

---

>   serviceSubnet: 10.96.0.0/
下载镜像
#查看所需镜像版本

[root@k8s-master01 tmp]# kubeadm config images list

k8s.gcr.io/kube-apiserver:v1.15.1

k8s.gcr.io/kube-controller-manager:v1.15.1

k8s.gcr.io/kube-scheduler:v1.15.1

k8s.gcr.io/kube-proxy:v1.15.1

k8s.gcr.io/pause:3.1

k8s.gcr.io/etcd:3.3.

k8s.gcr.io/coredns:1.3.

#下载所需镜像

[root@k8s-master01 tmp]# kubeadm config images pull --config kubeadm-init.yaml

[config/images] Pulled registry.cn-hangzhou.aliyuncs.com/google_containers/kube-apiserver:v1.15.1

[config/images] Pulled registry.cn-hangzhou.aliyuncs.com/google_containers/kube-controller-manager:v1.15.1

[config/images] Pulled registry.cn-hangzhou.aliyuncs.com/google_containers/kube-scheduler:v1.15.1

[config/images] Pulled registry.cn-hangzhou.aliyuncs.com/google_containers/kube-proxy:v1.15.1

[config/images] Pulled registry.cn-hangzhou.aliyuncs.com/google_containers/pause:3.1

[config/images] Pulled registry.cn-hangzhou.aliyuncs.com/google_containers/etcd:3.3.

[config/images] Pulled registry.cn-hangzhou.aliyuncs.com/google_containers/coredns:1.3.
初始化
[init] Using Kubernetes version: v1.15.1

[preflight] Running pre-flight checks

[preflight] Pulling images required for setting up a Kubernetes cluster

[preflight] This might take a minute or two, depending on the speed of your internet connection

[preflight] You can also perform this action in beforehand using 'kubeadm config images pull'

[kubelet-start] Writing kubelet environment file with flags to file "/var/lib/kubelet/kubeadm-flags.env"

[kubelet-start] Writing kubelet configuration to file "/var/lib/kubelet/config.yaml"

[kubelet-start] Activating the kubelet service

[certs] Using certificateDir folder "/etc/kubernetes/pki"

[certs] Generating "ca" certificate and key

[certs] Generating "apiserver" certificate and key

[certs] apiserver serving cert is signed for DNS names [k8s-master01 kubernetes kubernetes.default kubernetes.default.svc kubernetes.default.svc.cluster.local] and IPs [10.0.0.1 20.0.0.201 20.0.0.250]

[certs] Generating "apiserver-kubelet-client" certificate and key

[certs] Generating "etcd/ca" certificate and key

[certs] Generating "etcd/peer" certificate and key

[certs] etcd/peer serving cert is signed for DNS names [k8s-master01 localhost] and IPs [20.0.0.201 127.0.0.1 ::]

[certs] Generating "etcd/healthcheck-client" certificate and key

[certs] Generating "apiserver-etcd-client" certificate and key

[certs] Generating "etcd/server" certificate and key

[certs] etcd/server serving cert is signed for DNS names [k8s-master01 localhost] and IPs [20.0.0.201 127.0.0.1 ::]

[certs] Generating "front-proxy-ca" certificate and key

[certs] Generating "front-proxy-client" certificate and key

[certs] Generating "sa" key and public key

[kubeconfig] Using kubeconfig folder "/etc/kubernetes"

[endpoint] WARNING: port specified in controlPlaneEndpoint overrides bindPort in the controlplane address

[kubeconfig] Writing "admin.conf" kubeconfig file

[endpoint] WARNING: port specified in controlPlaneEndpoint overrides bindPort in the controlplane address

[kubeconfig] Writing "kubelet.conf" kubeconfig file

[endpoint] WARNING: port specified in controlPlaneEndpoint overrides bindPort in the controlplane address

[kubeconfig] Writing "controller-manager.conf" kubeconfig file

[endpoint] WARNING: port specified in controlPlaneEndpoint overrides bindPort in the controlplane address

[kubeconfig] Writing "scheduler.conf" kubeconfig file

[control-plane] Using manifest folder "/etc/kubernetes/manifests"

[control-plane] Creating static Pod manifest for "kube-apiserver"

[control-plane] Creating static Pod manifest for "kube-controller-manager"

[control-plane] Creating static Pod manifest for "kube-scheduler"

[etcd] Creating static Pod manifest for local etcd in "/etc/kubernetes/manifests"

[wait-control-plane] Waiting for the kubelet to boot up the control plane as static Pods from directory "/etc/kubernetes/manifests". This can take up to 4m0s

[kubelet-check] Initial timeout of 40s passed.

[apiclient] All control plane components are healthy after 57.514816 seconds

[upload-config] Storing the configuration used in ConfigMap "kubeadm-config" in the "kube-system" Namespace

[kubelet] Creating a ConfigMap "kubelet-config-1.15" in namespace kube-system with the configuration for the kubelets in the cluster

[upload-certs] Skipping phase. Please see --upload-certs

[mark-control-plane] Marking the node k8s-master01 as control-plane by adding the label "node-role.kubernetes.io/master=''"

[mark-control-plane] Marking the node k8s-master01 as control-plane by adding the taints [node-role.kubernetes.io/master:NoSchedule]

[bootstrap-token] Using token: abcdef.0123456789abcdef

[bootstrap-token] Configuring bootstrap tokens, cluster-info ConfigMap, RBAC Roles

[bootstrap-token] configured RBAC rules to allow Node Bootstrap tokens to post CSRs in order for nodes to get long term certificate credentials

[bootstrap-token] configured RBAC rules to allow the csrapprover controller automatically approve CSRs from a Node Bootstrap Token

[bootstrap-token] configured RBAC rules to allow certificate rotation for all node client certificates in the cluster

[bootstrap-token] Creating the "cluster-info" ConfigMap in the "kube-public" namespace

[addons] Applied essential addon: CoreDNS

[endpoint] WARNING: port specified in controlPlaneEndpoint overrides bindPort in the controlplane address

[addons] Applied essential addon: kube-proxy

Your Kubernetes control-plane has initialized successfully!

To start using your cluster, you need to run the following as a regular user:

  mkdir -p $HOME/.kube

  sudo cp -i /etc/kubernetes/admin.conf $HOME/.kube/config

  sudo chown $(id -u):$(id -g) $HOME/.kube/config

You should now deploy a pod network to the cluster.

Run "kubectl apply -f [podnetwork].yaml" with one of the options listed at:

  https://kubernetes.io/docs/concepts/cluster-administration/addons/

You can now join any number of control-plane nodes by copying certificate authorities

and service account keys on each node and then running the following as root:

  kubeadm join 20.0.0.250: --token abcdef.0123456789abcdef \

    --discovery-token-ca-cert-hash sha256:cdfa555306ee75391e03eef75b8fa16ba121f5a9effe85e81874f6207b610c9f \

    --control-plane

Then you can join any number of worker nodes by running the following on each as root:

kubeadm join 20.0.0.250: --token abcdef.0123456789abcdef \

    --discovery-token-ca-cert-hash sha256:cdfa555306ee75391e03eef75b8fa16ba121f5a9effe85e81874f6207b610c9f
注:kubeadm init主要执行了以下操作
[init]:指定版本进行初始化操作

[preflight] :初始化前的检查和下载所需要的Docker镜像文件

[kubelet-start] :生成kubelet的配置文件”/var/lib/kubelet/config.yaml”,没有这个文件kubelet无法启动,所以初始化之前的kubelet实际上启动失败。

[certificates]:生成Kubernetes使用的证书,存放在/etc/kubernetes/pki目录中。

[kubeconfig] :生成 KubeConfig 文件,存放在/etc/kubernetes目录中,组件之间通信需要使用对应文件。

[control-plane]:使用/etc/kubernetes/manifest目录下的YAML文件,安装 Master 组件。

[etcd]:使用/etc/kubernetes/manifest/etcd.yaml安装Etcd服务。

[wait-control-plane]:等待control-plan部署的Master组件启动。

[apiclient]:检查Master组件服务状态。

[uploadconfig]:更新配置

[kubelet]:使用configMap配置kubelet。

[patchnode]:更新CNI信息到Node上,通过注释的方式记录。

[mark-control-plane]:为当前节点打标签,打了角色Master,和不可调度标签,这样默认就不会使用Master节点来运行Pod。

[bootstrap-token]:生成token记录下来,后边使用kubeadm join往集群中添加节点时会用到

[addons]:安装附加组件CoreDNS和kube-proxy
为kubectl 准备kubeconfig文件
#kubectl默认会在执行的用户家目录下面的.kube目录下寻找config文件。这里是将在初始化时[kubeconfig]步骤生成的admin.conf拷贝到.kube/config

[root@k8s-master01 tmp]# mkdir -p $HOME/.kube

[root@k8s-master01 tmp]# sudo cp -i /etc/kubernetes/admin.conf $HOME/.kube/config

[root@k8s-master01 tmp]# sudo chown $(id -u):$(id -g) $HOME/.kube/config
查看组件状态
[root@k8s-master01 tmp]# kubectl get cs

NAME                 STATUS    MESSAGE             ERROR

scheduler            Healthy   ok

controller-manager   Healthy   ok

etcd-               Healthy   {"health":"true"}

[root@k8s-master01 tmp]# kubectl get nodes

NAME           STATUS     ROLES    AGE     VERSION

k8s-master01   NotReady   master   6m23s   v1.15.1

目前只有一个节点,角色是Master,状态是NotReady,状态是NotReady状态是因为还没有安装网络插件
部署其他master
在k8s-master01将证书文件拷贝至k8s-master02、k8s-master03节点

在k8s-master01上部署

#拷贝证书至k8s-master02节点

[root@k8s-master01 ~]# vim /service/scripts/k8s-master-zhengshu.sh

##########################################################################

#Author:                     zisefeizhu

#QQ:                         ********

#Date:                       --

#FileName:                   /service/scripts/k8s-master-zhengshu-master02.sh

#URL:                        https://www.cnblogs.com/zisefeizhu/

#Description:                The test script

#Copyright (C):               All rights reserved

##########################################################################

#!/bin/bash

USER=root

CONTROL_PLANE_IPS="k8s-master02 k8s-master03"

for host in ${CONTROL_PLANE_IPS}; do

    ssh "${USER}"@$host "mkdir -p /etc/kubernetes/pki/etcd"

    scp /etc/kubernetes/pki/ca.* "${USER}"@$host:/etc/kubernetes/pki/

    scp /etc/kubernetes/pki/sa.* "${USER}"@$host:/etc/kubernetes/pki/

    scp /etc/kubernetes/pki/front-proxy-ca.* "${USER}"@$host:/etc/kubernetes/pki/

    scp /etc/kubernetes/pki/etcd/ca.* "${USER}"@$host:/etc/kubernetes/pki/etcd/

    scp /etc/kubernetes/admin.conf "${USER}"@$host:/etc/kubernetes/

don

[root@k8s-master01 ~]# sh -x /service/scripts/k8s-master-zhengshu-master02.sh

#在k8s-master02上执行,注意注意--experimental-control-plane参数

[root@k8s-master02 ~]# kubeadm join 20.0.0.250: --token abcdef.0123456789abcdef \

>     --discovery-token-ca-cert-hash sha256:cdfa555306ee75391e03eef75b8fa16ba121f5a9effe85e81874f6207b610c9f  \

>    --experimental-control-plane

Flag --experimental-control-plane has been deprecated, use --control-plane instead

[preflight] Running pre-flight checks

[WARNING IsDockerSystemdCheck]: detected "cgroupfs" as the Docker cgroup driver. The recommended driver is "systemd". Please follow the guide at https://kubernetes.io/docs/setup/cri/

[preflight] Reading configuration from the cluster...

[preflight] FYI: You can look at this config file with 'kubectl -n kube-system get cm kubeadm-config -oyaml'

[preflight] Running pre-flight checks before initializing the new control plane instance

[preflight] Pulling images required for setting up a Kubernetes cluster

[preflight] This might take a minute or two, depending on the speed of your internet connection

[preflight] You can also perform this action in beforehand using 'kubeadm config images pull'

[certs] Using certificateDir folder "/etc/kubernetes/pki"

[certs] Generating "front-proxy-client" certificate and key

[certs] Generating "etcd/server" certificate and key

[certs] etcd/server serving cert is signed for DNS names [k8s-master02 localhost] and IPs [20.0.0.202 127.0.0.1 ::]

[certs] Generating "etcd/healthcheck-client" certificate and key

[certs] Generating "etcd/peer" certificate and key

[certs] etcd/peer serving cert is signed for DNS names [k8s-master02 localhost] and IPs [20.0.0.202 127.0.0.1 ::]

[certs] Generating "apiserver-etcd-client" certificate and key

[certs] Generating "apiserver" certificate and key

[certs] apiserver serving cert is signed for DNS names [k8s-master02 kubernetes kubernetes.default kubernetes.default.svc kubernetes.default.svc.cluster.local] and IPs [10.0.0.1 20.0.0.202 20.0.0.250]

[certs] Generating "apiserver-kubelet-client" certificate and key

[certs] Valid certificates and keys now exist in "/etc/kubernetes/pki"

[certs] Using the existing "sa" key

[kubeconfig] Generating kubeconfig files

[kubeconfig] Using kubeconfig folder "/etc/kubernetes"

[endpoint] WARNING: port specified in controlPlaneEndpoint overrides bindPort in the controlplane address

[kubeconfig] Using existing kubeconfig file: "/etc/kubernetes/admin.conf"

[kubeconfig] Writing "controller-manager.conf" kubeconfig file

[kubeconfig] Writing "scheduler.conf" kubeconfig file

[control-plane] Using manifest folder "/etc/kubernetes/manifests"

[control-plane] Creating static Pod manifest for "kube-apiserver"

[control-plane] Creating static Pod manifest for "kube-controller-manager"

[control-plane] Creating static Pod manifest for "kube-scheduler"

[check-etcd] Checking that the etcd cluster is healthy

[kubelet-start] Downloading configuration for the kubelet from the "kubelet-config-1.15" ConfigMap in the kube-system namespace

[kubelet-start] Writing kubelet configuration to file "/var/lib/kubelet/config.yaml"

[kubelet-start] Writing kubelet environment file with flags to file "/var/lib/kubelet/kubeadm-flags.env"

[kubelet-start] Activating the kubelet service

[kubelet-start] Waiting for the kubelet to perform the TLS Bootstrap...

[etcd] Announced new etcd member joining to the existing etcd cluster

[etcd] Wrote Static Pod manifest for a local etcd member to "/etc/kubernetes/manifests/etcd.yaml"

[etcd] Waiting for the new etcd member to join the cluster. This can take up to 40s

[upload-config] Storing the configuration used in ConfigMap "kubeadm-config" in the "kube-system" Namespace

[mark-control-plane] Marking the node k8s-master02 as control-plane by adding the label "node-role.kubernetes.io/master=''"

[mark-control-plane] Marking the node k8s-master02 as control-plane by adding the taints [node-role.kubernetes.io/master:NoSchedule]

This node has joined the cluster and a new control plane instance was created:

* Certificate signing request was sent to apiserver and approval was received.

* The Kubelet was informed of the new secure connection details.

* Control plane (master) label and taint were applied to the new node.

* The Kubernetes control plane instances scaled up.

* A new etcd member was added to the local/stacked etcd cluster.

To start administering your cluster from this node, you need to run the following as a regular user:

mkdir -p $HOME/.kube

sudo cp -i /etc/kubernetes/admin.conf $HOME/.kube/config

sudo chown $(id -u):$(id -g) $HOME/.kube/config

Run 'kubectl get nodes' to see this node join the cluster.

[root@k8s-master02 ~]# mkdir -p $HOME/.kube

[root@k8s-master02 ~]# sudo cp -i /etc/kubernetes/admin.conf $HOME/.kube/config

[root@k8s-master02 ~]# sudo chown $(id -u):$(id -g) $HOME/.kube/config

#在k8s-master02上执行,注意注意--experimental-control-plane参数

[root@k8s-master03 ~]# kubeadm join 20.0.0.250: --token abcdef.0123456789abcdef \

>     --discovery-token-ca-cert-hash sha256:cdfa555306ee75391e03eef75b8fa16ba121f5a9effe85e81874f6207b610c9f  \

>    --experimental-control-plane

Flag --experimental-control-plane has been deprecated, use --control-plane instead

[preflight] Running pre-flight checks

[preflight] Reading configuration from the cluster...

[preflight] FYI: You can look at this config file with 'kubectl -n kube-system get cm kubeadm-config -oyaml'

[preflight] Running pre-flight checks before initializing the new control plane instance

[preflight] Pulling images required for setting up a Kubernetes cluster

[preflight] This might take a minute or two, depending on the speed of your internet connection

[preflight] You can also perform this action in beforehand using 'kubeadm config images pull'

[certs] Using certificateDir folder "/etc/kubernetes/pki"

[certs] Generating "front-proxy-client" certificate and key

[certs] Generating "etcd/healthcheck-client" certificate and key

[certs] Generating "apiserver-etcd-client" certificate and key

[certs] Generating "etcd/server" certificate and key

[certs] etcd/server serving cert is signed for DNS names [k8s-master03 localhost] and IPs [20.0.0.203 127.0.0.1 ::]

[certs] Generating "etcd/peer" certificate and key

[certs] etcd/peer serving cert is signed for DNS names [k8s-master03 localhost] and IPs [20.0.0.203 127.0.0.1 ::]

[certs] Generating "apiserver-kubelet-client" certificate and key

[certs] Generating "apiserver" certificate and key

[certs] apiserver serving cert is signed for DNS names [k8s-master03 kubernetes kubernetes.default kubernetes.default.svc kubernetes.default.svc.cluster.local] and IPs [10.0.0.1 20.0.0.203 20.0.0.250]

[certs] Valid certificates and keys now exist in "/etc/kubernetes/pki"

[certs] Using the existing "sa" key

[kubeconfig] Generating kubeconfig files

[kubeconfig] Using kubeconfig folder "/etc/kubernetes"

[endpoint] WARNING: port specified in controlPlaneEndpoint overrides bindPort in the controlplane address

[kubeconfig] Using existing kubeconfig file: "/etc/kubernetes/admin.conf"

[kubeconfig] Writing "controller-manager.conf" kubeconfig file

[kubeconfig] Writing "scheduler.conf" kubeconfig file

[control-plane] Using manifest folder "/etc/kubernetes/manifests"

[control-plane] Creating static Pod manifest for "kube-apiserver"

[control-plane] Creating static Pod manifest for "kube-controller-manager"

[control-plane] Creating static Pod manifest for "kube-scheduler"

[check-etcd] Checking that the etcd cluster is healthy

[kubelet-start] Downloading configuration for the kubelet from the "kubelet-config-1.15" ConfigMap in the kube-system namespace

[kubelet-start] Writing kubelet configuration to file "/var/lib/kubelet/config.yaml"

[kubelet-start] Writing kubelet environment file with flags to file "/var/lib/kubelet/kubeadm-flags.env"

[kubelet-start] Activating the kubelet service

[kubelet-start] Waiting for the kubelet to perform the TLS Bootstrap...

[etcd] Announced new etcd member joining to the existing etcd cluster

[etcd] Wrote Static Pod manifest for a local etcd member to "/etc/kubernetes/manifests/etcd.yaml"

[etcd] Waiting for the new etcd member to join the cluster. This can take up to 40s

[upload-config] Storing the configuration used in ConfigMap "kubeadm-config" in the "kube-system" Namespace

[mark-control-plane] Marking the node k8s-master03 as control-plane by adding the label "node-role.kubernetes.io/master=''"

[mark-control-plane] Marking the node k8s-master03 as control-plane by adding the taints [node-role.kubernetes.io/master:NoSchedule]

This node has joined the cluster and a new control plane instance was created:

* Certificate signing request was sent to apiserver and approval was received.

* The Kubelet was informed of the new secure connection details.

* Control plane (master) label and taint were applied to the new node.

* The Kubernetes control plane instances scaled up.

* A new etcd member was added to the local/stacked etcd cluster.

To start administering your cluster from this node, you need to run the following as a regular user:

mkdir -p $HOME/.kube

sudo cp -i /etc/kubernetes/admin.conf $HOME/.kube/config

sudo chown $(id -u):$(id -g) $HOME/.kube/config

Run 'kubectl get nodes' to see this node join the cluster.

[root@k8s-master03 ~]# mkdir -p $HOME/.kube

[root@k8s-master03 ~]# sudo cp -i /etc/kubernetes/admin.conf $HOME/.kube/config

[root@k8s-master03 ~]# sudo chown $(id -u):$(id -g) $HOME/.kube/config

[root@k8s-master03 ~]# kubectl get nodes

NAME           STATUS     ROLES    AGE     VERSION

k8s-master01   NotReady   master   38m     v1.15.1

k8s-master02   NotReady   master   4m52s   v1.15.1

k8s-master03   NotReady   master   84s     v1.15.1
node节点部署
在k8s-node01、k8s-node02、k8s-node03执行,注意没有--experimental-control-plane参数
注意**:token有效期是有限的,如果旧的token过期,可以在master节点上使用kubeadm token create --print-join-command重新创建一条token。
在业务节点上执行下面这条命令
以k8s-node01为例
[root@k8s-node01 ~]# kubeadm join 20.0.0.250: --token abcdef.0123456789abcdef \

>     --discovery-token-ca-cert-hash sha256:cdfa555306ee75391e03eef75b8fa16ba121f5a9effe85e81874f6207b610c9f

[preflight] Running pre-flight checks

[preflight] Reading configuration from the cluster...

[preflight] FYI: You can look at this config file with 'kubectl -n kube-system get cm kubeadm-config -oyaml'

[kubelet-start] Downloading configuration for the kubelet from the "kubelet-config-1.15" ConfigMap in the kube-system namespace

[kubelet-start] Writing kubelet configuration to file "/var/lib/kubelet/config.yaml"

[kubelet-start] Writing kubelet environment file with flags to file "/var/lib/kubelet/kubeadm-flags.env"

[kubelet-start] Activating the kubelet service

[kubelet-start] Waiting for the kubelet to perform the TLS Bootstrap...

This node has joined the cluster:

* Certificate signing request was sent to apiserver and a response was received.

* The Kubelet was informed of the new secure connection details.

Run 'kubectl get nodes' on the control-plane to see this node join the cluster.

[root@k8s-master01 ~]# kubectl get nodes

NAME           STATUS     ROLES    AGE     VERSION

k8s-master01   NotReady   master   45m     v1.15.1

k8s-master02   NotReady   master   12m     v1.15.1

k8s-master03   NotReady   master   8m49s   v1.15.1

k8s-node01     NotReady   <none>   3m46s   v1.15.1

k8s-node02     NotReady   <none>   3m42s   v1.15.1

k8s-node03     NotReady   <none>   24s     v1.15.1
网络插件calico
#下载calico.yaml文件

[root@k8s-master01 tmp]# wget -c https://docs.projectcalico.org/v3.6/getting-started/kubernetes/installation/hosted/kubernetes-datastore/calico-networking/1.7/calico.yaml

#修改calico.yaml,修改CALICO_IPV4POOL_CIDR这个下面的vaule值。在前面设置的serviceSubnet的值

[root@k8s-master01 tmp]# cp calico.yaml{,.bak}

[root@k8s-master01 tmp]# vim calico.yaml

[root@k8s-master01 tmp]# diff calico.yaml{,.bak}

598c598

<               value: "10.0.0.0/16"

---

>               value: "192.168.0.0/16"

#安装

[root@k8s-master01 tmp]# kubectl apply -f calico.yaml

configmap/calico-config created

customresourcedefinition.apiextensions.k8s.io/felixconfigurations.crd.projectcalico.org created

customresourcedefinition.apiextensions.k8s.io/ipamblocks.crd.projectcalico.org created

customresourcedefinition.apiextensions.k8s.io/blockaffinities.crd.projectcalico.org created

customresourcedefinition.apiextensions.k8s.io/ipamhandles.crd.projectcalico.org created

customresourcedefinition.apiextensions.k8s.io/ipamconfigs.crd.projectcalico.org created

customresourcedefinition.apiextensions.k8s.io/bgppeers.crd.projectcalico.org created

customresourcedefinition.apiextensions.k8s.io/bgpconfigurations.crd.projectcalico.org created

customresourcedefinition.apiextensions.k8s.io/ippools.crd.projectcalico.org created

customresourcedefinition.apiextensions.k8s.io/hostendpoints.crd.projectcalico.org created

customresourcedefinition.apiextensions.k8s.io/clusterinformations.crd.projectcalico.org created

customresourcedefinition.apiextensions.k8s.io/globalnetworkpolicies.crd.projectcalico.org created

customresourcedefinition.apiextensions.k8s.io/globalnetworksets.crd.projectcalico.org created

customresourcedefinition.apiextensions.k8s.io/networkpolicies.crd.projectcalico.org created

clusterrole.rbac.authorization.k8s.io/calico-kube-controllers created

clusterrolebinding.rbac.authorization.k8s.io/calico-kube-controllers created

clusterrole.rbac.authorization.k8s.io/calico-node created

clusterrolebinding.rbac.authorization.k8s.io/calico-node created

daemonset.extensions/calico-node created

serviceaccount/calico-node created

deployment.extensions/calico-kube-controllers created

serviceaccount/calico-kube-controllers created
查看节点状态
[root@k8s-master01 tmp]# kubectl get nodes

NAME           STATUS     ROLES    AGE   VERSION

k8s-master01   Ready      master   59m   v1.15.1

k8s-master02   Ready      master   25m   v1.15.1

k8s-master03   Ready      master   22m   v1.15.1

k8s-node01     NotReady   <none>   17m   v1.15.1

k8s-node02     NotReady   <none>   17m   v1.15.1

k8s-node03     NotReady   <none>   14m   v1.15.1
kube-proxy开启ipvs
#修改ConfigMap的kube-system/kube-proxy中的config.conf,mode: "ipvs":

[root@k8s-master01 ~]# kubectl edit cm kube-proxy -n kube-system

#重启kube-proxy pod

[root@k8s-master01 ~]#  kubectl get pod -n kube-system | grep kube-proxy | awk '{system("kubectl delete pod "$1" -n kube-system")}'

pod "kube-proxy-4skt5" deleted

pod "kube-proxy-fxjl5" deleted

pod "kube-proxy-k5q6x" deleted

pod "kube-proxy-q47jk" deleted

pod "kube-proxy-rc6pg" deleted

pod "kube-proxy-wwm49" deleted

#查看Kube-proxy pod状态

[root@k8s-master01 ~]# kubectl get pod -n kube-system | grep kube-proxy

kube-proxy-7vg6s                           /     Running             82s

kube-proxy-dtpvd                           /     Running             2m2s

kube-proxy-hd8sk                           /     Running             114s

kube-proxy-lscgw                           /     Running             97s

kube-proxy-ssv94                           /     Running             106s

kube-proxy-vdlx7                           /     Running             79s

#查看是否开启了ipvs

[root@k8s-master01 ~]# kubectl logs kube-proxy-ssv94 -n kube-system

I0727 ::52.411755        server_others.go:] Using ipvs Proxier.

W0727 ::52.412270        proxier.go:] clusterCIDR not specified, unable to distinguish between internal and external traffic

W0727 ::52.412302        proxier.go:] IPVS scheduler not specified, use rr by default

I0727 ::52.412480        server.go:] Version: v1.15.1

I0727 ::52.427788        conntrack.go:] Setting nf_conntrack_max to

I0727 ::52.428163        config.go:] Starting service config controller

I0727 ::52.428199        config.go:] Starting endpoints config controller

I0727 ::52.428221        controller_utils.go:] Waiting for caches to sync for endpoints config controller

I0727 ::52.428233        controller_utils.go:] Waiting for caches to sync for service config controller

I0727 ::52.628536        controller_utils.go:] Caches are synced for service config controller

I0727 ::52.628636        controller_utils.go:] Caches are synced for endpoints config controller

[root@k8s-master01 ~]# kubectl logs kube-proxy-ssv94 -n kube-system  | grep "ipvs"

I0727 ::52.411755        server_others.go:] Using ipvs Proxier.
查看ipvs状态
[root@k8s-master01 ~]# ipvsadm -Ln

IP Virtual Server version 1.2. (size=)

Prot LocalAddress:Port Scheduler Flags

  -> RemoteAddress:Port           Forward Weight ActiveConn InActConn

TCP  10.0.0.1: rr

  -> 20.0.0.201:              Masq

  -> 20.0.0.202:              Masq

  -> 20.0.0.203:              Masq

TCP  10.0.0.10: rr

  -> 10.0.122.129:              Masq

  -> 10.0.195.0:                Masq

TCP  10.0.0.10: rr

  -> 10.0.122.129:            Masq

  -> 10.0.195.0:              Masq

UDP  10.0.0.10: rr

  -> 10.0.122.129:              Masq

  -> 10.0.195.0:                Masq
查看集群状态
[root@k8s-master01 ~]# kubectl get all -n kube-system

NAME                                           READY   STATUS    RESTARTS   AGE

pod/calico-kube-controllers-7c4d64d599-w24xk   /     Running             23m

pod/calico-node-9hzdk                          /     Running             23m

pod/calico-node-c7xbq                          /     Running             23m

pod/calico-node-gz967                          /     Running             23m

pod/calico-node-hkcjr                          /     Running             23m

pod/calico-node-pb9h4                          /     Running             23m

pod/calico-node-w75b8                          /     Running             23m

pod/coredns-6967fb4995-wv2j5                   /     Running             77m

pod/coredns-6967fb4995-ztrlt                   /     Running             77m

pod/etcd-k8s-master01                          /     Running             76m

pod/etcd-k8s-master02                          /     Running             44m

pod/etcd-k8s-master03                          /     Running             40m

pod/kube-apiserver-k8s-master01                /     Running             76m

pod/kube-apiserver-k8s-master02                /     Running             44m

pod/kube-apiserver-k8s-master03                /     Running             39m

pod/kube-controller-manager-k8s-master01       /     Running             76m

pod/kube-controller-manager-k8s-master02       /     Running             44m

pod/kube-controller-manager-k8s-master03       /     Running             39m

pod/kube-proxy-7vg6s                           /     Running             13m

pod/kube-proxy-dtpvd                           /     Running             14m

pod/kube-proxy-hd8sk                           /     Running             13m

pod/kube-proxy-lscgw                           /     Running             13m

pod/kube-proxy-ssv94                           /     Running             13m

pod/kube-proxy-vdlx7                           /     Running             13m

pod/kube-scheduler-k8s-master01                /     Running             76m

pod/kube-scheduler-k8s-master02                /     Running             44m

pod/kube-scheduler-k8s-master03                /     Running             39m

NAME               TYPE        CLUSTER-IP   EXTERNAL-IP   PORT(S)                  AGE

service/kube-dns   ClusterIP   10.0.0.10    <none>        /UDP,/TCP,/TCP   77m

NAME                         DESIRED   CURRENT   READY   UP-TO-DATE   AVAILABLE   NODE SELECTOR                 AGE

daemonset.apps/calico-node                                                   beta.kubernetes.io/os=linux   23m

daemonset.apps/kube-proxy                                                    beta.kubernetes.io/os=linux   77m

NAME                                      READY   UP-TO-DATE   AVAILABLE   AGE

deployment.apps/calico-kube-controllers   /                            23m

deployment.apps/coredns                   /                            77m

NAME                                                 DESIRED   CURRENT   READY   AGE

replicaset.apps/calico-kube-controllers-7c4d64d599                            23m

replicaset.apps/coredns-6967fb4995                                            77m
1.5.2.4 测试
#运行一个nginx pod

[root@k8s-master01 ~]# mkdir /data/yaml

[root@k8s-master01 ~]# cd /data/yaml

[root@k8s-master01 yaml]# vim nginx.yaml

##########################################################################

#Author:                     zisefeizhu

#QQ:                         ********

#Date:                       --

#FileName:                   nginx.yaml

#URL:                        https://www.cnblogs.com/zisefeizhu/

#Description:                The test script

#Copyright (C):               All rights reserved

###########################################################################

apiVersion: extensions/v1beta1

kind: Deployment

metadata:

  name: my-nginx

spec:

  replicas:

  template:

    metadata:

      labels:

        run: my-nginx

    spec:

      containers:

      - name: my-nginx

        image: nginx:1.14

        ports:

        - containerPort:

[root@k8s-master01 yaml]# kubectl apply -f nginx.yaml

deployment.extensions/my-nginx created

#查看nginx pod

[root@k8s-master01 yaml]# kubectl get pods -o wide

NAME                        READY   STATUS    RESTARTS   AGE   IP             NODE         NOMINATED NODE   READINESS GATES

my-nginx-6b8796c8f4-2bgjg   /     Running             49s   10.0.135.130   k8s-node03   <none>           <none>

my-nginx-6b8796c8f4-t2hk6   /     Running             49s   10.0.58.194    k8s-node02   <none>           <none>

my-nginx-6b8796c8f4-t56rp   /     Running             49s   10.0.85.194    k8s-node01   <none>           <none>

#通过curl命令测试

[root@k8s-master01 yaml]# curl 10.0.135.130

<!DOCTYPE html>

<html>

<head>

<title>Welcome to nginx!</title>

<style>

    body {

        width: 35em;

        margin:  auto;

        font-family: Tahoma, Verdana, Arial, sans-serif;

    }

</style>

</head>

<body>

<h1>Welcome to nginx!</h1>

<p>If you see this page, the nginx web server is successfully installed and

working. Further configuration is required.</p>

<p>For online documentation and support please refer to

<a href="http://nginx.org/">nginx.org</a>.<br/>

Commercial support is available at

<a href="http://nginx.com/">nginx.com</a>.</p>

<p><em>Thank you for using nginx.</em></p>

</body>

</html>

#export 该 Deployment, 生成 my-nginx 服务

[root@k8s-master01 yaml]# kubectl expose deployment my-nginx

service/my-nginx exposed

[root@k8s-master01 yaml]# kubectl get service --all-namespaces | grep "my-nginx"

default       my-nginx     ClusterIP   10.0.225.139   <none>        /TCP                   22s

注:能显示出Welcome to nginx,说明pod运行正常,间接也说明集群可以正常使用

#测试dns

[root@k8s-master01 yaml]# kubectl run curl --image=radial/busyboxplus:curl -it

kubectl run --generator=deployment/apps.v1 is DEPRECATED and will be removed in a future version. Use kubectl run --generator=run-pod/v1 or kubectl create instead.

If you don't see a command prompt, try pressing enter.

[ root@curl-6bf6db5c4f-9mpcs:/ ]$ nslookup kubernetes.default

Server:    10.0.0.10

Address : 10.0.0.10 kube-dns.kube-system.svc.cluster.local

Name:      kubernetes.default

Address : 10.0.0.1 kubernetes.default.svc.cluster.local

#init  --> kubectl get pods --all-namespaces --> init  --> 快照
1.5.3 dashboard
可以从微软中国提供的 gcr.io :http://mirror.azure.cn/help/gcr-proxy-cache.html免费代理下载被墙的镜像
docker pull gcr.azk8s.cn/google_containers/<imagename>:<version>
下载文件
下载三个文件:https://github.com/gjmzj/kubeasz/tree/master/manifests/dashboard
[root@k8s-master01 ~]# mkdir /data/tmp/dashboard

[root@k8s-master01 ~]# cd /data/tmp/dashboard

[root@k8s-master01 dashboard]# ll

总用量

-rw-r--r--  root root   7月   : admin-user-sa-rbac.yaml

-rw-r--r--  root root  7月   : kubernetes-dashboard.yaml

-rw-r--r--  root root  7月   : read-user-sa-rbac.yaml
部署dashboard主yaml配置文件
#修改镜像下载地址

image: gcr.azk8s.cn/google_containers/kubernetes-dashboard-amd64:v1.10.1

[root@k8s-master01 dashboard]# kubectl apply -f kubernetes-dashboard.yaml

secret/kubernetes-dashboard-certs created

serviceaccount/kubernetes-dashboard created

role.rbac.authorization.k8s.io/kubernetes-dashboard-minimal created

rolebinding.rbac.authorization.k8s.io/kubernetes-dashboard-minimal created

deployment.apps/kubernetes-dashboard created

service/kubernetes-dashboard created
创建可读可写admin Service Account
[root@k8s-master01 dashboard]# kubectl apply -f admin-user-sa-rbac.yaml

serviceaccount/admin-user created

clusterrolebinding.rbac.authorization.k8s.io/admin-user created
创建只读 read Service Account
[root@k8s-master01 dashboard]# kubectl apply -f read-user-sa-rbac.yaml

serviceaccount/dashboard-read-user created

clusterrolebinding.rbac.authorization.k8s.io/dashboard-read-binding created

clusterrole.rbac.authorization.k8s.io/dashboard-read-clusterrole created
查看
#查看pod运行状态

[root@k8s-master01 dashboard]# kubectl get pod -n kube-system | grep dashboard

kubernetes-dashboard-fcfb4cbc-xrbkx        /     Running             2m38s

#查看dashboard service

[root@k8s-master01 dashboard]# kubectl get svc -n kube-system|grep dashboard

kubernetes-dashboard   NodePort    10.0.71.179   <none>        :/TCP            2m47s

#查看集群服务

[root@k8s-master01 dashboard]# kubectl cluster-info

Kubernetes master is running at https://20.0.0.250:8443

KubeDNS is running at https://20.0.0.250:8443/api/v1/namespaces/kube-system/services/kube-dns:dns/proxy

kubernetes-dashboard is running at https://20.0.0.250:8443/api/v1/namespaces/kube-system/services/https:kubernetes-dashboard:/proxy

To further debug and diagnose cluster problems, use 'kubectl cluster-info dump'.

#查看pod运行日志

[root@k8s-master01 dashboard]# kubectl logs kubernetes-dashboard-fcfb4cbc-xrbkx -n kube-system
生成证书
供本地google浏览器使用

#生成client-certificate-data

[root@k8s-master01 dashboard]# grep 'client-certificate-data' ~/.kube/config | head -n  | awk '{print $2}' | base64 -d >> kubecfg.crt

#生成client-key-data

[root@k8s-master01 dashboard]# grep 'client-key-data' ~/.kube/config | head -n  | awk '{print $2}' | base64 -d >> kubecfg.key

#生成p12

[root@k8s-master01 dashboard]# openssl pkcs12 -export -clcerts -inkey kubecfg.key -in kubecfg.crt -out kubecfg.p12 -name "kubernetes-client"

Enter Export Password:

Verifying - Enter Export Password:

[root@k8s-master01 dashboard]# ll

总用量

-rw-r--r--  root root   7月   : admin-user-sa-rbac.yaml

-rw-r--r--  root root  7月   : kubecfg.crt

-rw-r--r--  root root  7月   : kubecfg.key

-rw-r--r--  root root  7月   : kubecfg.p12

-rw-r--r--  root root  7月   : kubernetes-dashboard.yaml

-rw-r--r--  root root  7月   : read-user-sa-rbac.yaml

[root@k8s-master01 dashboard]# sz kubecfg.p12
谷歌浏览器导入证书:
备注把上一步骤的kubecfg.p12 文件导入证书后需要重启浏览器:
导出令牌
[root@k8s-master01 dashboard]# kubectl -n kube-system describe secret $(kubectl -n kube-system get secret | grep admin-user | awk '{print $1}')

Name:         admin-user-token-ggxf6

Namespace:    kube-system

Labels:       <none>

Annotations:  kubernetes.io/service-account.name: admin-user

              kubernetes.io/service-account.uid: a4cc757e-e710-49ea--d4642d38bbf5

Type:  kubernetes.io/service-account-token

Data

====

ca.crt:      bytes

namespace:   bytes

token:      eyJhbGciOiJSUzI1NiIsImtpZCI6IiJ9.eyJpc3MiOiJrdWJlcm5ldGVzL3NlcnZpY2VhY2NvdW50Iiwia3ViZXJuZXRlcy5pby9zZXJ2aWNlYWNjb3VudC9uYW1lc3BhY2UiOiJrdWJlLXN5c3RlbSIsImt1YmVybmV0ZXMuaW8vc2VydmljZWFjY291bnQvc2VjcmV0Lm5hbWUiOiJhZG1pbi11c2VyLXRva2VuLWdneGY2Iiwia3ViZXJuZXRlcy5pby9zZXJ2aWNlYWNjb3VudC9zZXJ2aWNlLWFjY291bnQubmFtZSI6ImFkbWluLXVzZXIiLCJrdWJlcm5ldGVzLmlvL3NlcnZpY2VhY2NvdW50L3NlcnZpY2UtYWNjb3VudC51aWQiOiJhNGNjNzU3ZS1lNzEwLTQ5ZWEtODMyMS1kNDY0MmQzOGJiZjUiLCJzdWIiOiJzeXN0ZW06c2VydmljZWFjY291bnQ6a3ViZS1zeXN0ZW06YWRtaW4tdXNlciJ9.of88fLrICJ6o2SsnvWdCGfkpTJhaaI8aY0-G5VUcafuBQabLSYrdPsGpVSw4HKuAV1OkX3gMP63lx5I7FbLNjuxXGJqNFk9A83IqMwD2HISMNeDMsJZdtxYp_veFAFAJErr_F30pJKX4ad4FryV-LLjaxLt_xTPbZRK-8FERIUnBCa7--ds4WI-9qnZq4nIw5i6ws06F-J73KTGq9rYNkL91uPeGRaZEj_9Sc2XGDb6qk8XODghVYvmIIyBBJeRpYgN4384QqHIlE2GmoE8p8gRaC4K0zRrh8_PywL-bJI9NexfdH_78bJWsJBX2TmUjmnicitQGjqzg43Im3AJwQ

#导出令牌

[root@k8s-master01 dashboard]# vim /root/.kube/config   加

token:      eyJhbGciOiJSUzI1NiIsImtpZCI6IiJ9.eyJpc3MiOiJrdWJlcm5ldGVzL3NlcnZpY2VhY2NvdW50Iiwia3ViZXJuZXRlcy5pby9zZXJ2aWNlYWNjb3VudC9uYW1lc3BhY2UiOiJrdWJlLXN5c3RlbSIsImt1YmVybmV0ZXMuaW8vc2VydmljZWFjY291bnQvc2VjcmV0Lm5hbWUiOiJhZG1pbi11c2VyLXRva2VuLWdneGY2Iiwia3ViZXJuZXRlcy5pby9zZXJ2aWNlYWNjb3VudC9zZXJ2aWNlLWFjY291bnQubmFtZSI6ImFkbWluLXVzZXIiLCJrdWJlcm5ldGVzLmlvL3NlcnZpY2VhY2NvdW50L3NlcnZpY2UtYWNjb3VudC51aWQiOiJhNGNjNzU3ZS1lNzEwLTQ5ZWEtODMyMS1kNDY0MmQzOGJiZjUiLCJzdWIiOiJzeXN0ZW06c2VydmljZWFjY291bnQ6a3ViZS1zeXN0ZW06YWRtaW4tdXNlciJ9.of88fLrICJ6o2SsnvWdCGfkpTJhaaI8aY0-G5VUcafuBQabLSYrdPsGpVSw4HKuAV1OkX3gMP63lx5I7FbLNjuxXGJqNFk9A83IqMwD2HISMNeDMsJZdtxYp_veFAFAJErr_F30pJKX4ad4FryV-LLjaxLt_xTPbZRK-8FERIUnBCa7--ds4WI-9qnZq4nIw5i6ws06F-J73KTGq9rYNkL91uPeGRaZEj_9Sc2XGDb6qk8XODghVYvmIIyBBJeRpYgN4384QqHIlE2GmoE8p8gRaC4K0zRrh8_PywL-bJI9NexfdH_78bJWsJBX2TmUjmnicitQGjqzg43Im3AJwQ

[root@k8s-master01 dashboard]# cp /root/.kube/config /data/tmp/admin.kubeconfig

[root@k8s-master01 dashboard]# sz /data/tmp/admin.kubeconfig
浏览器访问
1.5.4 metrics-server
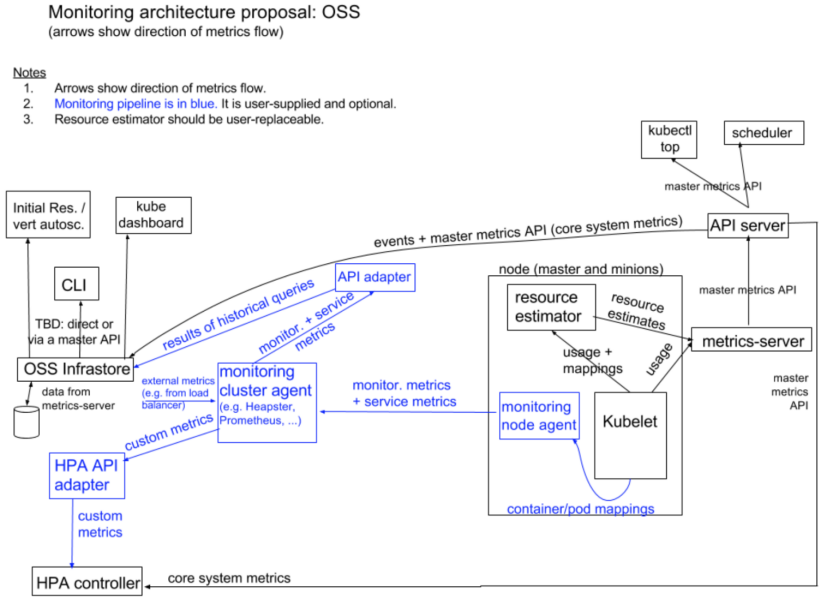
metrics-server 通过 kube-apiserver 发现所有节点,然后调用 kubelet APIs(通过 https 接口)获得各节点(Node)和 Pod 的 CPU、Memory 等资源使用情况。从 Kubernetes 1.12 开始,kubernetes 的安装脚本移除了 Heapster,从 1.13 开始完全移除了对 Heapster 的支持,Heapster 不再被维护。替代方案如下:
-> 用于支持自动扩缩容的 CPU/memory HPA metrics:metrics-server;
-> 通用的监控方案:使用第三方可以获取 Prometheus 格式监控指标的监控系统,如 Prometheus Operator;
-> 事件传输:使用第三方工具来传输、归档 kubernetes events;
从 Kubernetes 1.8 开始,资源使用指标(如容器 CPU 和内存使用率)通过 Metrics API 在 Kubernetes 中获取, metrics-server 替代了heapster。Metrics Server 实现了Resource Metrics API,Metrics Server 是集群范围资源使用数据的聚合器。 Metrics Server 从每个节点上的 Kubelet 公开的 Summary API 中采集指标信息。
在了解Metrics-Server之前,必须要事先了解下Metrics API的概念。Metrics API相比于之前的监控采集方式(hepaster)是一种新的思路,官方希望核心指标的监控应该是稳定的,版本可控的,且可以直接被用户访问(例如通过使用 kubectl top 命令),或由集群中的控制器使用(如HPA),和其他的Kubernetes APIs一样。官方废弃heapster项目,就是为了将核心资源监控作为一等公民对待,即像pod、service那样直接通过api-server或者client直接访问,不再是安装一个hepater来汇聚且由heapster单独管理。
假设每个pod和node我们收集10个指标,从k8s的1.6开始,支持5000节点,每个节点30个pod,假设采集粒度为1分钟一次,则"10 x 5000 x 30 / 60 = 25000 平均每分钟2万多个采集指标"。因为k8s的api-server将所有的数据持久化到了etcd中,显然k8s本身不能处理这种频率的采集,而且这种监控数据变化快且都是临时数据,因此需要有一个组件单独处理他们,k8s版本只存放部分在内存中,于是metric-server的概念诞生了。其实hepaster已经有暴露了api,但是用户和Kubernetes的其他组件必须通过master proxy的方式才能访问到,且heapster的接口不像api-server一样,有完整的鉴权以及client集成。
有了Metrics Server组件,也采集到了该有的数据,也暴露了api,但因为api要统一,如何将请求到api-server的/apis/metrics请求转发给Metrics Server呢,
解决方案就是:kube-aggregator,在k8s的1.7中已经完成,之前Metrics Server一直没有面世,就是耽误在了kube-aggregator这一步。kube-aggregator(聚合api)主要提供:
-> Provide an API for registering API servers;
-> Summarize discovery information from all the servers;
-> Proxy client requests to individual servers;
Metric API的使用:
-> Metrics API 只可以查询当前的度量数据,并不保存历史数据
-> Metrics API URI 为 /apis/metrics.k8s.io/,在 k8s.io/metrics 维护
-> 必须部署 metrics-server 才能使用该 API,metrics-server 通过调用 Kubelet Summary API 获取数据
Metrics server定时从Kubelet的Summary API(类似/ap1/v1/nodes/nodename/stats/summary)采集指标信息,这些聚合过的数据将存储在内存中,且以metric-api的形式暴露出去。Metrics server复用了api-server的库来实现自己的功能,比如鉴权、版本等,为了实现将数据存放在内存中吗,去掉了默认的etcd存储,引入了内存存储(即实现Storage interface)。因为存放在内存中,因此监控数据是没有持久化的,可以通过第三方存储来拓展,这个和heapster是一致的。
Kubernetes Dashboard 还不支持 metrics-server,如果使用 metrics-server 替代 Heapster,将无法在 dashboard 中以图形展示 Pod 的内存和 CPU 情况,需要通过 Prometheus、Grafana 等监控方案来弥补。kuberntes 自带插件的 manifests yaml 文件使用 gcr.io 的 docker registry,国内被墙,需要手动替换为其它 registry 地址(本文档未替换);可以从微软中国提供的 gcr.io 免费代理下载被墙的镜像;下面部署命令均在k8s-master01节点上执行。
监控架构
安装metrics-server
#从github clone源码:

[root@k8s-master01 tmp]# mkdir metrics

[root@k8s-master01 tmp]# cd metrics/

[root@k8s-master01 metrics]# git clone https://github.com/kubernetes-incubator/metrics-server.git

[root@k8s-master01 metrics]# cd metrics-server/deploy/1.8+/

[root@k8s-master01 1.8+]# ls

aggregated-metrics-reader.yaml  metrics-apiservice.yaml         resource-reader.yaml

auth-delegator.yaml             metrics-server-deployment.yaml

auth-reader.yaml                metrics-server-service.yaml

[root@k8s-master01 1.8+]# cp metrics-server-deployment.yaml  metrics-server-deployment.yaml.bak

[root@k8s-master01 1.8+]# vim metrics-server-deployment.yaml

[root@k8s-master01 1.8+]# diff  metrics-server-deployment.yaml  metrics-server-deployment.yaml.bak

,38c32,

<         image: gcr.azk8s.cn/google_containers/metrics-server-amd64:v0.3.3

<         imagePullPolicy: IfNotPresent

<         command:

<         - /metrics-server

<         - --metric-resolution=30s

<         - --kubelet-preferred-address-types=InternalIP,Hostname,InternalDNS,ExternalDNS,ExternalIP

<         - --kubelet-insecure-tls

---

>         image: k8s.gcr.io/metrics-server-amd64:v0.3.3

>         imagePullPolicy: Always
注:
这里需要注意:
--metric-resolution=30s:从 kubelet 采集数据的周期;

--kubelet-preferred-address-types:优先使用 InternalIP 来访问 kubelet,这样可以避免节点名称没有 DNS 解析记录时,通过节点名称调用节点 kubelet API 失败的情况(未配置时默认的情况);

将metrics-server-deployment.yaml文件中的镜像拉取策略修改为"IfNotPresent";

更改镜像来源
部署metrics-server
[root@k8s-master01 1.8+]# kubectl create -f .

clusterrole.rbac.authorization.k8s.io/system:aggregated-metrics-reader created

clusterrolebinding.rbac.authorization.k8s.io/metrics-server:system:auth-delegator created

rolebinding.rbac.authorization.k8s.io/metrics-server-auth-reader created

apiservice.apiregistration.k8s.io/v1beta1.metrics.k8s.io created

serviceaccount/metrics-server created

deployment.extensions/metrics-server created

service/metrics-server created

clusterrole.rbac.authorization.k8s.io/system:metrics-server created

clusterrolebinding.rbac.authorization.k8s.io/system:metrics-server created
查看运行情况
[root@k8s-master01 1.8+]#  kubectl -n kube-system get pods -l k8s-app=metrics-server

NAME                              READY   STATUS    RESTARTS   AGE

metrics-server-6c49c8b6cc-6flx6   /     Running             59s

[root@k8s-master01 1.8+]# kubectl get svc -n kube-system  metrics-server

NAME             TYPE        CLUSTER-IP    EXTERNAL-IP   PORT(S)   AGE

metrics-server   ClusterIP   10.0.94.102   <none>        /TCP   79s
metrics-server 的命令行参数 (在任意一个node节点上执行下面命令)
[root@k8s-node01 ~]# docker run -it --rm gcr.azk8s.cn/google_containers/metrics-server-amd64:v0.3.3 --help

Launch metrics-server

Usage:

   [flags]

Flags:

      --alsologtostderr                                         log to standard error as well as files

      --authentication-kubeconfig string                        kubeconfig file pointing at the 'core' kubernetes server with enough rights to create tokenaccessreviews.authentication.k8s.io.

      --authentication-skip-lookup                              If false, the authentication-kubeconfig will be used to lookup missing authentication configuration from the cluster.

      --authentication-token-webhook-cache-ttl duration         The duration to cache responses from the webhook token authenticator. (default 10s)

      --authentication-tolerate-lookup-failure                  If true, failures to look up missing authentication configuration from the cluster are not considered fatal. Note that this can result in authentication that treats all requests as anonymous.

      --authorization-always-allow-paths strings                A list of HTTP paths to skip during authorization, i.e. these are authorized without contacting the 'core' kubernetes server.

      --authorization-kubeconfig string                         kubeconfig file pointing at the 'core' kubernetes server with enough rights to create subjectaccessreviews.authorization.k8s.io.

      --authorization-webhook-cache-authorized-ttl duration     The duration to cache 'authorized' responses from the webhook authorizer. (default 10s)

      --authorization-webhook-cache-unauthorized-ttl duration   The duration to cache 'unauthorized' responses from the webhook authorizer. (default 10s)

      --bind-address ip                                         The IP address on which to listen for the --secure-port port. The associated interface(s) must be reachable by the rest of the cluster, and by CLI/web clients. If blank, all interfaces will be used (0.0.0.0 for all IPv4 interfaces and :: for all IPv6 interfaces). (default 0.0.0.0)

      --cert-dir string                                         The directory where the TLS certs are located. If --tls-cert-file and --tls-private-key-file are provided, this flag will be ignored. (default "apiserver.local.config/certificates")

      --client-ca-file string                                   If set, any request presenting a client certificate signed by one of the authorities in the client-ca-file is authenticated with an identity corresponding to the CommonName of the client certificate.

      --contention-profiling                                    Enable lock contention profiling, if profiling is enabled

  -h, --help                                                    help for this command

      --http2-max-streams-per-connection int                    The limit that the server gives to clients for the maximum number of streams in an HTTP/ connection. Zero means to use golang's default.

      --kubeconfig string                                       The path to the kubeconfig used to connect to the Kubernetes API server and the Kubelets (defaults to in-cluster config)

      --kubelet-certificate-authority string                    Path to the CA to use to validate the Kubelet's serving certificates.

      --kubelet-insecure-tls                                    Do not verify CA of serving certificates presented by Kubelets.  For testing purposes only.

      --kubelet-port int                                        The port to use to connect to Kubelets. (default )

      --kubelet-preferred-address-types strings                 The priority of node address types to use when determining which address to use to connect to a particular node (default [Hostname,InternalDNS,InternalIP,ExternalDNS,ExternalIP])

      --log-flush-frequency duration                            Maximum number of seconds between log flushes (default 5s)

      --log_backtrace_at traceLocation                          when logging hits line file:N, emit a stack trace (default :)

      --log_dir string                                          If non-empty, write log files in this directory

      --log_file string                                         If non-empty, use this log file

      --logtostderr                                             log to standard error instead of files (default true)

      --metric-resolution duration                              The resolution at which metrics-server will retain metrics. (default 1m0s)

      --profiling                                               Enable profiling via web interface host:port/debug/pprof/ (default true)

      --requestheader-allowed-names strings                     List of client certificate common names to allow to provide usernames in headers specified by --requestheader-username-headers. If empty, any client certificate validated by the authorities in --requestheader-client-ca-file is allowed.

      --requestheader-client-ca-file string                     Root certificate bundle to use to verify client certificates on incoming requests before trusting usernames in headers specified by --requestheader-username-headers. WARNING: generally do not depend on authorization being already done for incoming requests.

      --requestheader-extra-headers-prefix strings              List of request header prefixes to inspect. X-Remote-Extra- is suggested. (default [x-remote-extra-])

      --requestheader-group-headers strings                     List of request headers to inspect for groups. X-Remote-Group is suggested. (default [x-remote-group])

      --requestheader-username-headers strings                  List of request headers to inspect for usernames. X-Remote-User is common. (default [x-remote-user])

      --secure-port int                                         The port on which to serve HTTPS with authentication and authorization.If , don't serve HTTPS at all. (default 443)

      --skip_headers                                            If true, avoid header prefixes in the log messages

      --stderrthreshold severity                                logs at or above this threshold go to stderr

      --tls-cert-file string                                    File containing the default x509 Certificate for HTTPS. (CA cert, if any, concatenated after server cert). If HTTPS serving is enabled, and --tls-cert-file and --tls-private-key-file are not provided, a self-signed certificate and key are generated for the public address and saved to the directory specified by --cert-dir.

      --tls-cipher-suites strings                               Comma-separated list of cipher suites for the server. If omitted, the default Go cipher suites will be use.  Possible values: TLS_ECDHE_ECDSA_WITH_AES_128_CBC_SHA,TLS_ECDHE_ECDSA_WITH_AES_128_CBC_SHA256,TLS_ECDHE_ECDSA_WITH_AES_128_GCM_SHA256,TLS_ECDHE_ECDSA_WITH_AES_256_CBC_SHA,TLS_ECDHE_ECDSA_WITH_AES_256_GCM_SHA384,TLS_ECDHE_ECDSA_WITH_CHACHA20_POLY1305,TLS_ECDHE_ECDSA_WITH_RC4_128_SHA,TLS_ECDHE_RSA_WITH_3DES_EDE_CBC_SHA,TLS_ECDHE_RSA_WITH_AES_128_CBC_SHA,TLS_ECDHE_RSA_WITH_AES_128_CBC_SHA256,TLS_ECDHE_RSA_WITH_AES_128_GCM_SHA256,TLS_ECDHE_RSA_WITH_AES_256_CBC_SHA,TLS_ECDHE_RSA_WITH_AES_256_GCM_SHA384,TLS_ECDHE_RSA_WITH_CHACHA20_POLY1305,TLS_ECDHE_RSA_WITH_RC4_128_SHA,TLS_RSA_WITH_3DES_EDE_CBC_SHA,TLS_RSA_WITH_AES_128_CBC_SHA,TLS_RSA_WITH_AES_128_CBC_SHA256,TLS_RSA_WITH_AES_128_GCM_SHA256,TLS_RSA_WITH_AES_256_CBC_SHA,TLS_RSA_WITH_AES_256_GCM_SHA384,TLS_RSA_WITH_RC4_128_SHA

      --tls-min-version string                                  Minimum TLS version supported. Possible values: VersionTLS10, VersionTLS11, VersionTLS12

      --tls-private-key-file string                             File containing the default x509 private key matching --tls-cert-file.

      --tls-sni-cert-key namedCertKey                           A pair of x509 certificate and private key file paths, optionally suffixed with a list of domain patterns which are fully qualified domain names, possibly with prefixed wildcard segments. If no domain patterns are provided, the names of the certificate are extracted. Non-wildcard matches trump over wildcard matches, explicit domain patterns trump over extracted names. For multiple key/certificate pairs, use the --tls-sni-cert-key multiple times. Examples: "example.crt,example.key" or "foo.crt,foo.key:*.foo.com,foo.com". (default [])

  -v, --v Level                                                 number for the log level verbosity

      --vmodule moduleSpec                                      comma-separated list of pattern=N settings for file-filtered logging
测试是否成功
[root@k8s-master01 1.8+]# kubectl top node

error: metrics not available yet

说明还未成功,需要等待一会

[root@k8s-master01 1.8+]# kubectl top nodes

NAME           CPU(cores)   CPU%   MEMORY(bytes)   MEMORY%

k8s-master01   292m         %     1209Mi          %

k8s-master02   291m         %     1066Mi          %

k8s-master03   336m         %     1212Mi          %

k8s-node01     125m         %     448Mi           %

k8s-node02     117m         %     425Mi           %

k8s-node03     118m         %     464Mi           %

[root@k8s-master01 1.8+]# kubectl top pods -n kube-system

NAME                                       CPU(cores)   MEMORY(bytes)

calico-kube-controllers-7c4d64d599-w24xk   2m           14Mi

calico-node-9hzdk                          48m          40Mi

calico-node-w75b8                          43m          71Mi

coredns-6967fb4995-ztrlt                   5m           14Mi

etcd-k8s-master01                          81m          109Mi

etcd-k8s-master03                          54m          90Mi

kube-apiserver-k8s-master01                53m          368Mi

kube-apiserver-k8s-master03                42m          331Mi

kube-controller-manager-k8s-master01       32m          65Mi

kube-controller-manager-k8s-master03       1m           16Mi

kube-proxy-dtpvd                           1m           32Mi

kube-proxy-lscgw                           2m           20Mi

kube-scheduler-k8s-master01                2m           28Mi

kube-scheduler-k8s-master03                3m           18Mi
浏览器访问
[root@k8s-master01 1.8+]# kubectl cluster-info

Kubernetes master is running at https://20.0.0.250:8443

KubeDNS is running at https://20.0.0.250:8443/api/v1/namespaces/kube-system/services/kube-dns:dns/proxy

kubernetes-dashboard is running at https://20.0.0.250:8443/api/v1/namespaces/kube-system/services/https:kubernetes-dashboard:/proxy

Metrics-server is running at https://20.0.0.250:8443/api/v1/namespaces/kube-system/services/https:metrics-server:/proxy

To further debug and diagnose cluster problems, use 'kubectl cluster-info dump'.


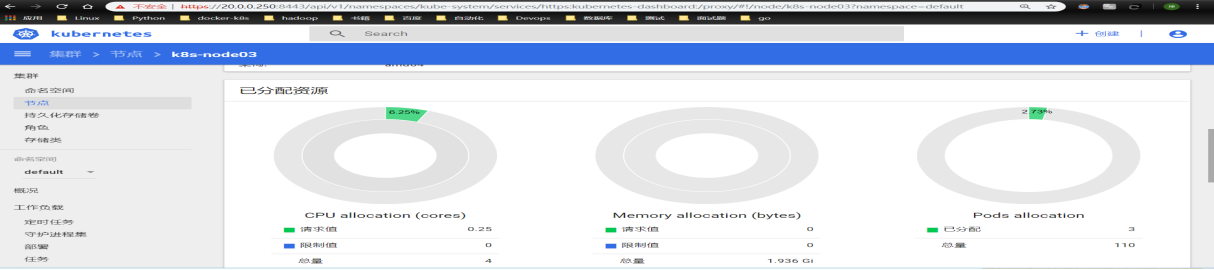
1.5. kube-state-metrics插件
上面已经部署了metric-server,几乎容器运行的大多数指标数据都能采集到了,但是下面这种情况的指标数据的采集却无能为力:
-> 调度了多少个replicas?现在可用的有几个?
-> 多少个Pod是running/stopped/terminated状态?
-> Pod重启了多少次?
-> 当前有多少job在运行中?
这些则是kube-state-metrics提供的内容,它是K8S的一个附加服务,基于client-go开发的。它会轮询Kubernetes API,并将Kubernetes的结构化信息转换为metrics。kube-state-metrics能够采集绝大多数k8s内置资源的相关数据,例如pod、deploy、service等等。同时它也提供自己的数据,主要是资源采集个数和采集发生的异常次数统计。
kube-state-metrics 指标类别包括:
CronJob Metrics

DaemonSet Metrics

Deployment Metrics

Job Metrics

LimitRange Metrics

Node Metrics

PersistentVolume Metrics

PersistentVolumeClaim Metrics

Pod Metrics

Pod Disruption Budget Metrics

ReplicaSet Metrics

ReplicationController Metrics

ResourceQuota Metrics

Service Metrics

StatefulSet Metrics

Namespace Metrics

Horizontal Pod Autoscaler Metrics

Endpoint Metrics

Secret Metrics

ConfigMap Metrics
以pod为例的指标有:
kube_pod_info

kube_pod_owner

kube_pod_status_running

kube_pod_status_ready

kube_pod_status_scheduled

kube_pod_container_status_waiting

kube_pod_container_status_terminated_reason

..............
kube-state-metrics与metric-server (或heapster)的对比
1)metric-server是从api-server中获取cpu,内存使用率这种监控指标,并把它们发送给存储后端,如influxdb或云厂商,它当前的核心作用是:为HPA等组件提供决策指标支持。
2)kube-state-metrics关注于获取k8s各种资源的最新状态,如deployment或者daemonset,之所以没有把kube-state-metrics纳入到metric-server的能力中,是因为它们的关注点本质上是不一样的。metric-server仅仅是获取、格式化现有数据,写入特定的存储,实质上是一个监控系统。而kube-state-metrics是将k8s的运行状况在内存中做了个快照,并且获取新的指标,但它没有能力导出这些指标
3)换个角度讲,kube-state-metrics本身是metric-server的一种数据来源,虽然现在没有这么做。
4)另外,像Prometheus这种监控系统,并不会去用metric-server中的数据,它都是自己做指标收集、集成的(Prometheus包含了metric-server的能力),但Prometheus可以监控metric-server本身组件的监控状态并适时报警,这里的监控就可以通过kube-state-metrics来实现,如metric-serverpod的运行状态。
kube-state-metrics本质上是不断轮询api-server,其性能优化:
kube-state-metrics在之前的版本中暴露出两个问题:
1)/metrics接口响应慢(10-20s)
2)内存消耗太大,导致超出limit被杀掉
问题一的方案:就是基于client-go的cache tool实现本地缓存,具体结构为:var cache = map[uuid][]byte{}
问题二的的方案是:对于时间序列的字符串,是存在很多重复字符的(如namespace等前缀筛选),可以用指针或者结构化这些重复字符。
kube-state-metrics优化点和问题
1)因为kube-state-metrics是监听资源的add、delete、update事件,那么在kube-state-metrics部署之前已经运行的资源的数据是不是就拿不到了?其实kube-state-metric利用client-go可以初始化所有已经存在的资源对象,确保没有任何遗漏;
2)kube-state-metrics当前不会输出metadata信息(如help和description);
3)缓存实现是基于golang的map,解决并发读问题当期是用了一个简单的互斥锁,应该可以解决问题,后续会考虑golang的sync.Map安全map;
4)kube-state-metrics通过比较resource version来保证event的顺序;
5)kube-state-metrics并不保证包含所有资源;
配置文件
https://github.com/kubernetes/kube-state-metrics
[root@k8s-master01 kubernetes]# ll

总用量

-rw-r--r--  root root   7月   : kube-state-metrics-cluster-role-binding.yaml

-rw-r--r--  root root  7月   : kube-state-metrics-cluster-role.yaml

-rw-r--r--  root root   7月   : kube-state-metrics-deployment.yaml

-rw-r--r--  root root    7月   : kube-state-metrics-service-account.yaml

-rw-r--r--  root root   7月   : kube-state-metrics-service.yaml
更改配置
[root@k8s-master01 kubernetes]# fgrep -R "image" ./*

./kube-state-metrics-deployment.yaml:        image: quay.io/coreos/kube-state-metrics:v1.7.1

[root@k8s-master01 kubernetes]# cat kube-state-metrics-deployment.yaml

......

        image: gcr.azk8s.cn/google_containers/kube-state-metrics:v1.7.1

        imagePullPolicy: IfNotPresent

[root@k8s-master01 kubernetes]# cat kube-state-metrics-service.yaml

......

  type: NodePort

  selector:

    k8s-app: kube-state-metrics
执行并检查
#执行配置文件

[root@k8s-master01 kubernetes]# kubectl create -f .

clusterrolebinding.rbac.authorization.k8s.io/kube-state-metrics created

clusterrole.rbac.authorization.k8s.io/kube-state-metrics created

deployment.apps/kube-state-metrics created

serviceaccount/kube-state-metrics created

service/kube-state-metrics created

#检查

[root@k8s-master01 kubernetes]# kubectl get pod -n kube-system|grep kube-state-metrics

kube-state-metrics-7d5dfb9596-lds7l        /     Running             45s

[root@k8s-master01 kubernetes]# kubectl get svc -n kube-system|grep kube-state-metrics

kube-state-metrics     NodePort    10.0.112.70   <none>        :/TCP,:/TCP   75s

[root@k8s-master01 kubernetes]# kubectl get pod,svc -n kube-system|grep kube-state-metrics

pod/kube-state-metrics-7d5dfb9596-lds7l        /     Running             82s

service/kube-state-metrics     NodePort    10.0.112.70   <none>        :/TCP,:/TCP   83s

[root@k8s-master01 kubernetes]# curl http://20.0.0.201:32672/metrics|head -10

  % Total    % Received % Xferd  Average Speed   Time    Time     Time  Current

                                 Dload  Upload   Total   Spent    Left  Speed

                                      --:--:-- --:--:-- --:--:--     # HELP kube_certificatesigningrequest_labels Kubernetes labels converted to Prometheus labels.

# TYPE kube_certificatesigningrequest_labels gauge

# HELP kube_certificatesigningrequest_created Unix creation timestamp

# TYPE kube_certificatesigningrequest_created gauge

# HELP kube_certificatesigningrequest_condition The number of each certificatesigningrequest condition

# TYPE kube_certificatesigningrequest_condition gauge

# HELP kube_certificatesigningrequest_cert_length Length of the issued cert

# TYPE kube_certificatesigningrequest_cert_length gauge

# HELP kube_certificatesigningrequest_annotations Kubernetes annotations converted to Prometheus labels.

# TYPE kube_certificatesigningrequest_annotations gauge

                  793k       --:--:-- --:--:-- --:--:--  879k

curl: () Failed writing body ( != )
浏览器


至此kubernetes集群部署完成
建议:init 6 --> 验证 --> 快照
1.5.6 感言
集群部署这块我是思考了又思考的,上次写了114页直接又毁了。这是一个开始,影响后面的学习。我希望自己可以写的更好!
kubernetes 1.15.1 高可用部署 -- 从零开始的更多相关文章
- Kubernetes 1.17.2 高可用部署
20.0.0.200 10.0.0.200 bs-k8s-master01 管理节点 2c2g 20.0.0.201 10.0.0.201 bs-k8s-master02 管理节点 2c2 ...
- kubeadm使用外部etcd部署kubernetes v1.17.3 高可用集群
文章转载自:https://mp.weixin.qq.com/s?__biz=MzI1MDgwNzQ1MQ==&mid=2247483891&idx=1&sn=17dcd7cd ...
- kubernetes1.7.6 ha高可用部署
写在前面: 1. 该文章部署方式为二进制部署. 2. 版本信息 k8s 1.7.6,etcd 3.2.9 3. 高可用部分 etcd做高可用集群.kube-apiserver 为无状态服务使用hap ...
- NoSQL数据库Mongodb副本集架构(Replica Set)高可用部署
NoSQL数据库Mongodb副本集架构(Replica Set)高可用部署 作者:尹正杰 版权声明:原创作品,谢绝转载!否则将追究法律责任. MongoDB 是一个基于分布式文件存储的数据库.由 C ...
- Redis高可用部署及监控
Redis高可用部署及监控 目录 一.Redis Sentinel简介 二.硬件需求 三.拓扑结构 .单M-S结构 .双M-S结构 .优劣对比 四.配置部 ...
- Centos7.2 下DNS+NamedManager高可用部署方案完整记录
Centos7.2 下DNS+NamedManager高可用部署方案完整记录 之前说到了NamedManager单机版的配置,下面说下DNS+NamedManager双机高可用的配置方案: 1)机器环 ...
- CDH构建大数据平台-Kerberos高可用部署【完结篇】
CDH构建大数据平台-Kerberos高可用部署[完结篇] 作者:尹正杰 版权声明:原创作品,谢绝转载!否则将追究法律责任. 一.安装Kerberos相关的软件包并同步配置文件 1>.实验环境 ...
- Pod在多可用区worker节点上的高可用部署
一. 需求分析 当前kubernetes集群中的worker节点可以支持添加多可用区中的ECS,这种部署方式的目的是可以让一个应用的多个pod(至少两个)能够分布在不同的可用区,起码不能分布在同一个可 ...
- Keepalived+LVS实现LNMP网站的高可用部署
Keepalived+LVS实现LNMP网站的高可用部署 项目需求 当我们访问某个网站的时候可以在浏览器中输入IP或者域名链接到Web Server进行访问,如果这个Web Server挂了, ...
随机推荐
- python中的内置函数(一)
内置函数:内置函数就是python提供的,可以拿来直接用的函数 作用域相关 locals():返回当前作用域中的名字globals():返回全局作用域中的内容 def func(): print('我 ...
- No.595-Big Countries-(LeetCode之Database篇)
数据库表 给出的数据库表如下,表名为World. +-----–+----+----+----–+-----+ | name | continent | area | ...
- Hadoop编程踩坑
Hadoop踩坑 在hadoop所有组件编程中,遇到在Windows下运行程序出现 java.io.IOException: Could not locate executable null\bin\ ...
- 曹工说Tomcat2:自己撸一个简易Tomcat Digester
一.前言 框架代码其实也没那么难,大家不要看着源码就害怕,现在去看 Tomcat 3.0的代码,保证还是看得懂一半,照着撸一遍基本上很多问题都能搞定了.这次我们就模拟 Tomcat 中的 Digest ...
- MD5加密工具代码
找到一个开源的MD5加密工具代码,收藏起来 /** * MD5加密工具 */ public class MD5Utils { /** * byte[]字节数组 转换成 十六进制字符串 * @param ...
- Neo4j 爬坑笔记for3.2.6
官网语法,非常详尽:http://neo4j.com/docs/developer-manual/current/cypher/clauses/match/ A:请对应版本号,不同大版本可能会有很大区 ...
- package.json 详解
使用package.json 属性说明 name - 包名. version - 包的版本号. description - 包的描述. homepage - 包的官网 url . author - ...
- 跟着大彬读源码 - Redis 1 - 启动服务,程序都干了什么?
一直很羡慕那些能读 Redis 源码的童鞋,也一直想自己解读一遍,但迫于 C 大魔王的压力,解读日期遥遥无期. 相信很多小伙伴应该也都对或曾对源码感兴趣,但一来觉得自己不会 C 语言,二来也不知从何入 ...
- 基于Dapper的开源Lambda扩展,且支持分库分表自动生成实体之基础介绍
LnskyDB LnskyDB是基于Dapper的Lambda扩展,支持按时间分库分表,也可以自定义分库分表方法.而且可以T4生成实体类免去手写实体类的烦恼. 文档地址: https://lining ...
- POJ 1741:Tree(树上点分治)
题目链接 题意 给一棵边带权树,问两点之间的距离小于等于K的点对有多少个. 思路 <分治算法在树的路径问题中的应用> 图片转载于http://www.cnblogs.com/Paul-Gu ...