Unity进阶之ET网络游戏开发框架 02-ET的客户端启动流程分析
版权申明:
- 本文原创首发于以下网站:
- 博客园『优梦创客』的空间:https://www.cnblogs.com/raymondking123
- 优梦创客的官方博客:https://91make.top
- 优梦创客的游戏讲堂:https://91make.ke.qq.com
- 『优梦创客』的微信公众号:umaketop
- 您可以自由转载,但必须加入完整的版权声明!
万物起源:Init.cs
- 打开范例场景init.unity,可以发现其场景层级如下:
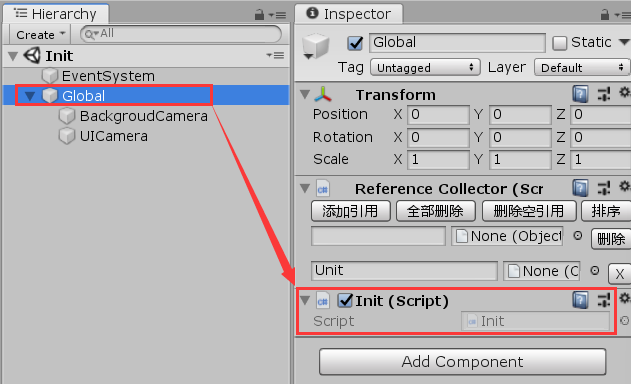
- 其中唯一重要的就是Global对象上挂在的init.cs脚本,关于其基础代码分析,还是建议大家看初见的教程(ghithub有链接)
- 在这里只想重点分析大家一定会关心的一个问题:init.cs是如何加载初始界面的
init.cs是如何加载初始界面的:
- 上节课分析了,init.cs首先加载UILoading界面,其加载流程大致是这样的,先上序列图,稍后结合序列图贴代码分析:
Unity->> +Init: StartAsync
Init ->> BundleHelper: DownloadBundle()
BundleHelper->>EventSystem: Run(EventIdType.LoadingBegin)
EventSystem->>LoadingBeginEvent_CreateLoadingUI: Run()
LoadingBeginEvent_CreateLoadingUI->>UILoadingFactory: Create()
note right of UILoadingFactory: 实例化UILoading预制体,并附加UILoadingComponent(更新并显示加载进度)
Init->>-Unity: StartAsync
- 加载初始界面的几个步骤如下:
- 调用
EventSystem.Run(EventIdType.LoadingBegin)引发LoadingBegin事件:
public static class BundleHelper

{

	public static async ETTask DownloadBundle()

	{

		if (Define.IsAsync)

		{

			try

			{

				using (BundleDownloaderComponent bundleDownloaderComponent = Game.Scene.AddComponent<BundleDownloaderComponent>())

				{

					await bundleDownloaderComponent.StartAsync();

					Debug.Log("EventIdType.LoadingBegin");

					Game.EventSystem.Run(EventIdType.LoadingBegin);

					await bundleDownloaderComponent.DownloadAsync();

				}

				Game.EventSystem.Run(EventIdType.LoadingFinish);

				Game.Scene.GetComponent<ResourcesComponent>().LoadOneBundle("StreamingAssets");

				ResourcesComponent.AssetBundleManifestObject = (AssetBundleManifest)Game.Scene.GetComponent<ResourcesComponent>().GetAsset("StreamingAssets", "AssetBundleManifest");

			}

			catch (Exception e)

			{

				Log.Error(e);

			}

		}

	}

}
- 由于在unity编辑器环境下IsAsync标志被设为false(在VS环境下选中IsAsync成员,右键→速览定义可见),也即异步加载资源才可见loading画面,所以实际上不会看到loading画面!
- 第19行为等待异步加载完毕后引发LoadingFinish事件,其流程与LoadingBegin类似,请同学们自行分析!
实现LoadingBegin事件处理程序:
[Event(EventIdType.LoadingBegin)]

public class LoadingBeginEvent_CreateLoadingUI : AEvent

{

	public override void Run()

	{

		UI ui = UILoadingFactory.Create();

		Game.Scene.GetComponent<UIComponent>().Add(ui);

	}

}
在这里有需要注意学习定义事件类的方法:
1. 为一个类添加Event标志(参数填具体事件类型)
2. 从AEvent继承
3. 此时,ET就会自动将该类识别为一个事件处理类(通过反射机制),并在EventSystem.Run被调用时执行LoadingBeginEvent_CreateLoadingUI事件类的Run方法!第六行代码
UILoadingFactory.Create()负责创建UILoading界面,下面代码加了注释:public static class UILoadingFactory
{
public static UI Create()
{
try
{
// KV是Resources文件夹下存储的本地预制体资源,主要存储一些键值对数据
// 从KV加载UIType.UILoading预制体,并实例化UI对象:
GameObject bundleGameObject = ((GameObject)ResourcesHelper.Load("KV")).Get<GameObject>(UIType.UILoading);
GameObject go = UnityEngine.Object.Instantiate(bundleGameObject);
go.layer = LayerMask.NameToLayer(LayerNames.UI); // 创建UI这个Entity,并将上面创建的UI对象作为该Entity的图形表示
UI ui = ComponentFactory.Create<UI, string, GameObject>(UIType.UILoading, go, false); // 添加UILoadingComponent,该组件负责更新loading进度并刷新显示
ui.AddComponent<UILoadingComponent>();
return ui;
}
catch (Exception e)
{
Log.Error(e);
return null;
}
}
}
说明:
- UI类是一个Entity类,Entity间接从Component类继承,但只有Entity类可以附加组件,Component类不行
- Entity和Component的关系实际就是设计模式中的Composite模式
- UI类可以复用,当你要创建一个UI时,在ET框架下只要:
- 添加一个static的UI工厂类,并在其中定义一个static的Create方法,具体实现参照UILoadingFactory
- 为该工厂添加一个新的UI组件(从Component类继承),并实现该组件的事件系统(见下文)实现UILoadingComponent并实现该组件的事件系统:
- UILoading组件
public class UILoadingComponent : Component

{

	public Text text;

}
- UILoading事件系统:
[ObjectSystem]

public class UiLoadingComponentAwakeSystem : AwakeSystem<UILoadingComponent>

{

	public override void Awake(UILoadingComponent self)

	{

		self.text = self.GetParent<UI>().GameObject.Get<GameObject>("Text").GetComponent<Text>();

	}

}

[ObjectSystem]

public class UiLoadingComponentStartSystem : StartSystem<UILoadingComponent>

{

	public override void Start(UILoadingComponent self)

	{

		StartAsync(self).Coroutine();

	}

	public async ETVoid StartAsync(UILoadingComponent self)

	{

		TimerComponent timerComponent = Game.Scene.GetComponent<TimerComponent>();

		long instanceId = self.InstanceId;

		while (true)

		{

			await timerComponent.WaitAsync(1000);

			if (self.InstanceId != instanceId)

			{

				return;

			}

			BundleDownloaderComponent bundleDownloaderComponent = Game.Scene.GetComponent<BundleDownloaderComponent>();

			if (bundleDownloaderComponent == null)

			{

				continue;

			}

			self.text.text = $"{bundleDownloaderComponent.Progress}%";

		}

	}

}
事件类的定义:
1. 添加[ObjectSystem]标志
2. 继承自对应的XxxSystem类,并实现基类的虚方法
- 事件类与Unity中含义类似,请自行参阅源码学习
总结:
- 通过对UILoading的学习,我们已经接触了ET的一个完整的ECS对象:
- E:Entity,对应UI类
- C:Component,对应UILoadingComponent类
- S:System,
对应UiLoadingComponentAwakeSystem和
UiLoadingComponentStartSystem类
Unity进阶之ET网络游戏开发框架 02-ET的客户端启动流程分析的更多相关文章
- Unity进阶之ET网络游戏开发框架 01-下载、运行
版权申明: 本文原创首发于以下网站: 博客园『优梦创客』的空间:https://www.cnblogs.com/raymondking123 优梦创客的官方博客:https://91make.top ...
- Unity进阶之ET网络游戏开发框架 04-资源打包
版权申明: 本文原创首发于以下网站: 博客园『优梦创客』的空间:https://www.cnblogs.com/raymondking123 优梦创客的官方博客:https://91make.top ...
- Unity进阶之ET网络游戏开发框架 05-搭建自己的第一个Scene
版权申明: 本文原创首发于以下网站: 博客园『优梦创客』的空间:https://www.cnblogs.com/raymondking123 优梦创客的官方博客:https://91make.top ...
- Unity进阶之ET网络游戏开发框架 08-深入登录成功消息
版权申明: 本文原创首发于以下网站: 博客园『优梦创客』的空间:https://www.cnblogs.com/raymondking123 优梦创客的官方博客:https://91make.top ...
- Unity进阶之ET网络游戏开发框架 03-Hotfix层启动
版权申明: 本文原创首发于以下网站: 博客园『优梦创客』的空间:https://www.cnblogs.com/raymondking123 优梦创客的官方博客:https://91make.top ...
- Unity进阶之ET网络游戏开发框架 06-游客登录
版权申明: 本文原创首发于以下网站: 博客园『优梦创客』的空间:https://www.cnblogs.com/raymondking123 优梦创客的官方博客:https://91make.top ...
- Unity进阶之ET网络游戏开发框架 07-修正游客登录的异步BUG
版权申明: 本文原创首发于以下网站: 博客园『优梦创客』的空间:https://www.cnblogs.com/raymondking123 优梦创客的官方博客:https://91make.top ...
- Spring源码解析02:Spring IOC容器之XmlBeanFactory启动流程分析和源码解析
一. 前言 Spring容器主要分为两类BeanFactory和ApplicationContext,后者是基于前者的功能扩展,也就是一个基础容器和一个高级容器的区别.本篇就以BeanFactory基 ...
- 【网络爬虫入门02】HTTP客户端库Requests的基本原理与基础应用
[网络爬虫入门02]HTTP客户端库Requests的基本原理与基础应用 广东职业技术学院 欧浩源 1.引言 实现网络爬虫的第一步就是要建立网络连接并向服务器或网页等网络资源发起请求.urllib是 ...
随机推荐
- pycharm install python packaging tools时遇到AttributeError: '_NamespacePath' object has no attribute 'sort'错误
pycharm install python packaging tools时报错AttributeError: '_NamespacePath' object has no attribute 's ...
- java.util.LinkedHashMap cannot be cast to
Jackson转换泛型List出现错误java.util.LinkedHashMap cannot be cast to com.xxx ObjectMapper mapper = new Objec ...
- 个人永久性免费-Excel催化剂功能第104波-批量选择多种类型的图形对象
在Excel的日常操作过程中,选择绝对是一个高频的操作,之前开发过一些快速选择单元格区域的辅助功能,除了单元格区域,Excel强大之处在于,类似PhotoShop那般可以存放多种图形,并且有图层先后顺 ...
- Python学习3——Python的简单推导
列表推导是一种从其他列表创建列表的方式,类似于数学中的集合推导,列表推导的工作原理非常简单,类似于for循环.(以下代码均在IDLE实现) 最简单的列表推导: >>>[x*x for ...
- C#编程之接口
1.定义 接口是把公共方法和属性组合起来,以封装特定功能的一个集合.(一旦定义了接口,就可以在类中实现它.这样类就可以支持接口所指定的所有属性和成员) 注意1:接口不能单独存在.不能像实例化一个类那样 ...
- 利用 ssh 传输文件
前提条件: 服务器要开启写入权限: 本地和服务器都要安装有 scp 包: 如何传输: 1. 从服务器上下载文件: scp username@servername:远程目录/文件名 本地目录 例:scp ...
- [学习笔记] NumPy走一趟(持续更)
Numpy学习笔记 之前没有花时间去专门学Numpy,都是用到什么就草草查一下,最近在学DeepLearning,就决定还是系统地把Numpy学一遍. 一.Numpy基础篇 https://www.r ...
- Java实现常见的排序算法
一.排序算法 常见的排序算法主要分为下面几类: 选择排序 堆排序 冒泡排序 快速排序 插入排序 希尔排序 归并排序 桶式排序 基数排序 本文主要介绍选择排序.堆排序.冒泡排序.快速排序和归并排序的原理 ...
- Linux系统命令。
help:命令用于显示shell内部命令的帮助信息.help命令只能显示shell内部的命令 帮助信息.而对于外部命令的帮助信息只能使用man或者info命令查看 m ...
- 【iOS】设置 rootViewController
iOS 开发中,rootViewController 经常用到,示例代码如下: self.window = [[UIWindow alloc] initWithFrame:[UIScreen main ...