[OpenCV实战]31 使用OpenCV将一个三角形仿射变换到另一个三角形
目录
在本文中,我们会看到如何将一个三角形仿射变换到另一个三角形。在图形学的研究中,研究者常常进行三角形之间的变换操作,因为任意的3D表面都可以用多个三角形去近似表示。同样的,图像也可以分解成多个三角形来表示。但是在OpenCV中并没有直接将三角形仿射变换成另一个三角形的函数。本教程将逐步说明如何将下图中左图中的三角形转换为右图。

在我们深入研究代码之前,我们需要了解仿射变换是什么。
1 什么是仿射变换?
仿射变换是将一个3个点的点集(即三角形)来转换到任意3个点另一点集的最简单的方法。它包含平移(移动),缩放,旋转和裁剪等操作。下图说明了如何使用仿射变换来改变正方形的形状。请注意,使用仿射变换,您可以在任何方向和比例下将正方形的形状更改为平行四边形。然而,仿射变换不够灵活,无法将方形变换为任意四边形。换句话说,在仿射变换之后,平行线继续平行。

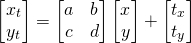
在OpenCV中,仿射变换可以用一个2×3的矩阵表示,这个矩阵的前两列表示旋转、缩放、裁剪操作,最后一列表示平移操作。如下公式所示:

给定一点 ,上面的仿射变换使用下面给出的等式得到点
 :
:
2 使用OpenCV进行三角形仿射变换
我们现在知道,要将三角形变形到另一个三角形,我们将需要使用仿射变换。在OpenCV中,warpAffine函数允许您对图像应用仿射变换,但不能对图像内的三角形区域应用仿射变换。
为了克服这个限制,我们在源三角形周围找到一个边界框,并从源图像中裁剪出矩形区域。然后,我们将仿射变换应用于裁剪图像以获得输出图像。前一步是至关重要的,因为它允许我们将仿射变换应用于图像的某一区域,从而提高计算性能。最后,我们通过用白色填充输出三角形内的像素来创建三角形掩模。与输出图像相乘时,此掩模将三角形外部的所有像素变为黑色,同时保留三角形内所有像素的颜色。在我们进入细节之前,让我们读入输入和输出图像,并定义输入和输出三角形。对于本教程,我们的输出图像只是白色,但如果您愿意,可以读取另一个图像。
2.1 定义输入和输出
我们现在需要定义输入图像和输出图像,以及输入输出三角形坐标。我们已准备好完成将输入三角形内的所有像素转换为输出三角形所需的步骤。输入输出设定代码如下:
C++:
// Read input image and convert to float

Mat img1 = imread("robot.jpg");

img1.convertTo(img1, CV_32FC3, 1/255.0);

// Output image is set to white

Mat imgOut = Mat::ones(imgIn.size(), imgIn.type());

imgOut = Scalar(1.0,1.0,1.0);

// Input triangle

vector <Point2f> tri1;

tri1.push_back(Point2f(360,200));

tri1.push_back(Point2d(60,250));

tri1.push_back(Point2f(450,400));

// Output triangle

vector <Point2f> triOut;

tri2.push_back(Point2f(400,200));

tri2.push_back(Point2f(160,270));

tri2.push_back(Point2f(400,400));
Python:
# Read input image and convert to float

img1 = cv2.imread("robot.jpg")

# Output image is set to white

img2 = 255 * np.ones(img_in.shape, dtype = img_in.dtype)

# Define input and output triangles

tri1 = np.float32([[[360,200], [60,250], [450,400]]])

tri2 = np.float32([[[400,200], [160,270], [400,400]]])
2.2 计算边界框
在此步骤中,我们计算三角形周围的边界框。这个想法只是扭曲图像的一小部分而不是整个图像以提高效率。通过boundingRect()得到包覆此三角形的最小正矩形。代码如下:
C++:
// Find bounding rectangle for each triangle

Rect r1 = boundingRect(tri1);

Rect r2 = boundingRect(tri2);
Python:
# Find bounding box.

r1 = cv2.boundingRect(tri1)

r2 = cv2.boundingRect(tri2)
2.3 裁剪图像和更改坐标
要有效地将仿射变换应用于图像而不是整个图像,我们将根据上一步中计算的边界框裁剪输入图像。还需要修改三角形的坐标以反映它们在新裁剪图像中的位置。这是通过从三角形的x和y坐标减去边界框左上角顶点的x和y坐标来完成的。代码如下:
C++:
// Offset points by left top corner of the respective rectangles

vector<Point2f> tri1Cropped, tri2Cropped;

vector<Point> tri2CroppedInt;

for(int i = 0; i < 3; i++)

{

    tri1Cropped.push_back( Point2f( tri1[i].x - r1.x, tri1[i].y -  r1.y) );

    tri2Cropped.push_back( Point2f( tri2[i].x - r2.x, tri2[i].y - r2.y) );

    // fillConvexPoly needs a vector of Point and not Point2f

    tri2CroppedInt.push_back( Point((int)(tri2[i].x - r2.x), (int)(tri2[i].y - r2.y)) );

}

// Apply warpImage to small rectangular patches

Mat img1Cropped;

img1(r1).copyTo(img1Cropped);
Python:
# Offset points by left top corner of the

# respective rectangles

tri1Cropped = []

tri2Cropped = []

for i in xrange(0, 3):

  tri1Cropped.append(((tri1[0][i][0] - r1[0]),(tri1[0][i][1] - r1[1])))

  tri2Cropped.append(((tri2[0][i][0] - r2[0]),(tri2[0][i][1] - r2[1])))

# Apply warpImage to small rectangular patches

img1Cropped = img1[r1[1]:r1[1] + r1[3], r1[0]:r1[0] + r1[2]]
2.4 计算仿射变换矩形
我们刚刚在裁剪的输入和输出图像中获得了输入和输出三角形的坐标。使用这两个三角形,我们可以找到仿射变换,它将使用以下代码将输入三角形转换为裁剪图像中的输出三角形。
C++:
// Given a pair of triangles, find the affine transform.

Mat warpMat = getAffineTransform( tri1Cropped, tri2Cropped );
Python:
# Given a pair of triangles, find the affine transform.

warpMat = cv2.getAffineTransform( np.float32(tri1Cropped), np.float32(tri2Cropped) )
2.5 应用仿射变换到三角形
将上一步骤中找到的仿射变换矩阵应用于裁剪的输入图像,以获得裁剪的输出图像。在OpenCV中,您可以使用warpAffine将仿射变换应用于图像。代码如下:
C++:
// Apply the Affine Transform just found to the src image

Mat img2Cropped = Mat::zeros(r2.height, r2.width, img1Cropped.type());

warpAffine( img1Cropped, img2Cropped, warpMat, img2Cropped.size(), INTER_LINEAR, BORDER_REFLECT_101);
Python:
# Apply the Affine Transform just found to the src image

img2Cropped = cv2.warpAffine( img1Cropped, warpMat, (r2[2], r2[3]), None, flags=cv2.INTER_LINEAR, borderMode=cv2.BORDER_REFLECT_101 )
2.6 屏蔽三角形外的像素
在上一步中,我们获得了输出矩形图像。但是,我们对矩形区域内的三角形感兴趣。因此,我们使用fillConvexPoly创建一个掩模,用于遮蔽三角形外的所有像素。这个新的裁剪图像最终可以使用输出边界矩形的左上角坐标点置于输出图像中的正确位置。
C++:
// Get mask by filling triangle

Mat mask = Mat::zeros(r2.height, r2.width, CV_32FC3);

fillConvexPoly(mask, tri2CroppedInt, Scalar(1.0, 1.0, 1.0), 16, 0);

// Copy triangular region of the rectangular patch to the output image

multiply(img2Cropped,mask, img2Cropped);

multiply(img2(r2), Scalar(1.0,1.0,1.0) - mask, img2(r2));

img2(r2) = img2(r2) + img2Cropped;
Python:
# Get mask by filling triangle

mask = np.zeros((r2[3], r2[2], 3), dtype = np.float32)

cv2.fillConvexPoly(mask, np.int32(tri2Cropped), (1.0, 1.0, 1.0), 16, 0);

# Apply mask to cropped region

img2Cropped = img2Cropped * mask

# Copy triangular region of the rectangular patch to the output image

img2[r2[1]:r2[1]+r2[3], r2[0]:r2[0]+r2[2]] = img2[r2[1]:r2[1]+r2[3], r2[0]:r2[0]+r2[2]] * ( (1.0, 1.0, 1.0) - mask )

img2[r2[1]:r2[1]+r2[3], r2[0]:r2[0]+r2[2]] = img2[r2[1]:r2[1]+r2[3], r2[0]:r2[0]+r2[2]] + img2Cropped
3 代码
本文所有代码见:
https://github.com/luohenyueji/OpenCV-Practical-Exercise
C++:
#include "pch.h"

#include <opencv2/opencv.hpp>

#include <stdlib.h>

using namespace cv;

using namespace std;

/**

 * @brief Warps and alpha blends triangular regions from img1 and img2 to img 图像仿射变换

 *

 *

 * @param img1 输入图像

 * @param img2 输出图像

 * @param tri1 输入三角形坐标点

 * @param tri2 输出三角形坐标点

 */

void warpTriangle(Mat &img1, Mat &img2, vector<Point2f> tri1, vector<Point2f> tri2)

{

	// Find bounding rectangle for each triangle

	//得到每个三角形的最小外接矩形

	Rect r1 = boundingRect(tri1);

	Rect r2 = boundingRect(tri2);

	// Offset points by left top corner of the respective rectangles

	// 获得剪裁后的坐标点

	//输入和输出三角形坐标点

	vector<Point2f> tri1Cropped, tri2Cropped;

	//输出三角形坐标点int形式

	vector<Point> tri2CroppedInt;

	for (int i = 0; i < 3; i++)

	{

		tri1Cropped.push_back(Point2f(tri1[i].x - r1.x, tri1[i].y - r1.y));

		tri2Cropped.push_back(Point2f(tri2[i].x - r2.x, tri2[i].y - r2.y));

		// fillConvexPoly needs a vector of Point and not Point2f

		tri2CroppedInt.push_back(Point((int)(tri2[i].x - r2.x), (int)(tri2[i].y - r2.y)));

	}

	// Apply warpImage to small rectangular patches 应用仿射变换到三角形外接矩形

	Mat img1Cropped;

	//提取外接矩形区域

	img1(r1).copyTo(img1Cropped);

	// Given a pair of triangles, find the affine transform.

	// 提取仿射变换矩阵

	Mat warpMat = getAffineTransform(tri1Cropped, tri2Cropped);

	// Apply the Affine Transform just found to the src image

	Mat img2Cropped = Mat::zeros(r2.height, r2.width, img1Cropped.type());

	// 应用仿射变换

	warpAffine(img1Cropped, img2Cropped, warpMat, img2Cropped.size(), INTER_LINEAR, BORDER_REFLECT_101);

	// Get mask by filling triangle 获得掩模

	Mat mask = Mat::zeros(r2.height, r2.width, CV_32FC3);

	//填充多边形

	fillConvexPoly(mask, tri2CroppedInt, Scalar(1.0, 1.0, 1.0), 16, 0);

	// Copy triangular region of the rectangular patch to the output image

	// 应用掩模,获得输出图

	// 提取掩模对应的图像区域

	multiply(img2Cropped, mask, img2Cropped);

	// 获得输出图像掩模区域

	multiply(img2(r2), Scalar(1.0, 1.0, 1.0) - mask, img2(r2));

	// 保存仿射变换结果

	img2(r2) = img2(r2) + img2Cropped;

}

int main()

{

	// Read input image and convert to float

	// 读取图像,并将图像转换为float

	Mat imgIn = imread("./image/robot.jpg");

	imgIn.convertTo(imgIn, CV_32FC3, 1 / 255.0);

	// Output image is set to white

	Mat imgOut = Mat::ones(imgIn.size(), imgIn.type());

	//设定输出,输出为纯白色图像

	imgOut = Scalar(1.0, 1.0, 1.0);

	// Input triangle 输入三角形坐标点

	vector<Point2f> triIn;

	triIn.push_back(Point2f(360, 200));

	triIn.push_back(Point2d(60, 250));

	triIn.push_back(Point2f(450, 400));

	// Output triangle 输出三角形坐标点

	vector<Point2f> triOut;

	triOut.push_back(Point2f(400, 200));

	triOut.push_back(Point2f(160, 270));

	triOut.push_back(Point2f(400, 400));

	// Warp all pixels inside input triangle to output triangle 仿射变换

	warpTriangle(imgIn, imgOut, triIn, triOut);

	// Draw triangle on the input and output image.

	// Convert back to uint because OpenCV antialiasing

	// does not work on image of type CV_32FC3

	//保存为INT型

	imgIn.convertTo(imgIn, CV_8UC3, 255.0);

	imgOut.convertTo(imgOut, CV_8UC3, 255.0);

	// Draw triangle using this color

	Scalar color = Scalar(255, 150, 0);

	// cv::polylines needs vector of type Point and not Point2f

	vector<Point> triInInt, triOutInt;

	for (int i = 0; i < 3; i++)

	{

		triInInt.push_back(Point(triIn[i].x, triIn[i].y));

		triOutInt.push_back(Point(triOut[i].x, triOut[i].y));

	}

	// Draw triangles in input and output images

	//在图中画出三角形

	polylines(imgIn, triInInt, true, color, 2, 16);

	polylines(imgOut, triOutInt, true, color, 2, 16);

	imshow("Input", imgIn);

	imshow("Output", imgOut);

	waitKey(0);

	return 0;

}
Python:
#!/usr/bin/env python

# Copyright (c) 2016 Satya Mallick <spmallick@learnopencv.com>

# All rights reserved. No warranty, explicit or implicit, provided.

import cv2

import numpy as np

# Warps and alpha blends triangular regions from img1 and img2 to img

def warpTriangle(img1, img2, tri1, tri2) :

    # Find bounding rectangle for each triangle

    r1 = cv2.boundingRect(tri1)

    r2 = cv2.boundingRect(tri2)

    # Offset points by left top corner of the respective rectangles

    tri1Cropped = []

    tri2Cropped = []

    for i in range(0, 3):

        tri1Cropped.append(((tri1[0][i][0] - r1[0]),(tri1[0][i][1] - r1[1])))

        tri2Cropped.append(((tri2[0][i][0] - r2[0]),(tri2[0][i][1] - r2[1])))

    # Crop input image

    img1Cropped = img1[r1[1]:r1[1] + r1[3], r1[0]:r1[0] + r1[2]]

    # Given a pair of triangles, find the affine transform.

    warpMat = cv2.getAffineTransform( np.float32(tri1Cropped), np.float32(tri2Cropped) )

    # Apply the Affine Transform just found to the src image

    img2Cropped = cv2.warpAffine( img1Cropped, warpMat, (r2[2], r2[3]), None, flags=cv2.INTER_LINEAR, borderMode=cv2.BORDER_REFLECT_101 )

    # Get mask by filling triangle

    mask = np.zeros((r2[3], r2[2], 3), dtype = np.float32)

    cv2.fillConvexPoly(mask, np.int32(tri2Cropped), (1.0, 1.0, 1.0), 16, 0);

    img2Cropped = img2Cropped * mask

    # Copy triangular region of the rectangular patch to the output image

    img2[r2[1]:r2[1]+r2[3], r2[0]:r2[0]+r2[2]] = img2[r2[1]:r2[1]+r2[3], r2[0]:r2[0]+r2[2]] * ( (1.0, 1.0, 1.0) - mask )

    img2[r2[1]:r2[1]+r2[3], r2[0]:r2[0]+r2[2]] = img2[r2[1]:r2[1]+r2[3], r2[0]:r2[0]+r2[2]] + img2Cropped

if __name__ == '__main__' :

    # Read input image

    imgIn = cv2.imread("./image/robot.jpg")

    # Output image is set to white

    imgOut = 255 * np.ones(imgIn.shape, dtype = imgIn.dtype)

    # Input triangle

    triIn = np.float32([[[360,200], [60,250], [450,400]]])

    # Output triangle

    triOut = np.float32([[[400,200], [160,270], [400,400]]])

    # Warp all pixels inside input triangle to output triangle

    warpTriangle(imgIn, imgOut, triIn, triOut)

    # Draw triangle using this color

    color = (255, 150, 0)

    # Draw triangles in input and output images.

    cv2.polylines(imgIn, triIn.astype(int), True, color, 2, 16)

    cv2.polylines(imgOut, triOut.astype(int), True, color, 2, 16)

    cv2.imshow("Input", imgIn)

    cv2.imshow("Output", imgOut)

    cv2.waitKey(0)
4 参考
https://www.learnopencv.com/warp-one-triangle-to-another-using-opencv-c-python/
[OpenCV实战]31 使用OpenCV将一个三角形仿射变换到另一个三角形的更多相关文章
- [OpenCV实战]45 基于OpenCV实现图像哈希算法
目前有许多算法来衡量两幅图像的相似性,本文主要介绍在工程领域最常用的图像相似性算法评价算法:图像哈希算法(img hash).图像哈希算法通过获取图像的哈希值并比较两幅图像的哈希值的汉明距离来衡量两幅 ...
- [OpenCV实战]50 用OpenCV制作低成本立体相机
本文主要讲述利用OpenCV制作低成本立体相机以及如何使用OpenCV创建3D视频,准确来说是模仿双目立体相机,我们通常说立体相机一般是指双目立体相机,就是带两个摄像头的那种(目就是指眼睛,双目就是两 ...
- [OpenCV实战]9 使用OpenCV寻找平面图形的质心
目录 1 名词解释 2 在OpenCV中查找Blob质心的步骤 3 图像多个blob下的质心获取 4 参考 在中学,我们学习了几何的中各种平面图形.找到标准平面图形的中心(几何中心)比较容易,如圆形, ...
- [OpenCV实战]48 基于OpenCV实现图像质量评价
本文主要介绍基于OpenCV contrib中的quality模块实现图像质量评价.图像质量评估Image Quality Analysis简称IQA,主要通过数学度量方法来评价图像质量的好坏. 本文 ...
- [OpenCV实战]47 基于OpenCV实现视觉显著性检测
人类具有一种视觉注意机制,即当面对一个场景时,会选择性地忽略不感兴趣的区域,聚焦于感兴趣的区域.这些感兴趣的区域称为显著性区域.视觉显著性检测(Visual Saliency Detection,VS ...
- [OpenCV实战]46 在OpenCV下应用图像强度变换实现图像对比度均衡
本文主要介绍基于图像强度变换算法来实现图像对比度均衡.通过图像对比度均衡能够抑制图像中的无效信息,使图像转换为更符合计算机或人处理分析的形式,以提高图像的视觉价值和使用价值.本文主要通过OpenCV ...
- [OpenCV实战]44 使用OpenCV进行图像超分放大
图像超分辨率(Image Super Resolution)是指从低分辨率图像或图像序列得到高分辨率图像.图像超分辨率是计算机视觉领域中一个非常重要的研究问题,广泛应用于医学图像分析.生物识别.视频监 ...
- [OpenCV实战]20 使用OpenCV实现基于增强相关系数最大化的图像对齐
目录 1 背景 1.1 彩色摄影的一个简短而不完整的历史 1.2 OpenCV中的运动模型 2 使用增强相关系数最大化(ECC)的图像对齐 2.1 findTransformECC在OpenCV中的示 ...
- [OpenCV实战]39 在OpenCV中使用ArUco标记的增强现实
文章目录 1 什么是ArUco标记? 2 在OpenCV中生成ArUco标记 3 检测Aruco标记 4 增强现实应用 5 总结和代码 5.1 生成aruco标记 5.2 使用aruco增强现实 6 ...
随机推荐
- 源码随想 String -> SoftReference
源码随想 String -> SoftReference 2021年7月27日 15:38:14 今天实习时看 String的源码,发现其中的一个构造方法 public String(byte ...
- 关于Vue多线程的思考
在前端调用的时候,我们难免需要同一时刻向后端请求多组数据或是总是期待着是否存在一个独立的线程去处理一系列的数据.线程相应,资源的抢占这是前端较为麻烦的点.这里就来聊聊我在前端踩的坑. 首先是线程问题说 ...
- Flink的异步算子的原理及使用
1.简介 Flink的特点是高吞吐低延迟.但是Flink中的某环节的数据处理逻辑需要和外部系统交互,调用耗时不可控会显著降低集群性能.这时候就可能需要使用异步算子让耗时操作不需要等待结果返回就可以继续 ...
- C语言------结构体和共用体
仅供借鉴.仅供借鉴.仅供借鉴(整理了一下大一C语言每个章节的练习题.没得题目.只有程序了) 文章目录 1 .实训名称 2 .实训目的及要求 3.源代码及运行截图 4 .小结 1 .实训名称 实训8:结 ...
- java 新特性之 Stream API
强大的 Stream API 一.Stream API 的概述 Stream到底是什么呢? 是数据渠道,用于操作数据源(集合.数组等)所生成的元素序列. "集合讲的是数据,Stream讲的是 ...
- C#中Enum的用法
1.定义枚举类型 public enum Test { 男 = 0, 女 = 1 } 2.获取枚举值 public void EnumsAction() { var s = Test.男;//男 va ...
- 畅联新增插件:新增依爱NB烟感
双美接入,C++版,就是解析Json时稍微有点问题,依爱这边的Json格式,Value字段竟然是单引号....呵呵,反正也解决了. 备注一下:电信模式,AEP平台模式.
- CSS动画-transition/animation
HTML系列: 人人都懂的HTML基础知识-HTML教程(1) HTML元素大全(1) HTML元素大全(2)-表单 CSS系列: CSS基础知识筑基 常用CSS样式属性 CSS选择器大全48式 CS ...
- 状态机的技术选型,yyds!
前言 今天跟大家分享一个关于"状态机"的话题.状态属性在我们的现实生活中无处不在.比如电商场景会有一系列的订单状态(待支付.待发货.已发货.超时.关闭):员工提交请假申请会有申请状 ...
- Linux下安装 SkyWalking 分布式追踪系统
Linux下安装 SkyWalking 分布式追踪系统 1.SkyWalking简介 1.1 SkyWalking介绍 SkyWalking项目是由华为大牛吴晟开源的个人项目,目前已经加入Apache ...