安卓开发:UI组件-RadioButton和复选框CheckBox
2.5RadioButton
为用户提供由两个及以上互斥的选项组成的选项集。
2.5.1精简代码
在按钮变多之后,多次重复书写点击事件有些繁琐,我们在这里创建一个事件OnClick,每次点击时调用该事件即可。
打开MainActivity:
private class OnClick implements View.OnClickListener{

        @Override

        public void onClick(View v) {

            Intent intent = null; //初始化

            switch(v.getId()){

                case R.id.btn_textview:

                    //跳转到TextView演示页面

                    intent = new Intent(MainActivity.this,TextViewActivity.class);

                    break;

            }

            startActivity(intent); //启用

        }

    }
编写事件OnClick,在其中使用switch结构,通过case跳转至不同页面。
设置监听位置:
private void setListeners(){

        OnClick onClick = new OnClick();

        mBtnTextView.setOnClickListener(onClick);

        mBtnButton.setOnClickListener(onClick);

        mBtnEditText.setOnClickListener(onClick);

        mBtnRadioButton.setOnClickListener(onClick);

    }
再新建RadioButton的按钮,最后精简完整代码如下(MainActivity):
package com.example.a73536.identitycard;

import android.content.Intent;

import android.support.v7.app.AppCompatActivity;

import android.os.Bundle;

import android.view.View;

import android.widget.Button;

public class MainActivity extends AppCompatActivity {

    private Button mBtnTextView; //声明组件

    private Button mBtnButton;

    private Button mBtnEditText;

    private Button mBtnRadioButton;

    @Override

    protected void onCreate(Bundle savedInstanceState) {

        super.onCreate(savedInstanceState);

        setContentView(R.layout.activity_main);

        mBtnTextView = findViewById(R.id.btn_textview); //连接视图

        mBtnButton = findViewById(R.id.btn_button);

        mBtnEditText = findViewById(R.id.btn_edittext);

        mBtnRadioButton = findViewById(R.id.btn_radiobutton);

        setListeners(); //调用

    }

    private void setListeners(){

        OnClick onClick = new OnClick();

        mBtnTextView.setOnClickListener(onClick);

        mBtnButton.setOnClickListener(onClick);

        mBtnEditText.setOnClickListener(onClick);

        mBtnRadioButton.setOnClickListener(onClick);

    }

    private class OnClick implements View.OnClickListener{

        @Override

        public void onClick(View v) {

            Intent intent = null; //初始化

            switch(v.getId()){

                case R.id.btn_textview:

                    //跳转到TextView演示页面

                    intent = new Intent(MainActivity.this,TextViewActivity.class);

                    break;

                case R.id.btn_button:

                    //跳转到Button演示页面

                    intent = new Intent(MainActivity.this,ButtonActivity.class);

                    break;

                case R.id.btn_edittext:

                    //跳转到EditText演示页面

                    intent = new Intent(MainActivity.this,EditTextActivity.class);

                    break;

                case R.id.btn_radiobutton:

                    //跳转到RadioButton演示页面

                    intent = new Intent(MainActivity.this,RadioButtonActivity.class);

                    break;

            }

            startActivity(intent); //启用

        }

    }

}
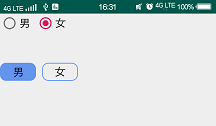
2.5.2使用RadioButton
在activity_radio_button的xml页面完成内容的编写。主要是通过RadioGroup和RadioButton的配合实现的。两个横排单选框,第一个为默认样式,第二个有所修改。
效果图:
代码如下:
<?xml version="1.0" encoding="utf-8"?>

<RelativeLayout xmlns:android="http://schemas.android.com/apk/res/android"

    android:layout_width="match_parent"

    android:layout_height="match_parent">

    <RadioGroup

        android:id="@+id/rg_1"

        android:layout_width="wrap_content"

        android:layout_height="wrap_content"

        android:orientation="horizontal">

            <RadioButton

                android:id="@+id/rb_1"

                android:layout_width="wrap_content"

                android:layout_height="wrap_content"

                android:text="男"

                android:checked="true" //默认为此选项

                android:textSize="18sp"

                android:textColor="#000"

                android:layout_marginRight="10dp"/> //边距

            <RadioButton

                android:id="@+id/rb_2"

                android:layout_width="wrap_content"

                android:layout_height="wrap_content"

                android:text="女"

                android:textSize="18sp"

                android:textColor="#000"/>

    </RadioGroup>

    <RadioGroup

        android:id="@+id/rg_2"

        android:layout_width="wrap_content"

        android:layout_height="wrap_content"

        android:orientation="horizontal"

        android:layout_below="@id/rg_1"

        android:paddingTop="50dp">

        <RadioButton

            android:id="@+id/rb_3"

            android:layout_width="60dp"

            android:layout_height="30dp"

            android:gravity="center"

            android:text="男"

            android:button="@null" //取消默认样式

            android:background="@drawable/bg_btn3" //使用自定义样式

            android:checked="true" //默认勾选此选项

            android:textSize="18sp"

            android:textColor="#000"

            android:layout_marginRight="10dp"/>

        <RadioButton

            android:id="@+id/rb_4"

            android:layout_width="60dp"

            android:layout_height="30dp"

            android:gravity="center"

            android:text="女"

            android:button="@null"

            android:background="@drawable/bg_btn3"

            android:textSize="18sp"

            android:textColor="#000"/>

    </RadioGroup>

</RelativeLayout>
bg_btn3.xml代码:
<?xml version="1.0" encoding="utf-8"?>

<selector xmlns:android="http://schemas.android.com/apk/res/android">

    <item android:state_checked="true"> //注意此处使用的是state_checked,表示判断有没有被选中

        <shape>

            <solid android:color="#6495ED"/>

            <corners android:radius="10dp"/>

        </shape>

    </item>

    <item android:state_checked="false">

        <shape>

            <stroke android:width="1dp" //没有被选择的时候使用线框。

                android:color="#6495ED"/>

            <corners android:radius="10dp"/>

        </shape>

    </item>

</selector>
同样,为第一组添加一个点击事件:
private RadioGroup mRg1;
mRg1 = findViewById(R.id.rg_1);

        mRg1.setOnCheckedChangeListener(new RadioGroup.OnCheckedChangeListener() {

            @Override

            public void onCheckedChanged(RadioGroup group, int checkedId) {

                RadioButton radioButton = group.findViewById(checkedId);

                Toast.makeText(RadioButtonActivity.this,radioButton.getText(),Toast.LENGTH_SHORT).show();

            }

        });
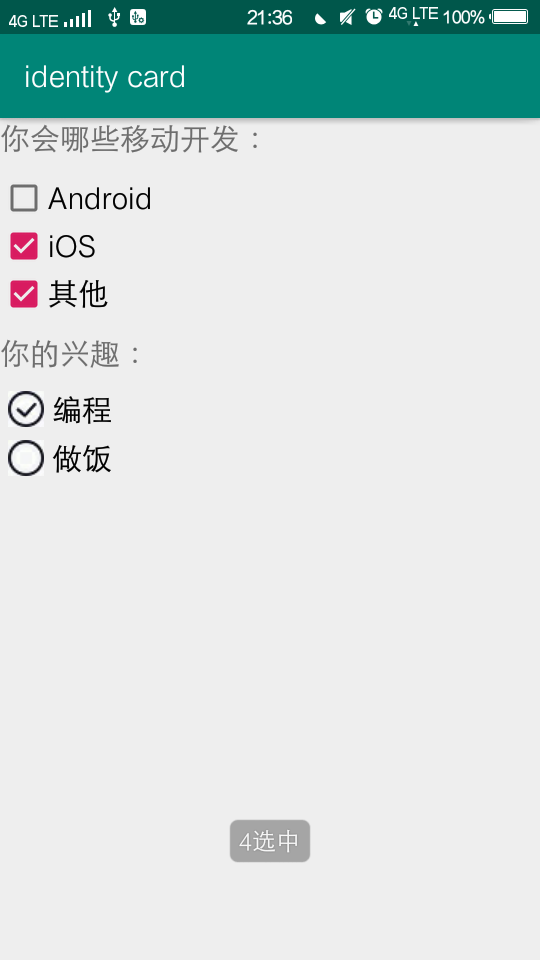
2.6复选框CheckBox
在主页添加新按钮CheckBox,链接新页面。CheckBox是一个复选框,可以同时选择多个选项。
效果图:
xml文件:
<?xml version="1.0" encoding="utf-8"?>

<RelativeLayout xmlns:android="http://schemas.android.com/apk/res/android"

    android:layout_width="match_parent"

    android:layout_height="match_parent">

    <TextView

        android:id="@+id/tv_title"

        android:layout_width="wrap_content"

        android:layout_height="wrap_content"

        android:text="你会哪些移动开发:"

        android:textSize="20sp"

        android:layout_marginBottom="10dp"/>

    <CheckBox

        android:id="@+id/cb_1"

        android:layout_width="wrap_content"

        android:layout_height="wrap_content"

        android:text="Android"

        android:textSize="20sp"

        android:layout_below="@+id/tv_title"/>

    <CheckBox

        android:id="@+id/cb_2"

        android:layout_width="wrap_content"

        android:layout_height="wrap_content"

        android:text="iOS"

        android:textSize="20sp"

        android:layout_below="@+id/cb_1"/>

    <CheckBox

        android:id="@+id/cb_3"

        android:layout_width="wrap_content"

        android:layout_height="wrap_content"

        android:text="其他"

        android:textSize="20sp"

        android:layout_below="@+id/cb_2"/>

    <LinearLayout //也可以通过LinearLayout布局

        android:layout_width="match_parent"

        android:layout_height="wrap_content"

        android:orientation="vertical"

        android:layout_below="@id/cb_3">

        <TextView

            android:layout_width="wrap_content"

            android:layout_height="wrap_content"

            android:text="你的兴趣:"

            android:textSize="20sp"

            android:layout_marginTop="10dp"

            android:layout_marginBottom="10dp"/>

        <CheckBox

            android:id="@+id/cb_4"

            android:layout_width="wrap_content"

            android:layout_height="wrap_content"

            android:text="编程"

            android:paddingLeft="5dp"

            android:button="@drawable/bg_checkbox" //使用一个新的选中图标,新建drawable文件

            android:textSize="20sp"

            android:layout_marginLeft="5dp"

            android:layout_marginBottom="5dp"/> //设置边距

        <CheckBox

            android:id="@+id/cb_5"

            android:layout_width="wrap_content"

            android:layout_height="wrap_content"

            android:text="做饭"

            android:paddingLeft="5dp"

            android:button="@drawable/bg_checkbox"

            android:textSize="20sp"

            android:layout_below="@+id/cb_4"

            android:layout_marginLeft="5dp"/>

    </LinearLayout>

</RelativeLayout>
drawable文件bg_checkbox:
<?xml version="1.0" encoding="utf-8"?>

<selector xmlns:android="http://schemas.android.com/apk/res/android">

    <item android:state_checked="true" android:drawable="@drawable/check"/> //根据选中和未选中各对应了不同图片

    <item android:state_checked="false" android:drawable="@drawable/uncheck"/>

</selector>
为复选框4和5添加点击事件:
package com.example.a73536.identitycard;

import android.support.v7.app.AppCompatActivity;

import android.os.Bundle;

import android.widget.CheckBox;

import android.widget.CompoundButton;

import android.widget.Toast;

public class CheckBoxActivity extends AppCompatActivity {

    private CheckBox mCb4,mCb5;

    @Override

    protected void onCreate(Bundle savedInstanceState) {

        super.onCreate(savedInstanceState);

        setContentView(R.layout.activity_check_box);

        mCb4 = findViewById(R.id.cb_4);

        mCb5 = findViewById(R.id.cb_5);

        mCb4.setOnCheckedChangeListener(new CompoundButton.OnCheckedChangeListener() {

            @Override

            public void onCheckedChanged(CompoundButton buttonView, boolean isChecked) {

                Toast.makeText(CheckBoxActivity.this,isChecked?"4选中":"4未选中", Toast.LENGTH_SHORT).show();

            }

        });

        mCb5.setOnCheckedChangeListener(new CompoundButton.OnCheckedChangeListener() {

            @Override

            public void onCheckedChanged(CompoundButton buttonView, boolean isChecked) {

                Toast.makeText(CheckBoxActivity.this,isChecked?"5选中":"5未选中", Toast.LENGTH_SHORT).show();

            }

        });

    }

}
完成!
Button还有其他衍生控件ToggleButton、Switch,不作详细举例。
安卓开发:UI组件-RadioButton和复选框CheckBox的更多相关文章
- Android 单选按钮(RadioButton)和复选框(CheckBox)的使用
1.RadioButton (1)介绍 (2)单选按钮点击事件的用法 (3)RadioButton与RadioGroup配合使用实现单选题功能 (4)xml布局及使用 <?xml version ...
- 可分组的选择框控件(MVVM下)(Toggle样式 仿造单选框RadioButton,复选框CheckBox功能)
原地址: http://www.cnblogs.com/yk250/p/5660340.html 效果图如下:支持分组的单选框,复选框样式和MVVM下功能的实现.这是项目中一个快捷键功能的扩展. 1, ...
- [原创]纯JS实现网页中多选复选框checkbox和单选radio的美化效果
图片素材: 最终效果图: <html><title> 纯JS实现网页中多选复选框checkbox和单选radio的美化效果</title><head>& ...
- 3.Android之单选按钮RadioGroup和复选框Checkbox学习
单选按钮和复选框在实际中经常看到,今天就简单梳理下. 首先,我们在工具中拖进单选按钮RadioGroup和复选框Checkbox,如图: xml对应的源码: <?xml version=&quo ...
- 关于bootstrap--表单(下拉<select>、输入框<input>、文本域<textare>复选框<checkbox>和单选按钮<radio>)
html 里面的 role 本质上是增强语义性,当现有的HTML标签不能充分表达语义性的时候,就可以借助role来说明.通常这种情况出现在一些自定义的组件上,这样可增强组件的可访问性.可用性和可交互性 ...
- 吾八哥学Selenium(三):操作复选框checkbox/单选框radio的方法
复选框checkbox和单选框radio是web网站里经常会使用到的两个控件,那么在web自动化测试的时候如何利用Selenium来操作这俩控件呢?今天我们就来简单入门练习一下! html测试页面代码 ...
- jQuery操作复选框checkbox技巧总结 ---- 设置选中、取消选中、获取被选中的值、判断是否选中等
转载:https://blog.csdn.net/chenchunlin526/article/details/77448168 jQuery操作复选框checkbox技巧总结 --- 设置选中.取消 ...
- css3美化复选框checkbox
两种美化效果如下图: 代码(html) <div id="main"> <h2 class="top_title">使用CSS3美化复 ...
- 复选框(checkbox)、单选框(radiobox)的使用
复选框(checkbox).单选框(radiobox)的使用 复选框: HTML: // 复选框 <input type="checkbox" name="chec ...
随机推荐
- 感恩节活动中奖名单 i春秋喊你领礼物啦!
上周我们组织的感恩节活动,得到了小伙伴们积极踊跃的回复,看到你们这么真诚的留言,我们也是满满的感动,在众多留言中,我们选出了八位幸运用户,让我们一起恭喜获奖的小伙伴们吧. 恭喜以上8位幸运的小伙伴,我 ...
- 这月薪过万的Java高级学习资料,难得一遇的干货,不下载真可惜了!
大家有没有想我呢 不管你们想不想我 我挺想你们的 通过昨天我不断的 死气白咧各种说好话 最终 要到了Java学科的Java集合学习资料 里面包含视频+资料+源码 堂兄也有一个愿望 希望你们月薪过万后 ...
- Javascript高级编程学习笔记(57)—— 事件(1)事件流
事件 JS与HTML的交互是通过事件实现的 而事件指的就是:文档或浏览器窗口特定的交互瞬间 可以通过侦听器来预定事件,以便在事件发生时执行相应的代码 这种模式也是设计模式中的观察者模式 事件流 有了事 ...
- [Swift]LeetCode156.二叉树的上下颠倒 $ Binary Tree Upside Down
Given a binary tree where all the right nodes are either leaf nodes with a sibling (a left node that ...
- Centos7中文乱码问题的解决
刚安装centos7之后,语言默认不是中文,导致中文路径或中文文件在系统中显示为乱码,查了些资料解决了这个问题. 1 查看和安装中文库 [root@bogon ~]# echo $LANG zh_CN ...
- spark按某几列删除dataframe重复行
新建一个 dataframe : val conf = new SparkConf().setAppName("TTyb").setMaster("local" ...
- python中的pip
python中的pip python有两个著名的包管理工具,其中,pip是一个.它对python的包进行管理和升级等操作. 问题一:pip本地的模块安装在哪里? 使用pip install numpy ...
- WeakHashMap
WeakHashMap 今天在具体业务的时候看到HashMap和WeakHashMap的区别.因为PHP语言并没有这种概念.所以很好奇做了一下研究. WeakHashMap WeakHashMap所谓 ...
- leetcode — decode-ways
/** * Source : https://oj.leetcode.com/problems/decode-ways/ * * * A message containing letters from ...
- pwnable.tw unexploitable 分析
这题是和pwnable.kr差不多的一道题,主要区别在于没有给syscall.所以需要自己去找. 只有read和sleep两个函数. 思路一是首先劫持堆栈到bss段,然后调用read函数将sleep的 ...