springboot+spring security +oauth2.0 demo搭建(password模式)(认证授权端与资源服务端分离的形式)
项目security_simple(认证授权项目)
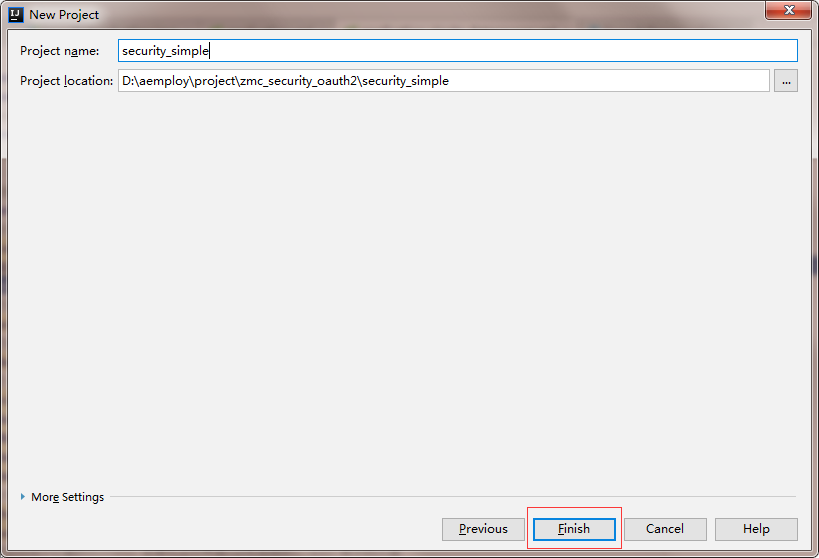
1.新建springboot项目


这儿选择springboot版本我选择的是2.0.6

点击finish后完成项目的创建
2.引入maven依赖 下面是我引入的依赖
 <?xml version="1.0" encoding="UTF-8"?>

 <project xmlns="http://maven.apache.org/POM/4.0.0" xmlns:xsi="http://www.w3.org/2001/XMLSchema-instance"

          xsi:schemaLocation="http://maven.apache.org/POM/4.0.0 http://maven.apache.org/xsd/maven-4.0.0.xsd">

     <modelVersion>4.0.0</modelVersion>

     <groupId>com.megalith</groupId>

     <artifactId>security_simple</artifactId>

     <version>0.0.1-SNAPSHOT</version>

     <packaging>jar</packaging>

     <name>security_simple</name>

     <description>Demo project for Spring Boot</description>

     <parent>

         <groupId>org.springframework.boot</groupId>

         <artifactId>spring-boot-starter-parent</artifactId>

         <version>2.0.6.RELEASE</version>

         <relativePath/> <!-- lookup parent from repository -->

     </parent>

     <properties>

         <project.build.sourceEncoding>UTF-8</project.build.sourceEncoding>

         <project.reporting.outputEncoding>UTF-8</project.reporting.outputEncoding>

         <java.version>1.8</java.version>

         <pagehelper.version>1.1.0</pagehelper.version>

         <mybatis.generator.version>1.3.2</mybatis.generator.version>

         <fastjson.version>1.2.31</fastjson.version>

         <jackson.version>2.9.7</jackson.version>

     </properties>

     <dependencies>

         <dependency>

             <groupId>junit</groupId>

             <artifactId>junit</artifactId>

             <version>4.11</version>

             <scope>test</scope>

         </dependency>

         <dependency>

             <groupId>org.springframework.boot</groupId>

             <artifactId>spring-boot-starter-web</artifactId>

             <exclusions>

                 <exclusion>

                     <groupId>org.springframework.boot</groupId>

                     <artifactId>spring-boot-starter-tomcat</artifactId>

                 </exclusion>

             </exclusions>

         </dependency>

         <dependency>

             <groupId>org.springframework.boot</groupId>

             <artifactId>spring-boot-configuration-processor</artifactId>

             <optional>true</optional>

         </dependency>

         <dependency>

             <groupId>org.springframework.boot</groupId>

             <artifactId>spring-boot-starter-jetty</artifactId>

         </dependency>

         <!-- aop -->

         <dependency>

             <groupId>org.springframework.boot</groupId>

             <artifactId>spring-boot-starter-aop</artifactId>

         </dependency>

         <!-- json处理 -->

         <dependency>

             <groupId>com.alibaba</groupId>

             <artifactId>fastjson</artifactId>

             <version>${fastjson.version}</version>

         </dependency>

         <!-- jackson json begin -->

         <dependency>

             <groupId>com.fasterxml.jackson.core</groupId>

             <artifactId>jackson-core</artifactId>

             <version>${jackson.version}</version>

         </dependency>

         <dependency>

             <groupId>com.fasterxml.jackson.core</groupId>

             <artifactId>jackson-databind</artifactId>

             <version>${jackson.version}</version>

         </dependency>

         <dependency>

             <groupId>com.fasterxml.jackson.core</groupId>

             <artifactId>jackson-annotations</artifactId>

             <version>${jackson.version}</version>

         </dependency>

         <dependency>

             <groupId>com.fasterxml.jackson.module</groupId>

             <artifactId>jackson-module-jaxb-annotations</artifactId>

             <version>${jackson.version}</version>

         </dependency>

         <!-- jackson json end -->

         <!-- https://mvnrepository.com/artifact/org.apache.commons/commons-lang3 -->

         <dependency>

             <groupId>org.apache.commons</groupId>

             <artifactId>commons-lang3</artifactId>

             <version>3.3.2</version>

         </dependency>

         <dependency>

             <groupId>com.fasterxml.uuid</groupId>

             <artifactId>java-uuid-generator</artifactId>

             <version>3.1.3</version>

         </dependency>

         <!-- druid datasource -->

         <dependency>

             <groupId>com.alibaba</groupId>

             <artifactId>druid</artifactId>

             <version>1.0.27</version>

         </dependency>

         <!-- mybatis -->

         <dependency>

             <groupId>org.mybatis.spring.boot</groupId>

             <artifactId>mybatis-spring-boot-starter</artifactId>

             <version>1.3.0</version>

         </dependency>

         <!--mybatis代码生成器 -->

         <dependency>

             <groupId>org.mybatis.generator</groupId>

             <artifactId>mybatis-generator-core</artifactId>

             <version>${mybatis.generator.version}</version>

         </dependency>

         <!-- bean验证 -->

         <dependency>

             <groupId>org.springframework.boot</groupId>

             <artifactId>spring-boot-starter-validation</artifactId>

         </dependency>

         <!-- mysql驱动 -->

         <dependency>

             <groupId>mysql</groupId>

             <artifactId>mysql-connector-java</artifactId>

             <scope>runtime</scope>

         </dependency>

         <!-- spring boot 开发工具 -->

         <dependency>

             <groupId>org.springframework.boot</groupId>

             <artifactId>spring-boot-devtools</artifactId>

             <optional>true</optional>

         </dependency>

         <!-- 测试 -->

         <dependency>

             <groupId>org.springframework.boot</groupId>

             <artifactId>spring-boot-starter-test</artifactId>

             <scope>test</scope>

         </dependency>

         <dependency>

             <groupId>org.springframework.boot</groupId>

             <artifactId>spring-boot-starter-data-jpa</artifactId>

         </dependency>

         <!--spring-security-oauth2 begin-->

         <dependency>

             <groupId>org.springframework.boot</groupId>

             <artifactId>spring-boot-starter-security</artifactId>

         </dependency>

         <dependency>

             <groupId>org.springframework.security.oauth.boot</groupId>

             <artifactId>spring-security-oauth2-autoconfigure</artifactId>

             <version>2.0.6.RELEASE</version>

         </dependency>

         <!--spring-security-oauth2 end-->

     </dependencies>

     <build>

         <plugins>

             <plugin>

                 <groupId>org.springframework.boot</groupId>

                 <artifactId>spring-boot-maven-plugin</artifactId>

             </plugin>

         </plugins>

     </build>

 </project>
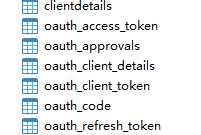
3.新建数据库(因为本项目采用jdbc的形式存储token相关)
建表sql语句的地址为 https://github.com/spring-projects/spring-security-oauth/blob/master/spring-security-oauth2/src/test/resources/schema.sql 这儿记得不同的数据库中的特殊字段需要修改一下,建好的表如下

4.进行配置
4.1 CustomAuthorizationServerConfig 类
 import org.springframework.beans.factory.annotation.Autowired;

 import org.springframework.context.annotation.Bean;

 import org.springframework.context.annotation.Configuration;

 import org.springframework.http.HttpHeaders;

 import org.springframework.security.authentication.AuthenticationManager;

 import org.springframework.security.core.userdetails.UserDetailsService;

 import org.springframework.security.oauth2.config.annotation.configurers.ClientDetailsServiceConfigurer;

 import org.springframework.security.oauth2.config.annotation.web.configuration.AuthorizationServerConfigurerAdapter;

 import org.springframework.security.oauth2.config.annotation.web.configuration.EnableAuthorizationServer;

 import org.springframework.security.oauth2.config.annotation.web.configurers.AuthorizationServerEndpointsConfigurer;

 import org.springframework.security.oauth2.config.annotation.web.configurers.AuthorizationServerSecurityConfigurer;

 import org.springframework.security.oauth2.provider.error.WebResponseExceptionTranslator;

 import org.springframework.security.oauth2.provider.token.TokenStore;

 import org.springframework.security.oauth2.provider.token.store.JdbcTokenStore;

 import org.springframework.web.cors.CorsConfiguration;

 import org.springframework.web.cors.CorsConfigurationSource;

 import org.springframework.web.filter.CorsFilter;

 import javax.annotation.Resource;

 import javax.servlet.http.HttpServletRequest;

 import javax.sql.DataSource;

 /**

  * @Description: 配置授权认证服务类

  * @author: zhoum

  * @Date: 2018-11-22

  * @Time: 13:41

  */

 @Configuration

 @EnableAuthorizationServer //授权认证中心

 public class CustomAuthorizationServerConfig extends AuthorizationServerConfigurerAdapter {

     /**

      * 权限验证控制器

      */

     @Autowired

     private AuthenticationManager authenticationManager;

     /**

      * 数据源,保存token的时候需要 默认为spring中配置的datasource

      */

     @Autowired

     private DataSource dataSource;

     /**

      * 设置保存token的方式,一共有五种,这里采用数据库的方式

      */

     @Autowired

     private TokenStore tokenStore;

     @Bean

     public TokenStore tokenStore() {

         return new JdbcTokenStore(dataSource);

     }

     /**

      * 自定义登录或者鉴权失败时的返回信息

      */

     @Resource(name = "webResponseExceptionTranslator")

     private WebResponseExceptionTranslator webResponseExceptionTranslator;

     /******************配置区域**********************/

     /**

      * 用来配置授权(authorizatio)以及令牌(token)的访问端点和令牌服务   核心配置  在启动时就会进行配置

      */

     @Override

     public void configure(AuthorizationServerEndpointsConfigurer endpoints) throws Exception {

         //开启密码授权类型

         endpoints.authenticationManager(authenticationManager);

         //配置token存储方式

         endpoints.tokenStore(tokenStore);

         //自定义登录或者鉴权失败时的返回信息

         endpoints.exceptionTranslator(webResponseExceptionTranslator);

     }

     /**

      * 用来配置令牌端点(Token Endpoint)的安全约束.

      */

     @Override

     public void configure(AuthorizationServerSecurityConfigurer security) throws Exception {

         /**

          * 配置oauth2服务跨域

          */

         CorsConfigurationSource source = new CorsConfigurationSource() {

             @Override

             public CorsConfiguration getCorsConfiguration(HttpServletRequest request) {

                 CorsConfiguration corsConfiguration = new CorsConfiguration();

                 corsConfiguration.addAllowedHeader("*");

                 corsConfiguration.addAllowedOrigin(request.getHeader(HttpHeaders.ORIGIN));

                 corsConfiguration.addAllowedMethod("*");

                 corsConfiguration.setAllowCredentials(true);

                 corsConfiguration.setMaxAge(3600L);

                 return corsConfiguration;

             }

         };

         security.tokenKeyAccess("permitAll()")

                 .checkTokenAccess("permitAll()")

                 .allowFormAuthenticationForClients()

                 .addTokenEndpointAuthenticationFilter(new CorsFilter(source));

     }

     /**

      * 用来配置客户端详情服务(ClientDetailsService),

      * 客户端详情信息在这里进行初始化,  数据库在进行client_id 与 client_secret验证时   会使用这个service进行验证

      */

     @Override

     public void configure(ClientDetailsServiceConfigurer clients) throws Exception {

         clients.jdbc(dataSource);

     }

 }
注意: 1. authenticationManager 的配置类会在后面的WebSecurityAdaptConfig配置中给出
2.TokenStore 一共有五种配置方式 本项目采用jdbc也就是数据库的形式

3.WebResponseExceptionTranslator为自定义的验证错误异常返回类,代码如下,其中responsedata为自定义的数据返回类 包含code,message,data三个属性
 import cn.com.megalith.common.ResponseData;

 import org.springframework.context.annotation.Bean;

 import org.springframework.context.annotation.Configuration;

 import org.springframework.http.HttpHeaders;

 import org.springframework.http.HttpStatus;

 import org.springframework.http.ResponseEntity;

 import org.springframework.security.oauth2.common.exceptions.OAuth2Exception;

 import org.springframework.security.oauth2.provider.error.DefaultWebResponseExceptionTranslator;

 import org.springframework.security.oauth2.provider.error.WebResponseExceptionTranslator;

 /**

  * @Description: web全局异常返回处理器

  * @author: zhoum

  * @Date: 2018-11-22

  * @Time: 14:48

  */

 @Configuration

 public class WebResponseExceptionTranslateConfig {

     /**

      * 自定义登录或者鉴权失败时的返回信息

      */

     @Bean(name = "webResponseExceptionTranslator")

     public WebResponseExceptionTranslator webResponseExceptionTranslator() {

         return new DefaultWebResponseExceptionTranslator() {

             @Override

             public ResponseEntity translate(Exception e) throws Exception {

                 ResponseEntity responseEntity = super.translate(e);

                 OAuth2Exception body = (OAuth2Exception) responseEntity.getBody();

                 HttpHeaders headers = new HttpHeaders();

                 headers.setAll(responseEntity.getHeaders().toSingleValueMap());

                 // do something with header or response

                 if ( 400 == responseEntity.getStatusCode().value() ) {

                     System.out.println(body.getMessage());

                     if ( "Bad credentials".equals(body.getMessage()) ) {

                         return new ResponseEntity(new ResponseData("400" , "您输入的用户名或密码错误" , null) , headers , HttpStatus.OK);

                     }

                 }

                 return new ResponseEntity(body , headers , responseEntity.getStatusCode());

             }

         };

     }

 }
4.2ResourceServerConfig
 import org.springframework.context.annotation.Configuration;

 import org.springframework.security.config.annotation.web.builders.HttpSecurity;

 import org.springframework.security.oauth2.config.annotation.web.configuration.EnableResourceServer;

 import org.springframework.security.oauth2.config.annotation.web.configuration.ResourceServerConfigurerAdapter;

 /**

  * @Description: 资源提供端的配置

  * @author: zhoum

  * @Date: 2018-11-22

  * @Time: 16:58

  */

 @Configuration

 @EnableResourceServer //开启资源提供服务的配置  是默认情况下spring security oauth2的http配置   会被WebSecurityConfigurerAdapter的配置覆盖

 public class ResourceServerConfig extends ResourceServerConfigurerAdapter {

     @Override

     public void configure(HttpSecurity http) throws Exception {

         http

                 .authorizeRequests()

                 .antMatchers("/**").permitAll();

     }

 }
这儿注意,后面的WebSecurityAdaptConfig的配置类会覆盖这儿的配置
4.3 WebSecurityAdaptConfig 配置类
 import cn.com.megalith.auth.CustomerAuthenticationProvider;

 import org.springframework.beans.factory.annotation.Autowired;

 import org.springframework.context.annotation.Bean;

 import org.springframework.context.annotation.Configuration;

 import org.springframework.security.authentication.AuthenticationManager;

 import org.springframework.security.config.annotation.authentication.builders.AuthenticationManagerBuilder;

 import org.springframework.security.config.annotation.method.configuration.EnableGlobalMethodSecurity;

 import org.springframework.security.config.annotation.web.builders.HttpSecurity;

 import org.springframework.security.config.annotation.web.configuration.WebSecurityConfigurerAdapter;

 import org.springframework.security.core.userdetails.UserDetailsService;

 import org.springframework.security.crypto.password.PasswordEncoder;

 import javax.annotation.Resource;

 /**

  * @Description: //是默认情况下spring security的http配置 优于ResourceServerConfigurerAdapter的配置

  * @author: zhoum

  * @Date: 2018-11-22

  * @Time: 17:06

  */

 @Configuration              //开启三种可以在方法上面加权限控制的注解

 @EnableGlobalMethodSecurity(prePostEnabled = true, securedEnabled = true, jsr250Enabled = true)

 public class WebSecurityAdaptConfig extends WebSecurityConfigurerAdapter {

     /**

      * 获取用户的验证配置类

      */

     @Resource(name = "signUserDetailService")

     private UserDetailsService userDetailsService;

     /**

      * 加密配置

      */

     @Autowired

     private PasswordEncoder passwordEncoder;

     /**

      * 密码验证处理器

      */

     @Resource(name = "myCustomerAuthenticationProvider")

     private CustomerAuthenticationProvider customerAuthenticationProvider;

     /**

      * spring security设置

      */

     @Override

     protected void configure(HttpSecurity http) throws Exception {

         http

                 .authorizeRequests()//定义哪些url需要被保护  哪些不需要保护

                 .antMatchers("/oauth/token" , "oauth/check_token").permitAll()//定义这两个链接不需要登录可访问

                 .antMatchers("/**").permitAll() //定义所有的都不需要登录  目前是测试需要

                 .anyRequest().authenticated() //其他的都需要登录

                 //.antMatchers("/sys/**").hasRole("admin")///sys/**下的请求 需要有admin的角色

                 .and()

                 .formLogin().loginPage("/login")//如果未登录则跳转登录的页面   这儿可以控制登录成功和登录失败跳转的页面

                 .usernameParameter("username").passwordParameter("password").permitAll()//定义号码与密码的parameter

                 .and()

                 .csrf().disable();//防止跨站请求  spring security中默认开启

     }

     /**

      * 权限管理器  AuthorizationServerConfigurerAdapter认证中心需要的AuthenticationManager需要

      */

     @Override

     protected void configure(AuthenticationManagerBuilder auth) throws Exception {

         //目的是为了前端获取数据时获取到整个form-data的数据,提供验证器

         auth.authenticationProvider(customerAuthenticationProvider);

         //配置登录user验证处理器  以及密码加密器  好让认证中心进行验证

         auth.userDetailsService(userDetailsService).passwordEncoder(passwordEncoder);

     }

     /**

      * 需要配置这个支持password模式

      * support password grant type

      *

      * @return

      * @throws Exception

      */

     @Override

     @Bean

     public AuthenticationManager authenticationManagerBean() throws Exception {

         return authenticationManager();

     }

 }
注意: 1. UserDetailsService接口中主要包含有一个UserDetails loadUserByUsername(String var1) 方法,其中var1代表username即登录时输入的用户名,本项目的配置如下
 import cn.com.megalith.auth.UserDetail;

 import cn.com.megalith.domain.entity.User;

 import cn.com.megalith.service.IUserService;

 import org.springframework.beans.factory.annotation.Autowired;

 import org.springframework.security.core.userdetails.UserDetails;

 import org.springframework.security.core.userdetails.UserDetailsService;

 import org.springframework.security.core.userdetails.UsernameNotFoundException;

 import org.springframework.stereotype.Component;

 /**

  * @Description:

  * @author: zhoum

  * @Date: 2018-11-22

  * @Time: 15:07

  */

 @Component("signUserDetailService")

 public class SignUserDetaiServiceConfig implements UserDetailsService {

     @Autowired

     private IUserService userService;

     /**

      * 启动刷新token授权类型,会判断用户是否还是存活的

      */

     @Override

     public UserDetails loadUserByUsername(String s) throws UsernameNotFoundException {

         User currentUser = userService.getByName(s);

         if ( currentUser == null ) {

             throw new UsernameNotFoundException("用户没用找到");

         }

         return new UserDetail(currentUser);

     }

 }
这儿需要返回一个UserDetails的实现类用于spring security中验证 本项目的配置如下 其中的user为自定义的user实体
 import cn.com.megalith.domain.entity.User;

 import org.springframework.context.ApplicationContext;

 import org.springframework.security.core.GrantedAuthority;

 import org.springframework.security.core.authority.SimpleGrantedAuthority;

 import org.springframework.security.core.userdetails.UserDetails;

 import java.util.ArrayList;

 import java.util.Collection;

 import java.util.List;

 /**

  * @Description: 用户信息的实体类

  * @author: zhoum

  * @Date: 2018-11-22

  * @Time: 15:46

  */

 public class UserDetail implements UserDetails {

     private User user;

     private String id;

     /**

      * 通过构造方法在UserDetailsService的方法中将查到的user注入进去

      */

     public UserDetail(User user) {

         this.user = user;

         if ( user != null ) {

             this.id = user.getId();

         }

     }

     /**

      * 对当前的用户赋予其应有的权限

      */

     @Override

     public Collection<? extends GrantedAuthority> getAuthorities() {

         //添加权限 这儿暂时写死  应该从数据库中拿到

         List authorisList = new ArrayList();

         authorisList.add(new SimpleGrantedAuthority("ROLE_AA"));

         authorisList.add(new SimpleGrantedAuthority("ROLE_BB"));

         authorisList.add(new SimpleGrantedAuthority("ROLE_CC"));

         authorisList.add(new SimpleGrantedAuthority("ROLE_DD"));

         return authorisList;

     }

     /**

      * 获取密码

      */

     @Override

     public String getPassword() {

         return user.getPassword();

     }

     /**

      * 获取用户名

      */

     @Override

     public String getUsername() {

         return user.getUsername();

     }

     /**

      * 账户是否未过期

      */

     @Override

     public boolean isAccountNonExpired() {

         return true;

     }

     /**

      * 账户是否未锁定

      */

     @Override

     public boolean isAccountNonLocked() {

         return true;

     }

     /**

      * 证书是否未过期

      */

     @Override

     public boolean isCredentialsNonExpired() {

         return true;

     }

     /**

      * 是否有效   可对应数据库中的delete_flag字段

      */

     @Override

     public boolean isEnabled() {

         return true;

     }

     public User getUser() {

         return user;

     }

     public void setUser(User user) {

         this.user = user;

     }

     public String getId() {

         return id;

     }

     public void setId(String id) {

         this.id = id;

     }

 }
注意: 2. PasswordEncoder 主要为加密管理器 用于密码的加密匹配 本项目的配置如下
 import org.springframework.context.annotation.Configuration;

 import org.springframework.security.crypto.password.PasswordEncoder;

 import org.springframework.stereotype.Component;

 import java.security.MessageDigest;

 /**

  * @Description:MD5加密

  * @author: zhoum

  * @Date: 2018-11-22

  * @Time: 17:36

  */

 @Component

 public class EncodePassword implements PasswordEncoder {

     /**

      * md5加密

      */

     @Override

     public String encode(CharSequence charSequence) {

         return MD5(charSequence.toString());

     }

     /**

      * 匹配规则

      */

     @Override

     public boolean matches(CharSequence charSequence , String s) {

         return MD5(charSequence.toString()).equals(s);

     }

     /**

      * md5加密过程

      */

     public static String MD5(String key) {

         char hexDigits[] = {

                 '0' , '1' , '2' , '3' , '4' , '5' , '6' , '7' , '8' , '9' , 'a' , 'b' , 'c' , 'd' , 'e' , 'f'

         };

         try {

             byte[] btInput = key.getBytes();

             // 获得MD5摘要算法的 MessageDigest 对象

             MessageDigest mdInst = MessageDigest.getInstance("MD5");

             // 使用指定的字节更新摘要

             mdInst.update(btInput);

             // 获得密文

             byte[] md = mdInst.digest();

             // 把密文转换成十六进制的字符串形式

             int j = md.length;

             char str[] = new char[ j * 2 ];

             int k = 0;

             for (int i = 0; i < j; i++) {

                 byte byte0 = md[ i ];

                 str[ k++ ] = hexDigits[ byte0 >>> 4 & 0xf ];

                 str[ k++ ] = hexDigits[ byte0 & 0xf ];

             }

             return new String(str);

         } catch (Exception e) {

             return null;

         }

     }

 }
注意: 3.CustomerAuthenticationProvider 主要是为AuthenticationProvider借接口的实现类 为spring security提供密码验证器 是核心配置,这儿需要注意 系统中已经有相应的实现类,如果不配置,则系统中会默认使用org.springframework.security.authentication.dao.DaoAuthenticationProvider这个类来进行验证,DaoAuthenticationProvider这个类继承了org.springframework.security.authentication.dao.AbstractUserDetailsAuthenticationProvider这个抽象类,所以我们要自定义provider验证流程可以实现AuthenticationProvider接口或者继承AbstractUserDetailsAuthenticationProvider抽象类均可,下面是两种模式的代码
(1)实现AuthenticationProvider形式 自己写验证流程
 import org.slf4j.Logger;

 import org.slf4j.LoggerFactory;

 import org.springframework.beans.factory.annotation.Autowired;

 import org.springframework.security.authentication.AuthenticationProvider;

 import org.springframework.security.authentication.BadCredentialsException;

 import org.springframework.security.authentication.UsernamePasswordAuthenticationToken;

 import org.springframework.security.authentication.dao.AbstractUserDetailsAuthenticationProvider;

 import org.springframework.security.core.Authentication;

 import org.springframework.security.core.AuthenticationException;

 import org.springframework.security.core.userdetails.UserDetails;

 import org.springframework.security.core.userdetails.UserDetailsService;

 import org.springframework.security.crypto.password.PasswordEncoder;

 import org.springframework.stereotype.Component;

 import javax.annotation.Resource;

 import java.util.Objects;

 /**

  * @Description: AuthenticationManagerBuilder中的AuthenticationProvider是进行认证的核心

  * @author: zhoum

  * @Date: 2018-11-23

  * @Time: 9:11

  */

 @Component("myCustomerAuthenticationProvider")

 public class CustomerAuthenticationProvider implements AuthenticationProvider {

     @Resource(name = "signUserDetailService")

     private UserDetailsService userDetailsService;

    public static final Logger LOGGER = LoggerFactory.getLogger(CustomerAuthenticationProvider.class);

     /**

      *authentication是前台拿过来的号码密码bean  主要验证流程代码  注意这儿懒得用加密验证!!!

      */

     @Override

     public Authentication authenticate(Authentication authentication) throws AuthenticationException {

         LOGGER.info("用户输入的用户名是:" + authentication.getName());

         LOGGER.info("用户输入的密码是:" + authentication.getCredentials());

         // 根据用户输入的用户名获取该用户名已经在服务器上存在的用户详情,如果没有则返回null

         UserDetails userDetails = userDetailsService.loadUserByUsername(authentication.getName());

         try {

             LOGGER.info("服务器上已经保存的用户名是:" + userDetails.getUsername());

             LOGGER.info("服务器上保存的该用户名对应的密码是: " + userDetails.getPassword());

             LOGGER.info("服务器上保存的该用户对应的权限是:" + userDetails.getAuthorities());

             if(authentication.getCredentials().equals(userDetails.getPassword())){

                 //验证成功  将返回一个UsernamePasswordAuthenticaionToken对象

                 LOGGER.info("LOGIN SUCCESS !!!!!!!!!!!!!!!!!!!");

                 //分别返回用户实体   输入的密码   以及用户的权限

                 return new UsernamePasswordAuthenticationToken(userDetails,authentication.getCredentials(),userDetails.getAuthorities());

             }

         } catch (Exception e){

             LOGGER.error("author failed, -------------------the error message is:-------- " + e);

             throw e;

         }

         //如果验证不同过则返回null或者抛出异常

         return null;

     }

     /**

      *

      **/

     @Override

     public boolean supports(Class<?> aClass) {

         return true;

     }

 }
这儿会返回一个UsernamePasswordAuthenticationToken对象,
(2)继承AbstractUserDetailsAuthenticationProvider抽象类 这儿主要是复写取user和验证流程 这儿直接用了DaoAuthenticationProvider中的验证代码 有兴趣的可以自己重新写验证代码
 import org.slf4j.Logger;

 import org.slf4j.LoggerFactory;

 import org.springframework.beans.factory.annotation.Autowired;

 import org.springframework.security.authentication.AuthenticationProvider;

 import org.springframework.security.authentication.BadCredentialsException;

 import org.springframework.security.authentication.UsernamePasswordAuthenticationToken;

 import org.springframework.security.authentication.dao.AbstractUserDetailsAuthenticationProvider;

 import org.springframework.security.core.Authentication;

 import org.springframework.security.core.AuthenticationException;

 import org.springframework.security.core.userdetails.UserDetails;

 import org.springframework.security.core.userdetails.UserDetailsService;

 import org.springframework.security.crypto.password.PasswordEncoder;

 import org.springframework.stereotype.Component;

 import javax.annotation.Resource;

 import java.util.Objects;

 /**

  * @Description: AuthenticationManagerBuilder中的AuthenticationProvider是进行认证的核心

  * @author: zhoum

  * @Date: 2018-11-23

  * @Time: 9:11

  */

 @Component("myCustomerAuthenticationProvider")

 public class CustomerAuthenticationProvider extends AbstractUserDetailsAuthenticationProvider {

     @Resource(name = "signUserDetailService")

     private UserDetailsService userDetailsService;

     @Autowired

     private PasswordEncoder passwordEncoder;

     /**

      * 手动实现认证

      */

     @Override

     protected void additionalAuthenticationChecks(UserDetails userDetails , UsernamePasswordAuthenticationToken authentication) throws AuthenticationException {

         if ( authentication.getCredentials() == null ) {

             this.logger.debug("Authentication failed: no credentials provided");

             throw new BadCredentialsException(this.messages.getMessage("AbstractUserDetailsAuthenticationProvider.badCredentials" , "Bad credentials"));

         } else {

             String presentedPassword = authentication.getCredentials().toString();

             if ( !this.passwordEncoder.matches(presentedPassword , userDetails.getPassword()) ) {

                 this.logger.debug("Authentication failed: password does not match stored value");

                 throw new BadCredentialsException(this.messages.getMessage("AbstractUserDetailsAuthenticationProvider.badCredentials" , "Bad credentials"));

             }

         }

     }

     /**

      * 手动加载user

      */

     @Override

     protected UserDetails retrieveUser(String s , UsernamePasswordAuthenticationToken usernamePasswordAuthenticationToken) throws AuthenticationException {

         return userDetailsService.loadUserByUsername(s);

     }

 }
注意4:configure(HttpSecurity http)会覆盖ResourceServerConfig中的配置
4.4 配置ajax跨域
 import org.springframework.context.annotation.Bean;

 import org.springframework.context.annotation.Configuration;

 import org.springframework.web.cors.CorsConfiguration;

 import org.springframework.web.cors.UrlBasedCorsConfigurationSource;

 import org.springframework.web.filter.CorsFilter;

 /**

  * @Description:

  * @author: zhoum

  * @Date: 2018-11-22

  * @Time: 17:09

  */

 @Configuration

 public class WebOrignAllowConfig {

     /**

      * @return org.springframework.web.filter.CorsFilter

      * @Author zhoum

      * @Description 解决跨域问题

      * @Date 17:10 2018-11-22

      * @Param []

      **/

     @Bean

     public CorsFilter corsFilter() {

         final UrlBasedCorsConfigurationSource urlBasedCorsConfigurationSource = new UrlBasedCorsConfigurationSource();

         final CorsConfiguration corsConfiguration = new CorsConfiguration();

         corsConfiguration.setAllowCredentials(true);

         corsConfiguration.addAllowedOrigin("*");

         corsConfiguration.addAllowedHeader("*");

         corsConfiguration.addAllowedMethod("*");

         urlBasedCorsConfigurationSource.registerCorsConfiguration("/**" , corsConfiguration);

         return new CorsFilter(urlBasedCorsConfigurationSource);

     }

 }
5. 其他项目类即根据User的bean创建出UserController UserService UserMapper等 代码可以查看git上的源码
6. 项目的属性配置 application.yml
spring:

  #色彩日志输出

  output:

    ansi:

      enabled: always

  datasource:

    username: root

    password: 123456

    url: jdbc:mysql://localhost:3306/tjfx?autoReconnect=true&useSSL=false&useUnicode=true&characterEncoding=UTF-8&allowMultiQueries=true&allowPublicKeyRetrieval=true

    type: com.alibaba.druid.pool.DruidDataSource

    #连接池配置

    driverClassName: com.mysql.jdbc.Driver

    # 初始化大小,最小,最大

    initialSize: 5

    minIdle: 5

    maxActive: 20

    # 配置获取连接等待超时的时间

    maxWait: 60000

    # 配置间隔多久才进行一次检测,检测需要关闭的空闲连接,单位是毫秒

    timeBetweenEvictionRunsMillis: 60000

    # 配置一个连接在池中最小生存的时间,单位是毫秒

    minEvictableIdleTimeMillis: 300000

    validationQuery: SELECT 1 FROM DUAL

    testWhileIdle: true

    testOnBorrow: false

    testOnReturn: false

    # 打开PSCache,并且指定每个连接上PSCache的大小

    poolPreparedStatements: true

    maxPoolPreparedStatementPerConnectionSize: 20

    # 配置监控统计拦截的filters,去掉后监控界面sql无法统计,'wall'用于防火墙

    filters: stat,log4j

    # 通过connectProperties属性来打开mergeSql功能;慢SQL记录

    connectionProperties: druid.stat.mergeSql=true;druid.stat.slowSqlMillis=5000

mybatis:

  mapper-locations: classpath*:**/mappers/*.xml

  type-aliases-package: cn.com.megalith.domain.entity

  configuration:

    map-underscore-to-camel-case: true

    use-generated-keys: true

    use-column-label: true

    cache-enabled: true

    call-setters-on-nulls: true

logging:

  level:

    root: info

    org:

      springframework: info

server:

  port: 8081
7.启动类SecurityApplication
 import org.mybatis.spring.annotation.MapperScan;

 import org.springframework.boot.SpringApplication;

 import org.springframework.boot.autoconfigure.SpringBootApplication;

 import org.springframework.transaction.annotation.EnableTransactionManagement;

 @SpringBootApplication

 @MapperScan("cn.com.megalith.dao")

 @EnableTransactionManagement

 public class SecurityApplication {

     public static void main(String[] args) {

         SpringApplication.run(SecurityApplication.class , args);

     }
8.项目整体效果如下(不要在意红色,编辑器故障了)

9.进行测试
(1) 获取token

注意:其中的client_id 与 client_secret即在oauth_client_details中的数据 这儿是我自己手动插入的一条 一般在申请别的网站的授权时应该会得到这个 client_secret是md5加密后的结果
如果号码密码正确则会返回 红色框内即为得到的token

如果密码错误 则会返回刚自定义的错误返回结果

(2)进行方法验证
 @RestController

 @RequestMapping("/user")

 public class UserController {

     @GetMapping("/current")

     @Secured("ROLE_AA")

     public String getCurrentUser(Principal principal) {

         System.out.println(principal);

         return "111";

     }

 }
访问方式:记得加上token 不然会验证不通过

如果有权限 则会返回
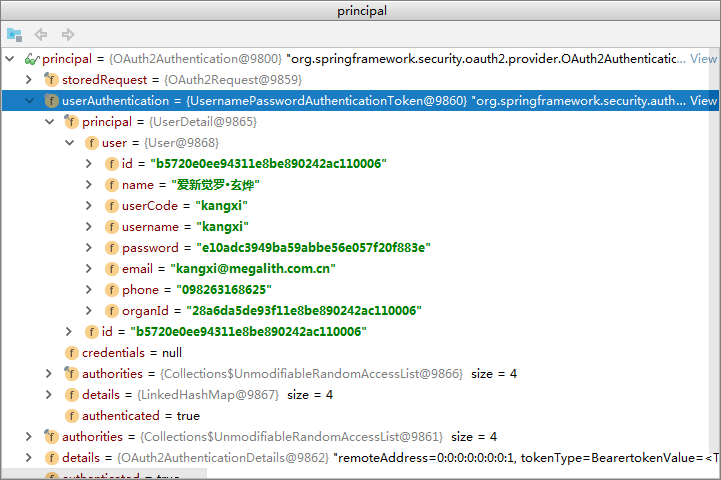
且principal即为获取到的当前用户的对象 具体结构如下

验证失败则会返回

如果无权限则会返回

以上为授权认证端与资源服务端在同一项目时,如果为不同的项目则资源服务的项目可以单独如下创建项目
项目customer_simple(资源服务项目)
1.创建项目
与创建上面授权项目完全类似,依赖一样,所以略过
2.配置类
(1)ResourceServiceConfig
 import org.springframework.context.annotation.Configuration;

 import org.springframework.security.config.annotation.method.configuration.EnableGlobalMethodSecurity;

 import org.springframework.security.config.annotation.web.builders.HttpSecurity;

 import org.springframework.security.oauth2.config.annotation.web.configuration.EnableResourceServer;

 import org.springframework.security.oauth2.config.annotation.web.configuration.ResourceServerConfigurerAdapter;

 import org.springframework.web.cors.CorsConfiguration;

 import javax.servlet.http.HttpServletResponse;

 /**

  * @Description: 配置资源服务器

  * @author: zhoum

  * @Date: 2018-11-26

  * @Time: 15:08

  */

 @Configuration

 @EnableResourceServer

 @EnableGlobalMethodSecurity(securedEnabled = true)

 public class ResourceServiceConfig extends ResourceServerConfigurerAdapter {

     @Override

     public void configure(HttpSecurity http) throws Exception {

         http

                 .csrf().disable()

                 .exceptionHandling()

                 .authenticationEntryPoint((request, response, authException) -> response.sendError(HttpServletResponse.SC_UNAUTHORIZED))

                 .and()

                 .authorizeRequests()

                 .antMatchers("/**").permitAll()

                 //跨域配置

                 .and().cors().configurationSource(request -> {

             CorsConfiguration corsConfiguration = new CorsConfiguration();

             corsConfiguration.addAllowedHeader("*");

             corsConfiguration.addAllowedOrigin(request.getHeader("Origin"));

             corsConfiguration.addAllowedMethod("*");

             corsConfiguration.setAllowCredentials(true);

             corsConfiguration.setMaxAge(3600L);

             return corsConfiguration;

         });

     }

 }
(2) 跨域配置类
 import org.springframework.context.annotation.Bean;

 import org.springframework.context.annotation.Configuration;

 import org.springframework.web.cors.CorsConfiguration;

 import org.springframework.web.cors.UrlBasedCorsConfigurationSource;

 import org.springframework.web.filter.CorsFilter;

 /**

  * @Description:

  * @author: zhoum

  * @Date: 2018-11-22

  * @Time: 17:09

  */

 @Configuration

 public class WebOrignAllowConfig {

     /**

      * @return org.springframework.web.filter.CorsFilter

      * @Author zhoum

      * @Description 解决跨域问题

      * @Date 17:10 2018-11-22

      * @Param []

      **/

     @Bean

     public CorsFilter corsFilter() {

         final UrlBasedCorsConfigurationSource urlBasedCorsConfigurationSource = new UrlBasedCorsConfigurationSource();

         final CorsConfiguration corsConfiguration = new CorsConfiguration();

         corsConfiguration.setAllowCredentials(true);

         corsConfiguration.addAllowedOrigin("*");

         corsConfiguration.addAllowedHeader("*");

         corsConfiguration.addAllowedMethod("*");

         urlBasedCorsConfigurationSource.registerCorsConfiguration("/**" , corsConfiguration);

         return new CorsFilter(urlBasedCorsConfigurationSource);

     }

 }
(3)application.yml配置
 spring:

   #色彩日志输出

   output:

     ansi:

       enabled: always

   datasource:

     username: root

     password: 123456

     url: jdbc:mysql://localhost:3306/tjfx?autoReconnect=true&useSSL=false&useUnicode=true&characterEncoding=UTF-8&allowMultiQueries=true&allowPublicKeyRetrieval=true

     type: com.alibaba.druid.pool.DruidDataSource

     #连接池配置

     driverClassName: com.mysql.jdbc.Driver

     # 初始化大小,最小,最大

     initialSize: 5

     minIdle: 5

     maxActive: 20

     # 配置获取连接等待超时的时间

     maxWait: 60000

     # 配置间隔多久才进行一次检测,检测需要关闭的空闲连接,单位是毫秒

     timeBetweenEvictionRunsMillis: 60000

     # 配置一个连接在池中最小生存的时间,单位是毫秒

     minEvictableIdleTimeMillis: 300000

     validationQuery: SELECT 1 FROM DUAL

     testWhileIdle: true

     testOnBorrow: false

     testOnReturn: false

     # 打开PSCache,并且指定每个连接上PSCache的大小

     poolPreparedStatements: true

     maxPoolPreparedStatementPerConnectionSize: 20

     # 配置监控统计拦截的filters,去掉后监控界面sql无法统计,'wall'用于防火墙

     filters: stat,log4j

     # 通过connectProperties属性来打开mergeSql功能;慢SQL记录

     connectionProperties: druid.stat.mergeSql=true;druid.stat.slowSqlMillis=5000

 mybatis:

   mapper-locations: classpath*:**/mappers/*.xml

   type-aliases-package: cn.com.megalith.domain.entity

   configuration:

     map-underscore-to-camel-case: true

     use-generated-keys: true

     use-column-label: true

     cache-enabled: true

     call-setters-on-nulls: true

 #spring security oauth2配置

 security:

   oauth2:

     #token检查的授权端url

     authorization:

       check-token-access: http://127.0.01:8081/oauth/check_token

     #对应的注册码与注册密码

     client:

       id: 1

       client-secret: 2

       authentication-scheme: form

     #获得授权端的当前用户信息url

     resource:

       user-info-uri: http://127.0.01:8081/user/me

       id: oa

 logging:

   level:

     root: info

     org:

       springframework: info

 server:

   port: 8082
这儿注意http://127.0.01:8081/user/me即授权服务端中的一个接口 需要提供,返回用户信息,代码在授权端项目的UserController下添加如下方法即可
     /**

      *客户端根据token获取用户

      */

     @RequestMapping("/me")

     public Principal user2(OAuth2Authentication principal) {

         return principal;

     }
(4)启动类配置
 import org.mybatis.spring.annotation.MapperScan;

 import org.springframework.boot.SpringApplication;

 import org.springframework.boot.autoconfigure.SpringBootApplication;

 @SpringBootApplication

 @MapperScan("cn.com.megalith.dao")

 public class CustomerSimpleApplication {

     public static void main(String[] args) {

         SpringApplication.run(CustomerSimpleApplication.class , args);

     }

 }
2.项目的其他辅助类主要为User的controller,service,dao,entity等 源码里有
3.项目弄好后结构如下

4.测试
依旧使用UserController,代码如下
 @RestController

 @RequestMapping("/user")

 public class UserController {

     @GetMapping("/current")

     @Secured("ROLE_AA")

     public String getCurrentUser(Principal principal) {

         System.out.println(principal);

         return "111";

     }

 }
测试方法如下,使用上面获得token的方式获取token后访问如下

注意这儿变成了8082端口,说明是另外的一个资源服务端的项目
验证成功
验证失败后返回

如果没有权限则会返回

到此基于springboot spring security +oauth2.0的密码模式授权 且授权端与资源提供端分离的模式就完成了 有问题留言
项目的源码地址为 https://github.com/hetutu5238/zmc_security_oauth2.git security_simple为认证授权端 customer_simple为资源服务端
项目的mysql脚本在 security_simple下的resource/sql/tjfx.sql

在获取token时 如何返回如下格式的数据结构?

1.定义返回类
 public class Result<T> implements Serializable {

     private String message ;

     private Integer code ;

     private T result;

     public static<T> Result<T> ok(T data) {

         Result<T> r = new Result<>();

         r.setMessage("ok");

         r.setCode(HttpStatus.OK.value());

         r.setResult(data);

         return r;

     }

     public String getMessage() {

         return message;

     }

     public void setMessage(String message) {

         this.message = message;

     }

     public Integer getCode() {

         return code;

     }

     public void setCode(Integer code) {

         this.code = code;

     }

     public T getResult() {

         return result;

     }

     public void setResult(T result) {

         this.result = result;

     }

 }
2.pom.xml新增
         <dependency>

             <groupId>org.springframework.boot</groupId>

             <artifactId>spring-boot-starter-aop</artifactId>

         </dependency>
3.增加配置类 项目源码我注掉了 有需要的可以打开
 @Aspect

 @Component

 public class CodeAspect {

     @Pointcut("execution(public * org.springframework.security.oauth2.provider..*.*TokenEndpoint.postAccessToken(..))")

     public void excudeService() {

     }

     @Around("excudeService()")

     public Object doAround(ProceedingJoinPoint pjp) throws Throwable {

         Object result = pjp.proceed();

         if ( result instanceof ResponseEntity ){

             ResponseEntity res = (ResponseEntity)result;

             if ( res.getStatusCode() .equals(HttpStatus.OK) ){

                 Object body = res.getBody();

                 if ( body instanceof DefaultOAuth2AccessToken ){

                     DefaultOAuth2AccessToken data = (DefaultOAuth2AccessToken)body;

                     ResponseEntity codeResult = new ResponseEntity(Result.ok(data.getValue()),HttpStatus.OK);

                     return codeResult;

                 }

             }

         }

         return result;

     }

 }
这样即可
springboot+spring security +oauth2.0 demo搭建(password模式)(认证授权端与资源服务端分离的形式)的更多相关文章
- Spring Security OAuth2.0认证授权二:搭建资源服务
在上一篇文章[Spring Security OAuth2.0认证授权一:框架搭建和认证测试](https://www.cnblogs.com/kuangdaoyizhimei/p/14250374. ...
- 【OAuth2.0】Spring Security OAuth2.0篇之初识
不吐不快 因为项目需求开始接触OAuth2.0授权协议.断断续续接触了有两周左右的时间.不得不吐槽的,依然是自己的学习习惯问题,总是着急想了解一切,习惯性地钻牛角尖去理解小的细节,而不是从宏观上去掌握 ...
- Spring Security OAuth2.0 - AuthorizationServer和ResourceServer分离
<Spring Security实现OAuth2.0授权服务 - 基础版>和<Spring Security实现OAuth2.0授权服务 - 进阶版>两篇文章中介绍如何搭建OA ...
- Spring Security OAuth2.0认证授权三:使用JWT令牌
Spring Security OAuth2.0系列文章: Spring Security OAuth2.0认证授权一:框架搭建和认证测试 Spring Security OAuth2.0认证授权二: ...
- Spring Security OAuth2.0认证授权四:分布式系统认证授权
Spring Security OAuth2.0认证授权系列文章 Spring Security OAuth2.0认证授权一:框架搭建和认证测试 Spring Security OAuth2.0认证授 ...
- Spring Security OAuth2.0认证授权五:用户信息扩展到jwt
历史文章 Spring Security OAuth2.0认证授权一:框架搭建和认证测试 Spring Security OAuth2.0认证授权二:搭建资源服务 Spring Security OA ...
- Spring Security OAuth2.0认证授权六:前后端分离下的登录授权
历史文章 Spring Security OAuth2.0认证授权一:框架搭建和认证测试 Spring Security OAuth2.0认证授权二:搭建资源服务 Spring Security OA ...
- 基于spring boot2.0+spring security +oauth2.0+ jwt微服务架构
github地址:https://github.com/hankuikuide/microservice-spring-security-oauth2 项目介绍 该项目是一个演示项目,主要演示了,基于 ...
- spring security oauth2.0 实现
oauth应该属于security的一部分.关于oauth的的相关知识可以查看阮一峰的文章:http://www.ruanyifeng.com/blog/2014/05/oauth_2_0.html ...
随机推荐
- 【原创】大叔问题定位分享(20)hdfs文件create写入正常,append写入报错
最近在hdfs写文件的时候发现一个问题,create写入正常,append写入报错,每次都能重现,代码示例如下: FileSystem fs = FileSystem.get(conf); Outpu ...
- WPF学习:3.Border & Brush
上一章<WPF学习:2.Layout-Panels-Countainers>主要介绍了布局,容器和面板.这一章主要开始介绍Border(边界)和Brush(画刷). 代码地址:http:/ ...
- 进入django
web应用,c/s,b/s架构 c/s: 客户端 服务端 b/s: 浏览器 服务器 HTTP协议: 超文本传输协议 四大特性: 1.基于TCP/IP作用在应用层之上的协议 2.基于请求响应 3.无状态 ...
- select获取选中的option(包含value和text,重点是text怎么获取)
简单描述:后台需要获取到select标签选择的内容,也就是text,该怎么取呢?很简单. 代码: //hml代码<div class="col-md-6"> <l ...
- 微信H5支付证书过滤
在对接微信支付,退款的时候,遇到 Caused by: java.lang.RuntimeException: java.io.IOException: DerInputStream.getLengt ...
- 修正锚点跳转位置 避免头部fixed固定部分遮挡
如下锚点标签: <div id="id1"> <span class="kkAnchor"></span> 正文正文正文正文 ...
- 方法的覆盖(override)
- python第九天(9-34)
一:队列的三种模式 先进先出(FIFO) class queue.Queue(maxsize) 后进先出(LIFO) class queue.LifoQueue(maxsize) 优先级顺序(优先级低 ...
- 【数据库】MySql分割字符串
上论坛时看到一个骨骼清奇的分割字符串算法. DROP TABLE IF EXISTS Tmp_AreaCode; CREATE TABLE Tmp_AreaCode( string ) )ENGINE ...
- mysql安装运行(centos)
http://repo.mysql.com寻找需要的版本 wget -P /opt/downloads http://repo.mysql.com/mysql57-community-release- ...
