QEMU KVM Libvirt手册(8): 半虚拟化设备virtio
KVM本身并不提供半虚拟化功能,是通过virtio来实现的
The benefits of virtio drivers are of lower overhead and higher performance.
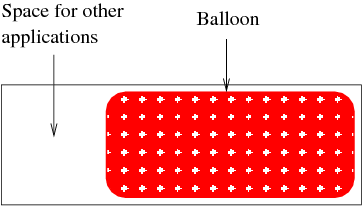
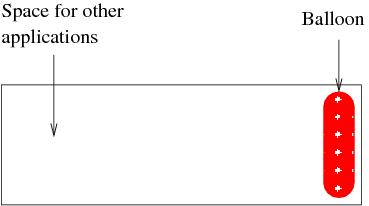
Memory Ballooning (virtio_balloon)
memory ballooning可以动态调整guest的内存的大小
如果有-m参数,则向更大的内存调整时无效的,但是可以往小的里面调整
我们首先ssh到guest里面
ip netns exec qrouter-26a45e0e-a58a-443b-a972-d62c0c5a1323 ssh -i openstack.pem ubuntu@192.168.0.35
在虚拟机里面看内存的大小
ubuntu@testinject19:~$ free
total used free shared buffers cached
Mem: 2051748 478276 1573472 0 46620 345908
-/+ buffers/cache: 85748 1966000
Swap: 0 0 0
在Monitor上看balloon的大小
root:/home/cliu8# virsh qemu-monitor-command instance-00000024 --hmp "info balloon"
balloon: actual=2048
我们试图往大里调整
root:/home/cliu8# virsh qemu-monitor-command instance-00000024 --hmp "balloon 4096"
发现无效
root:/home/cliu8# virsh qemu-monitor-command instance-00000024 --hmp "info balloon"
balloon: actual=2048
ubuntu@testinject19:~$ free
total used free shared buffers cached
Mem: 2051748 478276 1573472 0 46628 345920
-/+ buffers/cache: 85728 1966020
Swap: 0 0 0
我们往小里调整内存
root:/home/cliu8# virsh qemu-monitor-command instance-00000024 --hmp "balloon 1024"
发现生效了
root:/home/cliu8# virsh qemu-monitor-command instance-00000024 --hmp "info balloon"
balloon: actual=1024
ubuntu@testinject19:~$ free
total used free shared buffers cached
Mem: 1003172 470796 532376 0 46636 345920
-/+ buffers/cache: 78240 924932
Swap: 0 0 0
有了balloon,如果guest需要更多的RAM,则可以给它增加一些内存。如果guest不需要那么多内存,可以通过balloon从中拿出一部分内存。这个过程,不需要启停虚拟机。
balloon driver像是一个特殊的process,运行在guest机器上,它可以扩大自己的内存,使得其他的应用程序的内存减少,也可以缩小内存,使得其他的应用程序内存增加。


guest中的balloon driver通过virtio channel和host进行交互,接收host发来的命令,比如发来的命令式减少内存,则balloon driver就扩大它的内存占有量。
然后balloon driver将自己占有的内存交回给host,使得host有了更多的内存。

对于libvirt而言,有currentMemory和maxMemory两种概念,maxMemory就是-m参数设定的,currentMemory就是balloon设定的。
Para-virtualized network interface cards (virtio_net)
-netdev tap,fd=32,id=hostnet0,vhost=on,vhostfd=37
-device virtio-net-pci,netdev=hostnet0,id=net0,mac=fa:16:3e:d1:2d:99,bus=pci.0,addr=0x3
Para-virtualized block devices (virtio_blk)
-drive file=/var/lib/nova/instances/1f8e6f7e-5a70-4780-89c1-464dc0e7f308/disk,if=none,id=drive-virtio-disk0,format=qcow2,cache=none
-device virtio-blk-pci,scsi=off,bus=pci.0,addr=0x4,drive=drive-virtio-disk0,id=virtio-disk0,bootindex=1
QEMU KVM Libvirt手册(8): 半虚拟化设备virtio的更多相关文章
- QEMU KVM Libvirt手册(7): 硬件虚拟化
在openstack中,如果我们启动一个虚拟机,我们会看到非常复杂的参数 qemu-system-x86_64 -enable-kvm -name instance-00000024 -S -mach ...
- QEMU KVM Libvirt手册(11): Managing Storage
When managing a VM Guest on the VM Host Server itself, it is possible to access the complete file sy ...
- QEMU KVM Libvirt手册(10):Managing Virtual Machines with libvirt
libvirt is a library that provides a common API for managing popular virtualization solutions, among ...
- QEMU KVM libvirt 手册(1): 安装
安装 对虚拟化的支持通常在BIOS中是禁掉的,必须开启才可以. 对于Intel CPU,我们可以通过下面的命令查看是否支持虚拟化. # grep "vmx" /proc/cpuin ...
- QEMU KVM libvirt手册(4) – images
RAW raw是默认的格式,格式简单,容易转换为其他的格式.需要文件系统的支持才能支持sparse file 创建image # qemu-img create -f raw flat.img 10G ...
- QEMU KVM libvirt 手册(3) - Storage Media
访问Hard Drive 使用-hda –hdb qemu-system-x86_64 -enable-kvm -name ubuntutest -m 2048 -hda ubuntutest.im ...
- QEMU KVM Libvirt手册(10): KVM的各种限制
Overcommits KVM allows for both memory and disk space overcommit. However, hard errors resulting fro ...
- QEMU KVM Libvirt手册(5) – snapshots
前面讲了QEMU的qcow2格式的internal snapshot和external snapshot,这都是虚拟机文件格式的功能. 这是文件级别的. 还可以是文件系统级别的,比如很多文件系统支持s ...
- QEMU KVM libvirt手册(2): monitor
Administrating Virtual Machines with QEMU Monitor When QEMU is running, a monitor console is provide ...
随机推荐
- cocos2dx-lua http请求下载图片,使用XMLHttpRequest类
HttpFileDownLoadSimple.lua local downloader = {} --数据拆分,以没1024*5字节拆成一段,打包写入文件 (拆完再拼接,转成字符串) local fu ...
- 主席树——树链上第k大spoj COT
首先要求第k大就想到用主席树来处理 但是不能直接用树链剖分的dfs序来维护,因为一条链对应的dfs下标可能是断开的几段,无法用权值线段树来维护 那么久维护每个点到根节点的全值线段树,结点u的权值线段树 ...
- python3.0j基语法-01
python基础语法,字符编码,python解释器在加载 .py 文件中的代码时,会对内容进行编码(默认ascill) print("Hello word") 一个简单hello ...
- OPPO F9 Pro在哪里打开usb调试模式的完美方法
经常我们使用pc通过数据线连接到安卓手机的时候,如果手机没有开启USB调试模式,pc则没能够成功读到我们的手机,此情况我们需要找处理方法将手机的USB调试模式开启,今天我们介绍OPPO F9 Pro如 ...
- C#学习-类型转换
类型转换的方式主要有以下几种: 隐式类型转换,由低级别类型向高级类型的转换过程.例如派生类可以隐式地转换为它的父类,装箱过程就属于这种隐式类型转换. 显式类型转换,也叫强制类型转换, 通过is和as运 ...
- 【webpack系列】从零搭建 webpack4+react 脚手架(五)
本章节,我们一起来探讨以下问题:如何对编译后的文件进行gzip压缩,如何让开发环境的控制台输出更加高逼格,如何更好的对编译后的文件进行bundle分析等. 1 gzip压缩 如果你想节省带宽提高网站速 ...
- 2018-2019-2 20165239《网络对抗技术》Exp4 恶意代码分析
Exp4 恶意代码分析 实验内容 一.基础问题 1.如果在工作中怀疑一台主机上有恶意代码,但只是猜想,所有想监控下系统一天天的到底在干些什么.请设计下你想监控的操作有哪些,用什么方法来监控. •使用w ...
- RabbitMQ原理图
一.RabbitMQ 原理图 二.Rabbit 交换器讲解 1 Direct 交换器(发布与订阅 完全匹配) 1.2搭建环境 1 ...
- 业务线B/C端业务组件总结
/** * 业务线组件总结 * */ /* B端组件的总结 1.组件cssBase的总结 1像素底部边框 */ @mixin border - 1px - b($background: $gray - ...
- That girl
音标 词汇 Purple Glasses Black Hat Brown Bag Clothes Blue Jacket Pink Handbag Sock White Skirt Shoe 1, s ...
