python 全栈开发,Day93(vue内容补充,VueX)
昨日内容回顾
1. 页面的布局 Vue中使用Bootstrap搭页面

    1. 安装

        1. npm install bootstrap@3.3.7 -S

    2. 使用

        1. import 'bootstrap/dist/css/bootstrap.min.css'

2. 组件的使用

    1. 组件的定义

        1. 新建一个xx.vue

        2. 在里面定义三个区域(template、script、style)

        3. export default {

              name: "Note",  // 告诉别人怎么引用我

              components: {  // 告诉别人你加载我这个组建的时候 先要去找 NoteList

                  NoteList,

                  Zsq

              }

            }

    2. 组件的使用

        1. 导入

            import NoteList from '@/components/NoteList.vue'

        2. 使用

             <NoteList></NoteList>

    3. 组件的传值

        1. 父组件 -> 子组件

            1. 父组件: v-bind:xx='值'

            2. 子组件:使用props声明

        2. 子组件 -> 父组件

            1. 子组件:$emit('事件名', 参数)

            2. 父组件:v-on:事件名='方法名(参数)'

        3. 任意组件间传值

            1. bus

            2. VueX

3. marked的使用

    1. 安装

        npm install marked --save

    2. 使用

        import marked from 'marked'

        marked(内容)
一、Vue内容补充
npm安装的语法
1. npm install xx -D         --> 安装当前项目用到的开发环境(比如webpack等)

2. npm install xx -S(--save) --> 安装当前项目用到的依赖包(线上运行必须要有的包)

3. npm install xx -g         --> 全局安装,安装完之后在cmd可以直接当命令行工具使用的
Vue中配置全局jQuery
安装jquery依赖
npm install jquery –save
进入目录my-project\build
修改2处webpack.base.conf.js文件
//第一处,引入webpack

var webpack = require('webpack')
第二处
 // 第二处配置jquery插件

  plugins: [

    new webpack.ProvidePlugin({

  $: "jquery",

  jQuery: "jquery",

  jquery: "jquery",

  "window.jQuery": "jquery"

    })

  ],
webpack.base.conf.js完整代码如下:
'use strict'

const path = require('path')

const utils = require('./utils')

const config = require('../config')

const vueLoaderConfig = require('./vue-loader.conf')

function resolve (dir) {

  return path.join(__dirname, '..', dir)

}

//第一处,引入webpack

var webpack = require('webpack')

module.exports = {

  context: path.resolve(__dirname, '../'),

  entry: {

    app: './src/main.js'

  },

  output: {

    path: config.build.assetsRoot,

    filename: '[name].js',

    publicPath: process.env.NODE_ENV === 'production'

      ? config.build.assetsPublicPath

      : config.dev.assetsPublicPath

  },

  resolve: {

    extensions: ['.js', '.vue', '.json'],

    alias: {

      'vue$': 'vue/dist/vue.esm.js',

      '@': resolve('src'),

    }

  },

  // 第二处配置jquery插件

  plugins: [

    new webpack.ProvidePlugin({

      $: "jquery",

      jQuery: "jquery",

      jquery: "jquery",

      "window.jQuery": "jquery"

    })

  ],

  module: {

    rules: [

      {

        test: /\.vue$/,

        loader: 'vue-loader',

        options: vueLoaderConfig

      },

      {

        test: /\.js$/,

        loader: 'babel-loader',

        include: [resolve('src'), resolve('test'), resolve('node_modules/webpack-dev-server/client')]

      },

      {

        test: /\.(png|jpe?g|gif|svg)(\?.*)?$/,

        loader: 'url-loader',

        options: {

          limit: 10000,

          name: utils.assetsPath('img/[name].[hash:7].[ext]')

        }

      },

      {

        test: /\.(mp4|webm|ogg|mp3|wav|flac|aac)(\?.*)?$/,

        loader: 'url-loader',

        options: {

          limit: 10000,

          name: utils.assetsPath('media/[name].[hash:7].[ext]')

        }

      },

      {

        test: /\.(woff2?|eot|ttf|otf)(\?.*)?$/,

        loader: 'url-loader',

        options: {

          limit: 10000,

          name: utils.assetsPath('fonts/[name].[hash:7].[ext]')

        }

      }

    ]

  },

  node: {

    // prevent webpack from injecting useless setImmediate polyfill because Vue

    // source contains it (although only uses it if it's native).

    setImmediate: false,

    // prevent webpack from injecting mocks to Node native modules

    // that does not make sense for the client

    dgram: 'empty',

    fs: 'empty',

    net: 'empty',

    tls: 'empty',

    child_process: 'empty'

  }

}
需要在哪个页面用,直接
import jQuery from 'jquery'
如果需要全局使用,在mian.js中导入
highlight.js
昨天的文章,已经介绍了使用第一种方式,来引入highlight
下面介绍第二种:
安装highlight.js依赖
npm install highlight.js –save
在需要的页面,增加以下代码
import Vue from 'vue'

import marked from 'marked'

import highlightjs from 'highlight.js'

import 'highlight.js/styles/monokai-sublime.css'  //样式文件

// 注册highlightjs指令

Vue.directive('highlightjs',function (el) {

    let blocks = el.querySelectorAll('pre code');

    blocks.forEach((block)=>{

        highlightjs.highlightBlock(block)

    })

})

/*语法高亮*/

marked.setOptions({

    highlight: (code) => highlightjs.highlightAuto(code).value

})
修改NoteEdit.vue,完整代码如下:
<template>

  <div class="row">

    <!-- 左边的 textarea 区域开始 -->

    <div class="col-md-6 height600">

      <div class="input-group">

        <span class="input-group-addon" id="basic-addon1">标题</span>

        <input type="text" class="form-control" placeholder="请输入标题" aria-describedby="basic-addon1">

      </div>

      <!-- textarea -->

      <textarea class="my-textarea"

                v-model="content"

      >

      </textarea>

    </div>

    <!-- 左边的 textarea 区域结束 -->

    <!-- 右边的 展示区 区域开始 -->

    <div class="col-md-6 height600">

      <div>

        <button class="btn btn-success">添加</button>

      </div>

      <!--展示原始html使用v-html-->

      <div class="right-box my-textarea"

           v-html="markedDownContent"

      >

      </div>

    </div>

    <!-- 右变的 展示 区域结束 -->

  </div>

</template>

<script>

  import Vue from 'vue'

  import marked from 'marked'  //导入marked模块,用来处理makedown语法

  //Web代码语法高亮库

  import highlightjs from 'highlight.js'

  import 'highlight.js/styles/monokai.css'  //样式文件

  // 注册highlightjs指令

  Vue.directive('highlightjs',function (el) {

    let blocks = el.querySelectorAll('pre code');

    blocks.forEach((block)=>{

      highlightjs.highlightBlock(block)

    })

  })

  /*语法高亮*/

  marked.setOptions({

    highlight: (code) => highlightjs.highlightAuto(code).value

  })

  export default {

    name: 'NoteEdit',

    data:function () {

      return {

        content:''

      }

    },

    //增加计算属性

    computed:{

      markedDownContent:function(){

        return marked(this.content)

      }

    }

  }

</script>

<style>

  .my-textarea {

    margin-top: 15px;

    height: 80%;

    width: 100%

  }

  .height600 {

    height: 600px;

  }

  .right-box {

    border: 1px solid grey

  }

</style>
访问网页,测试一段代码

和昨天我的写的博客
https://www.cnblogs.com/xiao987334176/p/9379451.html#autoid-3-14-1
用的是同一个样式文件,但是效果不一样

我个人觉得,还是黑色背景比较好看!
如果已经改了NoteEdit.vue使用了第二种方式,请先还原成第一种方式!因为接下来的代码,可能会产生影响!
获取输入的标题
修改NoteEdit.vue,使用v-model获取用户输入
<template>

  <div class="row">

    <!-- 左边的 textarea 区域开始 -->

    <div class="col-md-6 height600">

      <div class="input-group">

        <span class="input-group-addon" id="basic-addon1">标题</span>

        <input

          v-model="title"

          type="text" class="form-control" placeholder="请输入标题" aria-describedby="basic-addon1">

      </div>

      <!-- textarea -->

      <textarea class="my-textarea"

                v-model="content"

      >

      </textarea>

    </div>

    <!-- 左边的 textarea 区域结束 -->

    <!-- 右边的 展示区 区域开始 -->

    <div class="col-md-6 height600">

      <div>

        <button v-on:click='addNote' class="btn btn-success">添加</button>

      </div>

      <!--展示原始html使用v-html-->

      <div class="right-box my-textarea"

           v-html="markedDownContent"

           v-highlight

      >

      </div>

    </div>

    <!-- 右变的 展示 区域结束 -->

  </div>

</template>

<script>

  //导入marked模块,用来处理makedown语法

  import marked from 'marked'

  export default {

    name: 'NoteEdit',

    data:function () {

      return {

        title:'',  //声明title变量

        content:''

      }

    },

    //增加计算属性

    computed:{

      markedDownContent:function(){

        return marked(this.content)

      }

    },

    methods:{

      addNote:function(){

        alert(this.title);  //获取标题

      }

    }

  }

</script>

<style>

  .my-textarea {

    margin-top: 15px;

    height: 80%;

    width: 100%

  }

  .height600 {

    height: 600px;

  }

  .right-box {

    border: 1px solid grey

  }

</style>
刷新网页,效果如下:
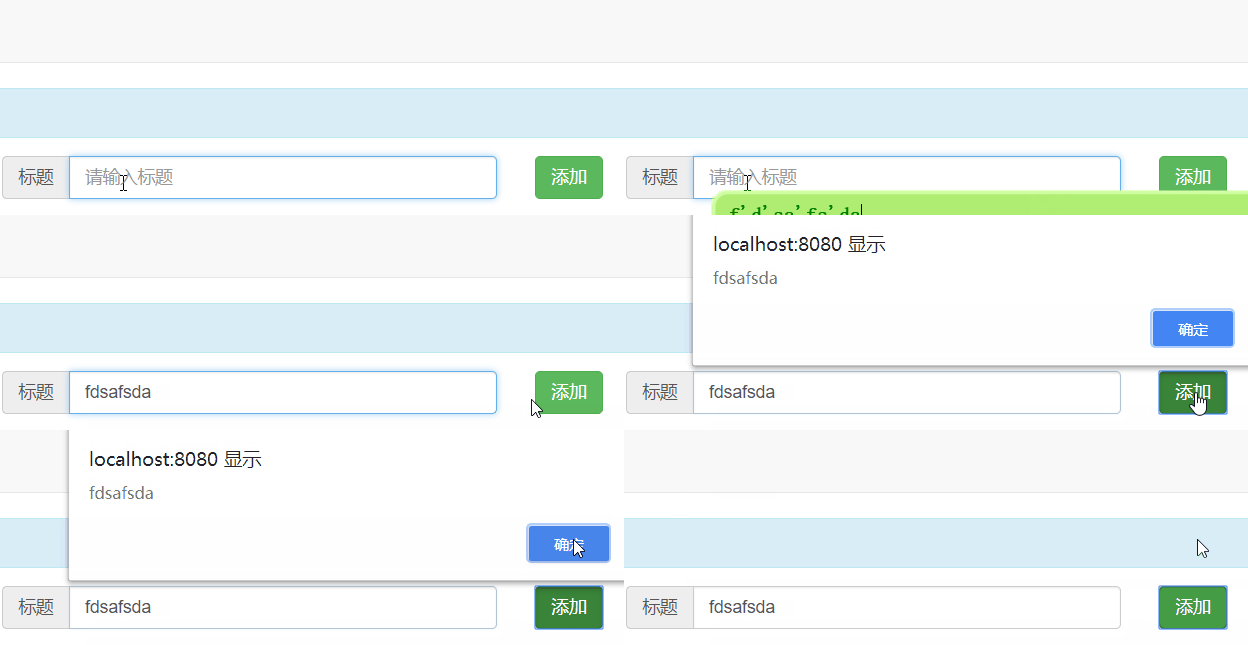
现在需要将输入的标题,添加到左侧的列表组中
查看NoteList.vue,发现左侧的列表组变量都是在NoteList数组中,增加到这个数组就可以了。
这就需要用到组件间的传值。之前我们学到,组件之间传值,使用bus。但是现在不用bus了,用vuex
vuex就是一个仓库
二、Vuex
vuex是什么?
先引用vuex官网的话:
Vuex 是一个专为 Vue.js 应用程序开发的状态管理模式。它采用集中式存储管理应用的所有组件的状态,并以相应的规则保证状态以一种可预测的方式发生变化。
状态管理模式、集中式存储管理 一听就很高大上,蛮吓人的。在我看来 vuex 就是把需要共享的变量全部存储在一个对象里面,然后将这个对象放在顶层组件中供其他组件使用。这么说吧,将vue想作是一个js文件、组件是函数,那么vuex就是一个全局变量,只是这个“全局变量”包含了一些特定的规则而已。
在vue的组件化开发中,经常会遇到需要将当前组件的状态传递给其他组件。父子组件通信时,我们通常会采用 props + emit 这种方式。但当通信双方不是父子组件甚至压根不存在相关联系,或者一个状态需要共享给多个组件时,就会非常麻烦,数据也会相当难维护,这对我们开发来讲就很不友好。vuex 这个时候就很实用,不过在使用vuex之后也带来了更多的概念和框架,需慎重!
vuex里面都有些什么内容?
Talk is cheap,Show me the code. 先来一段代码间隔下这么多的文字:
const store = new Vuex.Store({

    state: {

        name: 'weish',

        age: 22

    },

    getters: {

        personInfo(state) {

            return `My name is ${state.name}, I am ${state.age}`;

        }

    }

    mutations: {

        SET_AGE(state, age) {

            commit(age, age);

        }

    },

    actions: {

        nameAsyn({commit}) {

            setTimeout(() => {

                commit('SET_AGE', 18);

            }, 1000);

        }

    },

    modules: {

        a: modulesA

    }

}
这个就是最基本也是完整的vuex代码;vuex 包含有五个基本的对象:
- state:存储状态。也就是变量;
- getters:派生状态。也就是set、get中的get,有两个可选参数:state、getters分别可以获取state中的变量和其他的getters。外部调用方式:store.getters.personInfo()。就和vue的computed差不多;
- mutations:提交状态修改。也就是set、get中的set,这是vuex中唯一修改state的方式,但不支持异步操作。第一个参数默认是state。外部调用方式:store.commit('SET_AGE', 18)。和vue中的methods类似。
- actions:和mutations类似。不过actions支持异步操作。第一个参数默认是和store具有相同参数属性的对象。外部调用方式:store.dispatch('nameAsyn')。
- modules:store的子模块,内容就相当于是store的一个实例。调用方式和前面介绍的相似,只是要加上当前子模块名,如:store.a.getters.xxx()。
安装vuex
E:\python_script\Vue\my-project>npm install vuex -D
提示以下信息,表示成功
+ vuex@3.0.1

added 1 package from 1 contributor and audited 8829 packages in 44.575s

found 1 moderate severity vulnerability

  run `npm audit fix` to fix them, or `npm audit` for details
使用vuex
修改mian.js,导入vuex,并定义一个大仓库
// The Vue build version to load with the `import` command

// (runtime-only or standalone) has been set in webpack.base.conf with an alias.

import Vue from 'vue'

import App from './App'

import router from './router'

import jQuery from 'jquery'

import Vuex from 'vuex'

Vue.use(Vuex)  //使用vuex

//定义一个大仓库,用来存放项目组件中用到的数据

const store = new Vuex.Store({

  state:{

    noteList:[

      '吃饭','睡觉','打豆豆'

    ]

  },

})

Vue.config.productionTip = false

//Web代码语法高亮库

import hljs from 'highlight.js'

import 'highlight.js/styles/monokai.css' //样式文件

Vue.directive('highlight',function (el) {

  let blocks = el.querySelectorAll('pre code');

  blocks.forEach((block)=>{

    hljs.highlightBlock(block)

  })

})

/* eslint-disable no-new */

new Vue({

  el: '#app',

  router,

  store:store, //将上面定义的大仓库与vue实例建立联系

  components: { App },

  template: '<App/>'

})
修改NoteList.vue,删除原来的数组,调用大仓库的数组
注意数据名的大小写
<template>

  <div>

    <div class="list-group">

      <!--  在子组件声明 我需要被传入的参数

      v-for="(note, index) in NoteList"  : NoteList是一个数组,note是数组每一个元素

       v-bind:name=note                  : 子组件声明,被传入的参数为name,值为note,也就是数组的元素

      v-bind:key=index                   : for循环vue推荐绑定key,key用来标示for循环的每一项

      -->

      <NoteItem

        v-for="(note, index) in noteList"

        v-bind:name='note'

        v-bind:key="index"

      ></NoteItem>

    </div>

  </div>

</template>

<script>

  //导入NoteItem组件

  import NoteItem from '@/components/NoteItem.vue'

  export default {

    name: 'NoteList',

    components: {

      NoteItem

    },

    data:function(){

      return {

      }

    },

    computed:{

      noteList:function () {

        //从当前的vue实例的大仓库里找笔记列表

        return this.$store.state.noteList

      }

    }

  }

</script>

<style>

</style>
刷新网页,效果和之前是一样的。
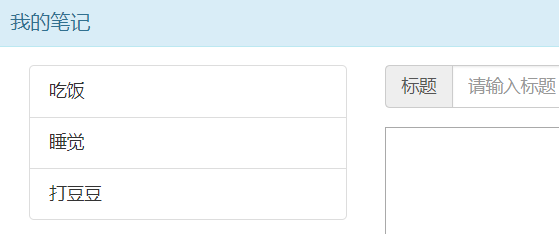
State
单一状态
Vuex 使用单一状态树——是的,用一个对象就包含了全部的应用层级状态。至此它便作为一个“唯一数据源 (SSOT)”而存在。这也意味着,每个应用将仅仅包含一个 store 实例。单一状态树让我们能够直接地定位任一特定的状态片段,在调试的过程中也能轻易地取得整个当前应用状态的快照。
单状态树和模块化并不冲突——在后面的章节里我们会讨论如何将状态和状态变更事件分布到各个子模块中。
在 Vue 组件中获得 Vuex 状态
那么我们如何在 Vue 组件中展示状态呢?由于 Vuex 的状态存储是响应式的,从 store 实例中读取状态最简单的方法就是在计算属性中返回某个状态:
// 创建一个 Counter 组件

const Counter = {

  template: `<div>{{ count }}</div>`,

  computed: {

    count () {

      return store.state.count

    }

  }

}
每当 store.state.count 变化的时候, 都会重新求取计算属性,并且触发更新相关联的 DOM。
然而,这种模式导致组件依赖全局状态单例。在模块化的构建系统中,在每个需要使用 state 的组件中需要频繁地导入,并且在测试组件时需要模拟状态。
Vuex 通过 store 选项,提供了一种机制将状态从根组件“注入”到每一个子组件中(需调用 Vue.use(Vuex)):
const app = new Vue({

  el: '#app',

  // 把 store 对象提供给 “store” 选项,这可以把 store 的实例注入所有的子组件

  store,

  components: { Counter },

  template: `

    <div class="app">

      <counter></counter>

    </div>

  `

})
通过在根实例中注册 store 选项,该 store 实例会注入到根组件下的所有子组件中,且子组件能通过 this.$store 访问到。让我们更新下 Counter 的实现:
const Counter = {

  template: `<div>{{ count }}</div>`,

  computed: {

    count () {

      return this.$store.state.count

    }

  }

}
添加标题到store
修改NoteEdit.vue,使用push添加到大仓库的笔记列表
<template>

  <div class="row">

    <!-- 左边的 textarea 区域开始 -->

    <div class="col-md-6 height600">

      <div class="input-group">

        <span class="input-group-addon" id="basic-addon1">标题</span>

        <input

          v-model="title"

          type="text" class="form-control" placeholder="请输入标题" aria-describedby="basic-addon1">

      </div>

      <!-- textarea -->

      <textarea class="my-textarea"

                v-model="content"

      >

      </textarea>

    </div>

    <!-- 左边的 textarea 区域结束 -->

    <!-- 右边的 展示区 区域开始 -->

    <div class="col-md-6 height600">

      <div>

        <button v-on:click='addNote' class="btn btn-success">添加</button>

      </div>

      <!--展示原始html使用v-html-->

      <div class="right-box my-textarea"

           v-html="markedDownContent"

           v-highlight

      >

      </div>

    </div>

    <!-- 右变的 展示 区域结束 -->

  </div>

</template>

<script>

  //导入marked模块,用来处理makedown语法

  import marked from 'marked'

  export default {

    name: 'NoteEdit',

    data:function () {

      return {

        title:'',  //声明title变量

        content:''

      }

    },

    //增加计算属性

    computed:{

      markedDownContent:function(){

        return marked(this.content)

      }

    },

    methods:{

      addNote:function(){

        //取新添加的笔记标题

        //向大仓库的noteList添加笔记

        this.$store.state.noteList.push(this.title)

        alert(this.title);  //获取标题

      }

    }

  }

</script>

<style>

  .my-textarea {

    margin-top: 15px;

    height: 80%;

    width: 100%

  }

  .height600 {

    height: 600px;

  }

  .right-box {

    border: 1px solid grey

  }

</style>
刷新网页效果如下:
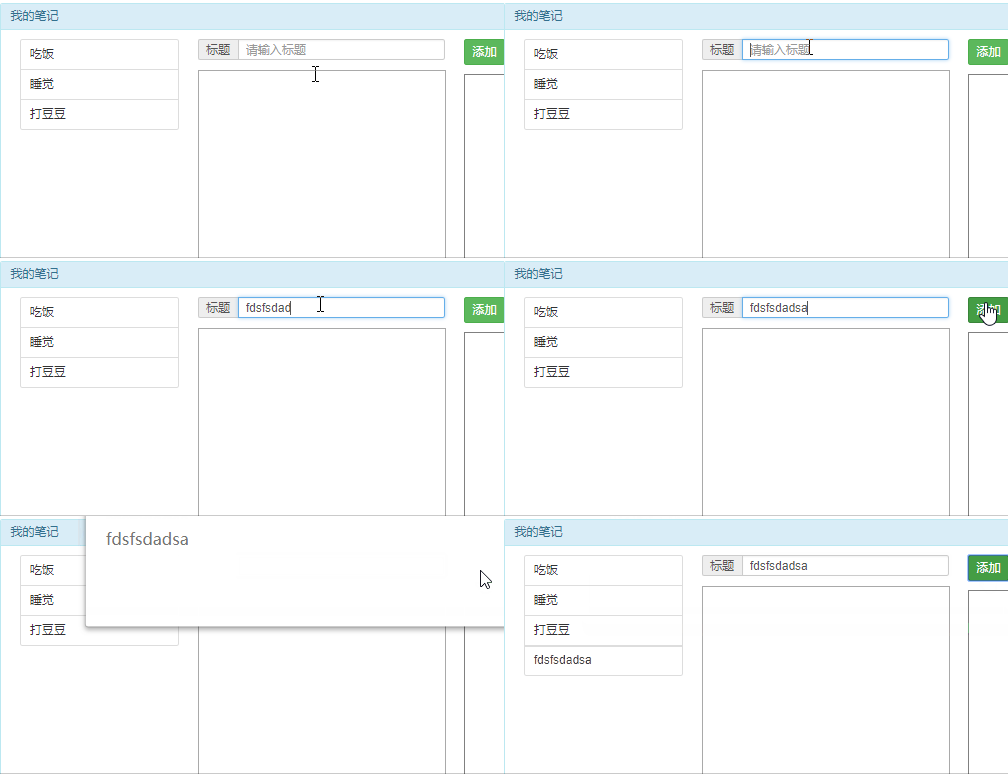
现在有一个问题,组件能直接修改大仓库的值。如果组件繁多,仓库的值出现了异常,不知道是哪个组件更新的。所以vuex为了解决这个问题,规定修改仓库的值,必须在仓库里面执行才可以!它提供一个方法Mutation
Mutation
更改 Vuex 的 store 中的状态的唯一方法是提交 mutation。Vuex 中的 mutation 非常类似于事件:每个 mutation 都有一个字符串的 事件类型 (type) 和 一个 回调函数 (handler)。这个回调函数就是我们实际进行状态更改的地方,并且它会接受 state 作为第一个参数:
const store = new Vuex.Store({

  state: {

    count: 1

  },

  mutations: {

    increment (state) {

      // 变更状态

      state.count++

    }

  }

})
你不能直接调用一个 mutation handler。这个选项更像是事件注册:“当触发一个类型为 increment 的 mutation 时,调用此函数。”要唤醒一个 mutation handler,你需要以相应的 type 调用 store.commit 方法:
store.commit('increment')
规范写法
修改main.js,增加mutation
// The Vue build version to load with the `import` command

// (runtime-only or standalone) has been set in webpack.base.conf with an alias.

import Vue from 'vue'

import App from './App'

import router from './router'

import jQuery from 'jquery'

import Vuex from 'vuex'

Vue.use(Vuex)  //使用vuex

//定义一个大仓库,用来存放项目组件中用到的数据

const store = new Vuex.Store({

  state:{

    noteList:[

      '吃饭','睡觉','打豆豆'

    ]

  },

  mutations:{

    //修改仓库中状态的唯一方法就是通过提交mutations

    ADDNOTE: function (state, note) {

      // 将新笔记数据添加到noteList(同步操作)

      state.noteList.push(note)

    },

  }

})

Vue.config.productionTip = false

//Web代码语法高亮库

import hljs from 'highlight.js'

import 'highlight.js/styles/monokai.css' //样式文件

Vue.directive('highlight',function (el) {

  let blocks = el.querySelectorAll('pre code');

  blocks.forEach((block)=>{

    hljs.highlightBlock(block)

  })

})

/* eslint-disable no-new */

new Vue({

  el: '#app',

  router,

  store:store, //将上面定义的大仓库与vue实例建立联系

  components: { App },

  template: '<App/>'

})
修改NoteEdit.vue,调用 store.commit 方法,来执行mian.js中的ADDNOTE方法
<template>

  <div class="row">

    <!-- 左边的 textarea 区域开始 -->

    <div class="col-md-6 height600">

      <div class="input-group">

        <span class="input-group-addon" id="basic-addon1">标题</span>

        <input

          v-model="title"

          type="text" class="form-control" placeholder="请输入标题" aria-describedby="basic-addon1">

      </div>

      <!-- textarea -->

      <textarea class="my-textarea"

                v-model="content"

      >

      </textarea>

    </div>

    <!-- 左边的 textarea 区域结束 -->

    <!-- 右边的 展示区 区域开始 -->

    <div class="col-md-6 height600">

      <div>

        <button v-on:click='addNote' class="btn btn-success">添加</button>

      </div>

      <!--展示原始html使用v-html-->

      <div class="right-box my-textarea"

           v-html="markedDownContent"

           v-highlight

      >

      </div>

    </div>

    <!-- 右变的 展示 区域结束 -->

  </div>

</template>

<script>

  //导入marked模块,用来处理makedown语法

  import marked from 'marked'

  export default {

    name: 'NoteEdit',

    data:function () {

      return {

        title:'',  //声明title变量

        content:''

      }

    },

    //增加计算属性

    computed:{

      markedDownContent:function(){

        return marked(this.content)

      }

    },

    methods:{

      addNote:function(){

        //取新添加的笔记标题

        //向大仓库的noteList添加笔记

        // this.$store.state.noteList.push(this.title)  //不规范的写法

        this.$store.commit('ADDNOTE',this.title)

      }

    }

  }

</script>

<style>

  .my-textarea {

    margin-top: 15px;

    height: 80%;

    width: 100%

  }

  .height600 {

    height: 600px;

  }

  .right-box {

    border: 1px solid grey

  }

</style>
刷新网页,再次验证添加功能是否正常!
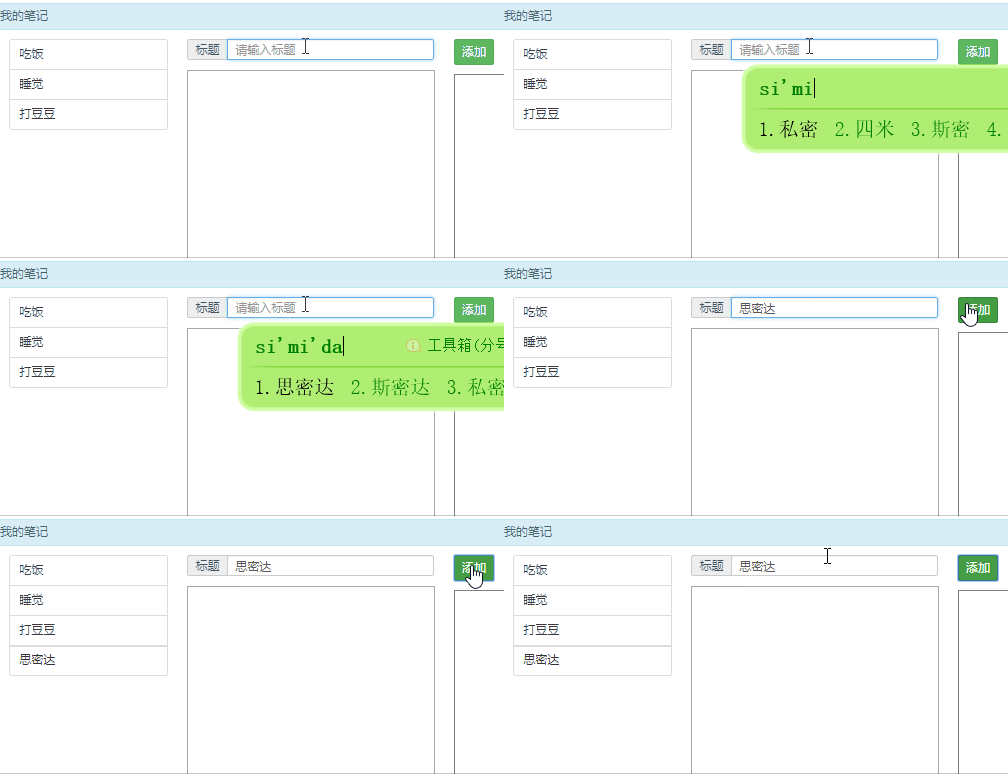
现在添加的数组,是在内存中,不是在数据库中。那么需要用django框架,来搭建一隔后端应用,用来保存数据!
现在已经写好了一个项目vue_backend,github地址如下:
https://github.com/987334176/MyNotes/tree/master/%E5%90%8E%E7%AB%AFDjango/vue_backend
注意:必须使用django 1.11版本才能启动
必须安装模块django-cors-headers
pip3 install django-cors-headers
查看版本,确保版本为1.11,已经安装django-cors-headers
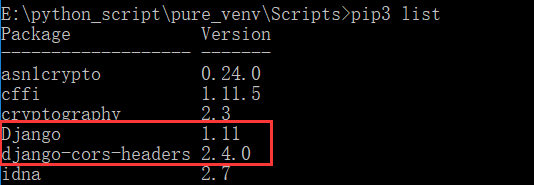
打开sqlite3数据库,查看app01_note表记录

访问我的笔记接口
http://127.0.0.1:8000/api/notes/
返回一段json数据

使用ajax获取后端数据
修改main.js
// The Vue build version to load with the `import` command

// (runtime-only or standalone) has been set in webpack.base.conf with an alias.

import Vue from 'vue'

import App from './App'

import router from './router'

import jQuery from 'jquery'

import Vuex from 'vuex'

Vue.use(Vuex)  //使用vuex

//定义一个大仓库,用来存放项目组件中用到的数据

const store = new Vuex.Store({

  state:{

    noteList:[

      '吃饭','睡觉','打豆豆'

    ]

  },

  mutations:{

    //修改仓库中状态的唯一方法就是通过提交mutations

    ADDNOTE: function (state, note) {

      // 将新笔记数据添加到noteList(同步操作)

      state.noteList.push(note)

    },

  }

})

Vue.config.productionTip = false

//Web代码语法高亮库

import hljs from 'highlight.js'

import 'highlight.js/styles/monokai.css' //样式文件

Vue.directive('highlight',function (el) {

  let blocks = el.querySelectorAll('pre code');

  blocks.forEach((block)=>{

    hljs.highlightBlock(block)

  })

})

/* eslint-disable no-new */

new Vue({

  el: '#app',

  router,

  store:store, //将上面定义的大仓库与vue实例建立联系

  components: { App },

  template: '<App/>',

  beforeMount: function () {  //挂载之前操作

    // 去后端拉取笔记数据

    // 通过ajax拉取

    var _this = this;

    jQuery.ajax({

      url:'http://127.0.0.1:8000/api/notes/',

      type: 'get',

      success:function(res){

        console.log('我要去后端拉取笔记数据啦!');

        console.log(res);

        // 将获取到的笔记数据 放到大仓库中

        _this.$store.state.noteList = res.data

      }

    })

  }

})
刷新网页,查看console
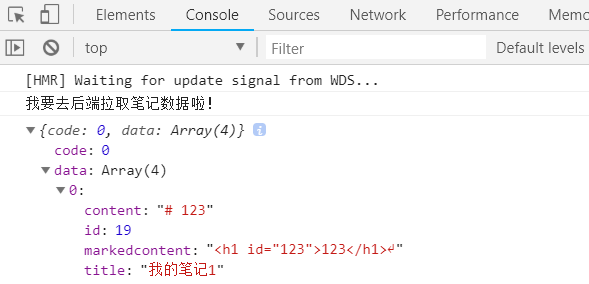
从上面可以看到数据库的记录了!
列表组正常显示
修改mian.js,获取到后端的数据后,清空数组。更新大仓库的数据
// The Vue build version to load with the `import` command

// (runtime-only or standalone) has been set in webpack.base.conf with an alias.

import Vue from 'vue'

import App from './App'

import router from './router'

import jQuery from 'jquery'

import Vuex from 'vuex'

Vue.use(Vuex)  //使用vuex

//定义一个大仓库,用来存放项目组件中用到的数据

const store = new Vuex.Store({

  state:{

    noteList:[]

  },

  mutations:{

    //修改仓库中状态的唯一方法就是通过提交mutations

    ADDNOTE: function (state, note) {

      // 将新笔记数据添加到noteList(同步操作)

      state.noteList.push(note)

    },

    INITNOTELIST: function (state, noteList) {

      state.noteList = noteList  //修改数组

    }

  }

})

Vue.config.productionTip = false

//Web代码语法高亮库

import hljs from 'highlight.js'

import 'highlight.js/styles/monokai.css' //样式文件

Vue.directive('highlight',function (el) {

  let blocks = el.querySelectorAll('pre code');

  blocks.forEach((block)=>{

    hljs.highlightBlock(block)

  })

})

/* eslint-disable no-new */

new Vue({

  el: '#app',

  router,

  store:store, //将上面定义的大仓库与vue实例建立联系

  components: { App },

  template: '<App/>',

  beforeMount: function () {  //挂载之前操作

    // 去后端拉取笔记数据

    // 通过ajax拉取

    var _this = this;

    jQuery.ajax({

      url:'http://127.0.0.1:8000/api/notes/',

      type: 'get',

      success:function(res){

        console.log('我要去后端拉取笔记数据啦!');

        console.log(res);

        // 将获取到的笔记数据 放到大仓库中

        // _this.$store.state.noteList = res.data

        //获取后端数据,调用commit,执行INITNOTELIST方法修改大仓库

        _this.$store.commit('INITNOTELIST', res.data)

      }

    })

  }

})
由于后端的数据是一个数组,数组每一个元素都是对象。修改NoteList.vue
<template>

  <div>

    <div class="list-group">

      <!--  在子组件声明 我需要被传入的参数

      v-for="note in NoteList"  : NoteList是一个数组对象,note是数组每一个对象

       v-bind:name=note.title                  : 子组件声明,被传入的参数为name,值为note.title,也就是对象的标题

      v-bind:key=note.id                  : for循环vue推荐绑定key,key用来标示for循环的每一项

      -->

      <NoteItem

        v-for="note in noteList"

        v-bind:name='note.title'

        v-bind:key="note.id"

      ></NoteItem>

    </div>

  </div>

</template>

<script>

  //导入NoteItem组件

  import NoteItem from '@/components/NoteItem.vue'

  export default {

    name: 'NoteList',

    components: {

      NoteItem

    },

    data:function(){

      return {

      }

    },

    computed:{

      noteList:function () {

        //从当前的vue实例的大仓库里找笔记列表

        return this.$store.state.noteList

      }

    }

  }

</script>

<style>

</style>
刷新页面,效果如下:

打开app01_note表,增加一条记录

刷新页面,会发现多了一条数据

axios
Axios 是一个基于 promise 的 HTTP 库,可以用在浏览器和 node.js 中。
中文文档链接如下:
https://www.kancloud.cn/yunye/axios/234845
vue中发送ajax请求推荐使用 axios
安装axios
E:\python_script\Vue\my-project>npm install axios -D
出现以下信息,表示安装成功
+ axios@0.18.0

added 1 package from 1 contributor and audited 8835 packages in 15.845s

found 1 moderate severity vulnerability

  run `npm audit fix` to fix them, or `npm audit` for details
使用axios
import axios from 'axios'
使用GET请求
语法:
axios.get('/user?ID=12345')

  .then(function (response) {

    console.log(response);

  })

  .catch(function (error) {

    console.log(error);

  });
.then 表示成功之后,要做的操作
.catch 表示成功之后,要做的操作
举例:
修改mian.js,改为axios
// The Vue build version to load with the `import` command

// (runtime-only or standalone) has been set in webpack.base.conf with an alias.

import Vue from 'vue'

import App from './App'

import router from './router'

import jQuery from 'jquery'

import Vuex from 'vuex'

import axios from 'axios'

Vue.use(Vuex)  //使用vuex

//定义一个大仓库,用来存放项目组件中用到的数据

const store = new Vuex.Store({

  state:{

    noteList:[]

  },

  mutations:{

    //修改仓库中状态的唯一方法就是通过提交mutations

    ADDNOTE: function (state, note) {

      // 将新笔记数据添加到noteList(同步操作)

      state.noteList.push(note)

    },

    INITNOTELIST: function (state, noteList) {

      state.noteList = noteList  //修改数组

    }

  }

})

Vue.config.productionTip = false

//Web代码语法高亮库

import hljs from 'highlight.js'

import 'highlight.js/styles/monokai.css' //样式文件

Vue.directive('highlight',function (el) {

  let blocks = el.querySelectorAll('pre code');

  blocks.forEach((block)=>{

    hljs.highlightBlock(block)

  })

})

/* eslint-disable no-new */

new Vue({

  el: '#app',

  router,

  store:store, //将上面定义的大仓库与vue实例建立联系

  components: { App },

  template: '<App/>',

  beforeMount: function () {  //挂载之前操作

    // 去后端拉取笔记数据

    // 通过ajax拉取

    var _this = this;

    axios.get('http://127.0.0.1:8000/api/notes/')

      .then(function (res) {

        console.log('我要去后端拉取笔记数据啦!');

        console.log(res.data.data)

        // 将获取到的笔记数据 放到大仓库中

        // _this.$store.state.noteList = res.data

        //获取后端数据,调用commit,执行INITNOTELIST方法修改大仓库

        _this.$store.commit('INITNOTELIST', res.data.data)

      })

      .catch(function (error) {

        console.log(error);

      });

    // jQuery.ajax({

    //   url:'http://127.0.0.1:8000/api/notes/',

    //   type: 'get',

    //   success:function(res){

    //     console.log('我要去后端拉取笔记数据啦!');

    //     console.log(res);

    //     // 将获取到的笔记数据 放到大仓库中

    //     // _this.$store.state.noteList = res.data

    //     //获取后端数据,调用commit,执行INITNOTELIST方法修改大仓库

    //     _this.$store.commit('INITNOTELIST', res.data)

    //   }

    // })

  }

})
刷新页面,效果如下:

添加标题到左侧
由于现在左侧的列表组里面存放的值,都是对象。所以页面点击添加按钮,是没有效果的!
修改NoteEdit.vue,改为增加对象
<template>

  <div class="row">

    <!-- 左边的 textarea 区域开始 -->

    <div class="col-md-6 height600">

      <div class="input-group">

        <span class="input-group-addon" id="basic-addon1">标题</span>

        <input

          v-model="title"

          type="text" class="form-control" placeholder="请输入标题" aria-describedby="basic-addon1">

      </div>

      <!-- textarea -->

      <textarea class="my-textarea"

                v-model="content"

      >

      </textarea>

    </div>

    <!-- 左边的 textarea 区域结束 -->

    <!-- 右边的 展示区 区域开始 -->

    <div class="col-md-6 height600">

      <div>

        <button v-on:click='addNote' class="btn btn-success">添加</button>

      </div>

      <!--展示原始html使用v-html-->

      <div class="right-box my-textarea"

           v-html="markedDownContent"

           v-highlight

      >

      </div>

    </div>

    <!-- 右变的 展示 区域结束 -->

  </div>

</template>

<script>

  //导入marked模块,用来处理makedown语法

  import marked from 'marked'

  export default {

    name: 'NoteEdit',

    data:function () {

      return {

        title:'',  //声明title变量

        content:''

      }

    },

    //增加计算属性

    computed:{

      markedDownContent:function(){

        return marked(this.content)

      }

    },

    methods:{

      addNote:function(){

        var noteObj = {

          title: this.title,

          content: this.content,

          markdownContent: this.markedDownContent

        }

        // 把新添加的笔记对象 发送到后端

        this.$store.commit('ADDNOTE',noteObj)

      }

    }

  }

</script>

<style>

  .my-textarea {

    margin-top: 15px;

    height: 80%;

    width: 100%

  }

  .height600 {

    height: 600px;

  }

  .right-box {

    border: 1px solid grey

  }

</style>
刷新网页,效果如下:
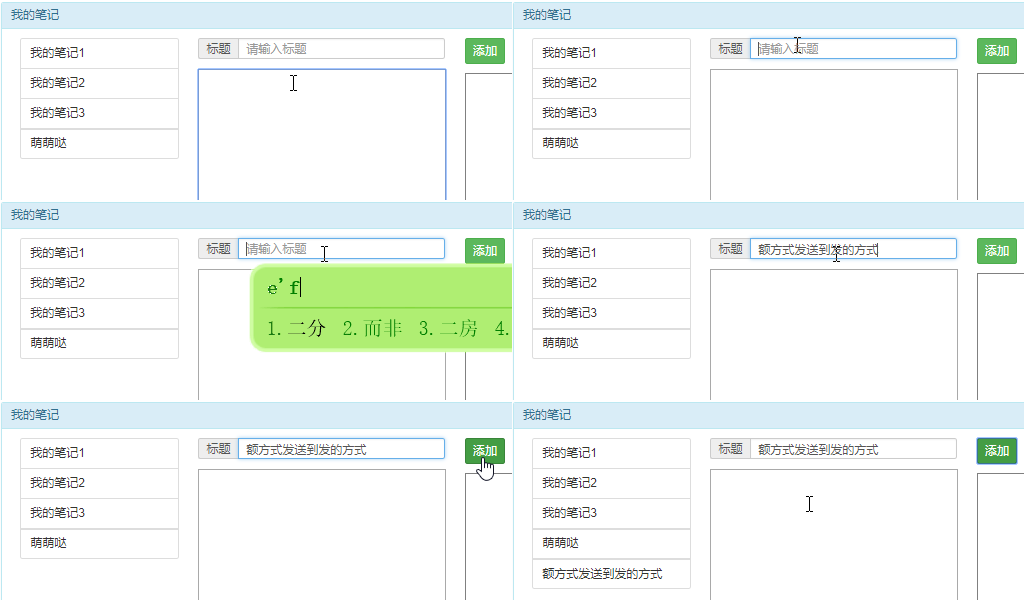
注意:此时添加的数据,只是在内存中,刷新网页,就没有了!
添加笔记到数据库
注意:必须指定axios发送的请求头的数据类型为application/x-www-form-urlencoded
django的request.POST才能接收到,否则只能用request.body接受,并用正则获取(太麻烦了!)
设置post请求的请求头
axios.defaults.headers.post['Content-Type'] = 'application/x-www-form-urlencoded';
django只能接收一个字符串,所以发送数据时,使用内置默认qs转换为字符串,使用时,必须导入一下
import qs from 'qs'
语法:
qs.stringify(note)
修改mian.js,完整代码如下:
// The Vue build version to load with the `import` command

// (runtime-only or standalone) has been set in webpack.base.conf with an alias.

import Vue from 'vue'

import App from './App'

import router from './router'

import jQuery from 'jquery'

import Vuex from 'vuex'

import axios from 'axios'

import qs from 'qs'

Vue.use(Vuex)  //使用vuex

// 设置post请求的请求头

axios.defaults.headers.post['Content-Type'] = 'application/x-www-form-urlencoded';

//定义一个大仓库,用来存放项目组件中用到的数据

const store = new Vuex.Store({

  state:{

    noteList:[]

  },

  mutations:{

    //修改仓库中状态的唯一方法就是通过提交mutations

    ADDNOTE: function (state, note) {

      // 先将新笔记数据post到后端 (异步操作)

      axios({

        method: 'post',

        url: 'http://127.0.0.1:8000/api/add/',

        data: qs.stringify(note)  // 将js对象转换成字符串格式

      })

        .then(function (res) {  //成功之后

          console.log(res)

          // 提交mutation

          context.commit('ADDNOTE', note)

        })

        .catch(function (error) {  //失败之后

          console.log(error)

        });

      // 将新笔记数据添加到noteList(同步操作)

      state.noteList.push(note)

    },

    INITNOTELIST: function (state, noteList) {

      state.noteList = noteList  //修改数组

    }

  }

})

Vue.config.productionTip = false

//Web代码语法高亮库

import hljs from 'highlight.js'

import 'highlight.js/styles/monokai.css' //样式文件

Vue.directive('highlight',function (el) {

  let blocks = el.querySelectorAll('pre code');

  blocks.forEach((block)=>{

    hljs.highlightBlock(block)

  })

})

/* eslint-disable no-new */

new Vue({

  el: '#app',

  router,

  store:store, //将上面定义的大仓库与vue实例建立联系

  components: { App },

  template: '<App/>',

  beforeMount: function () {  //挂载之前操作

    // 去后端拉取笔记数据

    // 通过ajax拉取

    var _this = this;

    axios.get('http://127.0.0.1:8000/api/notes/')

      .then(function (res) {

        console.log('我要去后端拉取笔记数据啦!');

        console.log(res.data.data)

        // 将获取到的笔记数据 放到大仓库中

        // _this.$store.state.noteList = res.data

        //获取后端数据,调用commit,执行INITNOTELIST方法修改大仓库

        _this.$store.commit('INITNOTELIST', res.data.data)

      })

      .catch(function (error) {

        console.log(error);

      });

  }

})
重新添加一条数据,效果如下:
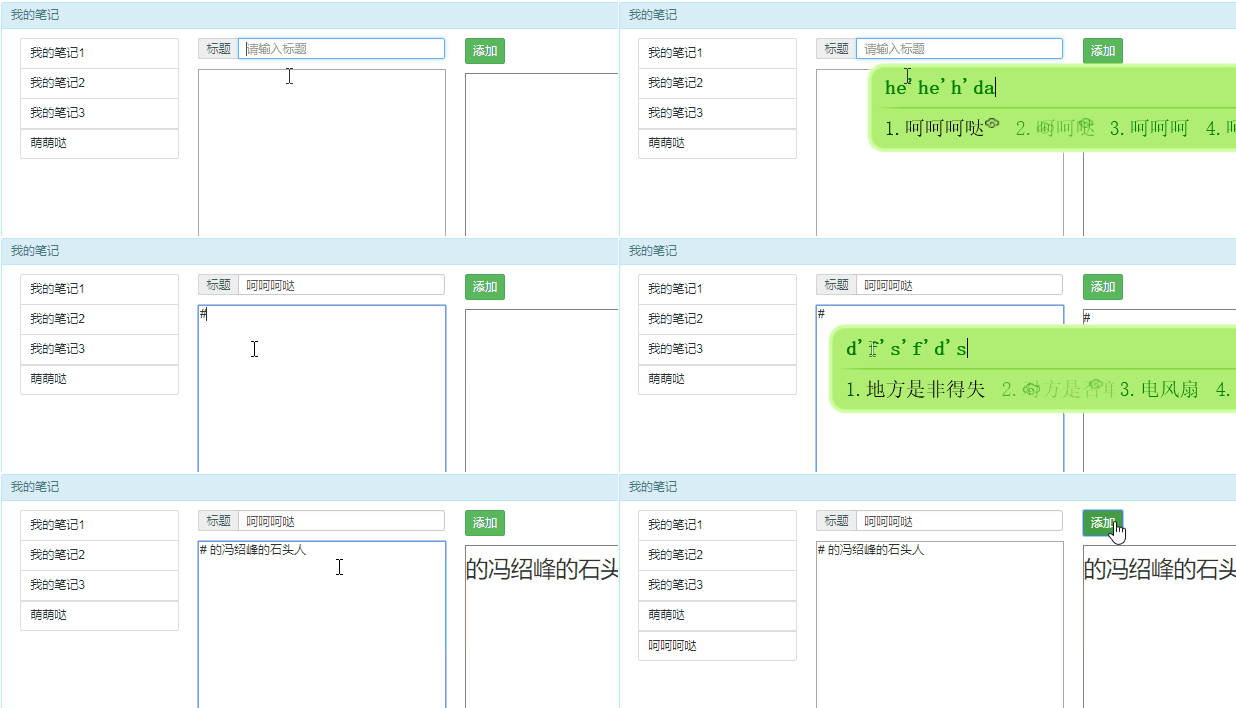
刷新页面,记录没有丢失
查看app01_note表记录,发现多了一条!
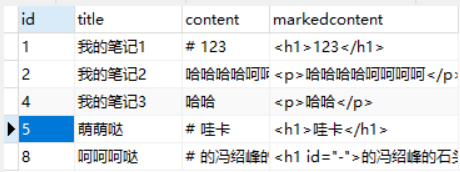
这里有一个问题,现在异步的从操作都写在了mutations里面,比如POST请求操作
但是Vuex里面规定,所有的异步操作,要放到actions里面!不能放到mutations里面
Action
Action 类似于 mutation,不同在于:
- Action 提交的是 mutation,而不是直接变更状态。
- Action 可以包含任意异步操作。
让我们来注册一个简单的 action:
const store = new Vuex.Store({

  state: {

    count: 0

  },

  mutations: {

    increment (state) {

      state.count++

    }

  },

  actions: {

    increment (context) {

      context.commit('increment')

    }

  }

})
Action 函数接受一个与 store 实例具有相同方法和属性的 context 对象,因此你可以调用 context.commit 提交一个 mutation,或者通过 context.state和 context.getters 来获取 state 和 getters。当我们在之后介绍到 Modules时,你就知道 context 对象为什么不是 store 实例本身了。
实践中,我们会经常用到 ES2015 的 参数解构 来简化代码(特别是我们需要调用 commit 很多次的时候):
actions: {

  increment ({ commit }) {

    commit('increment')

  }

}
分发 Action
Action 通过 store.dispatch 方法触发:
store.dispatch('increment')
乍一眼看上去感觉多此一举,我们直接分发 mutation 岂不更方便?实际上并非如此,还记得 mutation 必须同步执行这个限制么?Action 就不受约束!我们可以在 action 内部执行异步操作:
actions: {

  incrementAsync ({ commit }) {

    setTimeout(() => {

      commit('increment')

    }, 1000)

  }

}
Actions 支持同样的载荷方式和对象方式进行分发:
// 以载荷形式分发

store.dispatch('incrementAsync', {

  amount: 10

})

// 以对象形式分发

store.dispatch({

  type: 'incrementAsync',

  amount: 10

})
修改mian.js,将post请求部分代码移植到actions中
// The Vue build version to load with the `import` command

// (runtime-only or standalone) has been set in webpack.base.conf with an alias.

import Vue from 'vue'

import App from './App'

import router from './router'

import jQuery from 'jquery'

import Vuex from 'vuex'

import axios from 'axios'

import qs from 'qs'

Vue.use(Vuex)  //使用vuex

// 设置post请求的请求头

axios.defaults.headers.post['Content-Type'] = 'application/x-www-form-urlencoded';

// 定义一个大仓库,用来存放我项目组件中用到的数据

const store = new Vuex.Store({

  state: {

    noteList: []

  },

  mutations: {

    // 修改仓库中状态的唯一方法就是通过提交mutation

    ADDNOTE: function (state, note) {

      state.noteList.push(note)

      // 将新笔记数据添加到noteList(同步操作)

    },

    INITNOTELIST: function (state, noteList) {

      state.noteList = noteList

    }

  },

  actions: {

    // 拉取最新的笔记数据

    getNoteList: function (context, noteList) {

      axios.get('http://127.0.0.1:8000/api/notes/')

        .then((res)=> {

          console.log('我要去后端拉取笔记数据啦!');

          console.log(res.data.data)

          // 将获取到的笔记数据 放到大仓库中

          // _this.$store.state.noteList = res.data

          context.commit('INITNOTELIST', res.data.data)

        })

        .catch(function (error) {

          console.log(error);

        });

    },

    // 所有异步操作都放在这个actions中

    addNote(context, note) {

      // 先将新笔记数据post到后端 (异步操作)

      axios({

        method: 'post',

        url: 'http://127.0.0.1:8000/api/add/',

        data: qs.stringify(note)  // 将js对象转换成字符串格式

      })

        .then(function (res) {

          console.log(res)

          // 提交mutation

          context.commit('ADDNOTE', note)

        })

        .catch(function (error) {

          console.log(error)

        });

    },

  }

})

Vue.config.productionTip = false

//Web代码语法高亮库

import hljs from 'highlight.js'

import 'highlight.js/styles/monokai.css' //样式文件

Vue.directive('highlight',function (el) {

  let blocks = el.querySelectorAll('pre code');

  blocks.forEach((block)=>{

    hljs.highlightBlock(block)

  })

})

/* eslint-disable no-new */

new Vue({

  el: '#app',

  router,

  store:store, //将上面定义的大仓库与vue实例建立联系

  components: { App },

  template: '<App/>',

  beforeMount: function () {  //挂载之前操作

    // 去后端拉取笔记数据

    // 通过ajax拉取

    var _this = this;

    axios.get('http://127.0.0.1:8000/api/notes/')

      .then(function (res) {

        console.log('我要去后端拉取笔记数据啦!');

        console.log(res.data.data)

        // 将获取到的笔记数据 放到大仓库中

        // _this.$store.state.noteList = res.data

        //获取后端数据,调用commit,执行INITNOTELIST方法修改大仓库

        _this.$store.commit('INITNOTELIST', res.data.data)

      })

      .catch(function (error) {

        console.log(error);

      });

  }

})
这样的话,将异步限制在actions中。将同步操作限制在mutation中 。分工就明确了!
修改NoteEdit.vue,使用store.dispatch 方法触发,带一个参数过去
<template>

  <div class="row">

    <!-- 左边的 textarea 区域开始 -->

    <div class="col-md-6 height600">

      <div class="input-group">

        <span class="input-group-addon" id="basic-addon1">标题</span>

        <input

          v-model="title"

          type="text" class="form-control" placeholder="请输入标题" aria-describedby="basic-addon1">

      </div>

      <!-- textarea -->

      <textarea class="my-textarea"

                v-model="content"

      >

      </textarea>

    </div>

    <!-- 左边的 textarea 区域结束 -->

    <!-- 右边的 展示区 区域开始 -->

    <div class="col-md-6 height600">

      <div>

        <button v-on:click='addNote' class="btn btn-success">添加</button>

      </div>

      <!--展示原始html使用v-html-->

      <div class="right-box my-textarea"

           v-html="markedDownContent"

           v-highlight

      >

      </div>

    </div>

    <!-- 右变的 展示 区域结束 -->

  </div>

</template>

<script>

  //导入marked模块,用来处理makedown语法

  import marked from 'marked'

  export default {

    name: 'NoteEdit',

    data:function () {

      return {

        title:'',  //声明title变量

        content:''

      }

    },

    //增加计算属性

    computed:{

      markedDownContent:function(){

        return marked(this.content)

      }

    },

    methods:{

      addNote:function(){

        var noteObj = {

          title: this.title,

          content: this.content,

          markdownContent: this.markedDownContent

        }

        // 把新添加的笔记对象 发送到后端

        // this.$store.commit('ADDNOTE',noteObj)

        // 先分发action

        this.$store.dispatch('addNote',noteObj)

      }

    }

  }

</script>

<style>

  .my-textarea {

    margin-top: 15px;

    height: 80%;

    width: 100%

  }

  .height600 {

    height: 600px;

  }

  .right-box {

    border: 1px solid grey

  }

</style>
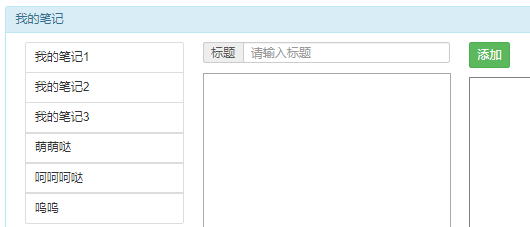
刷新网页,添加一条数据

再次刷新,网页效果如下:
单向数据流
官方解释:
prop 是单向绑定的:当父组件的属性变化时,将传导给子组件,但是不会反过来。这是为了防止子组件无意修改了父组件的状态——这会让应用的数据流难以理解。
另外,每次父组件更新时,子组件的所有 prop 都会更新为最新值。这意味着你不应该在子组件内部改变 prop。如果你这么做了,Vue 会在控制台给出警告。
看下图
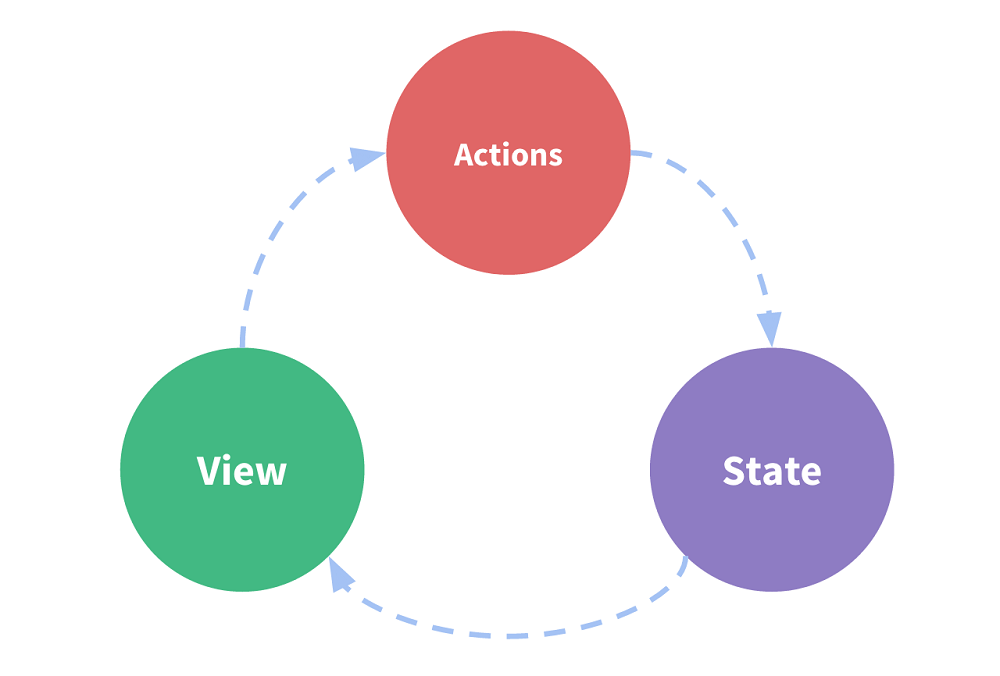
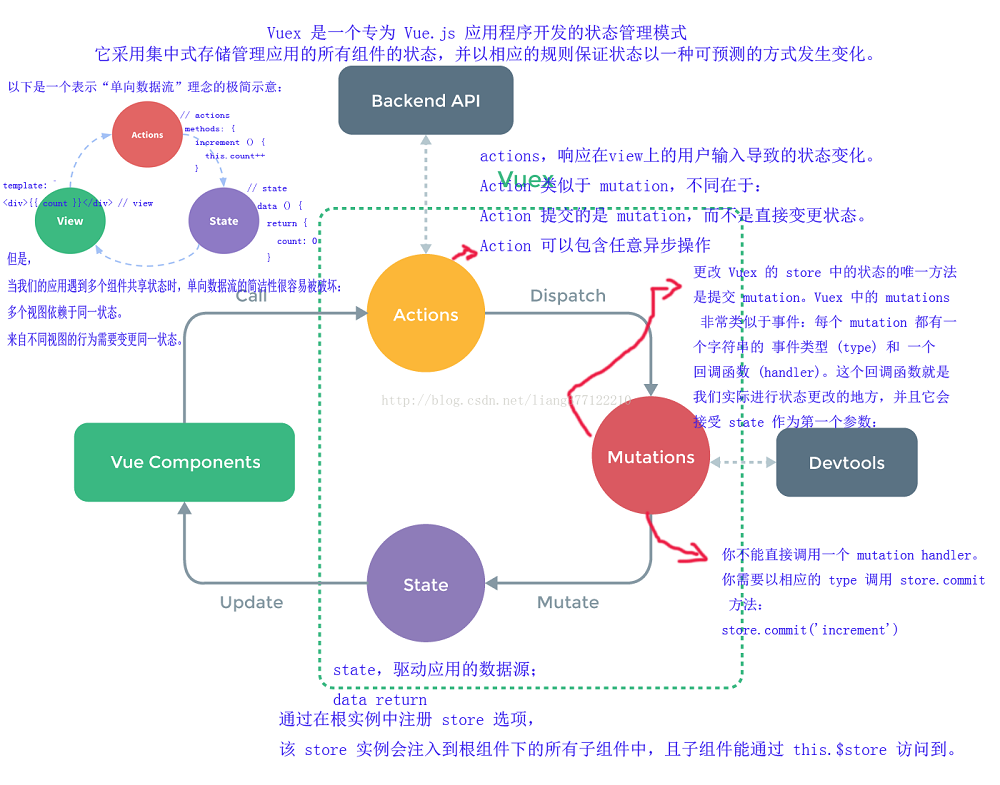
state,驱动应用的数据源;
view,以声明方式将 state 映射到视图;
actions,响应在 view 上的用户输入导致的状态变化。
单向数据流指只能从一个方向修改数据,姑且我们可以这样理解,如下图所示。一个父组件下有两个子组件1和子组件2,父组件可以向子组件传递数据。假如子组件都获取到了父组件的name,在子组件1中对name重新修改之后,子组件2和父组件中的值并不会发生改变,这正是因为Vue中的机制是单向数据流,子组件不能直接改变父组件的状态。但反过来,如果是父组件中的name修改了,当然两个子组件中的name也就改变了。
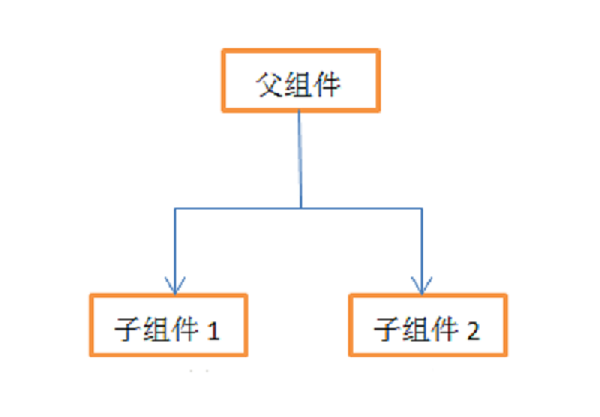
但是,当我们的应用遇到多个组件共享状态时,单向数据流的简洁性很容易被破坏:
- 多个视图依赖于同一状态。
- 来自不同视图的行为需要变更同一状态。
使用传统方式将会非常繁琐,通常会导致无法维护的代码
Vuex状态管理
组件的共享状态抽取出来,以一个全局单例模式管理,在这种模式下,我们的组件树构成了一个巨大的“视图”,不管在树的哪个位置,任何组件都能获取状态或者触发行为!
另外,通过定义和隔离状态管理中的各种概念并强制遵守一定的规则,我们的代码将会变得更结构化且易维护。
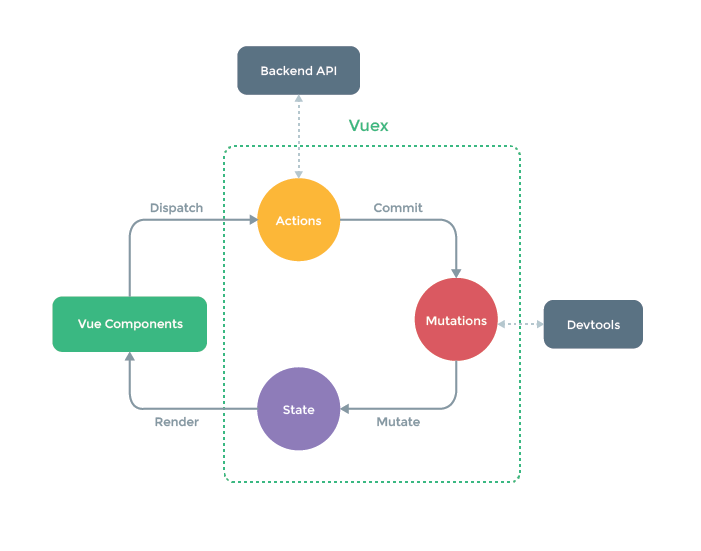
某些大神说,一看就明白了,不需要解释。那我只能呵呵!
再来看下面一张图
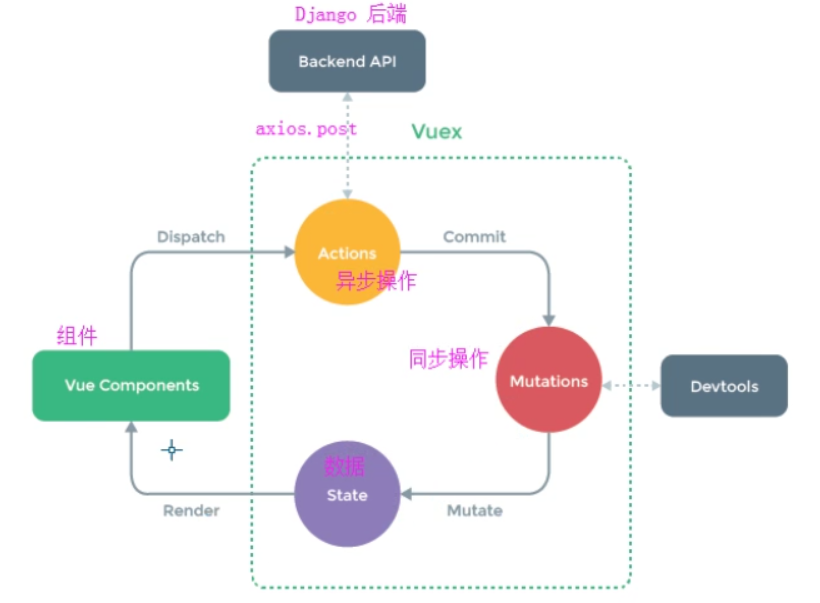
state:既然vuex是用来储存数据的,那么我们的储存地点就是这里。
render: 页面渲染
vue commponents: 页面的组件,比如输入值时
dispatch:组件分发给acitons
actions:专门用来提交mutations的,处理异步操作。它执行axios,请求后端服务器。拿到数据后,执行commit
mutations:对数据的处理都是在这里进行,处理同步操作。拿到axios的返回数据后,更新state
devtools: vue-devtools是一款基于chrome游览器的插件,用于调试vue应用
mutate:state数据变化后,页面执行render,开始重新渲染。
所以总的来说就是建立一个state,然后调用actions来提交mutations处理state中的数据,最后用getters得到state中的数据。
至于为什么要用actions来提交mutations处理state中的数据,原因是mutation 必须是同步函数,所以通过actions来调用mutations
state-->render-->vue components-->dispatch-->actions-->backend api-->commit-->mutations-->mutate
-->state-->render....
这张图描述的很棒,完整的数据流闭环,整个应用的数据流是单向的。对我们理解Vuex和Vue的组件间的通讯关系很有帮助。
网上找了一张图,解释了代码执行过程
Vuex应用场景
虽然 Vuex 可以帮助我们管理共享状态,但也附带了更多的概念和框架。这需要对短期和长期效益进行权衡。
如果您不打算开发大型单页应用,使用 Vuex 可能是繁琐冗余的。确实是如此——如果您的应用够简单,您最好不要使用 Vuex。一个简单的 store 模式就足够您所需了。但是,如果您需要构建一个中大型单页应用,您很可能会考虑如何更好地在组件外部管理状态,Vuex 将会成为自然而然的选择。引用 Redux 的作者 Dan Abramov 的话说就是:
Flux 架构就像眼镜:您自会知道什么时候需要它。
删除笔记
增加删除图标
修改NoteList.vue,改成v-bind:note=note,此时等式右边的note是一个对象。等式左边的note是变量名
<template>

  <div>

    <div class="list-group">

      <!--  在子组件声明 我需要被传入的参数

      v-for="note in NoteList"  : NoteList是一个数组对象,note是数组每一个对象

      v-bind:note='note'                  : 子组件声明,被传入的参数为note,值为note(它是一个对象)

      v-bind:key=note.id                  : for循环vue推荐绑定key,key用来标示for循环的每一项

      -->

      <NoteItem

        v-for="note in noteList"

        v-bind:note='note'

        v-bind:key="note.id"

      ></NoteItem>

    </div>

  </div>

</template>

<script>

  //导入NoteItem组件

  import NoteItem from '@/components/NoteItem.vue'

  export default {

    name: 'NoteList',

    components: {

      NoteItem

    },

    data:function(){

      return {

      }

    },

    computed:{

      noteList:function () {

        //从当前的vue实例的大仓库里找笔记列表

        return this.$store.state.noteList

      }

    }

  }

</script>

<style>

</style>
在来修改NoteItem.vue,页面渲染改成note.title和note.id
props的值改成note,因为父组件NoteList.vue将变量名改成了note了。
<template>

    <div class="list-group-item">{{note.title}}

        <span class="glyphicon glyphicon-trash pull-right"></span>

    </div>

</template>

<script>

    export default {

        name: 'NoteItem',

        props: ['note'],  // 在子组件声明 我需要被传入的参数

    }

</script>

<style>

</style>
刷新页面,效果如下:
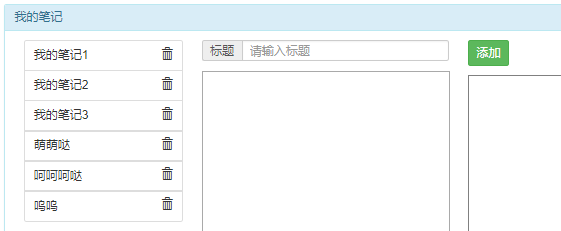
如果左侧的笔记列表是空的,查看django后端是否启动了。
浏览器打开控制台,查看Console是否有错误!
触发动作
要先发动ajax请求先去删除笔记,后端返回成功后,再发送ajax请求去拉取最新的笔记数据
比如这样:
removeNote:function(id){

        // 删除当前笔记

        // 去数据库删除该id的笔记

        this.$store.dispatch('removeNote', id)

        this.$store.dispatch('getNoteList')

      }
但是无法知道removeNote执行,到底有没有成功,因为它是异步操作!
这个时候,就需要用到组合action
组合 Action
Action 通常是异步的,那么如何知道 action 什么时候结束呢?更重要的是,我们如何才能组合多个 action,以处理更加复杂的异步流程?
首先,你需要明白 store.dispatch 可以处理被触发的 action 的处理函数返回的 Promise,并且 store.dispatch 仍旧返回 Promise:
actions: {

  actionA ({ commit }) {

    return new Promise((resolve, reject) => {

      setTimeout(() => {

        commit('someMutation')

        resolve()

      }, 1000)

    })

  }

}
现在你可以:
store.dispatch('actionA').then(() => {

  // ...

})
在另外一个 action 中也可以:
actions: {

  // ...

  actionB ({ dispatch, commit }) {

    return dispatch('actionA').then(() => {

      commit('someOtherMutation')

    })

  }

}
最后,如果我们利用 async / await,我们可以如下组合 action:
// 假设 getData() 和 getOtherData() 返回的是 Promise

actions: {

  async actionA ({ commit }) {

    commit('gotData', await getData())

  },

  async actionB ({ dispatch, commit }) {

    await dispatch('actionA') // 等待 actionA 完成

    commit('gotOtherData', await getOtherData())

  }

}
一个 store.dispatch 在不同模块中可以触发多个 action 函数。在这种情况下,只有当所有触发函数完成后,返回的 Promise 才会执行。
修改NoteItem.vue,绑定点击事件,执行dispatch
<template>

  <!--渲染name变量-->

  <div class="list-group-item">{{note.title}}

    <span

      v-on:click='removeNote(note.id)'

      class="glyphicon glyphicon-trash pull-right"

    ></span>

  </div>

</template>

<script>

  export default {

    name: 'NoteItem',

    props: ['note'],  // 在子组件声明 我需要被传入的参数

    methods:{

      removeNote:function(id){

        // 删除当前笔记

        // 去数据库删除该id的笔记

        this.$store.dispatch('removeNote', id)

          .then(()=>{

            this.$store.dispatch('getNoteList')  // 再发送ajax请求去拉取最新的笔记数据

          })  // 发动ajax请求先去删除笔记

          .catch(function(err){

            console.log('这是在Noteitem组件中捕获到的错误')

            console.log(err)

          })

      }

    }

  }

</script>

<style>

</style>
修改main.js,增加删除方法
// The Vue build version to load with the `import` command

// (runtime-only or standalone) has been set in webpack.base.conf with an alias.

import Vue from 'vue'

import App from './App'

import router from './router'

import jQuery from 'jquery'

import Vuex from 'vuex'

import axios from 'axios'

import qs from 'qs'

Vue.use(Vuex)  //使用vuex

// 设置post请求的请求头

axios.defaults.headers.post['Content-Type'] = 'application/x-www-form-urlencoded';

// 定义一个大仓库,用来存放我项目组件中用到的数据

const store = new Vuex.Store({

  state: {

    noteList: []

  },

  mutations: {

    // 修改仓库中状态的唯一方法就是通过提交mutation

    ADDNOTE: function (state, note) {

      state.noteList.push(note)

      // 将新笔记数据添加到noteList(同步操作)

    },

    INITNOTELIST: function (state, noteList) {

      state.noteList = noteList

    }

  },

  actions: {

    // 拉取最新的笔记数据

    getNoteList: function (context, noteList) {

      axios.get('http://127.0.0.1:8000/api/notes/')

        .then((res)=> {

          console.log('我要去后端拉取笔记数据啦!');

          console.log(res.data.data)

          // 将获取到的笔记数据 放到大仓库中

          // _this.$store.state.noteList = res.data

          context.commit('INITNOTELIST', res.data.data)

        })

        .catch(function (error) {

          console.log(error);

        });

    },

    // 所有异步操作都放在这个actions中

    addNote(context, note) {

      // 先将新笔记数据post到后端 (异步操作)

      axios({

        method: 'post',

        url: 'http://127.0.0.1:8000/api/add/',

        data: qs.stringify(note)  // 将js对象转换成字符串格式

      })

        .then(function (res) {

          console.log(res)

          // 提交mutation

          context.commit('ADDNOTE', note)

        })

        .catch(function (error) {

          console.log(error)

        });

    },

    // 删除笔记的异步操作

    removeNote(context, id) {

      return new Promise(function (resolve, reject) {

        // 先将新笔记数据post到后端 (异步操作)

        axios({

          method: 'get',

          url: 'http://127.0.0.1:8000/api/delete/' + id,

        })

          .then(function (res) {

            console.log(res)

            // 提交mutation

            // 删除成功之后要再去拉取最新的笔记数据

            resolve()

          })

          .catch(function (error) {

            console.log(error)

            reject(error)

          });

      })

    }

  }

})

Vue.config.productionTip = false

//Web代码语法高亮库

import hljs from 'highlight.js'

import 'highlight.js/styles/monokai.css' //样式文件

Vue.directive('highlight',function (el) {

  let blocks = el.querySelectorAll('pre code');

  blocks.forEach((block)=>{

    hljs.highlightBlock(block)

  })

})

/* eslint-disable no-new */

new Vue({

  el: '#app',

  router,

  store:store, //将上面定义的大仓库与vue实例建立联系

  components: { App },

  template: '<App/>',

  beforeMount: function () {  //挂载之前操作

    // 去后端拉取笔记数据

    // 通过ajax拉取

    var _this = this;

    axios.get('http://127.0.0.1:8000/api/notes/')

      .then(function (res) {

        console.log('我要去后端拉取笔记数据啦!');

        console.log(res.data.data)

        // 将获取到的笔记数据 放到大仓库中

        // _this.$store.state.noteList = res.data

        //获取后端数据,调用commit,执行INITNOTELIST方法修改大仓库

        _this.$store.commit('INITNOTELIST', res.data.data)

      })

      .catch(function (error) {

        console.log(error);

      });

  }

})
刷新网页,点击删除一个,效果如下:
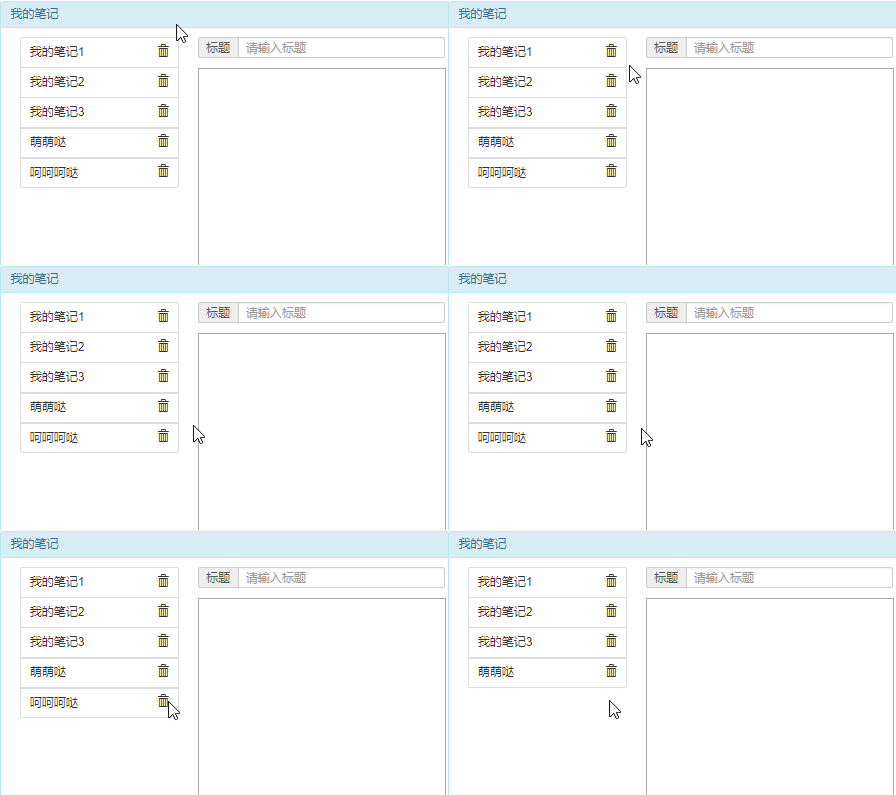
查看表app01_note的数据,发现少了一条

前端+后端完整代码,访问github
https://github.com/987334176/MyNotes
python 全栈开发,Day93(vue内容补充,VueX)的更多相关文章
- python全栈开发学习_内容目录及链接
python全栈开发学习_day1_计算机五大组成部分及操作系统 python全栈开发学习_day2_语言种类及变量 python全栈开发_day3_数据类型,输入输出及运算符 python全栈开发_ ...
- python 全栈开发,Day85(Git补充,随机生成图片验证码)
昨日内容回顾 第一部分:django相关 1.django请求生命周期 1. 当用户在浏览器中输入url时,浏览器会生成请求头和请求体发给服务端 请求头和请求体中会包含浏览器的动作(action),这 ...
- python 全栈开发,Day112(内容回顾,单例模式,路由系统,stark组件)
一.内容回顾 类可否作为字典的key 初级 举例: class Foo(object): pass _registry = { Foo:123 } print(_registry) 执行输出: {&l ...
- python全栈开发day92-day96 Vue总结
-- ES6常用语法 -- var let const -- 模板字符串 -- 反引号 -- ${} -- 箭头函数 -- 普通函数取决于函数最近的调用者 -- 箭头函数取决当前环境 -- 类 -- ...
- 老男孩最新Python全栈开发视频教程(92天全)重点内容梳理笔记 看完就是全栈开发工程师
为什么要写这个系列博客呢? 说来讽刺,91年生人的我,同龄人大多有一份事业,或者有一个家庭了.而我,念了次985大学,年少轻狂,在大学期间迷信创业,觉得大学里的许多课程如同吃翔一样学了几乎一辈子都用不 ...
- Python全栈开发【基础二】
Python全栈开发[基础二] 本节内容: Python 运算符(算术运算.比较运算.赋值运算.逻辑运算.成员运算) 基本数据类型(数字.布尔值.字符串.列表.元组.字典) 其他(编码,range,f ...
- python 全栈开发,Day99(作业讲解,DRF版本,DRF分页,DRF序列化进阶)
昨日内容回顾 1. 为什么要做前后端分离? - 前后端交给不同的人来编写,职责划分明确. - API (IOS,安卓,PC,微信小程序...) - vue.js等框架编写前端时,会比之前写jQuery ...
- Python全栈开发【面向对象进阶】
Python全栈开发[面向对象进阶] 本节内容: isinstance(obj,cls)和issubclass(sub,super) 反射 __setattr__,__delattr__,__geta ...
- Python全栈开发【面向对象】
Python全栈开发[面向对象] 本节内容: 三大编程范式 面向对象设计与面向对象编程 类和对象 静态属性.类方法.静态方法 类组合 继承 多态 封装 三大编程范式 三大编程范式: 1.面向过程编程 ...
随机推荐
- 即将上线的Spark服务器面临的一系列填坑笔记
即将上线的Spark服务器面临的一系列填坑笔记 作者:尹正杰 版权声明:原创作品,谢绝转载!否则将追究法律责任. 把kafka和flume倒腾玩了,以为可以轻松一段时间了,没想到使用CDH部署的spa ...
- Git,Github和Gitlab简介和基本使用
什么是Git Git是一个版本控制系统(Version Control System,VCS). 版本控制是一种记录一个或若干文件内容变化,以便将来查阅特定版本修订情况的系统. 多年前,我在法国做第一 ...
- 【C++ STL】Set和Multiset
1.结构 set和multiset会根据特定的排序原则将元素排序.两者不同之处在于,multisets允许元素重复,而set不允许重复. 只要是assignable.copyable.comparab ...
- JMS学习(八)-ActiveMQ Consumer 使用 push 还是 pull 获取消息
ActiveMQ是一个消息中间件,对于消费者而言有两种方式从消息中间件获取消息: ①Push方式:由消息中间件主动地将消息推送给消费者:②Pull方式:由消费者主动向消息中间件拉取消息.看一段官网对P ...
- DotNetBar ButtonX添加下拉面板
1. 2.在窗口上放一个控件 Control选择这个控件,即可,如果想让textBox下拉面板,需要使用textBoxDropDown,而不是textBoxX,DotNetBar的命名很奇怪.
- pip 报错
pip 安装 初始化系统 安装PiP 问题? 依赖包:yun install wget gcc gcc-c++ -y python 环境 wget http://www.python.org/ftp/ ...
- python - class propert应用
propert应用 #方式一: # class Student(object): # def __init__(self,name,sc): # self.name = name # self.sc ...
- PHP - CentOS下开发运行环境搭建(Apache+PHP+MySQL+FTP)
本文介绍如何在 Linux下搭建一个 PHP 环境.其中 Linux 系统使用是 CentOS 7.3,部署在阿里云服务器上. 1,连接登录服务器 拿到服务器的 ip.初始密码以后.我们先通过远程 ...
- 跟踪OceanLotus的新下载程序KerrDown
攻击的方法 两种方法将KerrDown下载器传递给目标.一个是使用带有恶意宏的Microsoft Office文档,另一个是包含带有DLL side-loading合法程序的RAR存档 .对于RAR存 ...
- AWTK(Toolkit AnyWhere): 为嵌入式、手机和桌面开发的通用GUI【转】
转自:https://blog.csdn.net/absurd/article/details/80958279 AWTK = Toolkit AnyWhere AWTK是吸取了FTK和CanTK的精 ...
