iptables之路由网关共享上网/端口映射
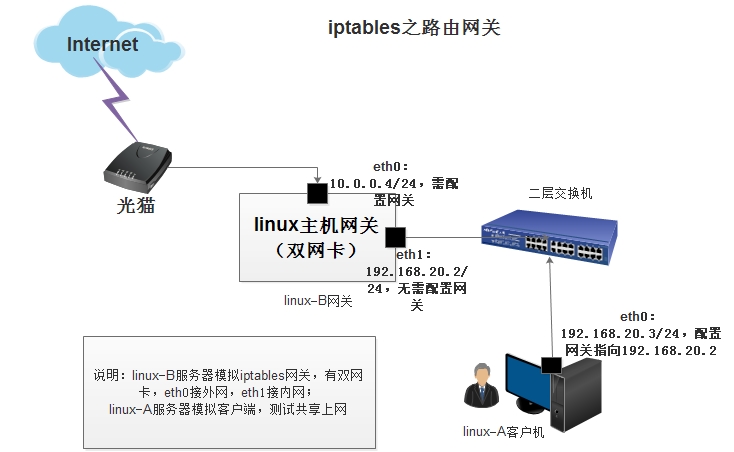
linux-A 主机配置eth0即可:
[root@linux-A ~]# ifconfig eth0|sed -n '2p'

inet addr:192.168.20.3 Bcast:192.168.20.255 Mask:255.255.255.0

[root@linux-A ~]# route -n

Kernel IP routing table

Destination Gateway Genmask Flags Metric Ref Use Iface

192.168.20.0 0.0.0.0 255.255.255.0 U 0 0 0 eth0

169.254.0.0 0.0.0.0 255.255.0.0 U 1002 0 0 eth0

0.0.0.0 192.168.20.2 0.0.0.0 UG 0 0 0 eth0

[root@linux-A ~]# /etc/init.d/iptables status

iptables: Firewall is not running.
linux-B网关服务器配置及步骤:
1.先配置好每个网卡的IP地址(linux-B的eth0必须要可以上外网),并置零所有规则和计数器
[root@linux-B ~]# ifconfig eth0|sed -n '2p'

inet addr:10.0.0.4 Bcast:10.0.0.255 Mask:255.255.255.0

[root@linux-B ~]# ifconfig eth1|sed -n '2p'        #<===无需配置网关

inet addr:192.168.20.2 Bcast:192.168.20.255 Mask:255.255.255.0

[root@linux-B ~]# route -n

Kernel IP routing table

Destination Gateway Genmask Flags Metric Ref Use Iface

192.168.20.0 0.0.0.0 255.255.255.0 U 0 0 0 eth1

10.0.0.0 0.0.0.0 255.255.255.0 U 0 0 0 eth0

169.254.0.0 0.0.0.0 255.255.0.0 U 1002 0 0 eth0

169.254.0.0 0.0.0.0 255.255.0.0 U 1003 0 0 eth1

0.0.0.0 10.0.0.254 0.0.0.0 UG 0 0 0 eth0

[root@linux-B~]# iptables -F

[root@linux-B~]# iptables -X

[root@linux-B~]# iptables -Z

[root@linux-B ~]# iptables -P FORWARD ACCEPT

[root@linux-B ~]# iptables -L -n      #<==实验时确保以下为允许状态,然后关闭iptables防火墙测试

Chain INPUT (policy ACCEPT)

target     prot opt source               destination

Chain FORWARD (policy ACCEPT)

target     prot opt source               destination

Chain OUTPUT (policy ACCEPT)

target     prot opt source               destination
[root@ B-linux ~]# /etc/init.d/iptables stop #<==先配置好网关,共享上网成功后再看情况开防火墙,表不同,先一个表调整好再调整另一个表
2.linux-B服务器主机开启 ip_forward 转发功能,并加载相应的模块
[root@linux-B ~]# grep "ip_forward" /etc/sysctl.conf

net.ipv4.ip_forward = 1        #<==确保转发功能开启

[root@linux-B ~]# sysctl -p

[root@linux-B~]# modprobe ip_tables

[root@linux-B~]# modprobe iptable_filter

[root@linux-B~]# modprobe iptable_nat

[root@linux-B~]# modprobe ip_conntrack

[root@linux-B~]# modprobe ip_conntrack_ftp

[root@linux-B ~]# modprobe ip_nat_ftp

[root@linux-B ~]# lsmod |egrep ^ip      #<===确保模块加载,模块加载最好放在 /etc/rc.local 下
3.配置地址转换实现共享上网(POSTROUTING链)
[root@linux-B ~]# iptables -t nat -A POSTROUTING -s 192.168.20.0/24 -o eth0 -j SNAT --to-source 10.0.0.4
参数说明:
-s 192.168.20.0/24                       类似生产环境中的内网网段
-o eth0                                  类似路由器中,有外网IP网卡的接口
-j SNAT --to-source 10.0.0.4             将内网网段IP地址及端口转换为外网IP地址及端口
或使用以下命令也可以实现地址转换
[root@linux-B ~]# iptables -t nat -A POSTROUTING -s 192.168.20.0/24 -o eth0 -j MASQUERADE #<==将外网eth0接口动态获取的IP地址作为地址转换
4.配置目的地址转换/端口转换(PREROUTING链)
[root@linux-B ~]# iptables -t nat -A PREROUTING -i eth0 -d 10.0.0.4 -p tcp --dport 80 -j DNAT --to-destination 192.168.20.3:8080
5.在linux-A主机上ping测试,或其他方法测试查看转换是否成功
[root@linux-A ~]# traceroute www.baidu.com

traceroute to www.baidu.com (14.215.177.39), 30 hops max, 60 byte packets

1 192.168.20.2 (192.168.20.2) 0.421 ms 0.284 ms 0.362 ms

2 10.0.0.254 (10.0.0.254) 0.643 ms 0.734 ms 0.627 ms

[root@linux-A ~]# curl -I www.baidu.com

HTTP/1.1 200 OK

[root@linux-B ~]# iptables -L -n -t nat

Chain PREROUTING (policy ACCEPT)

target prot opt source destination

Chain POSTROUTING (policy ACCEPT)

target prot opt source destination

SNAT all -- 192.168.20.0/24 0.0.0.0/0 to:10.0.0.4

Chain OUTPUT (policy ACCEPT)

target prot opt source destination
提示:更好的方法是利用脚本进行管理,参考脚本如下(脚本来源:老男孩老师QQ49000448)
#!/bin/bash

#!/bin/bash

#this is a server firewall created by oldboy 17:03 2006-7-26

# e_mail:31333741@qq.com

# qqinfo:49000448

# function: a server firewall

# version:1.1

################################################

# oldboy trainning info.

# QQ 1986787350 70271111

# site:http://www.etiantian.org

# blog:http://oldboy.blog.51cto.com

# oldboy trainning QQ group: 208160987 45039636

################################################

#define variable PATH

IPT=/sbin/iptables

LAN_GW_IP=192.168.0.15

WAN_GW_IP=10.0.0.15

LAN_SERVER=192.168.0.14

echo 1 > /proc/sys/net/ipv4/ip_forward

modprobe ip_tables

modprobe iptable_filter

modprobe iptable_nat

modprobe ip_conntrack

modprobe ip_conntrack_ftp

modprobe ip_nat_ftp

modprobe ipt_state

#Remove any existing rules

$IPT -F

$IPT -X

#setting default firewall policy

$IPT --policy OUTPUT ACCEPT

$IPT --policy FORWARD ACCEPT

$IPT -P INPUT DROP

#setting for loopback interface

$IPT -A INPUT -i lo -j ACCEPT

$IPT -A OUTPUT -o lo -j ACCEPT

$IPT -A INPUT -m state --state INVALID -j DROP

$IPT -A OUTPUT -m state --state INVALID -j DROP

# Source Address Spoofing and Other Bad Addresses

$IPT -A INPUT -i eth0 -s 172.16.0.0/12 -j DROP

$IPT -A INPUT -i eth0 -s 0.0.0.0/8 -j DROP

$IPT -A INPUT -i eth0 -s 169.254.0.0/16 -j DROP

$IPT -A INPUT -i eth0 -s 192.0.2.0/24 -j DROP

# prevent all Stealth Scans and TCP State Flags

$IPT -A INPUT -p tcp --tcp-flags ALL ALL -j DROP

# All of the bits are cleared

$IPT -A INPUT -p tcp --tcp-flags ALL NONE -j DROP

$IPT -A INPUT -p tcp --tcp-flags ALL FIN,URG,PSH -j DROP

#SYN and RST are both set

$IPT -A INPUT -p tcp --tcp-flags SYN,RST SYN,RST -j DROP

# SYN and FIN are both set

$IPT -A INPUT -p tcp --tcp-flags SYN,FIN SYN,FIN -j DROP

# FIN and RST are both set

$IPT -A INPUT -p tcp --tcp-flags FIN,RST FIN,RST -j DROP

# FIN is the only bit set, without the expected accompanying ACK

$IPT -A INPUT -p tcp --tcp-flags ACK,FIN FIN -j DROP

# PSH is the only bit set, without the expected accompanying ACK

$IPT -A INPUT -p tcp --tcp-flags ACK,PSH PSH -j DROP

# URG is the only bit set, without the expected accompanying ACK

$IPT -A INPUT -p tcp --tcp-flags ACK,URG URG -j DROP

#setting access rules

#one,ip access rules,allow all the ips of hudong.com

$IPT -A INPUT -s 202.81.17.0/24 -p all -j ACCEPT

$IPT -A INPUT -s 202.81.18.0/24 -p all -j ACCEPT

$IPT -A INPUT -s 124.43.62.96/27 -p all -j ACCEPT

$IPT -A INPUT -s 192.168.1.0/24 -p all -j ACCEPT

$IPT -A INPUT -s 10.0.0.0/24 -p all -j ACCEPT

#second,port access rules

#nagios

$IPT -A INPUT -s 192.168.1.0/24 -p tcp --dport 5666 -j ACCEPT

$IPT -A INPUT -s 202.81.17.0/24 -p tcp --dport 5666 -j ACCEPT

$IPT -A INPUT -s 202.81.18.0/24 -p tcp --dport 5666 -j ACCEPT

#db

$IPT -A INPUT -s 192.168.1.0/24 -p tcp --dport 3306 -j ACCEPT

$IPT -A INPUT -s 192.168.1.0/24 -p tcp --dport 3307 -j ACCEPT

$IPT -A INPUT -s 192.168.1.0/24 -p tcp --dport 3308 -j ACCEPT

$IPT -A INPUT -s 192.168.1.0/24 -p tcp --dport 1521 -j ACCEPT

#ssh difference from other servers here.........................................................>>

$IPT -A INPUT -s 202.81.17.0/24 -p tcp --dport 50718 -j ACCEPT

$IPT -A INPUT -s 202.81.18.0/24 -p tcp --dport 50718 -j ACCEPT

$IPT -A INPUT -s 124.43.62.96/27 -p tcp --dport 50718 -j ACCEPT

$IPT -A INPUT -s 192.168.1.0/24 -p tcp --dport 50718 -j ACCEPT

$IPT -A INPUT -p tcp --dport 22 -j ACCEPT

#ftp

#$IPT -A INPUT -p tcp --dport 21 -j ACCEPT

#http

$IPT -A INPUT -p tcp --dport 80 -j ACCEPT

$IPT -A INPUT -s 192.168.1.0/24 -p tcp -m multiport --dport 8080,8081,8082,8888,8010,8020,8030,8150 -j ACCEPT

$IPT -A INPUT -s 202.81.17.0/24 -p tcp -m multiport --dport 8080,8081,8082,8888,8010,8020,8030,8150 -j ACCEPT

$IPT -A INPUT -s 124.43.62.96/27 -p tcp -m multiport --dport 8080,8081,8082,8888,8010,8020,8030,8150 -j ACCEPT

#snmp

$IPT -A INPUT -s 192.168.1.0/24 -p UDP --dport 161 -j ACCEPT

$IPT -A INPUT -s 202.81.17.0/24 -p UDP --dport 161 -j ACCEPT

$IPT -A INPUT -s 202.81.18.0/24 -p UDP --dport 161 -j ACCEPT

#rsync

$IPT -A INPUT -s 192.168.1.0/24 -p tcp -m tcp --dport 873 -j ACCEPT

$IPT -A INPUT -s 202.81.17.0/24 -p tcp -m tcp --dport 873 -j ACCEPT

$IPT -A INPUT -s 202.81.18.0/24 -p tcp -m tcp --dport 873 -j ACCEPT

$IPT -A INPUT -s 124.43.62.96/27 -p tcp -m tcp --dport 873 -j ACCEPT

#nfs 2049,portmap 111

$IPT -A INPUT -s 192.168.1.0/24 -p udp -m multiport --dport 111,892,2049 -j ACCEPT

$IPT -A INPUT -s 192.168.1.0/24 -p tcp -m multiport --dport 111,892,2049 -j ACCEPT

#others RELATED

#$IPT -A INPUT -p icmp -m icmp --icmp-type any -j ACCEPT

$IPT -A INPUT -s 124.43.62.96/27 -p icmp -m icmp --icmp-type any -j ACCEPT

$IPT -A INPUT -s 192.168.1.0/24 -p icmp -m icmp --icmp-type any -j ACCEPT

$IPT -A INPUT -m state --state ESTABLISHED,RELATED -j ACCEPT

$IPT -A OUTPUT -m state --state ESTABLISHED,RELATED -j ACCEPT

###############nat start##############################

#nat internet

iptables -t nat -A POSTROUTING -s 192.168.0.0/255.255.255.0 -o eth1 -j SNAT --to-source $LAN_GW_IP

#www server nat wan to lan

iptables -t nat -A PREROUTING -d $WAN_GW_IP -p tcp -m tcp --dport 80 -j DNAT --to-destination $$LAN_SERVER:80

iptables -t nat -A POSTROUTING -d $LAN_SERVER -p tcp --dport 80 -j SNAT --to LAN_GW_IP
更多内幕知识及原理深入了解,看下面好友链接
http://www.cnblogs.com/f-ck-need-u/p/7397146.html
iptables之路由网关共享上网/端口映射的更多相关文章
- ROS2.9.27架设网吧软路由实战篇之端口映射与回流
转载:http://blog.csdn.net/zm2714/article/details/7924280 上一篇:ROS2.9.27架设网吧软路由实战篇之连通网络,主要讲述了网吧架设软路由ROS2 ...
- ubuntu12.04单卡server(mentohust认证)再加上交换机做路由软件共享上网
最近成立了实验室的网络环境中,通过交换机连接的所有主机实验室.想要一个通过该server(单卡)做网关,使用mentohust认证外网,然后内网中的其它主机通过此网关来连接外网. 1.首先在serve ...
- iptables、防火墙配置、NAT端口映射
一,配置一个filter表放火墙 (1)查看本机关于IPTABLES的设置情况 [root@tp ~]# iptables -L -n Chain INPUT (policy ACCEPT) targ ...
- 使用iptables为docker容器动态添加端口映射
1.将当前iptables的配置写入保存到/etc/sysconfig/iptables 2.保存 /etc/init.d/iptables sava 3.修改iptables配置(vi /etc/s ...
- Hyper-V端口映射
有时候我们为了让局域网或外网用户直接远程访问或访问虚拟机里的服务,可以将实机端口直接映射到Hyper-V的虚拟机里面,省去很多麻烦. 下面是hyper-v共享IP端口映射一些常用命令共享IP端口映射一 ...
- iptables filter表 案例、iptables nat表的路由功能 、端口映射
1.小案例 #!/bin/bashipt="/usr/sbin/iptables"$ipt -F$ipt -P INPUT DROP$ipt -P OUTPUT ACCEPT$ip ...
- iptables nat及端口映射
iptables nat及端口映射 发布: 2010-6-11 15:05 | 作者: admin | 来源: SF NetWork 门户网站 iptables 应用初探(nat+三层访问控制) ip ...
- ip route,ip rule, iptables和docker的端口映射
iptables 默认5个表, 不可增加其他表 raw 用于配置数据包,raw 中的数据包不会被系统跟踪. filter 是用于存放所有与防火墙相关操作的默认表. nat 用于 网络地址转换(例如:端 ...
- Hyper-V 共享式网络链接 端口映射
远程路由访问我配置了很久都不成功,经过多方搜索,现面的命令能实现端口映射一.查询端口映射情况netsh interface portproxy show v4tov4查询这个IP所有的端口映射.net ...
随机推荐
- NETCore下IConfiguration和IOptions的用法
NETCore下IConfiguration和IOptions的用法 https://www.cnblogs.com/RainingNight/p/strongly-typed-options-con ...
- springcloud复习1
1.SpringCloud是什么?SpringCloud=分布式微服务架构下的一站式解决方案,是各个微服务架构落地技术的集合体,俗称微服务全家桶. 2.SpringCloud和SpringBoot是什 ...
- python3迭代器
一.前提 1.dir()函数 dir()函数带参数时,返回参数的属性和方法列表:不带参数时,返回当前范围内变量.方法和定义的类型列表 # dir(参数):带参数,返回参数的属性和方法 s = '' p ...
- FindBugs报错
FindBugs是基于Bug Patterns概念,查找javabytecode(.class文件)中的潜在bug,主要检查bytecode中的bug patterns,如NullPoint空指针检查 ...
- Sublime Text 3 部分安装过程记录
概览: Sublime Text 3下载网址 Package Control的安装 Install Package报错(There are no packages availabel for inst ...
- Windows10 java环境配置
1.下载 JDK 下载地址:https ://www.oracle.com/technetwork/java/javase/downloads/index-jsp-138363.html 点击下载按钮 ...
- 时间序列数据库(TSDB)初识与选择
时间序列数据库(TSDB)初识与选择 本文作者由 MageByte 团队的 「借来方向」编写,关注公众号 给你更多硬核技术 背景 这两年互联网行业掀着一股新风,总是听着各种高大上的新名词.大数据.人工 ...
- ios--->泛型
泛型 开发中使用场景: 1.限制集合中的类型,只能检测方法的调用,因为声明的泛型只能存在方法中 2.当一个类在声明的时候,某个对象的属性不确定,只有创建对象的时候才能确定,就可以使用泛型. 使用泛型的 ...
- [Codeforces 1228E]Another Filling the Grid(组合数+容斥)
题目链接 解题思路: 容斥一下好久可以得到式子 \(\sum_{i=0}^{n}\sum_{j=0}^{n}(-1)^{i+j}C_n^iC_n^j(k-1)^{ni+nj-ij}k^{n^2-(ni ...
- centos7安装mysql5.5.62
mysql是我们最常用的开源的关系型数据库,mysql不同版本有时候安装的方式也不尽相同,下面梳理一下mysql5.5.62版本的安装 1.下载mysql5.5.62,URL:https://down ...