Linux系统实时数据同步inotify+rsync
一、inotify简介
inotify是Linux内核的一个功能,它能监控文件系统的变化,比如删除、读、写和卸载等操作。它监控到这些事件的发生后会默认往标准输出打印事件信息。要使用inotify,Linux内核版本必须是大于2.6.13,在这之前的内核都没有这个功能。我们可以利用inotify去监控我们要监控的资源,当资源发生变化时,我们扑捉它的事件,从而触发同步数据等操作。
二、inotify软件介绍
inotify是内核的一个功能,众所周知内核的功能我们必须要配合工具才能使用,通常情况下用户要使用内核的功能,都需要用户空间的软件去调用才可以达到使用内核的功能的目的,用户是无法直接操内核的。实现inotify软件有inotify-tools、sersync、lrsyncd。我们这里以inotify-tools这个软件包为例进行实验;inotify-tools包主要有两个文件,一个是inotifywait: 在被监控的文件或目录上等待特定文件系统事件(open close delete等)发生,常用于实时同步的目录监控;一个是inotifywatch:收集被监控的文件系统使用的统计数据,指文件系统事件发生的次数统计。通常情况下我们使用iontifywait就可以了。接下来我们来安装inotify-tools
三、inotify软件安装和使用
首先我们要确认我们手上的Linux系统是否支持inotify这个功能
[root@test ~]# uname -r

3.10.0-957.27.2.el7.x86_64

[root@test ~]# ll /proc/sys/fs/inotify/

总用量 0

-rw-r--r-- 1 root root 0 1月  31 16:29 max_queued_events

-rw-r--r-- 1 root root 0 1月  31 16:29 max_user_instances

-rw-r--r-- 1 root root 0 1月  31 16:29 max_user_watches

[root@test ~]#
提示:如果我们的内核版本高于2.6.13,并且有/proc/sys/fs/inotify/目录,说明我们的系统上支持inotify功能的
inotify内核参数说明
我们在/proc/sys/fs/inotify这个目录下看到有三个文件,这三个文件就是记录inotify的内核参数的文件。其中max_queued_events这个文件记录inotify事件队列最大长度,如值太小会报Event Queue Overflow 错误,默认值:16384,当然这个值是可以更改的,临时更改可以用echo 命令加上值给重定向到这个文件中。永久修改需要修改编辑/etc/sysctl.conf
[root@test ~]# cat /proc/sys/fs/inotify/max_queued_events

16384

[root@test ~]# echo 'fs.inotify.max_queued_events=999999' >> /etc/sysctl.conf

[root@test ~]# cat /etc/sysctl.conf

# sysctl settings are defined through files in

# /usr/lib/sysctl.d/, /run/sysctl.d/, and /etc/sysctl.d/.

#

# Vendors settings live in /usr/lib/sysctl.d/.

# To override a whole file, create a new file with the same in

# /etc/sysctl.d/ and put new settings there. To override

# only specific settings, add a file with a lexically later

# name in /etc/sysctl.d/ and put new settings there.

#

# For more information, see sysctl.conf(5) and sysctl.d(5).

fs.inotify.max_queued_events=999999

[root@test ~]# sysctl -p

fs.inotify.max_queued_events = 999999

[root@test ~]# cat /proc/sys/fs/inotify/max_queued_events

999999

[root@test ~]#
提示:修改内核其他参数,也是是类似的方法。
max_user_watches:这个文件主要存放单个进程监控文件的数量,默认是8129;生产环境中如果监控的文件数量庞大,可以通过上面的方式去修改这个值
max_user_instances:这个文件存放用户创建inotify实例的最大值,默认是128;同样也是可以通过上面的方式修改
inotify软件安装
参考文档https://github.com/rvoicilas/inotify-tools/wiki
inotify是基于epel源,在用yum安装前请先配好yum源
[root@test ~]# yum info inotify-tools

已加载插件:fastestmirror

Loading mirror speeds from cached hostfile

 * base: mirrors.aliyun.com

 * extras: mirrors.aliyun.com

 * updates: mirrors.aliyun.com

可安装的软件包

名称    :inotify-tools

架构    :x86_64

版本    :3.14

发布    :9.el7

大小    :51 k

源    :epel/x86_64

简介    : Command line utilities for inotify

网址    :http://inotify-tools.sourceforge.net/

协议    : GPLv2

描述    : inotify-tools is a set of command-line programs for Linux providing

         : a simple interface to inotify. These programs can be used to monitor

         : and act upon filesystem events.

[root@test ~]#
提示:如果用yum可以看到inotify-tools的说明信息,说明你的Linux yum仓库里有这个软件包,可以直接yum 安装即可
[root@test ~]# yum install -y inotify-tools

已加载插件:fastestmirror

Loading mirror speeds from cached hostfile

 * base: mirrors.aliyun.com

 * extras: mirrors.aliyun.com

 * updates: mirrors.aliyun.com

base                                                                                                      | 3.6 kB  00:00:00

dockerrepo                                                                                                | 2.9 kB  00:00:00

epel                                                                                                      | 5.3 kB  00:00:00

extras                                                                                                    | 2.9 kB  00:00:00

updates                                                                                                   | 2.9 kB  00:00:00

updates/7/x86_64/primary_db                                                                               | 5.9 MB  00:00:01

正在解决依赖关系

--> 正在检查事务

---> 软件包 inotify-tools.x86_64.0.3.14-9.el7 将被 安装

--> 解决依赖关系完成

依赖关系解决

=================================================================================================================================

 Package                            架构                        版本                             源                         大小

=================================================================================================================================

正在安装:

 inotify-tools                      x86_64                      3.14-9.el7                       epel                       51 k

事务概要

=================================================================================================================================

安装  1 软件包

总下载量:51 k

安装大小:111 k

Downloading packages:

inotify-tools-3.14-9.el7.x86_64.rpm                                                                       |  51 kB  00:00:00

Running transaction check

Running transaction test

Transaction test succeeded

Running transaction

  正在安装    : inotify-tools-3.14-9.el7.x86_64                                                                              1/1

  验证中      : inotify-tools-3.14-9.el7.x86_64                                                                              1/1

已安装:

  inotify-tools.x86_64 0:3.14-9.el7

完毕!

[root@test ~]#
提示:我们安装好软件包要习惯的去看这个软件包装了那些东西,它的配置文件大概放在哪个位置等信息
[root@test ~]# rpm -ql inotify-tools

/usr/bin/inotifywait

/usr/bin/inotifywatch

/usr/lib64/libinotifytools.so.0

/usr/lib64/libinotifytools.so.0.4.1

/usr/share/doc/inotify-tools-3.14

/usr/share/doc/inotify-tools-3.14/AUTHORS

/usr/share/doc/inotify-tools-3.14/COPYING

/usr/share/doc/inotify-tools-3.14/ChangeLog

/usr/share/doc/inotify-tools-3.14/NEWS

/usr/share/doc/inotify-tools-3.14/README

/usr/share/man/man1/inotifywait.1.gz

/usr/share/man/man1/inotifywatch.1.gz

[root@test ~]#
提示:从上面查询的信息我们可以清楚的知道,inotify-tools这两个包主要安装了两个程序,一个是/usr/bin/inotifywait,一个是/usr/bin/inotifywatch,其他都是它的帮助文档;在上面的介绍了这两个程序的作用;安装好了inotify工具后,我们再来看看inotifywait这个工具的用法和选项
inotifywait命令常见选项说明
[root@test ~]# inotifywait --help

inotifywait 3.14

Wait for a particular event on a file or set of files.

Usage: inotifywait [ options ] file1 [ file2 ] [ file3 ] [ ... ]

Options:

        -h|--help       Show this help text.

        @<file>         Exclude the specified file from being watched.

        --exclude <pattern>

                        Exclude all events on files matching the

                        extended regular expression <pattern>.

        --excludei <pattern>

                        Like --exclude but case insensitive.

        -m|--monitor    Keep listening for events forever.  Without

                        this option, inotifywait will exit after one

                        event is received.

        -d|--daemon     Same as --monitor, except run in the background

                        logging events to a file specified by --outfile.

                        Implies --syslog.

        -r|--recursive  Watch directories recursively.

        --fromfile <file>

                        Read files to watch from <file> or `-' for stdin.

        -o|--outfile <file>

                        Print events to <file> rather than stdout.

        -s|--syslog     Send errors to syslog rather than stderr.

        -q|--quiet      Print less (only print events).

        -qq             Print nothing (not even events).

        --format <fmt>  Print using a specified printf-like format

                        string; read the man page for more details.

        --timefmt <fmt> strftime-compatible format string for use with

                        %T in --format string.

        -c|--csv        Print events in CSV format.

        -t|--timeout <seconds>

                        When listening for a single event, time out after

                        waiting for an event for <seconds> seconds.

                        If <seconds> is 0, inotifywait will never time out.

        -e|--event <event1> [ -e|--event <event2> ... ]

                Listen for specific event(s).  If omitted, all events are

                listened for.

Exit status:

        0  -  An event you asked to watch for was received.

        1  -  An event you did not ask to watch for was received

              (usually delete_self or unmount), or some error occurred.

        2  -  The --timeout option was given and no events occurred

              in the specified interval of time.

Events:

        access          file or directory contents were read

        modify          file or directory contents were written

        attrib          file or directory attributes changed

        close_write     file or directory closed, after being opened in

                        writeable mode

        close_nowrite   file or directory closed, after being opened in

                        read-only mode

        close           file or directory closed, regardless of read/write mode

        open            file or directory opened

        moved_to        file or directory moved to watched directory

        moved_from      file or directory moved from watched directory

        move            file or directory moved to or from watched directory

        create          file or directory created within watched directory

        delete          file or directory deleted within watched directory

        delete_self     file or directory was deleted

        unmount         file system containing file or directory unmounted

[root@test ~]#
提示:-m,--monitor表示始终保持事件监听,如果不加这个选项,默认它只是监控一次,也就是说只要我们监控的目录里的资源发生一次变化后,它就退出监控了;通常情况我们是结合-m选项持续的监控一个目录下的资源变化情况;-d表示以守护进程方式执行,和-m相似,配合-o使用。-d选项我们可以理解为后台守护进程的方式监控我们的资源,后台守护进程的方式执行我们是看不到说监控的资源变化情况,我们可以结合-o来指定一个文件,把资源变化情况类似写日志的方式给记录下来; -r, --recursive表示递归监控目录数据信息变化;-q,--quiet表示输出少量事件信息;--timefmt <fmt>表示指定输出事件的时间格式;--format <fmt> 表示指定的输出格式;即实际监控输出内容; -e 表示指定监听指定的事件,如果省略,表示所有事件都进行监听;--exclude <pattern>表示指定排除文件或目录,使用扩展的正则表达式匹配的模式实现;--excludei <pattern> 和exclude相似,不区分大小写; -o, --outfile <file>打印事件到文件中,相当于标准正确输出;-s, --syslogOutput 发送错误到syslog相当于标准错误输出
--timefmt <fmt>时间格式
%Y:表示年份信息,包含世纪信息
%y:表示年份信息,不包含世纪信息
%m:表示月份,范围01-12
%d:表示每月的第几天,范围01-31
%H:表示小时信息,使用24小时制度,范围00-24
%M:表示分钟,范围00-59
--format<fmt>输出信息格式定义
%T:输出时间格式中定义的时间格式,这个表示调用我们前面定义时间格式,通常情况--timefmt选项和--format结合使用
%w:表示事件出现时,监控文件或目录的名称信息。也就是监控资源名称信息
%f:时间出现时,显示监控目录下触发事件的文件或目录信息
%e:显示发生的事件信息,不同事件默认用逗号分隔
%Xe:显示发生的事件,不同的时间指定用"X"分割
[root@test ~]# inotifywait -m --timefmt "%Y-%m-%d %H:%M" --format "%T %w event:%;e" /root/dir2

Setting up watches.

Watches established.

2020-01-31 18:07 /root/dir2/ event:OPEN;ISDIR

2020-01-31 18:07 /root/dir2/ event:CLOSE_NOWRITE;CLOSE;ISDIR

2020-01-31 18:07 /root/dir2/ event:OPEN;ISDIR

2020-01-31 18:07 /root/dir2/ event:CLOSE_NOWRITE;CLOSE;ISDIR

2020-01-31 18:07 /root/dir2/ event:OPEN;ISDIR

2020-01-31 18:07 /root/dir2/ event:CLOSE_NOWRITE;CLOSE;ISDIR

2020-01-31 18:07 /root/dir2/ event:OPEN;ISDIR

2020-01-31 18:07 /root/dir2/ event:CLOSE_NOWRITE;CLOSE;ISDIR
提示:指定信息不输出变化资源的文件名和目录,输出信息格式如上
[root@test ~]# inotifywait -m --timefmt "%Y-%m-%d %H:%M" --format "%T %w%f event:%;e" /root/dir2

Setting up watches.

Watches established.

2020-01-31 18:09 /root/dir2/test event:OPEN;ISDIR

2020-01-31 18:09 /root/dir2/test event:CLOSE_NOWRITE;CLOSE;ISDIR

2020-01-31 18:09 /root/dir2/ event:OPEN;ISDIR

2020-01-31 18:09 /root/dir2/ event:CLOSE_NOWRITE;CLOSE;ISDIR

2020-01-31 18:09 /root/dir2/f1 event:CREATE

2020-01-31 18:09 /root/dir2/f1 event:OPEN

2020-01-31 18:09 /root/dir2/f1 event:ATTRIB

2020-01-31 18:09 /root/dir2/f1 event:CLOSE_WRITE;CLOSE

2020-01-31 18:09 /root/dir2/f1 event:MOVED_FROM

2020-01-31 18:09 /root/dir2/ff event:MOVED_TO
提示:指定信息输出变化资源的文件名和目录,输出信息格式如上
[root@test ~]# inotifywait -m --timefmt "%Y-%m-%d %H:%M" --format "%T %w%f %e" /root/dir2

Setting up watches.

Watches established.

2020-01-31 18:10 /root/dir2/ OPEN,ISDIR

2020-01-31 18:10 /root/dir2/ CLOSE_NOWRITE,CLOSE,ISDIR

2020-01-31 18:10 /root/dir2/ OPEN,ISDIR

2020-01-31 18:10 /root/dir2/ CLOSE_NOWRITE,CLOSE,ISDIR

2020-01-31 18:10 /root/dir2/ OPEN,ISDIR

2020-01-31 18:10 /root/dir2/ CLOSE_NOWRITE,CLOSE,ISDIR

2020-01-31 18:10 /root/dir2/ OPEN,ISDIR

2020-01-31 18:10 /root/dir2/ CLOSE_NOWRITE,CLOSE,ISDIR

2020-01-31 18:10 /root/dir2/test OPEN,ISDIR

2020-01-31 18:10 /root/dir2/test CLOSE_NOWRITE,CLOSE,ISDIR
提示:不指定输出事件信息分割符,默认是逗号分隔
-e选项指定监控事件类型说明
create:表示文件或目录的创建
delete:表示文件或目录被删除
modify:表示文件或目录内容的修改
attrib:表示文件或目录的属性发生变化
close_write:表示文件或目录关闭,在写入模式打开之后关闭的
close_nowrite:表示文件或目录关闭,在只读模式打开之后关闭的
close:表示文件或目录关闭,不管是读还是写模式
open:文件或目录被打开
moved_to:表示文件被移动到监控目录中
moved_from:表示文件或目录从监控的目录中被移动
move:文件或目录不管移动到或移出监控目录都触发事件
access:表示文件或目录内容读取
delete_self:表示文件或目录被删除,目录本身被删除
unmount:表示取消挂载

提示:-e选项指定监控目录下文件或目录的事件,它只响应对应目录下的文件发生了指定事件后,才给予响应。以上表示只要/root/dir2目录下的文件或目录发生了create,delete,move这三种事件的任何一种,它都给予响应,我们查看/root/dir2下的文件它是不监控的,也不予响应。
了解了inotifywait命令的各种选项的使用后,我们就可以根据自己的实际需求来定义怎么监控我们的资源,当资源发生变化时,我们后续该怎么处理,这个不是inotify关心的事,它只负责告诉我们监控的资源发生了什么样的变化。如果我们想要备份变化后的资源,我们就需要用到别的服务,比如rsync;rsync这个软件是一个同步数据软件,它可以通过脚本和inotify结合实现,当资源文件发生变化时,触发rsync去同步数据,这样实现数据实时的同步。接下来我们在来搭建rsync服务
四、rsync服务安装配置
1、查看系统是否安装的有rsync,如果没有就安装
[root@test ~]# rpm -qa rsync

rsync-3.1.2-6.el7_6.1.x86_64

[root@test ~]# yum info rsync

已加载插件:fastestmirror

Loading mirror speeds from cached hostfile

 * base: mirrors.aliyun.com

 * extras: mirrors.aliyun.com

 * updates: mirrors.aliyun.com

已安装的软件包

名称    :rsync

架构    :x86_64

版本    :3.1.2

发布    :6.el7_6.1

大小    :815 k

源    :installed

来自源:updates

简介    : A program for synchronizing files over a network

网址    :http://rsync.samba.org/

协议    : GPLv3+

描述    : Rsync uses a reliable algorithm to bring remote and host files into

         : sync very quickly. Rsync is fast because it just sends the differences

         : in the files over the network instead of sending the complete

         : files. Rsync is often used as a very powerful mirroring process or

         : just as a more capable replacement for the rcp command. A technical

         : report which describes the rsync algorithm is included in this

         : package.

[root@test ~]#
2、查看rsync配置文件路径
[root@test ~]# rpm -ql rsync

/etc/rsyncd.conf

/etc/sysconfig/rsyncd

/usr/bin/rsync

/usr/lib/systemd/system/rsyncd.service

/usr/lib/systemd/system/rsyncd.socket

/usr/lib/systemd/system/rsyncd@.service

/usr/share/doc/rsync-3.1.2

/usr/share/doc/rsync-3.1.2/COPYING

/usr/share/doc/rsync-3.1.2/NEWS

/usr/share/doc/rsync-3.1.2/OLDNEWS

/usr/share/doc/rsync-3.1.2/README

/usr/share/doc/rsync-3.1.2/support

/usr/share/doc/rsync-3.1.2/support/Makefile

/usr/share/doc/rsync-3.1.2/support/atomic-rsync

/usr/share/doc/rsync-3.1.2/support/cvs2includes

/usr/share/doc/rsync-3.1.2/support/deny-rsync

/usr/share/doc/rsync-3.1.2/support/file-attr-restore

/usr/share/doc/rsync-3.1.2/support/files-to-excludes

/usr/share/doc/rsync-3.1.2/support/git-set-file-times

/usr/share/doc/rsync-3.1.2/support/instant-rsyncd

/usr/share/doc/rsync-3.1.2/support/logfilter

/usr/share/doc/rsync-3.1.2/support/lsh

/usr/share/doc/rsync-3.1.2/support/lsh.sh

/usr/share/doc/rsync-3.1.2/support/mapfrom

/usr/share/doc/rsync-3.1.2/support/mapto

/usr/share/doc/rsync-3.1.2/support/mnt-excl

/usr/share/doc/rsync-3.1.2/support/munge-symlinks

/usr/share/doc/rsync-3.1.2/support/rrsync

/usr/share/doc/rsync-3.1.2/support/rsync-no-vanished

/usr/share/doc/rsync-3.1.2/support/rsync-slash-strip

/usr/share/doc/rsync-3.1.2/support/rsyncstats

/usr/share/doc/rsync-3.1.2/support/savetransfer.c

/usr/share/doc/rsync-3.1.2/tech_report.tex

/usr/share/man/man1/rsync.1.gz

/usr/share/man/man5/rsyncd.conf.5.gz

[root@test ~]#
提示:可从上面的信息了解到rsync的配置文件是/etc/rsyncd.conf,二进制文件是/usr/bin/rsync
3、/etc/rsyncd.conf配置文件内容说明
[root@test ~]# cat /etc/rsyncd.conf

# /etc/rsyncd: configuration file for rsync daemon mode

# See rsyncd.conf man page for more options.

# configuration example:

# uid = nobody

# gid = nobody

# use chroot = yes

# max connections = 4

# pid file = /var/run/rsyncd.pid

# exclude = lost+found/

# transfer logging = yes

# timeout = 900

# ignore nonreadable = yes

# dont compress   = *.gz *.tgz *.zip *.z *.Z *.rpm *.deb *.bz2

# [ftp]

#        path = /home/ftp

#        comment = ftp export area

[root@test ~]#
提示:我们打开rsync的配置文件,里面内容告诉我们,这个配置文件用于rsync工作为独立守护进程的服务配置,我们可以通过man rsyncd.conf来查看里面的选项说明
4、编辑/etc/rsyncd.conf
[root@test ~]# cat /etc/rsyncd.conf

# /etc/rsyncd: configuration file for rsync daemon mode

# See rsyncd.conf man page for more options.

# configuration example:

# uid = nobody

# gid = nobody

# use chroot = yes

# max connections = 4

# pid file = /var/run/rsyncd.pid

# exclude = lost+found/

# transfer logging = yes

# timeout = 900

# ignore nonreadable = yes

# dont compress   = *.gz *.tgz *.zip *.z *.Z *.rpm *.deb *.bz2

# [ftp]

#        path = /home/ftp

#        comment = ftp export area

uid = root

gid = root

use chroot = no

max connections = 0

ignore errors

exclude = lost+found/

log file = /var/log/rsyncd.log

pid file = /var/run/rsyncd.pid

lock file = /var/run/rsyncd.lock

reverse lookup = no

hosts allow = 192.168.0.0/24

[backup]

path = /backup/

comment = backup

read only = no

auth users = rsyncuser

secrets file = /etc/rsync.pass

[root@test ~]#
提示:uid,gid表示rsync这个服务是以那个用户的身份去运行;use chroot表示是否可切换指定path里的路径,如果是yes表示在传输文件之前首先 chroot 到 path 参数所指定的目录下。这样做的原因是实现额外的安全防护,但是缺点是需要 root并且不能备份指向 path 外部的符号连接所指向的目录文件;max connections表示指定最大并发连接数,0表示不限制;ignore errors表示忽略守护进程上的I/O错误;exclude表示排除监控的资源列表,也就是exclude后面的资源不监控;log file、pid file、lock file指定日志文件,pid文件,lock文件的路径;reverse lookup表示是否使用名称解析(控制守护进程是否对客户端IP地址执行反向查找以确定其主机名);hosts allow表示指定允许的主机或网段内的主机来访问rsync服务器;[backup] 这个表示共享出来的目录共享名称,这个同samba的配置一样,这个名称只是对客户端看到共享出来的目录名称,它不是真的服务器路径名称;path表示指定真实存放同步数据的路径,也就是共享出去的名称对应到系统上的那个目录;comment表示描述说明;auth users表示那些用户可以访问这个目录;secrets file表示auth users的用户的密码信息文件
5、准备备份数据目录和创建secrets file所指定的用户密码文件,并把auth users所指定的用户和密码信息写入到该文件中
[root@test ~]# mkdir /backup

[root@test ~]# echo 'rsyncuser:admin' > /etc/rsync.pass

[root@test ~]# cat /etc/rsync.pass

rsyncuser:admin

[root@test ~]# chmod 600 /etc/rsync.pass

[root@test ~]# ll /etc/rsync.pass

-rw------- 1 root root 16 1月  31 19:27 /etc/rsync.pass

[root@test ~]#
提示:/etc/rsync.pass这个文件是secrets file指定的文件,它相当于一个虚拟的用户文件,不需要存在Linux系统中,这个文件主要保存用于同步数据时,所用到的用户;通常情况下为了rsync的用户信息安全,建议把这个文件的权限修改成600
6、启动rsync服务以Daemon方式运行,并检查端口运行情况
[root@test ~]# ss -ntl

State       Recv-Q Send-Q                   Local Address:Port                                  Peer Address:Port

LISTEN      0      100                          127.0.0.1:25                                               *:*

LISTEN      0      25                                   *:514                                              *:*

LISTEN      0      128                                  *:41319                                            *:*

LISTEN      0      50                                   *:3306                                             *:*

LISTEN      0      128                                  *:111                                              *:*

LISTEN      0      100                                ::1:25                                              :::*

LISTEN      0      25                                  :::514                                             :::*

LISTEN      0      128                                 :::41319                                           :::*

LISTEN      0      128                                 :::111                                             :::*

LISTEN      0      128                                 :::80                                              :::*

[root@test ~]# rsync --daemon

[root@test ~]# ss -ntl

State       Recv-Q Send-Q                   Local Address:Port                                  Peer Address:Port

LISTEN      0      100                          127.0.0.1:25                                               *:*

LISTEN      0      25                                   *:514                                              *:*

LISTEN      0      128                                  *:41319                                            *:*

LISTEN      0      5                                    *:873                                              *:*

LISTEN      0      50                                   *:3306                                             *:*

LISTEN      0      128                                  *:111                                              *:*

LISTEN      0      100                                ::1:25                                              :::*

LISTEN      0      25                                  :::514                                             :::*

LISTEN      0      128                                 :::41319                                           :::*

LISTEN      0      5                                   :::873                                             :::*

LISTEN      0      128                                 :::111                                             :::*

LISTEN      0      128                                 :::80                                              :::*

[root@test ~]#
提示:rsync默认端口是873 当然也可以通过在配置文件中用port 来指定
7、在客户端上创建密码文件
[root@test-centos6-node1 ~]# echo "admin" >/etc/rsync.pass

[root@test-centos6-node1 ~]# chmod 600 /etc/rsync.pass

[root@test-centos6-node1 ~]# ll /etc/rsync.pass

-rw------- 1 root root 6 Feb  1 03:38 /etc/rsync.pass

[root@test-centos6-node1 ~]#
8、在客户端测试rsync是否可以把指定文件同步到rsync共享出来的backup下(这里的backup不是指服务器上的真实路径,是中括号里指定的名称,这个名称可以随便起,没有特殊要求)
[root@test-centos6-node1 ~]# tree

.

└── test

1 directory, 0 files

[root@test-centos6-node1 ~]# echo "this is test file" >test/f1

[root@test-centos6-node1 ~]# rsync -avz --password-file=/etc/rsync.pass /root/test/ rsyncuser@192.168.0.99::backup

sending incremental file list

./

f1

sent 93 bytes  received 30 bytes  246.00 bytes/sec

total size is 18  speedup is 0.15

[root@test-centos6-node1 ~]#
提示:可以看到在客户端已经把指定的资源给同步到rsync服务器上了,接下来我们看看rsync指定存放同步数据的目录是否有客户端同步过来的文件
[root@test ~]# ll /backup

总用量 4

-rw-r--r-- 1 root root 18 2月   1 2020 f1

[root@test ~]# cat /backup/f1

this is test file

[root@test ~]#
提示:在服务端可以看到客户端同步过来的文件;到此rsync服务就搭建完毕了。接下来我们编写脚本结合inotify和rsync实现实时同步
五、在客户端编写脚本实现inotify+rsync实现实时同步
实验环境:centos6是客户端,在上面安装inotify-tools工具;centos7是rsync服务端;实验目的是实现实时监控centos6上的/root/test/目录下的所有资源,如果有变化就把文件通过rsync推送到rsync服务器上,实现实时同步
1、在centos6上安装inotify-tools
[root@test-centos6-node1 ~]# yum install -y inotify-tools

Loaded plugins: fastestmirror

Setting up Install Process

Loading mirror speeds from cached hostfile

 * base: mirrors.cn99.com

 * extras: mirrors.aliyun.com

 * updates: mirrors.aliyun.com

base                                                                              | 3.7 kB     00:00

epel                                                                              | 5.3 kB     00:00

extras                                                                            | 3.4 kB     00:00

my_base                                                                           | 4.0 kB     00:00

percona-release-noarch                                                            | 2.9 kB     00:00

percona-release-x86_64                                                            | 2.9 kB     00:00

updates                                                                           | 3.4 kB     00:00

Resolving Dependencies

--> Running transaction check

---> Package inotify-tools.x86_64 0:3.14-2.el6 will be installed

--> Finished Dependency Resolution

Dependencies Resolved

=========================================================================================================

 Package                      Arch                  Version                    Repository           Size

=========================================================================================================

Installing:

 inotify-tools                x86_64                3.14-2.el6                 epel                 46 k

Transaction Summary

=========================================================================================================

Install       1 Package(s)

Total download size: 46 k

Installed size: 104 k

Downloading Packages:

inotify-tools-3.14-2.el6.x86_64.rpm                                               |  46 kB     00:00

Running rpm_check_debug

Running Transaction Test

Transaction Test Succeeded

Running Transaction

  Installing : inotify-tools-3.14-2.el6.x86_64                                                       1/1

  Verifying  : inotify-tools-3.14-2.el6.x86_64                                                       1/1

Installed:

  inotify-tools.x86_64 0:3.14-2.el6

Complete!

[root@test-centos6-node1 ~]#
2、编写脚本
[root@test-centos6-node1 ~]# cat inotify_rsync.sh

#!/bin/bash

SRC='/root/test/'

DEST='rsyncuser@192.168.0.99::backup'

inotifywait -mrq --timefmt '%Y-%m-%d %H:%M' --format '%T %w %f' -e create,delete,moved_to,close_write ${SRC} |while read DATE TIME DIR FILE;do

        FILEPATH=${DIR}${FILE}

        rsync -az --delete --password-file=/etc/rsync.pass $SRC $DEST &&

        echo "At ${TIME} on ${DATE}, file $FILEPATH was backuped up via rsync" >> /var/log/changelist.log

done

[root@test-centos6-node1 ~]#
提示:解释下上面的脚本,首先我们定义要监控的目录src和rsync的地址dest(这个地址就是客户端rsync连接rsync服务端的地址),然后通过inotifywait来指定监控的资源和事件,以及输出信息的格式,然后每一次触发事件的输出信息就交给while read处理,while read 把事件输出信息分别用DATA TIME DIR FILE来保存;然后把DIR和FILE做合并,得到变化资源的真实路径,然后通过rsync把变化的资源推到rsync服务器上,然后把对应的事件信息写到/var/log/changelist.log中。
测试脚本是否能够达到实时备份的效果
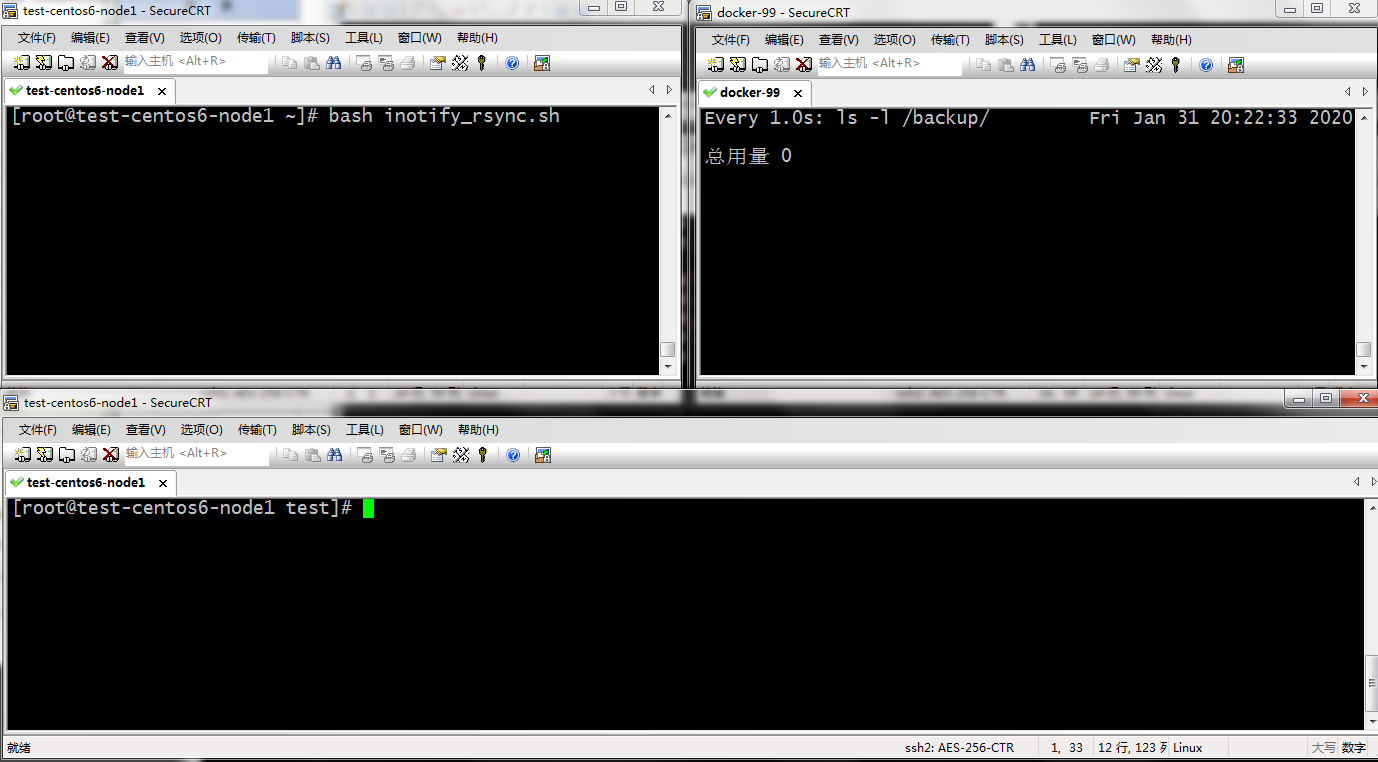
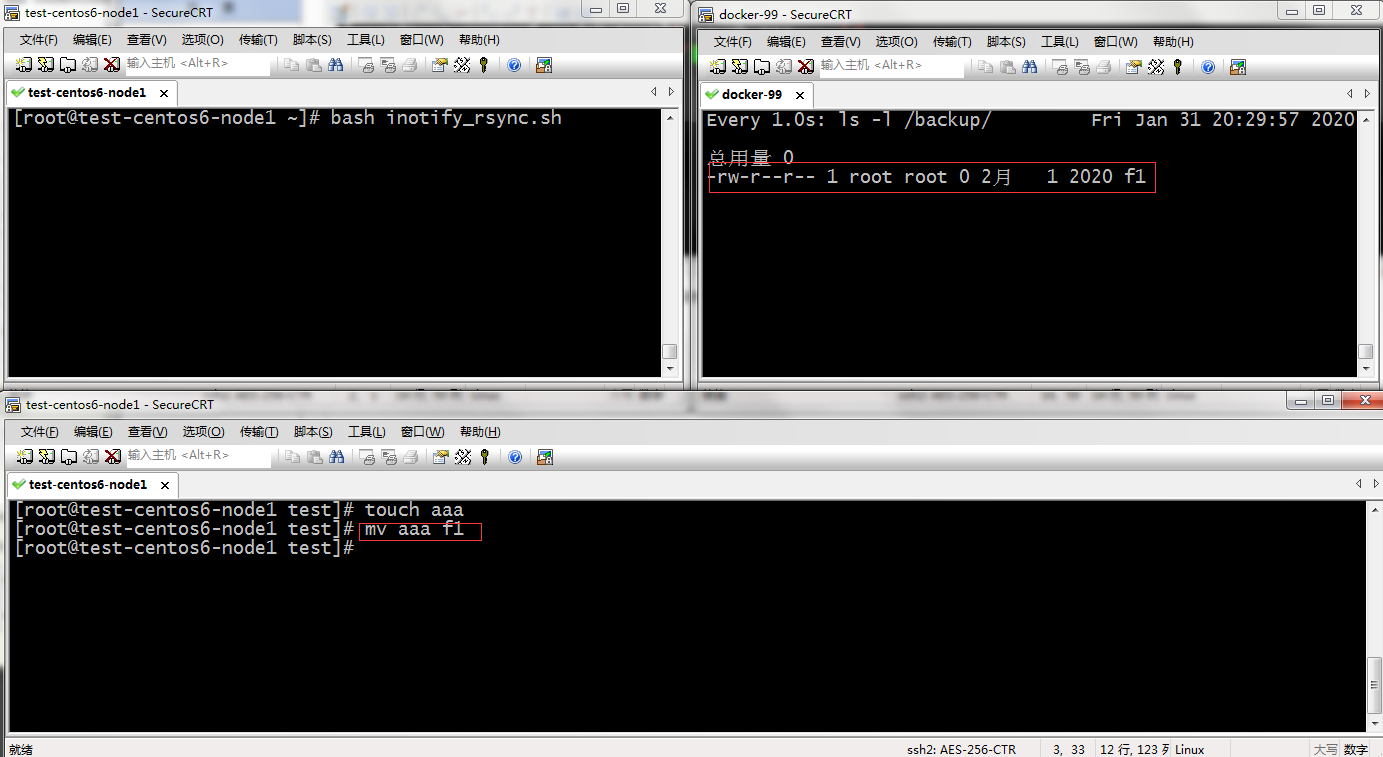
提示:在客户端运行脚本,在rsync服务端监控/backup里的变化。然后在客户端操作在/root/test/目录下进行文件的增加删除修改,看看是否能够及时的同步到rysnc服务器上

提示:可以看到我们在客户端新建一个文件是能够及时的同步到rysnc服务器上的

提示:到此我们就实现了把客户端的指定目录下的资源通过inotify监控和rsync实时的把数据同步到rysnc服务器上。监控的事件我们可以在脚本里用inotifywait -e去指定即可;我们发现脚本运行,它是前端运行的,如果我们把CRT窗口关闭了,随之我们的监控也失效了,所以我们希望脚本后台运行
脚本以后台方式运行
[root@test-centos6-node1 ~]# bash inotify_rsync.sh &

[1] 1697

[root@test-centos6-node1 ~]#
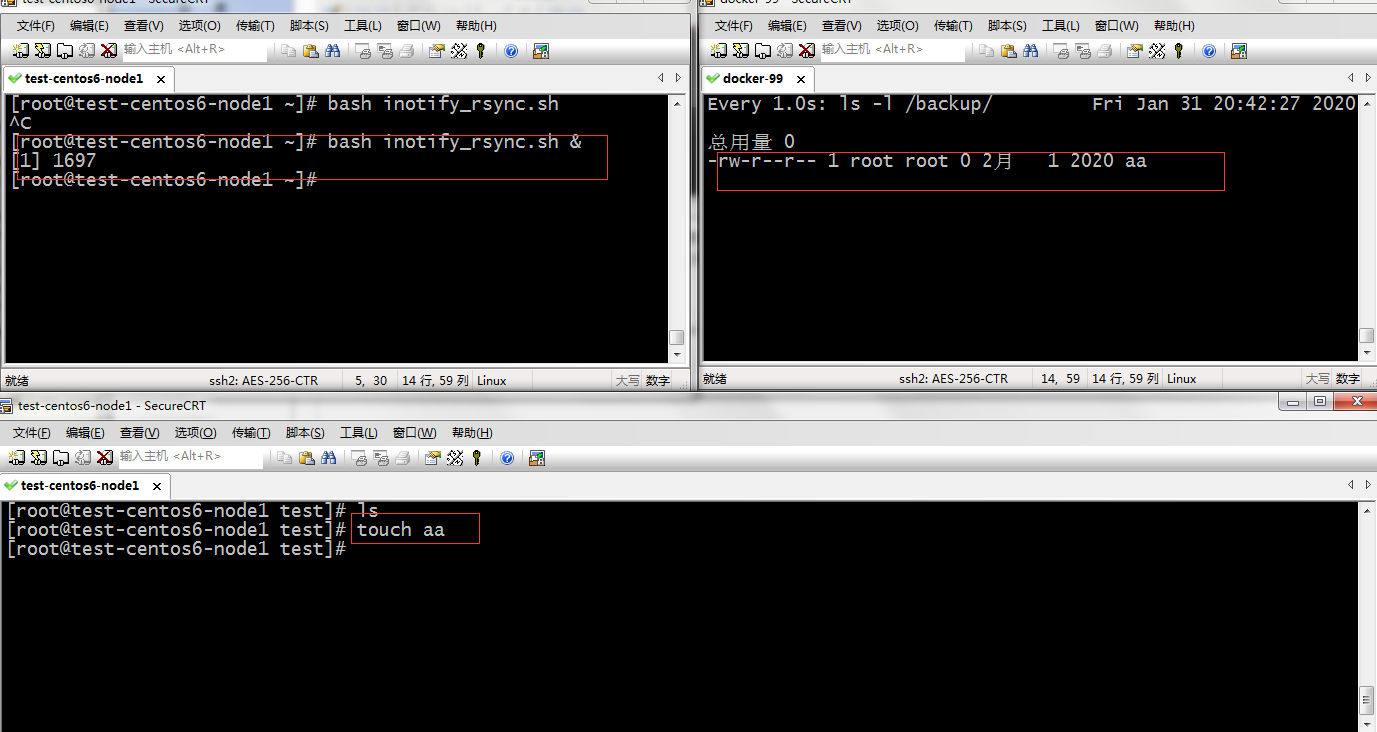
提示:我们把脚本以后台方式执行也是可以正常的把客户端指定目录下的文件同步rsync服务器上,到此inotify+rsync实现实时数据同步就完成了。
Linux系统实时数据同步inotify+rsync的更多相关文章
- 实时数据同步inotify+rsync
inotify inotify是一个实时监控服务,他能实时监控服务器中的目录的变化,发现目录中变化后,在配合rsync服务推送到备份服务器上 inotify要求内核要在2.6.13或之上,通过noti ...
- Rsync+inotify 实时数据同步 inotify master 端的配置
强大的,细致的,异步的文件系统事件监控机制.Linux 内科从 2.6.13 起支持 inotify Inotify 实现的几款软件:Inotify,sersync,lsyncd ※Inotify 实 ...
- 【linux运维】rsync+inotify与sersync+rsync实时数据同步笔记
Rsync(remote sync)远程同步工具,通过rsync可以实现对远程服务器数据的增量备份通过,但rsync自身也有缺陷,同步数据时,rsync采用核心算法对远程服务器的目标文件进行对比,只进 ...
- Linux学习系列之Inotify+Rsync实现实时数据同步
Inotify简介 inotify介绍 inotify是一种强大的.异步的文件系统监控机制,linux内核从2.6.13起,加入了inotify的支持,通过inotify可以监控文件系统中添加.删除. ...
- (转)Linux系统sersync数据实时同步
Linux系统sersync数据实时同步 原文:http://blog.csdn.net/mingongge/article/details/52985259 前面介绍了以守护进程的方式传输或同步数据 ...
- rsync+inotify实时数据同步多目录实战
rsync+inotify实时数据同步多目录实战 inotify配置是建立在rsync服务基础上的配置过程 操作系统 主机名 网卡eth0 默认网关 用途 root@58server1 1 ...
- rsync+inotify实时数据同步单目录实战
rsync+inotify实时数据同步单目录实战 rsync+inotify实时数据同步单目录实战 inotify是一个强大的.细粒度的.异步的文件系统事件监控机制,linux内核从2.6.13起 ...
- sersync+rsync实时数据同步
sersync+rsync实时数据同步 1.相关背景介绍 前面有关文章配置实现了rsync增量同步以及配置为定时同步,但是在实际生产环境中需要实时的监控数据从而进行同步(不间断同步),可以采取inot ...
- centos linux 系统日常管理4 scp,rsync,md5sum,sha1sum,strace ,find Rsync 常见错误及解决方法 第十七节课
centos linux 系统日常管理4 scp,rsync,md5sum,sha1sum,strace ,find Rsync 常见错误及解决方法 第十七节课 rsync可以增量同步,scp不行 ...
随机推荐
- Git是什么?
Git是什么? Git 是一个开源的分布式版本控制系统,用于敏捷高效地处理任何或小或大的项目. Git 是 Linus Torvalds 为了帮助管理 Linux 内核开发而开发的一个开放源码的版本控 ...
- Mysql库、表、记录的基本操作
库的操作 ---> 类似于文件夹 - 增: 创建数据库: create database db1; 创建带字符集的数据库: create database db2 charset=utf8; - ...
- ES6学习之二
本文的学习来自技术胖大神的教程:https://jspang.com/ 1扩展运算符和rest运算符 扩展运算符和rest运算符,它们都是…(三个点). 它们有很多相似之处,甚至很多时候不用特意去区分 ...
- 【题解】多少个$1$(exBSGS)
[题解]多少个\(1\)(exBSGS) 解方程: \[ \underbrace {1\dots1}_{n}\equiv k \mod m \] 其实就是 \[ \dfrac {10^n-1} {9} ...
- 1068 万绿丛中一点红 (20分)C语言
对于计算机而言,颜色不过是像素点对应的一个 24 位的数值.现给定一幅分辨率为 M×N 的画,要求你找出万绿丛中的一点红,即有独一无二颜色的那个像素点,并且该点的颜色与其周围 8 个相邻像素的颜色差充 ...
- Web开发学习目录
1.MyBaits 1.1mybatis学习入门 1.2mybatis学习之CURD 1.3mybatis学习之连接池 1.4mybatis学习之动态SQL 1.5mybatis学习之多表操作 1.6 ...
- 2019年最值得关注的AI领域技术突破及未来展望
选自venturebeat 翻译:魔王.一鸣 前言 AI 领域最杰出的头脑如何总结 2019 年技术进展,又如何预测 2020 年发展趋势呢?本文介绍了 Soumith Chintala.Celest ...
- GC 为什么要挂起用户线程? 什么愁什么怨?
GC 为什么要挂起用户线程? 什么愁什么怨? 前言 JVM 系列文章的第一篇.敬请期待后续. 故障描述 某年某月某日 上午,线上发生故障,经过排查,发现某核心服务 Dubbo 接口超时. 故障根源 查 ...
- Go中锁的那些姿势,估计你不知道
什么是锁,为什么使用锁 用俗语来说,锁意味着一种保护,对资源的一种保护,在程序员眼中,这个资源可以是一个变量,一个代码片段,一条记录,一张数据库表等等. 就跟小孩需要保护一样,不保护的话小孩会收到伤害 ...
- Mysql中使用mysqldump进行导入导出sql文件
纪念工作中的第一次删库跑路的经历 今天接到一个任务,是将一个测试库数据导到另一个测试库,然而我们公司的数据库是不让直连的,所以只能通过远程连接进行导库操作. 老大布置任务的时候让用dump命令进行操作 ...