OpenCASCADE(一) VS2017+OpenCASCADE+MFC 下载配置安装运行单文档程序画个基本图形
原文作者:aircraft
原文链接:https://www.cnblogs.com/DOMLX/p/12368154.html
一.下载OpenCASCADE
官网下载是: http://www.opencascade.org/getocc/download/loadocc/
我的百度云已经下载好的是:
链接:https://pan.baidu.com/s/1D-fw8vspKTOZ8GmAGBSVGw
提取码:mzp3
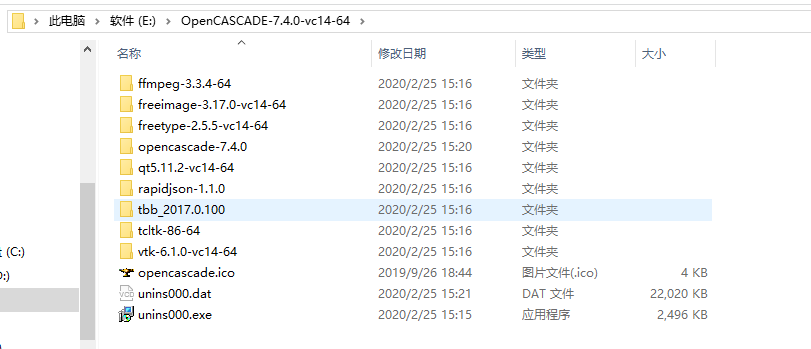
下载后运行完毕就是这样:
二.VS2017 MFC单文档配置OpenCASCADE 环境
先将每个文件夹里的bin文件夹都添加到系统的环境变量里
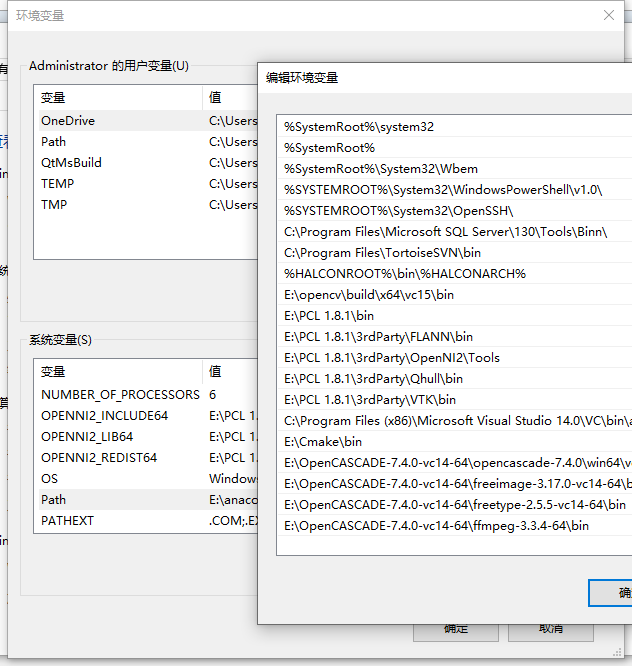
然后在将bin文件夹内的dll文件全部复制一份放在C:\Windows\SysWOW64里(注意我这里是64位的)你们32就放32里
在VS2017中创建一个单文档MFC项目,我的命名是OCCmfc
然后在项目属性里:
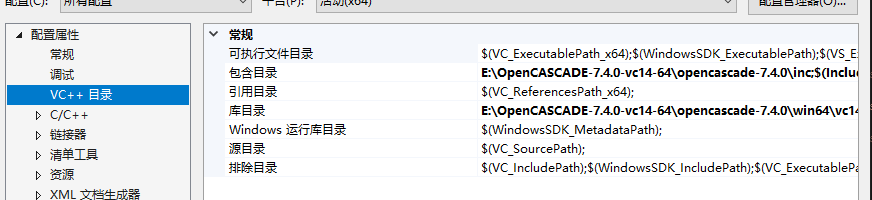
将你们自己路径下的!!包含目录,和库目录都添加上去(看图!!)
我的包含目录是:E:\OpenCASCADE-7.4.0-vc14-64\opencascade-7.4.0\inc
我的库目录是:E:\OpenCASCADE-7.4.0-vc14-64\opencascade-7.4.0\win64\vc14\lib
然后在连接器-》输入-》附加依赖项里添加下面这些Lib文件名:
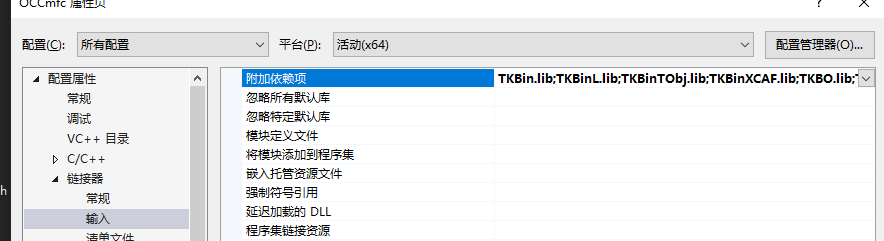
TKBin.lib

TKBinL.lib

TKBinTObj.lib

TKBinXCAF.lib

TKBO.lib

TKBool.lib

TKBRep.lib

TKCAF.lib

TKCDF.lib

TKD3DHost.lib

TKDCAF.lib

TKDFBrowser.lib

TKDraw.lib

TKernel.lib

TKFeat.lib

TKFillet.lib

TKG2d.lib

TKG3d.lib

TKGeomAlgo.lib

TKGeomBase.lib

TKHLR.lib

TKIGES.lib

TKIVtk.lib

TKIVtkDraw.lib

TKLCAF.lib

TKMath.lib

TKMesh.lib

TKMeshVS.lib

TKOffset.lib

TKOpenGl.lib

TKPrim.lib

TKQADraw.lib

TKRWMesh.lib

TKService.lib

TKShapeView.lib

TKShHealing.lib

TKStd.lib

TKStdL.lib

TKSTEP.lib

TKSTEP209.lib

TKSTEPAttr.lib

TKSTEPBase.lib

TKSTL.lib

TKTInspector.lib

TKTInspectorAPI.lib

TKTObj.lib

TKTObjDRAW.lib

TKToolsDraw.lib

TKTopAlgo.lib

TKTopTest.lib

TKTreeModel.lib

TKV3d.lib

TKVCAF.lib

TKView.lib

TKViewerTest.lib

TKVInspector.lib

TKVRML.lib

TKXCAF.lib

TKXDEDRAW.lib

TKXDEIGES.lib

TKXDESTEP.lib

TKXMesh.lib

TKXml.lib

TKXmlL.lib

TKXmlTObj.lib

TKXmlXCAF.lib

TKXSBase.lib

TKXSDRAW.lib
如果你们版本跟我的不一样 那么可以在cmd里打开到这个文件夹然后输入命令 dir /b>libName.txt
然后打开这个文件,复制lib的名字就行了
然后打开项目后在stdafx.h中添加这些要用到的头文件:
#include <BRepTools.hxx>

#include <Standard_DefineHandle.hxx>

#include <DsgPrs_LengthPresentation.hxx>

#include <GCPnts_TangentialDeflection.hxx>

#include <Geom_Axis2Placement.hxx>

#include <Geom_CartesianPoint.hxx>

#include <Geom_Line.hxx>

#include <Geom_Surface.hxx>

#include <BRepAdaptor_Surface.hxx>

#include <GeomAbs_CurveType.hxx>

#include <GeomAdaptor_Curve.hxx>

#include <GeomTools_Curve2dSet.hxx>

#include <gp_Vec.hxx>

#include <Graphic3d_NameOfMaterial.hxx>

#include <MMgt_TShared.hxx>

#include <OSD_Environment.hxx>

#include <Precision.hxx>

#include <Prs3d_IsoAspect.hxx>

#include <Prs3d_LineAspect.hxx>

#include <Prs3d_Projector.hxx>

#include <Prs3d_Text.hxx>

#include <Quantity_Factor.hxx>

#include <Quantity_Length.hxx>

#include <Quantity_NameOfColor.hxx>

#include <Quantity_PhysicalQuantity.hxx>

#include <Quantity_PlaneAngle.hxx>

#include <Quantity_TypeOfColor.hxx>

#include <SelectMgr_EntityOwner.hxx>

#include <SelectMgr_SelectableObject.hxx>

#include <SelectMgr_Selection.hxx>

#include <SelectMgr_SelectionManager.hxx>

#include <SelectMgr_ListOfFilter.hxx>

#include <SelectMgr_Filter.hxx>

#include <StdSelect_EdgeFilter.hxx>

#include <StdSelect_ShapeTypeFilter.hxx>

#include <Standard_Boolean.hxx>

#include <Standard_CString.hxx>

#include <Standard_ErrorHandler.hxx>

#include <Standard_Integer.hxx>

#include <Standard_IStream.hxx>

#include <Standard_Macro.hxx>

#include <Standard_NotImplemented.hxx>

#include <Standard_OStream.hxx>

#include <Standard_Real.hxx>

#include <StdPrs_Curve.hxx>

#include <StdPrs_Point.hxx>

#include <StdPrs_PoleCurve.hxx>

#include <TCollection_AsciiString.hxx>

#include <TColgp_Array1OfPnt2d.hxx>

#include <TColgp_HArray1OfPnt2d.hxx>

#include <TCollection_AsciiString.hxx>

#include <TColStd_HSequenceOfTransient.hxx>

#include <TColStd_MapIteratorOfMapOfTransient.hxx>

#include <TColStd_MapOfTransient.hxx>

#include <TopExp_Explorer.hxx>

#include <TopoDS.hxx>

#include <TopoDS_Compound.hxx>

#include <TopoDS_Shape.hxx>

#include <TopoDS_Solid.hxx>

#include <TopoDS_Vertex.hxx>

#include <TopExp.hxx>

#include <TopTools_HSequenceOfShape.hxx>

#include <UnitsAPI.hxx>

#include <V3d_View.hxx>

#include <V3d_Viewer.hxx>

#include <WNT_Window.hxx>

#include <Prs3d_PointAspect.hxx>

#include <AIS_Point.hxx>

#include <AIS_InteractiveContext.hxx>

#include <AIS_Shape.hxx>

#include <BRep_Tool.hxx>

#include <BRepAlgoAPI_Fuse.hxx>

#include <BRepBuilderAPI_MakeEdge.hxx>

#include <BRepBuilderAPI_MakeFace.hxx>

#include <BRepBuilderAPI_MakeWire.hxx>

#include <BRepBuilderAPI_MakeVertex.hxx>

#include <BRepBuilderAPI_Transform.hxx>

#include <BRepPrimAPI_MakeCone.hxx>

#include <BRepPrimAPI_MakeRevol.hxx>

#include <BRepFilletAPI_MakeFillet.hxx>

#include <BRepBuilderAPI_Copy.hxx>

#include <BRepBuilderAPI_MakePolygon.hxx>

#include <BRepLib.hxx>

#include <BRepOffsetAPI_MakeThickSolid.hxx>

#include <BRepOffsetAPI_ThruSections.hxx>

#include <BRepPrimAPI_MakeCylinder.hxx>

#include <BRepPrimAPI_MakePrism.hxx>

#include <BRepPrimAPI_MakeTorus.hxx>

#include <BRepAlgoAPI_Section.hxx>

#include <BRepPrimAPI_MakeSphere.hxx>

#include <BRepFeat_SplitShape.hxx>

#include <TColgp_HArray1OfPnt.hxx>

#include <GeomAPI_Interpolate.hxx>

#include <GC_MakeArcOfCircle.hxx>

#include <GC_MakeSegment.hxx>

#include <GC_MakeCircle.hxx>

#include <GCE2d_MakeSegment.hxx>

#include <gp.hxx>

#include <gp_Ax1.hxx>

#include <gp_Ax2.hxx>

#include <gp_Ax2d.hxx>

#include <gp_Dir.hxx>

#include <gp_Dir2d.hxx>

#include <gp_Pnt.hxx>

#include <gp_Pnt2d.hxx>

#include <gp_Trsf.hxx>

#include <gp_Vec.hxx>

#include <Geom_CylindricalSurface.hxx>

#include <Geom_Plane.hxx>

#include <Geom_Surface.hxx>

#include <Geom_TrimmedCurve.hxx>

#include <Geom2d_Ellipse.hxx>

#include <Geom2d_TrimmedCurve.hxx>

#include <TopExp_Explorer.hxx>

#include <TopoDS.hxx>

#include <TopoDS_Edge.hxx>

#include <TopoDS_Face.hxx>

#include <TopoDS_Wire.hxx>

#include <TopoDS_Shape.hxx>

#include <TopoDS_Compound.hxx>

#include <GCPnts_AbscissaPoint.hxx>

#include <BRepAdaptor_Curve.hxx>

#include <GeomLib.hxx>

#include <GeomConvert_CompCurveToBSplineCurve.hxx>

#include <TopTools_ListOfShape.hxx>

#include <TopTools_ListIteratorOfListOfShape.hxx>

#include <TopTools_DataMapOfShapeInteger.hxx>

#include <TopTools_DataMapOfShapeReal.hxx>

#include <TopTools_IndexedDataMapOfShapeAddress.hxx>

#include <V3d_PositionalLight.hxx>

#include <V3d_DirectionalLight.hxx>

#include <V3d_AmbientLight.hxx>

#include <IGESControl_Controller.hxx>

#include <IGESControl_Writer.hxx>

#include <Interface_Static.hxx>

#include <OpenGl_GraphicDriver.hxx>

#include <Graphic3d_GraphicDriver.hxx>
然后在OCCmfc.h文件的类里添加:
Handle(Graphic3d_GraphicDriver) m_GraphicDriver;

Handle(Graphic3d_GraphicDriver) GetGraphicDriver() { return m_GraphicDriver; }
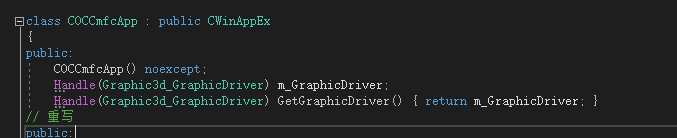
和头文件
#include <Standard_Macro.hxx>
#include <Graphic3d_GraphicDriver.hxx>
在OCCmfc.cpp的构造函数里加上:
try {

        Handle(Aspect_DisplayConnection) aDisplayConnection;

        m_GraphicDriver = new OpenGl_GraphicDriver(aDisplayConnection);

    }

    catch (Standard_Failure) {

        AfxMessageBox(L"(Error Ocured in Initializing the Opencascade graphic variable.)");

    }
注意!!!如果new字符报错,那么是因为opencascade对new进行了重载,我们将每个new报错文件顶部的:
#ifdef _DEBUG

#define new DEBUG_NEW

#endif
这几行代码注释就行了
接着在OCCmfcDoc.h文件类里添加:
Handle(AIS_InteractiveContext) myAISContext;

Handle(V3d_Viewer) myViewer;

Handle(V3d_Viewer) GetViewer(void) {return myViewer;}

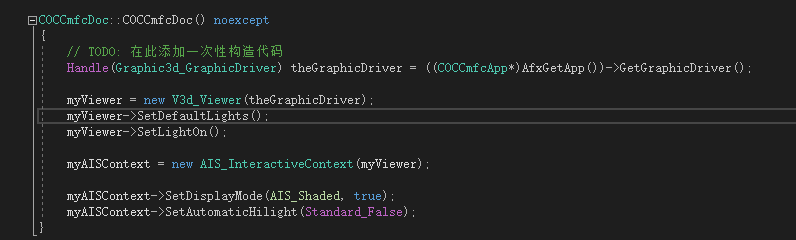
接着去实现文档OCCmfcDoc.cpp中类的构造函数中添加:
Handle(Graphic3d_GraphicDriver) theGraphicDriver = ((CmOCCTApp*)AfxGetApp())->GetGraphicDriver();

    myViewer = new V3d_Viewer(theGraphicDriver);

    myViewer->SetDefaultLights();

    myViewer->SetLightOn();

    myAISContext = new AIS_InteractiveContext(myViewer);

    myAISContext->SetDisplayMode(AIS_Shaded,true);

    myAISContext->SetAutomaticHilight(Standard_False);
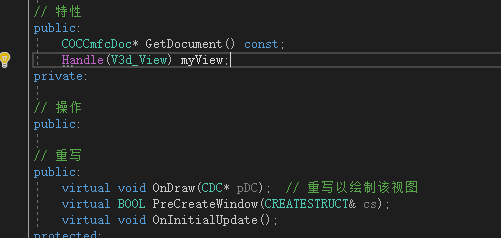
然后去去OCCmfcView.h定义类里添加:
Handle(V3d_View) myView;
和添加要重写的这个函数:
virtual void OnInitialUpdate();
然后去OCCmfcView.cpp文件里添加下面这个实现函数(随便添加在哪里):
void COCCmfcView::OnInitialUpdate()

{

    CView::OnInitialUpdate();

    myView = GetDocument()->GetViewer()->CreateView();

    myView->SetShadingModel(V3d_GOURAUD);

    Handle(Graphic3d_GraphicDriver) theGraphicDriver = ((COCCmfcApp*)AfxGetApp())->GetGraphicDriver();

    Aspect_Handle aWindowHandle = (Aspect_Handle)GetSafeHwnd();

    Handle(WNT_Window) aWntWindow = new WNT_Window(GetSafeHwnd());

    myView->SetWindow(aWntWindow);

    if (!aWntWindow->IsMapped()) {

        aWntWindow->Map();

    }

    Standard_Integer w = ;

    Standard_Integer h = ;

    aWntWindow->Size(w, h);

    ::PostMessage(GetSafeHwnd(), WM_SIZE, SIZE_RESTORED, w + h * );

    myView->FitAll();

    myView->ZBufferTriedronSetup(Quantity_NOC_RED, Quantity_NOC_GREEN, Quantity_NOC_BLUE1, 0.8, 0.05, );

    myView->TriedronDisplay(Aspect_TOTP_LEFT_LOWER, Quantity_NOC_WHITE, 0.2, V3d_ZBUFFER);

}
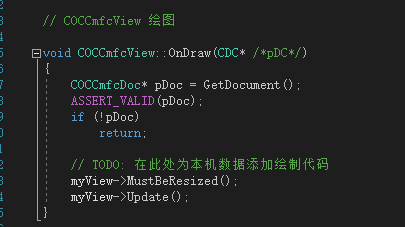
然后在这个文件中的OnDraw()函数中添加:
myView->MustBeResized();

myView->Update();
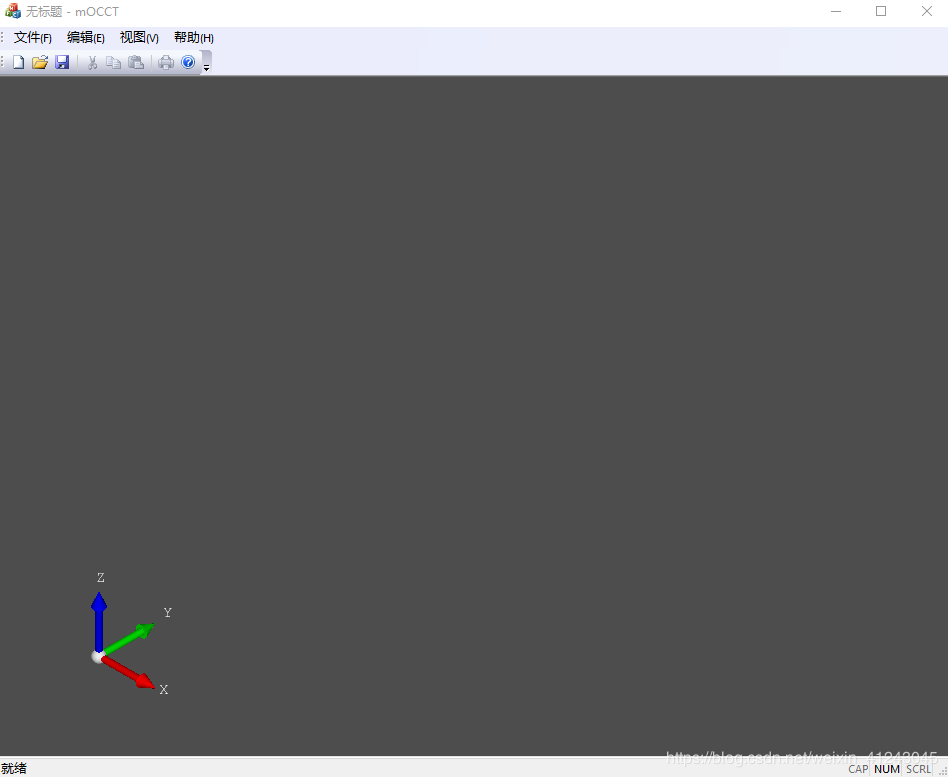
编译运行:
三.绘制图形
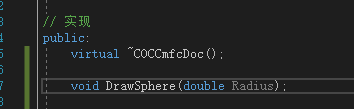
在OCCmfcDoc.h中添加
void DrawSphere(double Radius);
在OCCmfcDoc.cpp中添加函数(随便放哪):
void COCCmfcDoc::DrawSphere(double Radius)

{

    BRepPrimAPI_MakeSphere mkSphere(Radius);

    TopoDS_Shape Sphere = mkSphere.Shape();

    Handle(AIS_Shape) myAISSphere = new AIS_Shape(Sphere);

    myAISContext->Display(myAISSphere, Standard_False);

    CMDIFrameWnd *pFrame = (CMDIFrameWnd*)AfxGetApp()->m_pMainWnd;

    CMDIChildWnd *pChild = (CMDIChildWnd *)pFrame->GetActiveFrame();

    COCCmfcView *pView = (COCCmfcView *)pChild->GetActiveView();

    pView->FitAll();

}
然后在OCCmfcView.h中添加:
void FitAll() { if (!myView.IsNull()) myView->FitAll(); myView->ZFitAll(); };

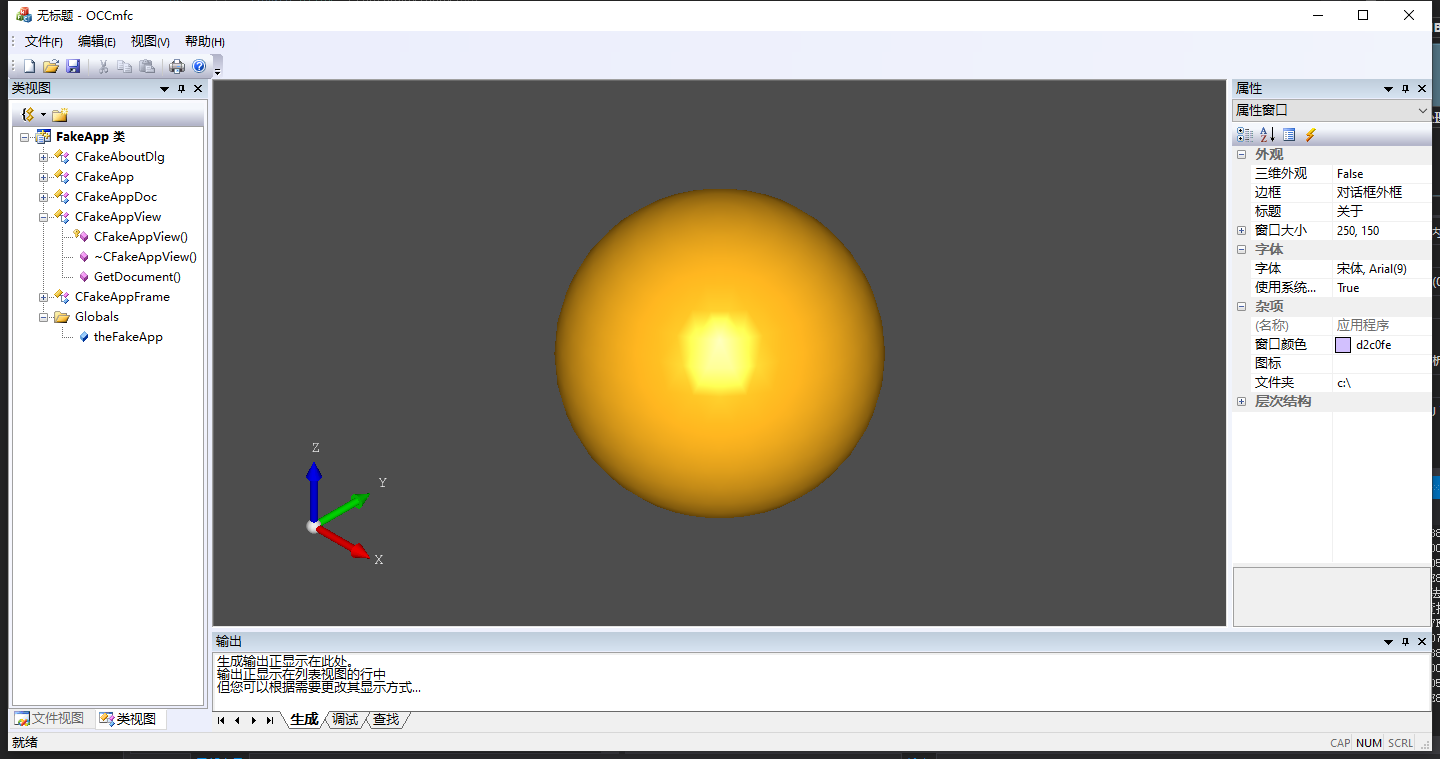
最后在OCCmfcView.cpp文件里的OnDraw()函数里添加:
pDoc->DrawSphere();

然后运行如下所示 画了一个图形出来:
完整代码项目可以关注公众号发送添加小编微信发送文章标题获取。
若有兴趣交流分享技术,可关注本人公众号,里面会不定期的分享各种编程教程,和共享源码,诸如研究分享关于c/c++,python,前端,后端,opencv,halcon,opengl,机器学习深度学习之类有关于基础编程,图像处理和机器视觉开发的知识

OpenCASCADE(一) VS2017+OpenCASCADE+MFC 下载配置安装运行单文档程序画个基本图形的更多相关文章
- MFC学习(七) 单文档程序
1 MFC单文档程序的主要类 (1)文档类(Document) 即应用程序处理的数据对象,文档一般从 MFC 中 CDocument 中派生.CDocument 类用于相应数据文件的读取以及存储 Cv ...
- MFC单文档程序结构
MFC单文档程序结构三方面: Doc MainFrame View
- VC-基础:MFC单文档程序架构解析
MFC单文档程序架构解析 这里我以科院杨老师的单文档程序来分析一下MFC单文档的程序架构,纯属个人见解,不当之处烦请指教! 首先我们了解到的是 图(一) theApp 是唯一一个在程序形成的时候就存在 ...
- MFC单文档程序架构解析
MFC单文档程序架构解析 MFC单文档程序架构解析 这里我以科院杨老师的单文档程序来分析一下MFC单文档的程序架构,纯属个人见解,不当之处烦请指教! 首先我们了解到的是 图(一) theApp 是唯一 ...
- MFC:“Debug Assertion Failed!” ——自动生成的单文档程序项目编译运行就有错误
今天照着孙鑫老师的VC++教程学习文件的操作,VS2010,单文档应用程序,项目文件命名为File,也就有了自动生成的CFileDoc.CFileView等类,一进去就编译运行(就是最初自动生成的项目 ...
- MFC单文档程序添加HTML帮助支持
1.在App类 构造函数中添加 EnableHtmlHelp(); 2.在Frame类中,添加消息影射: ON_COMMAND(ID_HELP_FINDER, CFrameWnd::OnHelpFin ...
- MFC单文档
一.创建并运行MFC单文档程序 1.创建单文档程序 这里使用的是VS2017.首先,打开VS2017,选择文件->新建->项目,然后选择Visual C++ -> MFC /ATL& ...
- MFC设置单文档保存格式以及标题
在使用MFC编写单文档程序时,有时候需要将编辑的内容序列化为文件,使该文件可以直接以自己的程序打开,这时候需要在保存时将文件后缀改为我们想要的格式. 步骤 打开String Table,找到IDR_M ...
- VS2010/MFC编程入门之四十(文档、视图和框架:各对象之间的关系)
前面一节中鸡啄米进行了文档.视图和框架的概述,本节主要讲解文档.视图.框架结构中各对象之间的关系. 各个对象之间的关系 文档.视图.框架结构中涉及到的对象主要有:应用程序对象.文档模板对象.文档对象. ...
随机推荐
- [校内训练20_01_17]ABC
1.平面上每次加入直角边平行于坐标轴的等腰直角三角形,每次询问某个点被覆盖了多少次. 大常数算法:O(nlog^2) #include<bits/stdc++.h> using names ...
- UML--->用例图梳理
用例图梳理 概述 用例图主要用来描述"用户.需求.系统功能单元"之间的关系.它展示了一个外部用户能够观察到的系统功能模型图. 用例图的主要目的是帮助开发团队以一种可视化的方式理解系 ...
- linux--->linux下composer 安装
composer 安装 进入var/src目录中 下载composer安装包 curl -sS https://getcomposer.org/installer | php 设置全局访问 sudo ...
- Windows下Charles从下载安装到证书设置和浏览器抓包
1.在Charles官网https://www.charlesproxy.com/download/下载,我这边下载的是免费体验版的. 2.安装好以后打开,配置Charles证书:选择help——SS ...
- HanLP《自然语言处理入门》笔记--1.新手上路
1. 新手上路 自然语言处理(Natural Language Processing,NLP)是一门融合了计算机科学.人工智能及语言学的交叉学科,它们的关系如下图所示.这门学科研究的是如何通过机器学习 ...
- laravel路由与控制器(资源路由restful)
目前我们大致了解了laravel下,在开始一个Http程序需要先定义路由.之前的例子中,我们的业务逻辑都是在路由里实现,这对于简单的网站或web应用没什么问题,当我们需要扩大规模,程序变得复杂,分层的 ...
- 一段关于用户登录 和乘法表的python代码
用户登录代码(低配): name = 1password =11counter = 1while counter <3 : a = int(input ('name:')) #注意这里 inpu ...
- Visual Studio 常见问题
VS 2013相关问题 VS 2013 Ultimate Update 5 下载地址: 英文版: vs2013.5_ult_enu.iso SHA-1:918EA4A911858D32C9771480 ...
- Codeforces_834
A.两个方向都判断. #include<bits/stdc++.h> using namespace std; string s1,s2; map<char,int> mp; ...
- 用Python来自动刷智慧树网站的网课
学校最近让看什么网课,智慧树网站的,太无聊了,写个脚本刷下,这里是用Python+selenium实现的,也可以用js脚本,更简单,但是我这里刚好最近在学python,就顺便练习下,说下有几个点, 1 ...