COLA的扩展性使用和源码研究
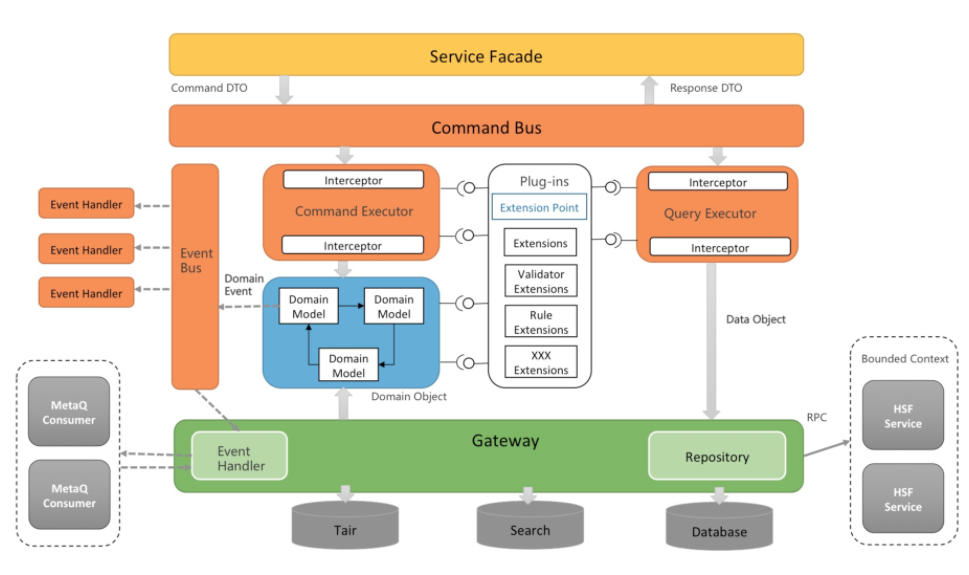
cola扩展点使用和设计初探

封装变化,可灵活应对程序的需求变化。
扩展点使用
步骤:
定义扩展点接口,类型可以是校验器,转换器,实体; 必须以ExtPt结尾,表示一个扩展点。
比如,我定义一个云枢的组织结构的扩展点接口,消息发送扩展点,二开扩展点,webapi的rest接口扩展点点。
定义扩展点接口
package com.authine.web.cola.domain.customer;

import com.alibaba.cola.extension.ExtensionPointI;

import com.authine.web.cola.dto.domainmodel.Department;

import java.util.List;

/**

 * @author carter

 * create_date  2020/5/25 14:25

 * description     定义扩展点接口,对组织机构的某些方法。

 */

public interface OrganizationExtPt extends ExtensionPointI {

    /**

     * 根据corpId查询企业下所有部门

     *

     * @param corpId        企业编号

     * @param includeDelete 是否包含删除的部门

     * @return 部门

     */

    List<Department> getDepartmentsByCorpId(String corpId, Boolean includeDelete);

}
比如业务扩展分为钉钉,微信:
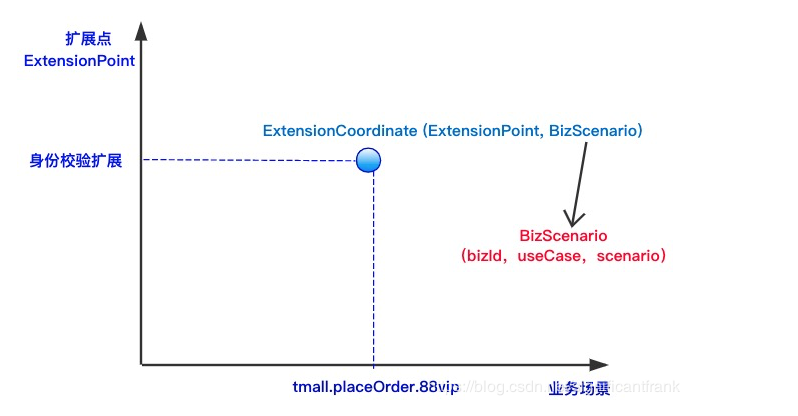
这里基于扩展理论(x,y);
即通过 业务,用例,场景得到扩展点的key, 那后扩展类就是针对实际的业务场景的业务处理代码;

钉钉场景扩展点实现
package com.authine.web.cola.domain.customer.extpt;

import com.alibaba.cola.extension.Extension;

import com.authine.web.cola.dto.domainmodel.Department;

import com.authine.web.cola.domain.customer.OrganizationExtPt;

import lombok.extern.slf4j.Slf4j;

import java.util.Collections;

import java.util.List;

/**

 * @author carter

 * create_date  2020/5/25 14:32

 * description     企业部门在通过corpId获取部门列表的场景下,钉钉的扩展

 */

@Extension(bizId = "organize",useCase = "getByCorpId",scenario = "dingTalk")

@Slf4j

public class DingTalkOrganizationExt implements OrganizationExtPt {

    @Override

    public List<Department> getDepartmentsByCorpId(String corpId, Boolean includeDelete) {

        log.info("在组织结构业务,通过企业编号获取部门列表的用例,在钉钉的场景下业务的实现处理方式");

        log.info("通过钉钉的配置信息和API获取得到组织信息,并组装成云枢识别的部门信息");

        Department department = new Department();

        department.setName("dingTalk");

        department.setCorpId(corpId);

        return Collections.singletonList(department);

    }

}
企业微信扩展点实现
package com.authine.web.cola.domain.customer.extpt;

import com.alibaba.cola.extension.Extension;

import com.authine.web.cola.dto.domainmodel.Department;

import com.authine.web.cola.domain.customer.OrganizationExtPt;

import lombok.extern.slf4j.Slf4j;

import java.util.Collections;

import java.util.List;

/**

 * @author carter

 * create_date  2020/5/25 15:05

 * description     企业微信的扩展点实现

 */

@Extension(bizId = "organize",useCase = "getByCorpId",scenario = "wechat")

@Slf4j

public class WechatOrganizationExt  implements OrganizationExtPt {

    @Override

    public List<Department> getDepartmentsByCorpId(String corpId, Boolean includeDelete) {

        log.info("业务:组织机构,用例:通过企业编号获取部门 , 场景:企业微信");

        log.info("通过企业微信的API获取组织的部门信息,然后包装为需要的部门列表");

        Department department = new Department();

        department.setName("wechat");

        department.setCorpId(corpId);

        return Collections.singletonList(department);

    }

}
扩展点使用
在命令执行器中使用。
package com.authine.web.cola.executor.query;

import com.alibaba.cola.command.Command;

import com.alibaba.cola.command.CommandExecutorI;

import com.alibaba.cola.dto.MultiResponse;

import com.alibaba.cola.extension.ExtensionExecutor;

import com.authine.web.cola.dto.domainmodel.Department;

import com.authine.web.cola.domain.customer.OrganizationExtPt;

import com.authine.web.cola.dto.OrgnizationQry;

import java.util.List;

/**

 * @author carter

 * create_date  2020/5/25 15:09

 * description     查询组织机构的指令执行

 */

@Command

public class OrgazationQueryExe implements CommandExecutorI<MultiResponse, OrgnizationQry> {

    private final ExtensionExecutor extensionExecutor;

    public OrgazationQueryExe(ExtensionExecutor extensionExecutor) {

        this.extensionExecutor = extensionExecutor;

    }

    @Override

    public MultiResponse execute(OrgnizationQry cmd) {

        String corpId = cmd.getCorpId();

        boolean includeDelete = cmd.isIncludeDelete();

        List<Department> departmentList = extensionExecutor.execute(OrganizationExtPt.class, cmd.getBizScenario(),

                ex -> ex.getDepartmentsByCorpId(corpId, includeDelete));

        return MultiResponse.ofWithoutTotal(departmentList);

    }

}
测试扩展点的使用
封装一个http接口来调用。
package com.authine.web.cola.controller;

import com.alibaba.cola.dto.MultiResponse;

import com.alibaba.cola.extension.BizScenario;

import com.authine.web.cola.api.OrganizationServiceI;

import com.authine.web.cola.dto.OrgnizationQry;

import com.authine.web.cola.dto.domainmodel.Department;

import org.springframework.web.bind.annotation.GetMapping;

import org.springframework.web.bind.annotation.PathVariable;

import org.springframework.web.bind.annotation.RestController;

@RestController

public class OrganizationController {

    private final OrganizationServiceI organizationServiceI;

    public OrganizationController(OrganizationServiceI organizationServiceI) {

        this.organizationServiceI = organizationServiceI;

    }

    @GetMapping(value = "/organization/getDepartmentsByCorpId/{corpId}/{scenario}")

    public MultiResponse<Department> listCustomerByName(@PathVariable("corpId") String corpId,@PathVariable("scenario") String scenario){

        OrgnizationQry qry = new OrgnizationQry();

        qry.setCorpId(corpId);

        qry.setIncludeDelete(true);

        qry.setBizScenario(BizScenario.valueOf("organize","getByCorpId",scenario));

        return organizationServiceI.getDepartmentsByCorpId(qry);

    }

}
下面是使用接口进行测试的结果。

小结

基于元数据的扩展点设计,可以灵活的应对 业务场景的多样性,以及灵活的支持版本升级。
其它的扩展点(校验器,转换器)其它等,也可以轻松做到扩展。
使用例子在框架的单元测试用例中。
扩展点设计
设计本质
设计理念。是一种基于数据的配置扩展。即基于注解上带上配置数据。
@Extension 源码如下:
package com.alibaba.cola.extension;

import com.alibaba.cola.common.ColaConstant;

import org.springframework.stereotype.Component;

import java.lang.annotation.*;

@Inherited

@Retention(RetentionPolicy.RUNTIME)

@Target({ElementType.TYPE})

@Component

public @interface Extension {

    String bizId()  default BizScenario.DEFAULT_BIZ_ID;

    String useCase() default BizScenario.DEFAULT_USE_CASE;

    String scenario() default BizScenario.DEFAULT_SCENARIO;

}
图文说明如下:

下面深入源码进行研究。从使用的源码出发。
ExtensionExecutor
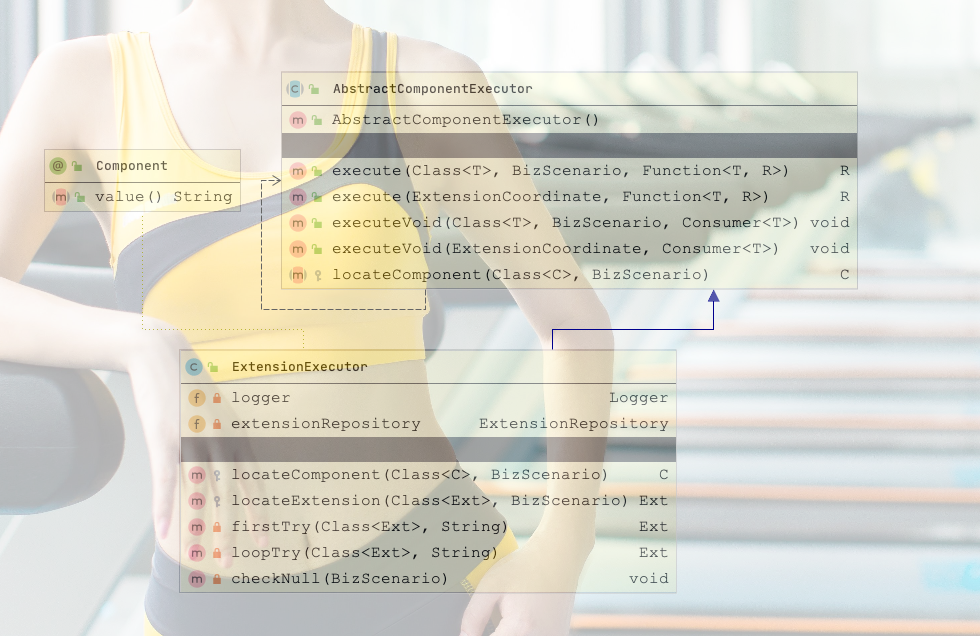
类图如下。
首先,标注了Component,所以,在ioc中可以通过类型拿到实例。
最后,执行函数是放在父类AbstractComponentExecutor中;

重点分析一下它实现的功能:即通过坐标得到扩展实例;
 /**

     * if the bizScenarioUniqueIdentity is "ali.tmall.supermarket"

     *

     * the search path is as below:

     * 1、first try to get extension by "ali.tmall.supermarket", if get, return it.

     * 2、loop try to get extension by "ali.tmall", if get, return it.

     * 3、loop try to get extension by "ali", if get, return it.

     * 4、if not found, try the default extension

     * @param targetClz

     */

    protected <Ext> Ext locateExtension(Class<Ext> targetClz, BizScenario bizScenario) {

        checkNull(bizScenario);

        Ext extension;

        String bizScenarioUniqueIdentity = bizScenario.getUniqueIdentity();

        logger.debug("BizScenario in locateExtension is : " + bizScenarioUniqueIdentity);

        // first try

        extension = firstTry(targetClz, bizScenarioUniqueIdentity);

        if (extension != null) {

            return extension;

        }

        // loop try

        extension = loopTry(targetClz, bizScenarioUniqueIdentity);

        if (extension != null) {

            return extension;

        }

        throw new ColaException("Can not find extension with ExtensionPoint: "+targetClz+" BizScenario:"+bizScenarioUniqueIdentity);

    }
实现步骤如下:

ExtensionRepository
package com.alibaba.cola.extension;

import java.util.HashMap;

import java.util.Map;

import org.springframework.stereotype.Component;

import lombok.Getter;

/**

 * ExtensionRepository

 * @author fulan.zjf 2017-11-05

 */

@Component

public class ExtensionRepository {

    @Getter

    private Map<ExtensionCoordinate, ExtensionPointI> extensionRepo = new HashMap<>();

}
里面是一个空的map,主要还是看组装过程。看下面的ExtensionRegister;
ExtensionRegister
看名字,就是注册扩展的组件。
/*

 * Copyright 2017 Alibaba.com All right reserved. This software is the

 * confidential and proprietary information of Alibaba.com ("Confidential

 * Information"). You shall not disclose such Confidential Information and shall

 * use it only in accordance with the terms of the license agreement you entered

 * into with Alibaba.com.

 */

package com.alibaba.cola.boot;

import com.alibaba.cola.common.ApplicationContextHelper;

import com.alibaba.cola.common.ColaConstant;

import com.alibaba.cola.exception.framework.ColaException;

import com.alibaba.cola.extension.*;

import org.apache.commons.lang3.ArrayUtils;

import org.apache.commons.lang3.StringUtils;

import org.springframework.beans.factory.annotation.Autowired;

import org.springframework.stereotype.Component;

/**

 * ExtensionRegister

 * @author fulan.zjf 2017-11-05

 */

@Component

public class ExtensionRegister implements RegisterI{

    @Autowired

    private ExtensionRepository extensionRepository;

    @Override

    public void doRegistration(Class<?> targetClz) {

        ExtensionPointI extension = (ExtensionPointI) ApplicationContextHelper.getBean(targetClz);

        Extension extensionAnn = targetClz.getDeclaredAnnotation(Extension.class);

        String extPtClassName = calculateExtensionPoint(targetClz);

        BizScenario bizScenario = BizScenario.valueOf(extensionAnn.bizId(), extensionAnn.useCase(), extensionAnn.scenario());

        ExtensionCoordinate extensionCoordinate = new ExtensionCoordinate(extPtClassName, bizScenario.getUniqueIdentity());

        ExtensionPointI preVal = extensionRepository.getExtensionRepo().put(extensionCoordinate, extension);

        if (preVal != null) {

            throw new ColaException("Duplicate registration is not allowed for :" + extensionCoordinate);

        }

    }

    /**

     * @param targetClz

     * @return

     */

    private String calculateExtensionPoint(Class<?> targetClz) {

        Class[] interfaces = targetClz.getInterfaces();

        if (ArrayUtils.isEmpty(interfaces))

            throw new ColaException("Please assign a extension point interface for "+targetClz);

        for (Class intf : interfaces) {

            String extensionPoint = intf.getSimpleName();

            if (StringUtils.contains(extensionPoint, ColaConstant.EXTENSION_EXTPT_NAMING))

                return intf.getName();

        }

        throw new ColaException("Your name of ExtensionPoint for "+targetClz+" is not valid, must be end of "+ ColaConstant.EXTENSION_EXTPT_NAMING);

    }

}
注册过程如下:

以上是扩展类注册到扩展仓库的过程。
注册时机。启动的时刻通过包扫描进行注册。
RegisterFactory
把各种注册器放入到ioc中,通过一个统一的方法返回。
/*

 * Copyright 2017 Alibaba.com All right reserved. This software is the

 * confidential and proprietary information of Alibaba.com ("Confidential

 * Information"). You shall not disclose such Confidential Information and shall

 * use it only in accordance with the terms of the license agreement you entered

 * into with Alibaba.com.

 */

package com.alibaba.cola.boot;

import com.alibaba.cola.command.Command;

import com.alibaba.cola.command.PostInterceptor;

import com.alibaba.cola.command.PreInterceptor;

import com.alibaba.cola.event.EventHandler;

import com.alibaba.cola.extension.Extension;

import org.springframework.beans.factory.annotation.Autowired;

import org.springframework.stereotype.Component;

/**

 * RegisterFactory

 *

 * @author fulan.zjf 2017-11-04

 */

@Component

public class RegisterFactory{

    @Autowired

    private PreInterceptorRegister preInterceptorRegister;

    @Autowired

    private PostInterceptorRegister postInterceptorRegister;

    @Autowired

    private CommandRegister commandRegister;

    @Autowired

    private ExtensionRegister extensionRegister;

    @Autowired

    private EventRegister eventRegister;

    public RegisterI getRegister(Class<?> targetClz) {

        PreInterceptor preInterceptorAnn = targetClz.getDeclaredAnnotation(PreInterceptor.class);

        if (preInterceptorAnn != null) {

            return preInterceptorRegister;

        }

        PostInterceptor postInterceptorAnn = targetClz.getDeclaredAnnotation(PostInterceptor.class);

        if (postInterceptorAnn != null) {

            return postInterceptorRegister;

        }

        Command commandAnn = targetClz.getDeclaredAnnotation(Command.class);

        if (commandAnn != null) {

            return commandRegister;

        }

        Extension extensionAnn = targetClz.getDeclaredAnnotation(Extension.class);

        if (extensionAnn != null) {

            return extensionRegister;

        }

        EventHandler eventHandlerAnn = targetClz.getDeclaredAnnotation(EventHandler.class);

        if (eventHandlerAnn != null) {

            return eventRegister;

        }

        return null;

    }

}
BootStrap
扫描java的class,进行ioc组装;
/*

 * Copyright 2017 Alibaba.com All right reserved. This software is the

 * confidential and proprietary information of Alibaba.com ("Confidential

 * Information"). You shall not disclose such Confidential Information and shall

 * use it only in accordance with the terms of the license agreement you entered

 * into with Alibaba.com.

 */

package com.alibaba.cola.boot;

import java.util.List;

import java.util.Set;

import java.util.TreeSet;

import org.springframework.beans.factory.annotation.Autowired;

import com.alibaba.cola.exception.framework.ColaException;

import lombok.Getter;

import lombok.Setter;

/**

 * <B>应用的核心引导启动类</B>

 * <p>

 * 负责扫描在applicationContext.xml中配置的packages. 获取到CommandExecutors, intercepters, extensions, validators等

 * 交给各个注册器进行注册。

 *

 * @author fulan.zjf 2017-11-04

 */

public class Bootstrap {

    @Getter

    @Setter

    private List<String> packages;

    private ClassPathScanHandler handler;

    @Autowired

    private RegisterFactory registerFactory;

    public void init() {

        Set<Class<?>> classSet = scanConfiguredPackages();

        registerBeans(classSet);

    }

    /**

     * @param classSet

     */

    private void registerBeans(Set<Class<?>> classSet) {

        for (Class<?> targetClz : classSet) {

            RegisterI register = registerFactory.getRegister(targetClz);

            if (null != register) {

                register.doRegistration(targetClz);

            }

        }

    }
其它的核心组件的注册也在该代码中。
AbstractComponentExecutor
抽象的组件执行器,主要功能是定位到扩展类,然后执行接口的方法。
源码如下:
package com.alibaba.cola.boot;

import com.alibaba.cola.extension.BizScenario;

import com.alibaba.cola.extension.ExtensionCoordinate;

import java.util.function.Consumer;

import java.util.function.Function;

/**

 * @author fulan.zjf

 * @date 2017/12/21

 */

public abstract class AbstractComponentExecutor {

    /**

     * Execute extension with Response

     *

     * @param targetClz

     * @param bizScenario

     * @param exeFunction

     * @param <R> Response Type

     * @param <T> Parameter Type

     * @return

     */

    public <R, T> R execute(Class<T> targetClz, BizScenario bizScenario, Function<T, R> exeFunction) {

        T component = locateComponent(targetClz, bizScenario);

        return exeFunction.apply(component);

    }

    public <R, T> R execute(ExtensionCoordinate extensionCoordinate, Function<T, R> exeFunction){

        return execute((Class<T>) extensionCoordinate.getExtensionPointClass(), extensionCoordinate.getBizScenario(), exeFunction);

    }

    /**

     * Execute extension without Response

     *

     * @param targetClz

     * @param context

     * @param exeFunction

     * @param <T> Parameter Type

     */

    public <T> void executeVoid(Class<T> targetClz, BizScenario context, Consumer<T> exeFunction) {

        T component = locateComponent(targetClz, context);

        exeFunction.accept(component);

    }

    public <T> void executeVoid(ExtensionCoordinate extensionCoordinate, Consumer<T> exeFunction){

        executeVoid(extensionCoordinate.getExtensionPointClass(), extensionCoordinate.getBizScenario(), exeFunction);

    }

    protected abstract <C> C locateComponent(Class<C> targetClz, BizScenario context);

}
主要用到了java8的函数式接口Function<T,R>.
T:即系统中注册好的扩展类实例;
R即调用T的使用类的方法,执行之后的返回值。
把执行哪个方法的选择权交给了业务逻辑代码。
提供了4种不同的重载方法。
小结
通过key,value的方式进行扩展。
代码
原创不易,关注诚可贵,转发价更高!转载请注明出处,让我们互通有无,共同进步,欢迎沟通交流。
我会持续分享Java软件编程知识和程序员发展职业之路,欢迎关注,我整理了这些年编程学习的各种资源,关注公众号‘李福春持续输出’,发送'学习资料'分享给你!
COLA的扩展性使用和源码研究的更多相关文章
- MapReduce多用户任务调度器——容量调度器(Capacity Scheduler)原理和源码研究
前言:为了研究需要,将Capacity Scheduler和Fair Scheduler的原理和代码进行学习,用两篇文章作为记录.如有理解错误之处,欢迎批评指正. 容量调度器(Capacity Sch ...
- 《Netty5.0架构剖析和源码解读》【PDF】下载
<Netty5.0架构剖析和源码解读>[PDF]下载链接: https://u253469.pipipan.com/fs/253469-230062545 内容简介 Netty 是个异步的 ...
- 使用Lua脚本语言开发出高扩展性的系统,AgileEAS.NET SOA中间件Lua脚本引擎介绍
一.前言 AgileEAS.NET SOA 中间件平台是一款基于基于敏捷并行开发思想和Microsoft .Net构件(组件)开发技术而构建的一个快速开发应用平台.用于帮助中小型软件企业建立一条适合市 ...
- Java并发编程:性能、扩展性和响应
1.介绍 本文讨论的重点在于多线程应用程序的性能问题.我们会先给性能和扩展性下一个定义,然后再仔细学习一下Amdahl法则.下面的内容我们会考察一下如何用不同的技术方法来减少锁竞争,以及如何用代码来实 ...
- Zend server最大化应用程序的性能、扩展性和可用性
如果我有8个小时去砍到一棵树,我会花6个小时磨斧子”——林肯(美国总统) 你可以知道? 世界页面访问量的峰值超过7000万每分钟. CloudFare公司服务器问题,导致785000站点崩溃一小时. ...
- [Spark内核] 第32课:Spark Worker原理和源码剖析解密:Worker工作流程图、Worker启动Driver源码解密、Worker启动Executor源码解密等
本課主題 Spark Worker 原理 Worker 启动 Driver 源码鉴赏 Worker 启动 Executor 源码鉴赏 Worker 与 Master 的交互关系 [引言部份:你希望读者 ...
- Dubbo原理和源码解析之“微内核+插件”机制
github新增仓库 "dubbo-read"(点此查看),集合所有<Dubbo原理和源码解析>系列文章,后续将继续补充该系列,同时将针对Dubbo所做的功能扩展也进行 ...
- 【转】rpm包和源码包安装的区别
转自:https://blog.csdn.net/junjie_6/article/details/59483785 建议在安装线上的生产服务器软件包时都用源码安装,这是因为源码安装可以自行调整编译参 ...
- Java并发编程(七)ConcurrentLinkedQueue的实现原理和源码分析
相关文章 Java并发编程(一)线程定义.状态和属性 Java并发编程(二)同步 Java并发编程(三)volatile域 Java并发编程(四)Java内存模型 Java并发编程(五)Concurr ...
随机推荐
- Codeforce-Ozon Tech Challenge 2020-B. Kuroni and Simple Strings(贪心)
B. Kuroni and Simple Strings time limit per test1 second memory limit per test256 megabytes inputsta ...
- codeforce 266c Below the Diagonal 矩阵变换 (思维题)
C. Below the Diagonal You are given a square matrix consisting of n rows and n columns. We assume th ...
- Springboot-WebFlux实现http重定向到https
1 简介 Spring WebFlux是一个新兴的技术,Spring团队把宝都压在响应式Reactive上了,于是推出了全新的Web实现.本文不讨论响应式编程,而是通过实例讲解Springboot W ...
- 7) 项目准备流程 和 django权限六表
一.项目准备 1. 创建django项目 2. 创建数据库 —— init文件中声明mysql —— settings中配置数据库 import pymysql pymysql.install_as_ ...
- python——random.sample()的用法
写脚本过程中用到了需要随机一段字符串的操作,查了一下资料,对于random.sample的用法,多用于截取列表的指定长度的随机数,但是不会改变列表本身的排序: list = [0,1,2,3,4] r ...
- 题目分享I
题意:2*n的地面,q次操作,每次操作将地面翻转,若该地是地面那翻转就成熔岩,如果是熔岩那翻转就成地面,熔岩人不能走,问人是否能从1,1走到2,n (ps:1,1和2,n不会在翻转的范围内,n,q≤1 ...
- c++ concurrency
c++的并发涉及到这么几个东西: std::thread std::mutex std::lock_guard std::lock 参考资料: http://en.cppreference.com/w ...
- opencv基于PCA降维算法的人脸识别
opencv基于PCA降维算法的人脸识别(att_faces) 一.数据提取与处理 # 导入所需模块 import matplotlib.pyplot as plt import numpy as n ...
- E - Help Jimmy POJ - 1661 dp
E - Help Jimmy POJ - 1661 这个题目本身不是很难,但是可以更加优化这个写法. 开始是n*n #include <cstdio> #include <cstri ...
- python2执行程序报错:NameError: name 'y' is not defined
然后运行一直报错 这个错误,是由于版本不同造成的语法错误,在python3中,输入可以使用input,但如果你的版本是python2,那么此时input就得改成raw_input,否则你输入数据会被当 ...

