React 源码剖析系列 - 生命周期的管理艺术
目前,前端领域中 React 势头正盛,很少能够深入剖析内部实现机制和原理。
本系列文章 希望通过剖析 React 源码,理解其内部的实现原理,知其然更要知其所以然。
对于 React,其组件生命周期(Component Lifecycle)是它的核心概念,本文从源码入手,来剖析 React 生命周期的管理艺术。
阅读本文需要对 React 有一定的了解,如果你不知何为组件的生命周期,请详读 React 生命周期的文档。
如果你对 React 组件的生命周期存在些许疑惑,如生命周期如何顺序管理;setState 如何实现异步操作,又是何时真正更新等,那么本文值得阅读。
前言
React 的主要思想是通过构建可复用组件来构建用户界面。
所谓组件其实就是 有限状态机,通过状态渲染对应的界面,且每个组件都有自己的生命周期,
它规定了组件的状态和方法需要在哪个阶段进行改变和执行。
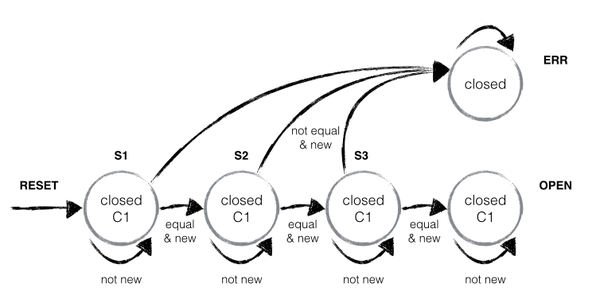
有限状态机(FSM),表示有限个状态以及在这些状态之间的转移和动作等行为的模型。
一般通过状态、事件、转换和动作来描述有限状态机,下面是描述组合锁状态机的模型图,
包括5个状态、5个状态自转换、6个状态间转换和1个复位 RESET 转换到状态 S1。状态机,
能够记住目前所处的状态,根据当前的状态可以做出相应的决策,
并且在进入不同的状态时,可以做不同的操作。
通过状态机将复杂的关系简单化,利用这种自然而直观的方式可以让代码更容易理解。
React 正是利用这一概念,通过管理状态来实现对组件的管理。
例如,某个组件有显示和隐藏两个状态,通常会设计两个方法 show() 和 hide() 来实现切换;
而 React 只需要设置状态 setState({ showed: true/false }) 即可实现。
同时,React 还引入了组件的生命周期概念。通过它就可以实现组件的状态机控制,从而达到 “生命周期-状态-组件” 的和谐画面。
虽然组件、状态机、生命周期这三者都不是 React 独创,如果熟悉 Web Components 标准,
它与其中的自定义组件的生命周期的概念相似。但就目前而言,React 是将这三种概念结合地相对清晰流畅的界面库。
初探 React 生命周期
在自定义 React 组件时,根据需要会在组件生命周期的不同阶段实现不同的逻辑。
为了查看 组件生命周期的执行顺序,你可以使用 react-lifecycle mixin,
将此 mixin 添加到需要观察的组件中,当任何生命周期方法被调用时,都能在控制台观察到对应的生命周期的调用时状态。
// react-lifecycle mixin

import React from 'react';

import ReactDom from 'react-dom';

import LifeCycle from 'react-lifecycle';

const body = document.body;

const MyComponent = React.createClass({

  mixins: [LifeCycle],

  render() {

    console.log('render');

    return null;

  }

});

ReactDom.render(<MyComponent />, body);

ReactDom.unmountComponentAtNode(body);

ReactDom.render(<MyComponent />, body);

ReactDom.render(<MyComponent />, body);
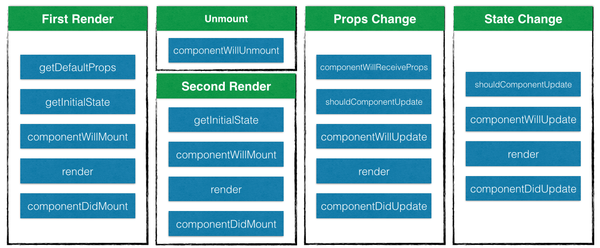
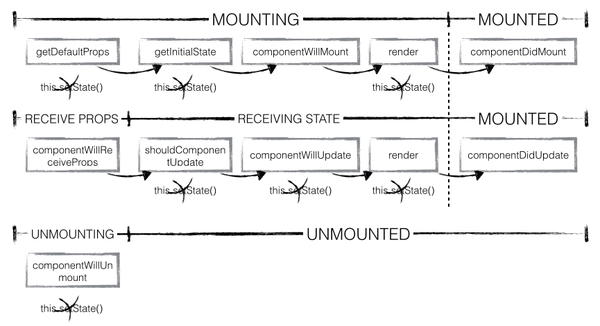
通过反复试验,得到了组件的生命周期在不同状态下的执行顺序:经典
当首次装载组件时,按顺序执行 getDefaultProps、getInitialState、componentWillMount、render 和 componentDidMount;
当卸载组件时,执行 componentWillUnmount;
当重新装载组件时,此时按顺序执行 getInitialState、componentWillMount、render 和 componentDidMount,但并不执行 getDefaultProps;
当再次渲染组件时,组件接受到更新状态,此时按顺序执行 componentWillReceiveProps、shouldComponentUpdate、componentWillUpdate、render 和 componentDidUpdate。
疑问
为何 React 会按上述顺序执行生命周期?
为何 React 多次 render 时,会执行生命周期的不同阶段?
为何 getDefaultProps 只执行了1次?
详解 React 生命周期
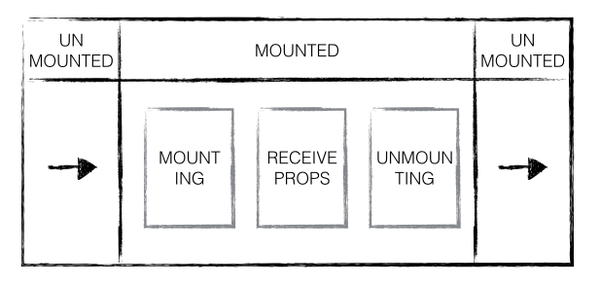
自定义组件(ReactCompositeComponent)的生命周期主要通过三种状态进行管理:
MOUNTING、RECEIVE_PROPS、UNMOUNTING,它们负责通知组件当前所处的状态,
应该执行生命周期中的哪个步骤,是否可以更新 state。三个状态对应三种方法,
分别为:mountComponent、updateComponent、unmountComponent,
每个方法都提供了两种处理方法,will 方法在进入状态之前调用,
did 方法在进入状态之后调用,三种状态三种方法五种处理方法,此外还提供两种特殊状态的处理方法。
mountComponent -> MOUNTING
updateComponent -> RECEIVE_PROPS
unmountComponent -> UNMOUNTING
createClass 创建自定义组件
createClass 创建自定义组件的入口方法,负责管理生命周期中的 getDefaultProps。
getDefaultProps 方法只执行一次,这样所有实例初始化的 props 将会被共享。
通过 createClass 创建自定义组件,利用原型继承 ReactCompositeComponentBase 父类,
按顺序合并 mixins,设置初始化 defaultProps,创建元素 ReactElement。
// ReactCompositeComponent 的基类

var ReactCompositeComponentBase = function() {};

// 将 Mixin 合并到 ReactCompositeComponentBase 的原型上

assign(

  ReactCompositeComponentBase.prototype,

  ReactComponent.Mixin,

  ReactOwner.Mixin,

  ReactPropTransferer.Mixin,

  ReactCompositeComponentMixin

);

var ReactCompositeComponent = {

  LifeCycle: CompositeLifeCycle,

  Base: ReactCompositeComponentBase,

  // 创建组件

  createClass: function(spec) {

    // 构造函数

    var Constructor = function(props, context) {

      this.props = props;

      this.context = context;

      this.state = null;

      var initialState = this.getInitialState ? this.getInitialState() : null;

      this.state = initialState;

    };

    // 原型继承父类

    Constructor.prototype = new ReactCompositeComponentBase();

    Constructor.prototype.constructor = Constructor;

    // 合并 mixins

    injectedMixins.forEach(

      mixSpecIntoComponent.bind(null, Constructor)

    );

    mixSpecIntoComponent(Constructor, spec);

    // mixins 合并后装载 defaultProps (React整个生命周期中 getDefaultProps 只执行一次)

    if (Constructor.getDefaultProps) {

      Constructor.defaultProps = Constructor.getDefaultProps();

    }

    for (var methodName in ReactCompositeComponentInterface) {

      if (!Constructor.prototype[methodName]) {

        Constructor.prototype[methodName] = null;

      }

    }

    return ReactElement.createFactory(Constructor);

  }

}
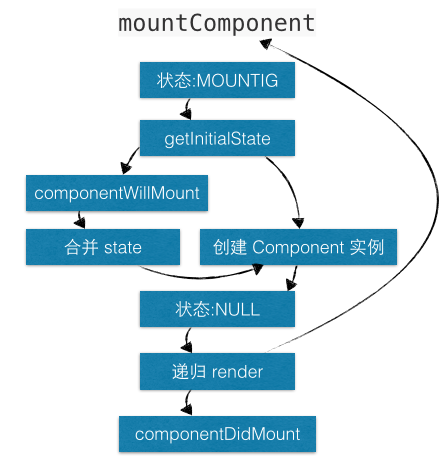
状态一:MOUNTING
mountComponent 负责管理生命周期中的 getInitialState、componentWillMount、render 和 componentDidMount。
由于 getDefaultProps 是通过 Constructor 进行管理,因此也是整个生命周期中最先开始执行,而 mountComponent 只能望洋兴叹,无法调用到 getDefaultProps。这就解释了为何 getDefaultProps 只执行1次的原因。
由于通过 ReactCompositeComponentBase 返回的是一个虚拟节点,因此需要利用 instantiateReactComponent 去得到实例,再使用 mountComponent 拿到结果作为当前自定义元素的结果。
首先通过 mountComponent 装载组件,此时,将状态设置为 MOUNTING,利用 getInitialState 获取初始化 state,初始化更新队列。
若存在 componentWillMount,则执行;如果此时在 componentWillMount 中调用 setState,是不会触发 reRender,而是进行 state 合并。
到此时,已经完成 MOUNTING 的工作,更新状态为 NULL,同时 state 也将执行更新操作,此刻在 render 中可以获取更新后的 this.state 数据。
其实,mountComponent 本质上是通过 递归渲染 内容的,由于递归的特性,父组件的 componentWillMount 一定在其子组件的 componentWillMount 之前调用,而父组件的 componentDidMount 肯定在其子组件的 componentDidMount 之后调用。
当渲染完成之后,若存在 componentDidMount 则触发。这就解释了 componentWillMount - render - componentDidMount 三者之间的执行顺序。
instantiateReactComponent 通过判断元素类型(类型包括:object、string、function)创建元素实例,这里不做过多介绍,当讲解到 React Virtual DOM 时,再详细介绍此方法。
// 装载组件

mountComponent: function(rootID, transaction, mountDepth) {

  // 当前状态为 MOUNTING

  this._compositeLifeCycleState = CompositeLifeCycle.MOUNTING;

  // 当前元素对应的上下文

  this.context = this._processContext(this._currentElement._context);

  // 当前元素对应的 props

  this.props = this._processProps(this.props);

  // 获取初始化 state

  this.state = this.getInitialState();

  // 初始化更新队列

  this._pendingState = null;

  this._pendingForceUpdate = false;

  // componentWillMount 调用setstate,不会触发rerender而是自动提前合并

  if (this.componentWillMount) {

    this.componentWillMount();

    if (this._pendingState) {

      this.state = this._pendingState;

      this._pendingState = null;

    }

  }

  // 得到 _currentElement 对应的 component 类实例

  this._renderedComponent = instantiateReactComponent(

    this._renderValidatedComponent(),

    this._currentElement.type

  );

  // 完成 MOUNTING,更新 state

  this._compositeLifeCycleState = null;

  // render 递归渲染

  var markup = this._renderedComponent.mountComponent(

    rootID,

    transaction,

    mountDepth + 1

  );

  // 如果存在 this.componentDidMount,则渲染完成后触发

  if (this.componentDidMount) {

    transaction.getReactMountReady().enqueue(this.componentDidMount, this);

  }

  return markup;

}
状态二:RECEIVE_PROPS
updateComponent 负责管理生命周期中的 componentWillReceiveProps、shouldComponentUpdate、componentWillUpdate、render 和 componentDidUpdate。
首先通过 updateComponent 更新组件,如果前后元素不一致说明需要进行组件更新,此时将状态设置为RECEIVING_PROPS。
若存在 componentWillReceiveProps,则执行;如果此时在 componentWillReceiveProps 中调用 setState,是不会触发 reRender,而是进行 state 合并。
到此时,已经完成 RECEIVING_PROPS 工作,更新状态为 NULL,同时 state 也将执行更新操作,此刻 this.state 可以获取到更新后的数据。
注意:此时 this.state 虽然获取到更新数据,但只能在内部源码中使用,我们在开发时,若在 componentWillReceiveProps 中调用 setState,那么在 componentWillReceiveProps、shouldComponentUpdate 和 componentWillUpdate 中还是无法获取到更新后的 this.state,即此时访问的this.state 仍然是未更新的数据,只有在 render 和 componentDidUpdate 中才能获取到更新后的this.state。
调用 shouldComponentUpdate 判断是否需要进行组件更新,如果存在 componentWillUpdate,则执行。
updateComponent 本质上也是通过 递归渲染 内容的,由于递归的特性,父组件的 componentWillUpdate 一定在其子组件的 componentWillUpdate 之前调用,而父组件的 componentDidUpdate 肯定在其子组件 componentDidUpdate 之后调用。
当渲染完成之后,若存在 componentDidUpdate,则触发,这就解释了 componentWillReceiveProps - componentWillUpdate - render - componentDidUpdate 它们之间的执行顺序。
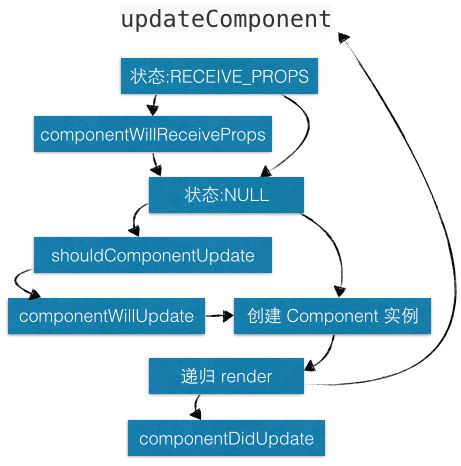
注意:禁止在 shouldComponentUpdate 和 componentWillUpdate 中调用 setState,会造成循环调用,直至耗光浏览器内存后崩溃。(请继续阅读,寻找答案)
// 更新组件

updateComponent: function(transaction, prevParentElement, nextParentElement) {

  var prevContext = this.context;

  var prevProps = this.props;

  var nextContext = prevContext;

  var nextProps = prevProps;

  if (prevParentElement !== nextParentElement) {

    nextContext = this._processContext(nextParentElement._context);

    nextProps = this._processProps(nextParentElement.props);

    // 当前状态为 RECEIVING_PROPS

    this._compositeLifeCycleState = CompositeLifeCycle.RECEIVING_PROPS;

    // 如果存在 componentWillReceiveProps,则执行

    if (this.componentWillReceiveProps) {

      this.componentWillReceiveProps(nextProps, nextContext);

    }

  }

  // 设置状态为 null,更新 state

  this._compositeLifeCycleState = null;

  var nextState = this._pendingState || this.state;

  this._pendingState = null;

  var shouldUpdate =

    this._pendingForceUpdate ||

    !this.shouldComponentUpdate ||

    this.shouldComponentUpdate(nextProps, nextState, nextContext);

  if (!shouldUpdate) {

    // 如果确定组件不更新,仍然要设置 props 和 state

    this._currentElement = nextParentElement;

    this.props = nextProps;

    this.state = nextState;

    this.context = nextContext;

    this._owner = nextParentElement._owner;

    return;

  }

  this._pendingForceUpdate = false;

  ......

  // 如果存在 componentWillUpdate,则触发

  if (this.componentWillUpdate) {

    this.componentWillUpdate(nextProps, nextState, nextContext);

  }

  // render 递归渲染

  var nextMarkup = this._renderedComponent.mountComponent(

    thisID,

    transaction,

    this._mountDepth + 1

  );

  // 如果存在 componentDidUpdate,则触发

  if (this.componentDidUpdate) {

    transaction.getReactMountReady().enqueue(

      this.componentDidUpdate.bind(this, prevProps, prevState, prevContext),

      this

    );

  }

}
状态三:UNMOUNTING
unmountComponent 负责管理生命周期中的 componentWillUnmount。
首先将状态设置为 UNMOUNTING,若存在 componentWillUnmount,则执行;如果此时在 componentWillUnmount 中调用 setState,是不会触发 reRender。更新状态为 NULL,完成组件卸载操作。
// 卸载组件

unmountComponent: function() {

  // 设置状态为 UNMOUNTING

  this._compositeLifeCycleState = CompositeLifeCycle.UNMOUNTING;

  // 如果存在 componentWillUnmount,则触发

  if (this.componentWillUnmount) {

    this.componentWillUnmount();

  }

  // 更新状态为 null

  this._compositeLifeCycleState = null;

  this._renderedComponent.unmountComponent();

  this._renderedComponent = null;

  ReactComponent.Mixin.unmountComponent.call(this);

}
setState 更新机制
当调用 setState 时,会对 state 以及 _pendingState 更新队列进行合并操作,但其实真正更新 state 的幕后黑手是replaceState。
replaceState 会先判断当前状态是否为 MOUNTING,如果不是即会调用 ReactUpdates.enqueueUpdate 执行更新。
当状态不为 MOUNTING 或 RECEIVING_PROPS 时,performUpdateIfNecessary 会获取 _pendingElement、_pendingState、_pendingForceUpdate,并调用 updateComponent 进行组件更新。
如果在 shouldComponentUpdate 或 componentWillUpdate 中调用 setState,此时的状态已经从 RECEIVING_PROPS -> NULL,则 performUpdateIfNecessary 就会调用 updateComponent 进行组件更新,但 updateComponent 又会调用 shouldComponentUpdate 和 componentWillUpdate,因此造成循环调用,使得浏览器内存占满后崩溃。

// 更新 state

setState: function(partialState, callback) {

  // 合并 _pendingState

  this.replaceState(

    assign({}, this._pendingState || this.state, partialState),

    callback

  );

},

// 更新 state

replaceState: function(completeState, callback) {

  validateLifeCycleOnReplaceState(this);

  // 更新队列

  this._pendingState = completeState;

  // 判断状态是否为 MOUNTING,如果不是,即可执行更新

  if (this._compositeLifeCycleState !== CompositeLifeCycle.MOUNTING) {

    ReactUpdates.enqueueUpdate(this, callback);

  }

},

// 如果存在 _pendingElement、_pendingState、_pendingForceUpdate,则更新组件

performUpdateIfNecessary: function(transaction) {

  var compositeLifeCycleState = this._compositeLifeCycleState;

  // 当状态为 MOUNTING 或 RECEIVING_PROPS时,则不更新

  if (compositeLifeCycleState === CompositeLifeCycle.MOUNTING ||

      compositeLifeCycleState === CompositeLifeCycle.RECEIVING_PROPS) {

    return;

  }

  var prevElement = this._currentElement;

  var nextElement = prevElement;

  if (this._pendingElement != null) {

    nextElement = this._pendingElement;

    this._pendingElement = null;

  }

  // 调用 updateComponent

  this.updateComponent(

    transaction,

    prevElement,

    nextElement

  );

}
总结
React 通过三种状态:MOUNTING、RECEIVE_PROPS、UNMOUNTING,管理整个生命周期的执行顺序;
setState 会先进行 _pendingState 更新队列的合并操作,不会立刻 reRender,因此是异步操作,且通过判断状态(MOUNTING、RECEIVE_PROPS)来控制 reRender 的时机;
不建议在 getDefaultProps、getInitialState、shouldComponentUpdate、componentWillUpdate、render 和 componentWillUnmount 中调用 setState,特别注意:不能在 shouldComponentUpdate 和 componentWillUpdate中调用 setState,会导致循环调用。
参考资料
如果本文能够为你解决些许关于 React 生命周期管理的疑惑,请点个赞吧!
React 源码剖析系列 - 生命周期的管理艺术的更多相关文章
- React源码剖析系列 - 生命周期的管理艺术
目前,前端领域中 React 势头正盛,很少能够深入剖析内部实现机制和原理.本系列文章希望通过剖析 React 源码,理解其内部的实现原理,知其然更要知其所以然. 对于 React,其组件生命周期(C ...
- React 源码剖析系列 - 不可思议的 react diff
简单点的重复利用已有的dom和其他REACT性能快的原理. key的作用和虚拟节点 目前,前端领域中 React 势头正盛,使用者众多却少有能够深入剖析内部实现机制和原理. 本系列文章希望通过剖析 ...
- 【java集合框架源码剖析系列】java源码剖析之TreeSet
本博客将从源码的角度带领大家学习TreeSet相关的知识. 一TreeSet类的定义: public class TreeSet<E> extends AbstractSet<E&g ...
- 【java集合框架源码剖析系列】java源码剖析之HashSet
注:博主java集合框架源码剖析系列的源码全部基于JDK1.8.0版本.本博客将从源码角度带领大家学习关于HashSet的知识. 一HashSet的定义: public class HashSet&l ...
- 【java集合框架源码剖析系列】java源码剖析之TreeMap
注:博主java集合框架源码剖析系列的源码全部基于JDK1.8.0版本.本博客将从源码角度带领大家学习关于TreeMap的知识. 一TreeMap的定义: public class TreeMap&l ...
- 【java集合框架源码剖析系列】java源码剖析之ArrayList
注:博主java集合框架源码剖析系列的源码全部基于JDK1.8.0版本. 本博客将从源码角度带领大家学习关于ArrayList的知识. 一ArrayList类的定义: public class Arr ...
- 【java集合框架源码剖析系列】java源码剖析之LinkedList
注:博主java集合框架源码剖析系列的源码全部基于JDK1.8.0版本. 在实际项目中LinkedList也是使用频率非常高的一种集合,本博客将从源码角度带领大家学习关于LinkedList的知识. ...
- 【java集合框架源码剖析系列】java源码剖析之HashMap
前言:之所以打算写java集合框架源码剖析系列博客是因为自己反思了一下阿里内推一面的失败(估计没过,因为写此博客已距阿里巴巴一面一个星期),当时面试完之后感觉自己回答的挺好的,而且据面试官最后说的这几 ...
- WorldWind源码剖析系列:星球类World
星球类World代表通用的星球类,因为可能需要绘制除地球之外的其它星球,如月球.火星等.该类的类图如下. 需要说明的是,在WorldWind中星球球体的渲染和经纬网格的渲染时分别绘制的.经纬网格的渲染 ...
随机推荐
- 系统间接口联调总是报500 for URL 和 乱码
两个系统做数据传输时,懒省事,直接访问 action 方式.结果总是报500,或者fileNotFount. 究其原因是因为两边的数据格式没对应上.post请求返回的格式是String,数据提供方返回 ...
- 转:C#访问修饰符
http://www.cnblogs.com/netlyf/archive/2009/12/13/1623103.html
- velocity 使用笔记
1. velocity获取字符串长度方法: 用length()就可以了,截取子字符串用substring(0,10) .$str.substring(0,3) 集合获取集合长度用:size() 2. ...
- Windows:FTP命令大全
Windows:FTP命令大全 简介 1, open:与服务器相连接: 2, send(put):上传文件: 3,get:下载文件: 4,mget:下载多个文件: 用法: mget *:下载当前路径下 ...
- var和let/const的区别
let和const是 ES6 新增的命令,用于声明变量,这两个命令跟 ES5 的var有许多不同,并且let和const也有一些细微的不同,再认真阅读了阮一峰老师的文档后,发现还是有一些不知道的细节. ...
- Oracle loop、while、for循环
Loop循环 Declare p_sum ; p_i number; Begin p_i :; Loop p_sum := p_sum + p_i; p_i :; ) then SYS.Dbms_Ou ...
- [CF]Cycling City
题目大意:给定一张无向图,问图中是否存在两个点,使得这两个点之间有三条路径,而且三条路径没有公共点. 解法: 我们可以先走出来一个环,再出环上任意一点走到另外一点.就像这样:
- idea软件编码已经设置好了为utf-8,但是svn中down下来的文件格式本身不是utf-8的,此时打开后会出现中文乱码解决方法
我是个idea的忠实用户,新公司的项目都是用eclipse做的,通过svn拉下代码后发现,注释的内容里,中文内容都是乱码.问过项目负责人,说可能是GBK编码. 但是,我通过idea的setting设置 ...
- gulp前端构建工具的搭建
我的机器: 3.13.0-32-generic #57-Ubuntu SMP Tue Jul 15 03:51:08 UTC 2014 x86_64 x86_64 x86_64 GNU/Linux 1 ...
- JS复制内容到剪贴板: 兼容IE、Firefox、Chrome、Safari所有浏览器【转】
正 文: 现在浏览器种类也越来越多,诸如 IE.Firefox.Chrome.Safari等等,因此现在要实现一个js复制内容到剪贴板的小功能就不是一件那么容易的事了. 在FLASH 9 时代,有一个 ...