crypto 加解密库简介与测试【GO 常用的库】
〇、前言
GO 语言的标准库 crypto 提供了一组用于加密和解密的包,包括对称加密、哈希函数、数字签名、随机数生成等功能。在日常开发中,通过使用这些库,可以确保数据的安全性和完整性。
对于使用频率比较高的东西,还是要汇总一下用来备查。
一、md5 加密
md5 包实现了 RFC 1321 中定义的 MD5 哈希算法。
需要注意的是,md5 是可以通过暴力碰撞破解的,因此不可用于安全性要求较高的场景。
package main

import (

	"crypto/md5"

	"encoding/hex"

	"fmt"

	"io"

	"strings"

)

func main() {

	h := md5.New()

	io.WriteString(h, "md5 加密测试!")

	fmt.Printf("%x\n", h.Sum(nil))

	fmt.Printf("%X\n", h.Sum(nil)) // 大写的 X,代表大写的十六进制字符串

	hh := md5.New()

	hh.Write([]byte("md5 加密测试!"))

	fmt.Print(hex.EncodeToString(hh.Sum(nil)) + "\n")

    fmt.Print(strings.ToTitle(hex.EncodeToString(hh.Sum(nil)))) // strings.ToTitle() 转大写

}
二、sha256 字符串、文件加密
sha1 和 md5 类似,都是可以被暴力碰撞破解,因此首先推荐的就是本节主要介绍的 sha256,结果为 64 位十六进制的字符串。
其实 sha1、sha256、sha512 等等用法都是类似的,均适用如下代码实现方式:
package main

import (

	"crypto/sha256"

	"encoding/hex"

	"fmt"

	"io"

	"log"

	"os"

	"strings"

)

func main() {

	// 对字符串加密,方式一

	h := sha256.New()

	h.Write([]byte("sha256 加密测试!"))

	fmt.Printf("%x\n", h.Sum(nil))

	fmt.Printf("%X\n", h.Sum(nil)) // 大写的 X,代表大写的十六进制字符串

	// 对字符串加密,方式二

	hh := sha256.New()

	hh.Write([]byte("sha256 加密测试!"))

	fmt.Print(hex.EncodeToString(hh.Sum(nil)) + "\n")

	fmt.Print(strings.ToTitle(hex.EncodeToString(hh.Sum(nil))) + "\n")

	// 对文件进行加密

	f, err := os.Open("file.txt")

	if err != nil {

		log.Fatal(err)

	}

	defer f.Close()

	h2 := sha256.New()

	if _, err := io.Copy(h2, f); err != nil {

		log.Fatal(err)

	}

	fmt.Printf("%x\n", h2.Sum(nil))

	fmt.Printf("%X", h2.Sum(nil))

}
三、rsa 加密解密以及密钥生成
RSA 是一种非对称加密算法,它的名字是由它的三位开发者,即 Ron.Rivest、Adi.Shamir 和 Leonard.Adleman 的姓氏的首字母组成的(Rivest-Shamir-Adleman),可用于数据加密和数字签名。
用于数据加密时,消息发送方利用对方的公钥进行加密,消息接受方收到密文时使用自己的私钥进行解密。
如下代码,包含了生成密钥和加解密:(其中包含了 byte 类型和 base64 类型互相转换的操作)
package main
import (
"crypto/rand"
"crypto/rsa"
"crypto/x509"
"encoding/base64"
"encoding/pem"
"fmt"
"os"
)
func main() {
// 生成密钥对,保存到文件
GenerateRSAKey(2048)
message := []byte("rsa 加密解密测试!")
// 加密
cipherText := RSA_Encrypt(message, "public.pem")
cipherText_base64 := base64.StdEncoding.EncodeToString(cipherText) // 将 []byte 类型的密文转换为 base64 字符串
fmt.Println("加密后为(base64):", cipherText_base64)
fmt.Println("加密后为([]byte):", cipherText)
// 解密
cipherText, _ = base64.StdEncoding.DecodeString(cipherText_base64) // 若转换为输入为 base64 字符串,则需先解码为 []byte
plainText := RSA_Decrypt(cipherText, "private.pem")
fmt.Println("解密后为([]byte):", plainText)
fmt.Println("解密后为(string):", string(plainText))
}
// 生成 RSA 私钥和公钥,保存到文件中
func GenerateRSAKey(bits int) {
// GenerateKey 函数使用随机数据生成器 random 生成一对具有指定字位数的 RSA 密钥
// Reader 是一个全局、共享的密码用强随机数生成器
privateKey, err := rsa.GenerateKey(rand.Reader, bits)
if err != nil {
panic(err)
}
// 保存私钥
// 通过 x509 标准将得到的 ras 私钥序列化为 ASN.1 的 DER 编码字符串
X509PrivateKey := x509.MarshalPKCS1PrivateKey(privateKey)
// 使用 pem 格式对 x509 输出的内容进行编码
// 创建文件保存私钥
privateFile, err := os.Create("private.pem")
if err != nil {
panic(err)
}
defer privateFile.Close()
// 构建一个 pem.Block 结构体对象
privateBlock := pem.Block{Type: "RSA Private Key", Bytes: X509PrivateKey}
// 将数据保存到文件
pem.Encode(privateFile, &privateBlock)
// 保存公钥
// 获取公钥的数据
publicKey := privateKey.PublicKey
// X509 对公钥编码
X509PublicKey, err := x509.MarshalPKIXPublicKey(&publicKey)
if err != nil {
panic(err)
}
// pem 格式编码
// 创建用于保存公钥的文件
publicFile, err := os.Create("public.pem")
if err != nil {
panic(err)
}
defer publicFile.Close()
// 创建一个 pem.Block 结构体对象
publicBlock := pem.Block{Type: "RSA Public Key", Bytes: X509PublicKey}
// 保存到文件
pem.Encode(publicFile, &publicBlock)
}
// RSA 加密
func RSA_Encrypt(plainText []byte, path string) []byte {
// 打开文件
file, err := os.Open(path)
if err != nil {
panic(err)
}
defer file.Close()
// 读取文件的内容
info, _ := file.Stat()
buf := make([]byte, info.Size())
file.Read(buf)
// pem 解码
block, _ := pem.Decode(buf)
// x509 解码
publicKeyInterface, err := x509.ParsePKIXPublicKey(block.Bytes)
if err != nil {
panic(err)
}
// 类型断言
publicKey := publicKeyInterface.(*rsa.PublicKey)
// 对明文进行加密
cipherText, err := rsa.EncryptPKCS1v15(rand.Reader, publicKey, plainText)
if err != nil {
panic(err)
}
// 返回 []byte 密文
return cipherText
}
// RSA 解密
func RSA_Decrypt(cipherText []byte, path string) []byte {
// 打开文件
file, err := os.Open(path)
if err != nil {
panic(err)
}
defer file.Close()
// 获取文件内容
info, _ := file.Stat()
buf := make([]byte, info.Size())
file.Read(buf)
// pem 解码
block, _ := pem.Decode(buf)
// X509 解码
privateKey, err := x509.ParsePKCS1PrivateKey(block.Bytes)
if err != nil {
panic(err)
}
// 对密文进行解密
plainText, _ := rsa.DecryptPKCS1v15(rand.Reader, privateKey, cipherText)
// 返回明文
return plainText
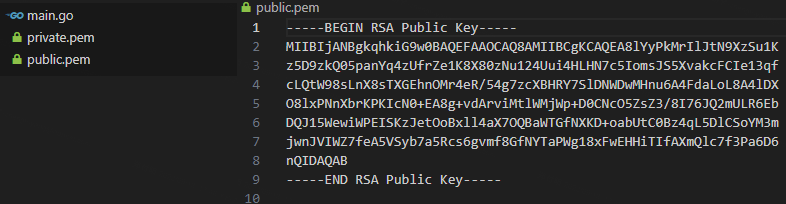
}运行生成密钥方法后,main.go 的同级目录下,回自动生成两个 .pem 后缀的密钥文件:
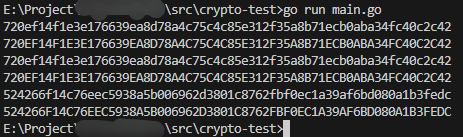
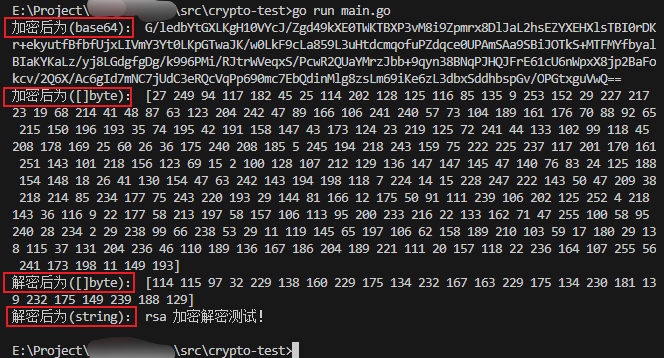
下面是加解密输出的结果:
参考:https://blog.csdn.net/chenxing1230/article/details/83757638
四、sm2 加解密以及签名验证
加密库 crypto 中其实是不包含 sm2 的,但是它毕竟是国家公钥密码算法的标准,有很广的使用度,因此必须安排。
国密 SM2 为非对称加密,也称为公钥密码。它是我国在吸收国际先进成果基础上研发出来的具有自主知识产权的 ECC(椭圆曲线公钥密码算法),它在安全性和实现效率方面相当于或略优于国际上同类的 ECC 算法,能取代 RSA 以满足各种应用对公钥密码算法安全性和实现效率的更高要求,这也是国家主推此加密方法的原因。
以下示例一开源库 https://github.com/tjfoc/gmsm 为基础实现:
// 安装必要的模块

go get github.com/tjfoc/gmsm/sm2

go get github.com/tjfoc/gmsm/x509

// 整理全部模块

go mod tidy
package main
import (
"crypto/rand"
"encoding/base64"
"fmt"
"os"
"github.com/tjfoc/gmsm/sm2"
"github.com/tjfoc/gmsm/x509"
)
type GMCrypt struct {
PublicFile string
PrivateFile string
}
var (
path = "./"
privateFile = "sm2private.pem" // 私钥文件
publicFile = "sm2public.pem" // 公钥文件
data = "hello 国密"
)
// 测试一下
func main() {
GenerateSM2Key() // 密钥生成并保存在文件中
crypt := GMCrypt{
PublicFile: path + publicFile,
PrivateFile: path + privateFile,
}
encryptText, _ := crypt.Encrypt(data) // 加密
fmt.Println(encryptText)
decryptText, _ := crypt.Decrypt(encryptText) // 解密
fmt.Println(decryptText)
msg := []byte("hello 国密")
sig, key, _ := CreateSm2Sig(msg) // 签名
fmt.Printf("签名结果:%x\n公钥:%v, \n", sig, key)
verSm2Sig := VerSm2Sig(key, msg, sig) // 验证签名
fmt.Println("验证结果为:", verSm2Sig)
}
// 生成公钥、私钥
func GenerateSM2Key() {
// 生成私钥、公钥
priKey, err := sm2.GenerateKey(rand.Reader)
if err != nil {
fmt.Println("秘钥产生失败:", err)
os.Exit(1)
}
pubKey := &priKey.PublicKey
// 生成文件 保存私钥、公钥
// x509 编码
pemPrivKey, _ := x509.WritePrivateKeyToPem(priKey, nil)
privateFile, _ := os.Create(path + privateFile)
defer privateFile.Close()
privateFile.Write(pemPrivKey)
pemPublicKey, _ := x509.WritePublicKeyToPem(pubKey)
publicFile, _ := os.Create(path + publicFile)
defer publicFile.Close()
publicFile.Write(pemPublicKey)
}
// 读取密钥文件
func readPemCxt(path string) ([]byte, error) {
file, err := os.Open(path)
if err != nil {
return []byte{}, err
}
defer file.Close()
fileInfo, err := file.Stat()
if err != nil {
return []byte{}, err
}
buf := make([]byte, fileInfo.Size())
_, err = file.Read(buf)
if err != nil {
return []byte{}, err
}
return buf, err
}
// 加密
func (s *GMCrypt) Encrypt(data string) (string, error) {
pub, err := readPemCxt(s.PublicFile)
if err != nil {
return "", err
}
// read public key
publicKeyFromPem, err := x509.ReadPublicKeyFromPem(pub)
if err != nil {
fmt.Println(err)
return "", err
}
ciphertxt, err := publicKeyFromPem.EncryptAsn1([]byte(data), rand.Reader)
if err != nil {
return "", err
}
return base64.StdEncoding.EncodeToString(ciphertxt), nil
}
// 解密
func (s *GMCrypt) Decrypt(data string) (string, error) {
pri, err := readPemCxt(s.PrivateFile)
if err != nil {
return "", err
}
privateKeyFromPem, err := x509.ReadPrivateKeyFromPem(pri, nil)
if err != nil {
return "", err
}
ciphertxt, err := base64.StdEncoding.DecodeString(data)
if err != nil {
return "", err
}
plaintxt, err := privateKeyFromPem.DecryptAsn1(ciphertxt)
if err != nil {
return "", err
}
return string(plaintxt), nil
}
// 使用私钥创建签名
func CreateSm2Sig(msg []byte) ([]byte, *sm2.PublicKey, error) {
// 读取密钥
pri, _ := readPemCxt(path + privateFile)
privateKey, _ := x509.ReadPrivateKeyFromPem(pri, nil)
c := sm2.P256Sm2() // 椭圆曲线
priv := new(sm2.PrivateKey)
priv.PublicKey.Curve = c
priv.D = privateKey.D
priv.PublicKey.X = privateKey.X
priv.PublicKey.Y = privateKey.Y
sign, err := priv.Sign(rand.Reader, msg, nil) // sm2签名
if err != nil {
return nil, nil, err
}
return sign, &priv.PublicKey, err
}
// 验证签名
func VerSm2Sig(pub *sm2.PublicKey, msg []byte, sign []byte) bool {
isok := pub.Verify(msg, sign)
return isok
}
参考:https://blog.csdn.net/weixin_42117918/article/details/130558002
五、aes 加解密
AES 密码与分组密码 Rijndael 基本上完全一致,Rijndael 分组大小和密钥大小都可以为 128 位、192 位和256 位。然而 AES 只要求分组大小为 128 位,因此只有分组长度为 128Bit 的 Rijndael 才称为 AES 算法。但这并不妨碍三种密码的相同使用环境。
5.1 对字符串加解密
package main

import (

	"bytes"

	"crypto/aes"

	"crypto/cipher"

	"encoding/base64"

	"errors"

	"fmt"

)

// 测试一下

func main() {

	data := "aes 加密测试!"

	// 加密

	enstr, _ := EncryptByAes([]byte(data))

	// 解密

	destr, _ := DecryptByAes(enstr)

	// 打印

	fmt.Printf(" 加密:%v\n 解密:%s", enstr, destr)

}

var PwdKey = []byte("ABCDABCDABCDABCD") // 三种密码标准:128 位、192 位和 256 位,对应字符串位数 16、32、64

// EncryptByAes Aes加密 后 base64 再加

func EncryptByAes(data []byte) (string, error) {

	res, err := AesEncrypt(data, PwdKey)

	if err != nil {

		return "", err

	}

	return base64.StdEncoding.EncodeToString(res), nil

}

// DecryptByAes Aes 解密

func DecryptByAes(data string) ([]byte, error) {

	dataByte, err := base64.StdEncoding.DecodeString(data)

	if err != nil {

		return nil, err

	}

	return AesDecrypt(dataByte, PwdKey)

}

// 加密

func AesEncrypt(data []byte, key []byte) ([]byte, error) {

	// 创建加密实例

	block, err := aes.NewCipher(key)

	if err != nil {

		return nil, err

	}

	// 判断加密快的大小

	blockSize := block.BlockSize()

	// 填充

	encryptBytes := pkcs7Padding(data, blockSize)

	// 初始化加密数据接收切片

	crypted := make([]byte, len(encryptBytes))

	// 使用cbc加密模式

	blockMode := cipher.NewCBCEncrypter(block, key[:blockSize]) // Cipher Block Chaining:加密块链

	// 执行加密

	blockMode.CryptBlocks(crypted, encryptBytes)

	return crypted, nil

}

// 解密

func AesDecrypt(data []byte, key []byte) ([]byte, error) {

	// 创建实例

	block, err := aes.NewCipher(key)

	if err != nil {

		return nil, err

	}

	// 获取块的大小

	blockSize := block.BlockSize()

	// 使用cbc

	blockMode := cipher.NewCBCDecrypter(block, key[:blockSize]) // Cipher Block Chaining:加密块链

	// 初始化解密数据接收切片

	crypted := make([]byte, len(data))

	// 执行解密

	blockMode.CryptBlocks(crypted, data)

	// 去除填充

	crypted, err = pkcs7UnPadding(crypted)

	if err != nil {

		return nil, err

	}

	return crypted, nil

}

// pkcs7Padding 填充

func pkcs7Padding(data []byte, blockSize int) []byte {

	// 判断缺少几位长度。最少1,最多 blockSize

	padding := blockSize - len(data)%blockSize

	// 补足位数。把切片[]byte{byte(padding)}复制padding个

	padText := bytes.Repeat([]byte{byte(padding)}, padding)

	return append(data, padText...)

}

// pkcs7UnPadding 填充的反向操作

func pkcs7UnPadding(data []byte) ([]byte, error) {

	length := len(data)

	if length == 0 {

		return nil, errors.New("加密字符串错误!")

	}

	// 获取填充的个数

	unPadding := int(data[length-1])

	return data[:(length - unPadding)], nil

}
5.2 对文件加解密
此部分是在字符串加解密基础上,先读取文件内容,然后和加密字符串一样,将 []byte 类型的数据加密即可。
对于单行超大文本文件,加密时就需要分片去读,加密后字符串写入文件中,每次加密写入一行,一定要换行,不然解密的时候区分不出来。非单行的可以逐行加密,密文也是逐行写入文本中。解密时,逐行读取解密文件,每一行为一个密文字串,将其解密,写入到文本中。
package main

import (

	"bufio"

	"bytes"

	"crypto/aes"

	"crypto/cipher"

	"encoding/base64"

	"errors"

	"fmt"

	"os"

	"time"

)

func main() {

	startTime := time.Now()

	// EncryptFile("file.txt", "secuityfile.txt")

	DecryptFile("encryptFile_secuityfile.txt", "file_new.txt")

	fmt.Printf("耗时:%v", time.Since(startTime))

}

var PwdKey = []byte("ABCDABCDABCDABCD") // 三种密码标准:128 位、192 位和 256 位,对应字符串位数 16、32、64

// EncryptByAes Aes加密 后 base64 再加

func EncryptByAes(data []byte) (string, error) {

	res, err := AesEncrypt(data, PwdKey)

	if err != nil {

		return "", err

	}

	return base64.StdEncoding.EncodeToString(res), nil

}

// DecryptByAes Aes 解密

func DecryptByAes(data string) ([]byte, error) {

	dataByte, err := base64.StdEncoding.DecodeString(data)

	if err != nil {

		return nil, err

	}

	return AesDecrypt(dataByte, PwdKey)

}

// 加密

func AesEncrypt(data []byte, key []byte) ([]byte, error) {

	// 创建加密实例

	block, err := aes.NewCipher(key)

	if err != nil {

		return nil, err

	}

	// 判断加密快的大小

	blockSize := block.BlockSize()

	// 填充

	encryptBytes := pkcs7Padding(data, blockSize)

	// 初始化加密数据接收切片

	crypted := make([]byte, len(encryptBytes))

	// 使用cbc加密模式

	blockMode := cipher.NewCBCEncrypter(block, key[:blockSize]) // Cipher Block Chaining:加密块链

	// 执行加密

	blockMode.CryptBlocks(crypted, encryptBytes)

	return crypted, nil

}

// 解密

func AesDecrypt(data []byte, key []byte) ([]byte, error) {

	// 创建实例

	block, err := aes.NewCipher(key)

	if err != nil {

		return nil, err

	}

	// 获取块的大小

	blockSize := block.BlockSize()

	// 使用cbc

	blockMode := cipher.NewCBCDecrypter(block, key[:blockSize]) // Cipher Block Chaining:加密块链

	// 初始化解密数据接收切片

	crypted := make([]byte, len(data))

	// 执行解密

	blockMode.CryptBlocks(crypted, data)

	// 去除填充

	crypted, err = pkcs7UnPadding(crypted)

	if err != nil {

		return nil, err

	}

	return crypted, nil

}

// pkcs7Padding 填充

func pkcs7Padding(data []byte, blockSize int) []byte {

	// 判断缺少几位长度。最少1,最多 blockSize

	padding := blockSize - len(data)%blockSize

	// 补足位数。把切片[]byte{byte(padding)}复制padding个

	padText := bytes.Repeat([]byte{byte(padding)}, padding)

	return append(data, padText...)

}

// pkcs7UnPadding 填充的反向操作

func pkcs7UnPadding(data []byte) ([]byte, error) {

	length := len(data)

	if length == 0 {

		return nil, errors.New("加密字符串错误!")

	}

	// 获取填充的个数

	unPadding := int(data[length-1])

	return data[:(length - unPadding)], nil

}

// EncryptFile 文件加密,filePath 需要加密的文件路径 ,fName加密后文件名

func EncryptFile(filePath, fName string) (err error) {

	f, err := os.Open(filePath)

	if err != nil {

		fmt.Println("未找到文件")

		return

	}

	defer f.Close()

	fInfo, _ := f.Stat()

	fLen := fInfo.Size()

	fmt.Println("待处理文件大小:", fLen)

	maxLen := 1024 * 1024 * 100 // 100mb  每 100mb 进行加密一次

	var forNum int64 = 0

	getLen := fLen

	if fLen > int64(maxLen) {

		getLen = int64(maxLen)

		forNum = fLen / int64(maxLen)

		fmt.Println("需要加密次数:", forNum+1)

	}

	// 加密后存储的文件

	ff, err := os.OpenFile("encryptFile_"+fName, os.O_RDWR|os.O_CREATE|os.O_APPEND, 0666)

	if err != nil {

		fmt.Println("文件写入错误")

		return err

	}

	defer ff.Close()

	// 循环加密,并写入文件

	for i := 0; i < int(forNum+1); i++ {

		a := make([]byte, getLen)

		n, err := f.Read(a)

		if err != nil {

			fmt.Println("文件读取错误")

			return err

		}

		getByte, err := EncryptByAes(a[:n])

		if err != nil {

			fmt.Println("加密错误")

			return err

		}

		// 换行处理,有点乱了,想到更好的再改

		getBytes := append([]byte(getByte), []byte("\n")...)

		// 写入

		buf := bufio.NewWriter(ff)

		buf.WriteString(string(getBytes[:]))

		buf.Flush()

	}

	ffInfo, _ := ff.Stat()

	fmt.Printf("文件加密成功,生成文件名为:%s,文件大小为:%v Byte \n", ffInfo.Name(), ffInfo.Size())

	return nil

}

// DecryptFile 文件解密

func DecryptFile(filePath, fName string) (err error) {

	f, err := os.Open(filePath)

	if err != nil {

		fmt.Println("未找到文件")

		return

	}

	defer f.Close()

	fInfo, _ := f.Stat()

	fmt.Println("待处理文件大小:", fInfo.Size())

	br := bufio.NewReader(f)

	ff, err := os.OpenFile("decryptFile_"+fName, os.O_WRONLY|os.O_CREATE|os.O_APPEND, 0666)

	if err != nil {

		fmt.Println("文件写入错误")

		return err

	}

	defer ff.Close()

	num := 0

	// 逐行读取密文,进行解密,写入文件

	for {

		num = num + 1

		a, err := br.ReadString('\n')

		if err != nil {

			break

		}

		getByte, err := DecryptByAes(a)

		if err != nil {

			fmt.Println("解密错误")

			return err

		}

		buf := bufio.NewWriter(ff)

		buf.Write(getByte)

		buf.Flush()

	}

	fmt.Println("解密次数:", num)

	ffInfo, _ := ff.Stat()

	fmt.Printf("文件解密成功,生成文件名为:%s,文件大小为:%v Byte \n", ffInfo.Name(), ffInfo.Size())

	return

}
5.3 明文长度与密文长度关系
| n | 明文长度 | 密文长度 |
| 1 | 0~15 | 24 |
| 2 | 16~31 | 44 |
| 3 | 32~47 | 64 |
| 4 | 48~63 | 88 |
| 5 | 64~79 | 108 |
| 6 | 80~95 | 128 |
| 7 | 96~111 | 152 |
| ... | ... | ... |
| n | 16(n-1) ~ (16n-1) | 20n+(n/3+1)x4 (/ :除法取整) |
参考:https://www.jianshu.com/p/0caab60fea9f https://cloud.tencent.com/developer/section/1140756
crypto 加解密库简介与测试【GO 常用的库】的更多相关文章
- RSA加解密用途简介及java示例
在公司当前版本的中间件通信框架中,为了防止非授权第三方和到期客户端的连接,我们通过AES和RSA两种方式的加解密策略进行认证.对于非对称RSA加解密,因为其性能耗费较大,一般仅用于认证连接,不会用于每 ...
- KingbaseES R6 集群备库网卡down测试案例
数据库版本: test=# select version(); version ------------------------------------------------------------ ...
- C#调用Crypto++库AES ECB CBC加解密
本文章使用上一篇<C#调用C++类库例子>的项目代码作为Demo.本文中,C#将调用C++的Crypto++库,实现AES的ECB和CBC加解密. 一.下载Crypto 1.进入Crypt ...
- Crypto++入门学习笔记(DES、AES、RSA、SHA-256)(加解密)
转自http://www.cppblog.com/ArthasLee/archive/2010/12/01/135186.html 最近,基于某些原因和需要,笔者需要去了解一下Crypto++库,然后 ...
- [dev][dpdk][crypto] dpdk加解密设备与IPSEC
概述 分三部分,加解密框架(crypto framework),加解密设备(crypto dev),安全协议(Security Framework) × API,设计思路等,都在加解密框架里:见文档 ...
- 加解密 3DES AES RSA 简介 示例 MD
Markdown版本笔记 我的GitHub首页 我的博客 我的微信 我的邮箱 MyAndroidBlogs baiqiantao baiqiantao bqt20094 baiqiantao@sina ...
- 介绍一个很好用的Rsa加解密的.Net库 Kalix.ApiCrypto
Rsa非对称加密技术 这个就不说了,大家上网搜索都知道,公钥加密,私钥解密.当然大家也可以自己实现.这里就懒了,就去找一个现成的库,Nuget上搜索,GitHub上搜索,发现.Net的加解密库,下载量 ...
- POCO库——Foundation组件之加解密Crypt
加解密Crypt:内部提供多种加解密方式.信息摘要提取.随机数产生等,具体的算法内部实现不做研究学习: DigestEngine.h :DigestEngine类作为各种摘要提取的基类,提供必要的接口 ...
- RSA加解密 私钥加密公钥解密 私加公解 && C++ 调用openssl库 的代码实例
前提:秘钥长度=1024 ============================================== 对一片(117字节)明文加密 私加 ===================== ...
- DES加解密 cbc模式 的简单讲解 && C++用openssl库来实现的注意事项
DES cbc是基于数据块加密的.数据块的长度为8字节64bit.以数据块为单位循环加密,再拼接.每个数据块加密的秘钥一样,IV向量不同.第一个数据快所需的IV向量,需要我们提供,从第二个数据块开始, ...
随机推荐
- 快速上手kettle(二)小试牛刀
目录 一 .前言 二 .两个小目标 三. kettle核心概念介绍 3.1 转换 3.1.1 步骤(Step) 3.1.2 跳(Hop) 3.1.3 元素据 3.1.4 数据类型 3.1.5 并发执行 ...
- JavaWeb编程面试题——MyBatis
引言 面试题==知识点,这里所记录的面试题并不针对于面试者,而是将这些面试题作为技能知识点来看待.不以刷题进大厂为目的,而是以学习为目的.这里的知识点会持续更新,目录也会随时进行调整. 关注公众号:编 ...
- .Net8罕见的技术:MSIL的机器码简析
前言 一般的只有最终的汇编代码才有机器码表示,然一个偶然的机会发现,MSIL(Microsoft intermediate language)作为一个中间语言表示,居然也有机器码,其实这也难怪,计算机 ...
- Java NIO原理 (Selector、Channel、Buffer、零拷贝、IO多路复用)
系列文章目录和关于我 零丶背景 最近有很多想学的,像netty的使用.原理源码,但是苦于自己对于操作系统和nio了解不多,有点无从下手,遂学习之. 一丶网络io的过程 上图粗略描述了网络io的过程,了 ...
- C++面试八股文:什么是RAII?
某日二师兄参加XXX科技公司的C++工程师开发岗位第13面: 面试官:什么是RAII? 二师兄:RAII是Resource Acquisition Is Initialization的缩写.翻译成中文 ...
- 抓包分析RST报文
大家好,我是蓝胖子,今天我们来分析下网络连接中经常出现的RST信号,连接中出现RST信号意味着这条链接将会断开,来看下什么时候会触发RST信号,这在分析连接断开的原因时十分有帮助. 本文的讲解视频已经 ...
- 记一次 .NET 某旅行社审批系统 崩溃分析
一:背景 1. 讲故事 前些天有位朋友找到我,说他的程序跑着跑着就崩溃了,让我看下怎么回事,其实没怎么回事,抓它的 crash dump 就好,具体怎么抓也是被问到的一个高频问题,这里再补一下链接: ...
- 前端vue echart自定义图表(柱形图 折线图 饼图 树形结构图 关系图谱 )
快速实现echart自定义图表(柱形图 折线图 饼图 树形结构图 关系图谱 ); 下载完整代码请访问uni-app插件市场地址:https://ext.dcloud.net.cn/plugin?id= ...
- 怎么让英文大预言模型支持中文?(一)构建自己的tokenization
代码地址:https://github.com/taishan1994/sentencepiece_chinese_bpe Part1前言 目前,大语言模型呈爆发式的增长,其中,基于llama家族的模 ...
- 解决 Windows 环境下 conda 切换 Python 版本报错 NoWritablePkgsDirError: No writeable pkgs directories configured.
1. 起因 今天运行一个 flask 项目,报错:AttributeError: module 'time' has no attribute 'clock' 一查才发现,Python3.8 不再支持 ...