Angular2快速起步——构建一个简单的应用
构建此应用,分为如下几步:
1、环境准备:安装Node.js和npm;
2、创建并配置此项目;
3、创建应用;
5、启动应用程序;
6、定义作为该应用的宿主页面;
7、构建并运行此应用;
环境准备:安装Node.js和npm;
下载node.js.msi文件来进行安装,可以参考这个文档来安装 http://www.runoob.com/nodejs/nodejs-install-setup.html
我们的例子需要node v5.x.x或更高版本以及npm 3.x.x或更高版本。 要检查你正在使用的版本,请在终端窗口中运行node -v和npm -v命令。
创建并配置本项目
1、创建项目目录
可以通过终端创建项目目录,在终端进入你想要创建文件夹的位置,之后 mkdir angular2 创建angular2文件夹 ,同理创建quickstart文件夹,也可以新建文件夹创建。
2、创建配置文件,在上面的文件夹下
package.json用来标记出本项目所需的npm依赖包;
tsconfig.json定义了TypeScript编译器如何从项目原文件生成JavaScript代码;
typings.json为那些TypeScript编译器无法识别的库提供了别的定义文件;
systemjs.config.js为模块加载器提供了该到哪里去查找应用模块的信息,并注册了所有必备的依赖包。
package.json内容如下
{  "name": "angular2-quickstart",

   "version": "1.0.0",

   "scripts": {

       "start": "tsc && concurrently \"npm run tsc:w\" \"npm run lite\" ",

       "lite": "lite-server",

       "postinstall": "typings install",

       "tsc": "tsc",    "tsc:w": "tsc -w",

       "typings": "typings"  },

   "license": "ISC",

  "dependencies": {

       "@angular/common": "2.0.0",

       "@angular/compiler": "2.0.0",

       "@angular/core": "2.0.0",

       "@angular/forms": "2.0.0",

       "@angular/http": "2.0.0",

       "@angular/platform-browser": "2.0.0",

       "@angular/platform-browser-dynamic": "2.0.0",

       "@angular/router": "3.0.0",

       "@angular/upgrade": "2.0.0",

       "core-js": "^2.4.1",

       "reflect-metadata": "^0.1.3",

       "rxjs": "5.0.0-beta.12",

       "systemjs": "0.19.27",

       "zone.js": "^0.6.23",

       "angular2-in-memory-web-api": "0.0.20",

       "bootstrap": "^3.3.6"  },

   "devDependencies": {

         "concurrently": "^2.2.0",

         "lite-server": "^2.2.2",

         "typescript": "^2.0.2",    "typings":"^1.3.2"

        }

}
tsconfig.json
{

    "compilerOptions": {

              "target": "es5",

              "module": "commonjs",

              "moduleResolution": "node",

              "sourceMap": true,

              "emitDecoratorMetadata": true,

              "experimentalDecorators": true,

              "removeComments": false,

              "noImplicitAny": false

           }

}
typings.json
{

  "globalDependencies": {

    "core-js": "registry:dt/core-js#0.0.0+20160725163759",

    "jasmine": "registry:dt/jasmine#2.2.0+20160621224255",

    "node": "registry:dt/node#6.0.0+20160909174046"

  }

}
systemjs.config.js
/**

 * System configuration for Angular 2 samples

 * Adjust as necessary for your application needs.

 */

(function (global) {

  System.config({

    paths: {

      // paths serve as alias

      'npm:': 'node_modules/'

    },

    // map tells the System loader where to look for things

    map: {

      // our app is within the app folder

      app: 'app',

      // angular bundles

      '@angular/core': 'npm:@angular/core/bundles/core.umd.js',

      '@angular/common': 'npm:@angular/common/bundles/common.umd.js',

      '@angular/compiler': 'npm:@angular/compiler/bundles/compiler.umd.js',

      '@angular/platform-browser': 'npm:@angular/platform-browser/bundles/platform-browser.umd.js',

      '@angular/platform-browser-dynamic': 'npm:@angular/platform-browser-dynamic/bundles/platform-browser-dynamic.umd.js',

      '@angular/http': 'npm:@angular/http/bundles/http.umd.js',

      '@angular/router': 'npm:@angular/router/bundles/router.umd.js',

      '@angular/forms': 'npm:@angular/forms/bundles/forms.umd.js',

      // other libraries

      'rxjs':                       'npm:rxjs',

      'angular2-in-memory-web-api': 'npm:angular2-in-memory-web-api',

    },

    // packages tells the System loader how to load when no filename and/or no extension

    packages: {

      app: {

        main: './main.js',

        defaultExtension: 'js'

      },

      rxjs: {

        defaultExtension: 'js'

      },

      'angular2-in-memory-web-api': {

        main: './index.js',

        defaultExtension: 'js'

      }

    }

  });

})(this);
3、安装依赖包
在终端定位到package.json的位置,直接npm install
在安装期间可能出现红色的错误信息,你还会看到npm WARN信息。不过不用担心,只要末尾处没有npm ERR!信息就算成功了。
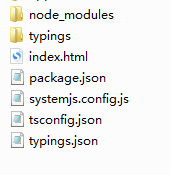
你应该得到如下结构:

如果在运行npm install之后没有出现typings目录,我们可以手动安装它
npm run typings install
创建应用
在应用的根目录下创建app子目录,在app子目录下创建app.module.ts文件
app.module.ts
import { NgModule } from '@angular/core';

import { BrowserModule } from '@angular/platform-browser';

@NgModule({

imports: [ BrowserModule ]

})

export class AppModule { }
这里是应用的入口点,由于应用是运行在浏览器中的,所以根模块需要从@angular/platform-browser中导入BrowserModule并添加到imports数组中,这是要让最小的应用在浏览器中运行时,对Angular的最低需求。
创建组件并添加到应用中
每个Angular应用都至少有一个组件:根组件,这里叫AppComponent,组件是Angular应用的基本构造块,每个组件都会通过与它相关的模块来控制屏幕上的一小块,在app文件夹下创建app.component.ts
app.component.ts
import { Component } from '@angular/core';

@Component({

selector: 'my-app',

template: '<h1>My First Angular App</h1>'

})

export class AppComponent { }
import语句。它让你能访问Angular核心库中的@Component装饰器函数。
@Component装饰器,它会把一份元数据关联到AppComponent组件类上:
selector为用来代表该组件的HTML元素指定简单的CSS选择器。
template用来告诉Angular如何渲染该组件的视图。
我们还要导出AppComponent类,以便让刚刚创建的这个应用导入它
编辑app/app.module.ts文件,导入这个新的AppComponent,并把它添加到NgModule装饰器中的declarations和bootstrap字段:
app.module.ts
import { NgModule } from '@angular/core';

import { BrowserModule } from '@angular/platform-browser';

import { AppComponent } from './app.component';

@NgModule({

imports: [ BrowserModule ],

declarations: [ AppComponent ],

bootstrap: [ AppComponent ]

})

export class AppModule { }
启动应用
在app文件夹下创建新文件main.ts
main.ts
import { platformBrowserDynamic } from '@angular/platform-browser-dynamic';

import { AppModule } from './app.module';

const platform = platformBrowserDynamic();

platform.bootstrapModule(AppModule);
定义该应用的宿主页面
在quickstart文件夹下创建index.html文件
index.html
<!DOCTYPE html>

<html lang="en">

<head>

    <meta charset="UTF-8">

    <title>Angular Quickstart</title>

    <meta name="viewport" content="width=device-width, initial-scale=1">

    <!-- 1. Load libraries -->

    <!-- Polyfill(s) for older browsers -->

    <script src="node_modules/core-js/client/shim.min.js"></script>

    <script src="node_modules/zone.js/dist/zone.js"></script>

    <script src="node_modules/reflect-metadata/Reflect.js"></script>

    <script src="node_modules/systemjs/dist/system.src.js"></script>

    <!-- 2. Configure SystemJS -->

    <script src="systemjs.config.js"></script>

    <script>

        System.import('app').catch(function(err){ console.error(err); });

    </script>

</head>

<body>

<my-app>Loading...</my-app>

</body>

</html>
编译并运行应用程序
打开终端,定位到该目录,npm start
稍后,一个浏览器页标签就会打开并显示出来。

Angular2快速起步——构建一个简单的应用的更多相关文章
- 通过python 构建一个简单的聊天服务器
构建一个 Python 聊天服务器 一个简单的聊天服务器 现在您已经了解了 Python 中基本的网络 API:接下来可以在一个简单的应用程序中应用这些知识了.在本节中,将构建一个简单的聊天服务器.使 ...
- struts1:(Struts重构)构建一个简单的基于MVC模式的JavaWeb
在构建一个简单的基于MVC模式的JavaWeb 中,我们使用了JSP+Servlet+JavaBean构建了一个基于MVC模式的简单登录系统,但在其小结中已经指出,这种模式下的Controller 和 ...
- 【Android Developers Training】 3. 构建一个简单UI
注:本文翻译自Google官方的Android Developers Training文档,译者技术一般,由于喜爱安卓而产生了翻译的念头,纯属个人兴趣爱好. 原文链接:http://developer ...
- 构建一个简单的Linux系统 MenuOs —— start_kernel到init进程(20135304刘世鹏)
构建一个简单的Linux系统 MenuOs —— start_kernel到init进程 作者:刘世鹏20135304 <Linux内核分析>MOOC课程http://mooc.study ...
- gRPC初探——概念介绍以及如何构建一个简单的gRPC服务
目录 引言 1. gRPC简介 2. 使用Protocol Buffers进行服务定义 2.1 定义消息 2.2 定义服务接口 3.构建简单的gRPC服务 3.1 编写proto文件,定义消息和接口 ...
- 第三周——构建一个简单的Linux系统MenuOS
[洪韶武 原创作品转载请注明出处 <Linux内核分析>MOOC课程http://mooc.study.163.com/course/USTC-1000029000 ] 第三周 构建一个 ...
- 构建一个简单的基于MVC模式的JavaWeb
零晨三点半了,刚刚几个兄弟一起出去吼歌,才回来,这应该是我大学第二次去K歌,第一次是大一吧,之后每次兄弟喊我,我都不想去,因为我还是很害怕去KTV,或许是因为那里是我伤心的地方,也或许是因为我在那里失 ...
- 手把手教你用vue-cli构建一个简单的路由应用
上一章说道:十分钟上手-搭建vue开发环境(新手教程)https://www.jianshu.com/p/0c6678671635 开发环境搭建好之后,那么开始新添加一些页面,构建最基本的vue项目, ...
- Ant—使用Ant构建一个简单的Java工程(两)
博客<Ant-使用Ant构建一个简单的Java项目(一)>演示了使用Ant工具构建简单的Java项目,接着这个样例来进一步学习Ant: 上面样例须要运行多条ant命令才干运行Test类中的 ...
随机推荐
- 10分钟精通SharePoint - SharePoint升级
类型: b2b(安装更新)和v2v(跨版本升级) 内容:二进制文件和数据库 过程: 升级前检查 - 检查场内数据,配置和自定义等等 升级准备和计划 - 根据需要和升级检查制定相应计划和准备工作 ...
- 【Troubleshooting Case】Unable to delete Exchange database?
在我们日常邮件系统运维管理或实施部署变更中,经常会遇到,删除Exchange 数据库DB时,提示无法删除. ------------------– Microsoft Exchange Error - ...
- Chrome 下动画卡顿问题的另一种可能
[现象] 动画出现了明显的卡顿,且仅仅出现在 chrome 中. [原因排查] 一开始使用了css动画的时候已经出现了卡顿.找到如下的文章:CSS3 动画卡顿解决方案.深入浏览器理解CSS anima ...
- Halloc内存分配器
MAX_NSBS 8192:默认的最大superblocks数量 SB_SET_SZ(MAX_NSBS / WORD_SZ):superblock set的大小,每个set32个superblcoks ...
- c#关于时间TimeHelper类的总结
using System; namespace DotNet.Utilities{ /// <summary> /// 时间类 /// 1.SecondToMinute( ...
- android 热更新 tinker 从零开始到使用
这几天项目完结了,闲来无事,想起来了以前研究的热更新,那个开源的只有nvwa.recoo,等,不是很好用,最近听说tinker开源一段时间了,用的人还挺多,决定研究一下! 首先进入了官方文档 http ...
- ajax 实现修改功能
这段时间在做项目,发现自己忘得好快呀,幸亏有博客园帮我记着呢,整理博客园简直不要太重要了哦 因为做的是一个内部管理系统,只用了一个主页面,所有的都不允许整个网页刷新,所以我们只能用ajax 来做,当 ...
- JPlayer Jquery video视频插件
近日一直在搜关于视频的jquery插件,要求功能全,跨平台,百思不得其解,偶尔找到一个插件JPlayer,国产的,很全.为什么选择JPlayer 简单:几分钟就可以上手编码.部署 可定制:可以方便地用 ...
- JavaEE开发之Spring中的多线程编程以及任务定时器详解
上篇博客我们详细的聊了Spring中的事件的发送和监听,也就是常说的广播或者通知一类的东西,详情请移步于<JavaEE开发之Spring中的事件发送与监听以及使用@Profile进行环境切换&g ...
- UNION ALL合表查询
有时候需要连表查询数据,可以使用union all来做合表. 语法: SELECT column_name FROM table1UNION ALLSELECT column_name FROM ta ...
