使用Dagger2做静态注入, 对比Guice.
Dagger
依赖注入的诉求, 这边就不重复描述了, 在上文Spring以及Guice的IOC文档中都有提及, 既然有了Guice,
Google为啥还要搞个Dagger2出来重复造轮子呢? 因为使用动态注入, 虽然写法简单了, 耦合也降低了,
但是带来了调试不方便, 反射性能差等一些缺点.
而Dagger跟Guice最大的差异在于, 他是编译期注入的, 而不是运行时.
他生成的代码可以直观的调试, 也不是通过反射, 而是通过构建工厂类. 下面我们用代码来简单演示一下.
构建工程
既然Dagger是静态注入的, 那么他自然也跟其他动态注入框架工程有点区别,
编译时需要额外依赖dagger-compiler, dagger-producers等,

不过运行时的jar只需要dagger以及javax.inject包即可.
好在Google为我们提供了pom文件, 我们只需要在idea里新建maven工程, 在pom文件中导入如下内容, 他会自动下载依赖.
 <?xml version="1.0" encoding="UTF-8"?>

 <project xmlns="http://maven.apache.org/POM/4.0.0"

          xmlns:xsi="http://www.w3.org/2001/XMLSchema-instance"

          xsi:schemaLocation="http://maven.apache.org/POM/4.0.0 http://maven.apache.org/xsd/maven-4.0.0.xsd">

     <modelVersion>4.0.0</modelVersion>

     <groupId>com.maven.dagger2</groupId>

     <artifactId>com.maven.dagger2</artifactId>

     <version>1.0-SNAPSHOT</version>

     <dependencies>

         <dependency>

             <groupId>com.google.dagger</groupId>

             <artifactId>dagger</artifactId>

             <version>2.2</version>

         </dependency>

         <dependency>

             <groupId>com.google.dagger</groupId>

             <artifactId>dagger-compiler</artifactId>

             <version>2.2</version>

             <optional>true</optional>

         </dependency>

     </dependencies>

 </project>
第一个注入程序
我们以一个打印系统为例, 打印业务类PrintJob, 里面有一份报表Reportpage待打印.
 public class ReportPage{

     public void print(){

         System.out.println("开始打印报表");

     }

 }
 public class PrintJob {

 2     // 需要打印的报表

     public ReportPage reportPage;

     public void setReportPage(ReportPage reportPage) {

         this.reportPage = reportPage;

     }

     public void print() {

         this.reportPage.print();

     }

     public static void main(String[] args) throws InterruptedException {

         // 初始化报表

         ReportPage page = new ReportPage();

         PrintJob job = new PrintJob();

         job.setReportPage(page);

         //执行打印

         job.print();

     }

 }
在main函数中, 我们初始化了Printjob以及它里面的报表对象, 并执行打印.
下面我们通过Dagger注入的方式来写.
写法很简单, 跟Guice类似, 我们只需要在reportpage成员上加@Inject注解.
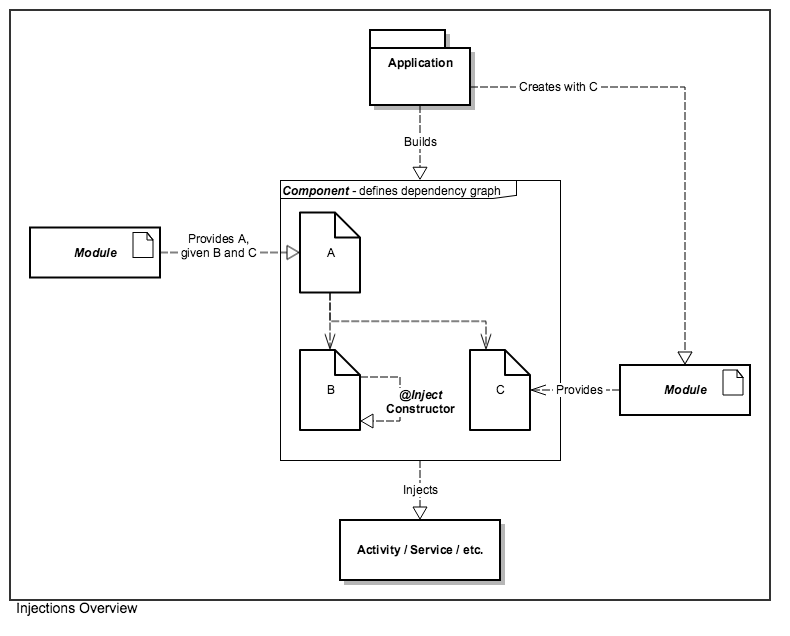
同时添加一个Component对象, 用来告诉Dagger, 应该注入到该类, 并扫描其中@Inject的成员
 @Component

 public interface PrintjobComponent {

     void inject(PrintJob job);

 }
添加完Component以及@Inject注解后我们需要编译代码或者rebuild工程, 让Dagger为我们生成工厂类.
生成的代码位于target/generated-sources目录. 里面会有一个叫DaggerPrintjobComponent的类.
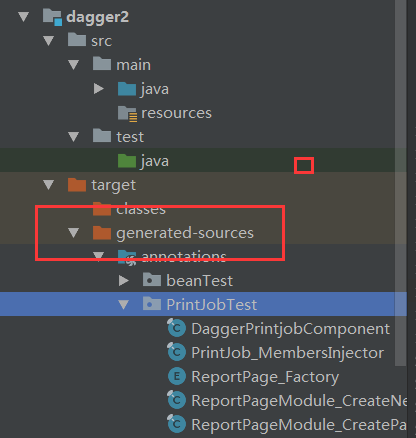
idea会自动将当期路径标记成Classpath, 因此我们也不需要把他手动拷贝出来.
如果没有自动import, 可以右键pom.xml->Maven ->Reimport.
我们在Printjob的构造函数里加上DaggerPrintjobComponent.create().inject(this);来实现注入
 public class PrintJob {

     @Inject

     public ReportPage reportPage;

     public PrintJob() {

         DaggerPrintjobComponent.create().inject(this);

     }

     public void print() {

         this.reportPage.print();

     }

     public static void main(String[] args) throws InterruptedException {

         // 看上去清爽了一点

         PrintJob job = new PrintJob();

         job.print();

     }

 }
 public class ReportPage {

     @Inject

     public ReportPage() {

         System.out.println("初始化成功!!!");

     }

     public void print(){

         System.out.println("开始打印报表");

     }

 }
相比于一开始的非注入写法, 在外部是看不到赋值操作的.
有人会说, 那我直接在printjob的构造函数里new reportpage()不就行了, 为什么要这么费事呢.
原因很简单, 大型系统里, printjob只存在一个接口, 他无法, 也不需要直接new reportpage()对象.
下面演示如何注入接口对象.
注入接口对象
我们给reportpage增加一个接口, 并在printjob中修改为接口声明.
public class ReportPage implements ReportPageProvider{
 public interface ReportPageProvider {

     void print();

 }
 public class PrintJob {

     @Inject

     public ReportPageProvider reportPage;
这个时候会发现, 运行注入报错了, 原因很简单, 我们@inject依然加载reportpage对象上,
此时他是一个接口, 接口是无法直接被实例化的.
因此我们需要引入Module对象来处理接口, 其实就是类似于一个工厂提供类.
 @Module

 public class ReportPageModule {

     @Provides

     public ReportPageProvider createPage() {

         return new ReportPage();

     }

 }
然后在component中引入module, 其他代码不用改, 依然直接new printjob().print()对象.
 @Component(modules = ReportPageModule.class)

 public interface PrintjobComponent {

     void inject(PrintJob job);

 }
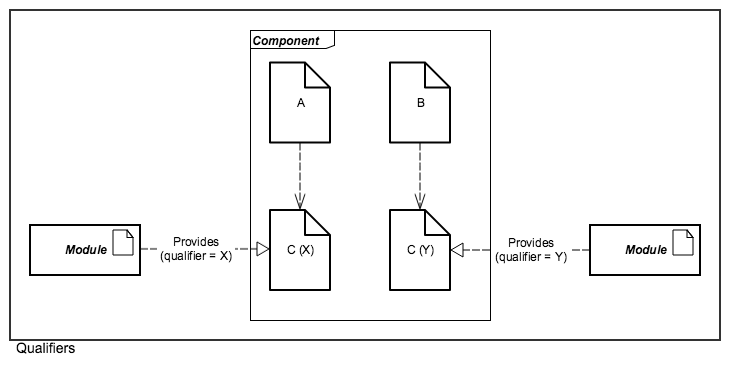
接口存在多个实现
我们给ReportpageProvider再增加一个子类NewReportPage, 修改Module, 增加一个方法, 构造NewReportPage.
 @Module

 public class ReportPageModule {

     @Provides

     public ReportPageProvider createPage() {

         return new ReportPage();

     }

     @Provides

     public ReportPageProvider createNewReportPage() {

         return new NewReportPage();

     }

 }
这个时候直接编译是无法通过的, 相同返回类型的provider只能添加一个, 如果添加多个, dagger将报错, 存在多个提供类.

此时我们就要跟Guice里一样, 使用@Named注解来标识了
     @Named("new")

     public ReportPageProvider reportPage;
调用的时候也很简单
     @Inject

     @Named("new")

     public ReportPageProvider reportPage;
同理, 也可以通过@Qualifier来自定义注解标识.
 @Qualifier

 @Retention(RetentionPolicy.RUNTIME)

 public @interface NewReportMark {}
然后在调用的地方加上 @NewReportMark即可.
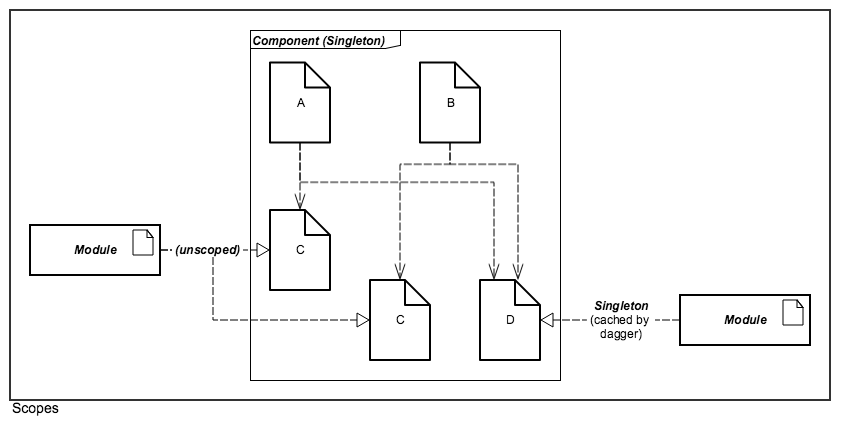
Scope生命周期
默认对象都是每次都new的, 如果想要单例实现, 则需要添加@Singleton.
在Component以及Module都加上Singleton注解.
 @Singleton

 @Component(modules = ReportPageModule.class)

 public interface PrintjobComponent {

     void inject(PrintJob job);

 }
     @Provides

     @Named("new")

     @Singleton

     public ReportPageProvider createNewReportPage() {

         return new NewReportPage();

     }
我们给Printjob中再增加一个reportpage对象, 并打印他们的hashcode.
     @Inject

     @Named("new")

     public ReportPageProvider reportPage;

     @Inject

     @Named("new")

     public ReportPageProvider reportPage2;

 ......

     PrintJob job = new PrintJob();

     System.out.println(job.reportPage);

     System.out.println(job.reportPage2);
加上Singleton注解后, 打印出来的hashcode是一致的了.
但是, 如果我们再new 一个Printjob, 打印他的reportpage.
         PrintJob job = new PrintJob();

         System.out.println(job.reportPage);

         System.out.println(job.reportPage2);

         PrintJob job2 = new PrintJob();

         System.out.println(job2.reportPage);

         System.out.println(job2.reportPage2);
会发现前两个的hashcode跟后两个的不一样, 这就很蛋疼了. 他只是一个作用于当前component的伪单例.
那么如何实现真单例呢, 其实就是想办法把Component搞成单例的.
这样他里面的对象也都是同一个作用域下的单例了.
我们添加一个SingletonPrintjobComponent, 写法与PrintjobComponent一致.
编译后生成DaggerSingletonPrintjobComponent. 然后修改printjob构造函数中的注入.
DaggerPrintjobComponent.create().inject(this); 改成如下:
 public class PrintJob {

     private static SingletonPrintjobComponent component = DaggerSingletonPrintjobComponent.create();

     @Inject

     @Named("new")

     public ReportPageProvider reportPage;

     @Inject

     @Named("new")

     public ReportPageProvider reportPage2;

     public PrintJob() {

         component.inject(this);

     }

     public void print() {

         this.reportPage.print();

     }

     public static void main(String[] args) throws InterruptedException {

         PrintJob job = new PrintJob();

         System.out.println(job.reportPage);

         System.out.println(job.reportPage2);

         PrintJob job2 = new PrintJob();

         System.out.println(job2.reportPage);

         System.out.println(job2.reportPage2);

     }

 }
这样的话, 多个printjob打印出来的reportpage就是一致的了, 因为都是位于同一个static的component中.
Lazy 延迟初始化
默认对象是inject的时候初始化, 如果使用Lazy封装一下, 则可以在get的时候再初始化.
     @Inject

     @Named("old")

     public Lazy<ReportPageProvider> oldReportPage;
         PrintJob job = new PrintJob();

         Thread.sleep(3000);

         // 对象会在get()方法调用的时候触发初始化

         job.oldReportPage.get().print();
到这边就结束了, 可以看到Dagger使用上跟Guice基本差不多, 各个注解概念也类似,
最大的区别就是非动态注入, 非反射实现, 而是编译期静态注入.
使用Dagger2做静态注入, 对比Guice.的更多相关文章
- Android项目使用Dagger2进行依赖注入
原文链接:http://code.tutsplus.com/tutorials/dependency-injection-with-dagger-2-on-android–cms-23345 依赖注入 ...
- Spring静态注入的三种方式
版权声明:本文为博主原创文章,未经博主允许不得转载. https://blog.csdn.net/chen1403876161/article/details/53644024Spring静态注入的三 ...
- spring 静态注入
1.静态注入 在setter 方法修改为非 static , 然后在上面注入即可 @Component public class WeixinConfig { // token public stat ...
- 日志系统实战(一)—AOP静态注入
背景 近期在写日志系统,需要在运行时在函数内注入日志记录,并附带函数信息,这时就想到用Aop注入的方式. AOP分动态注入和静态注入两种注入的方式. 动态注入方式 利用Remoting的Context ...
- 基于Mono.Cecil的静态注入
Aop注入有2种方式:动态注入和静态注入,其中动态注入有很多实现了 动态注入有几种方式: 利用Remoting的ContextBoundObject或MarshalByRefObject. 动态代理( ...
- Android 使用dagger2进行依赖注入(基础篇)
0. 前言 Dagger2是首个使用生成代码实现完整依赖注入的框架,极大减少了使用者的编码负担,本文主要介绍如何使用dagger2进行依赖注入.如果你不还不了解依赖注入,请看这一篇. 1. 简单的依赖 ...
- 用keras做SQL注入攻击的判断
本文是通过深度学习框架keras来做SQL注入特征识别, 不过虽然用了keras,但是大部分还是普通的神经网络,只是外加了一些规则化.dropout层(随着深度学习出现的层). 基本思路就是喂入一堆数 ...
- spring静态注入
与其说是静态注入(IOC),不如讲是对JavaBean 的静态成员变量进行赋值. 一般我们在使用依赖注入的时候,如果当前对象(javaBean )创建(实例化)一次,那么非静态的成员变量也会实例化一次 ...
- 转: spring静态注入
与其说是静态注入(IOC),不如讲是对JavaBean 的静态成员变量进行赋值. 一般我们在使用依赖注入的时候,如果当前对象(javaBean )创建(实例化)一次,那么非静态的成员变量也会实例化一次 ...
随机推荐
- Problem B: 点之间的距离
#include <iostream> #include <vector> #include <cmath> #include <algorithm> ...
- Servlet的理解
一.什么是Servlet? Servlet是用Java编写的web组件,实际上可以简单的理解为是用来处理请求的,为什么这么说,看了它的生命周期就知道了. 二.常见的Servlet容器 4容器顾名思义是 ...
- mysql +keeplive+drbd高可用架构
1MySQL+DRBD+keepalived高可用架构 DRBD(DistributedReplicatedBlockDevice)是一个基于块设备级别在远程服务器直接同步和镜像数据的开源软件,类似于 ...
- java 虚拟机的类加载机制
Java 虚拟机的类加载机制 关于类加载机制: 虚拟机把描述类的数据从Class 文件加载到内存,并对数据进行效验.转换解析和初始化,最终 形成可以被虚拟机直接使用的Java 类型,就是虚拟机的类 ...
- Cngigure和BUS实现远端配置
1 server依赖 <?xml version="1.0" encoding="UTF-8"?><project xmlns="h ...
- tensorflow 学习笔记 多层感知机
# -*- coding: utf-8 -*- """ Created on Thu Mar 9 19:20:51 2017 @author: Jarvis " ...
- 我的第一个python web开发框架(17)——产品管理
这是后台管理系统最后一个功能,产品管理,它的接口与页面功能与上一章差不多. 获取产品列表接口 @get('/api/product/') def callback(): ""&qu ...
- 关于String中的不变模式
不变模式 不变模式就是为了尽可能的去除并行中的同步操作,提高并行程序的性能,可以使用一种不可改变的对象,依靠对象的不变性,可以确保其在没有同步操作的多线程环境中依然始终保持内部状态的一致性和正确性.并 ...
- ORACLE 错误代码提示归集
有时数据库出现问题,不是每次都有网络可查,所以把所有的ora系列的错误整理出来, 在最没有办法的时候,需要自己来解决,有了这些根据,问题会好办的.虽说对于数据库方面, DBA很强大,他们在遇到错误时, ...
- 人体姿态的相似性评价基于OpenCV实现最近邻分类KNN K-Nearest Neighbors
最近学习了人体姿态的相似性评价.需要用到KNN来统计与当前姿态相似的k个姿态信息. 假设我们已经有了矩阵W和给定的测试样本姿态Xi,需要寻找与Xi相似的几个姿态,来估计当前Xi的姿态标签. //knn ...