第六篇--MFC美化界面
1.MFC如何设置背景颜色
首先,为对话框添加WM_CTLCOLOR消息,方法为:右击Dialog窗口 --> Class Wizard --> Messages --> WM_CTLCOLOR --> Add Handler --> Edit Code
然后,在Dlg.h文件中添加成员变量CBrush m_brush;
接着,在之前Edit Code的位置,写上
HBRUSH CMFCInterfaceDlg::OnCtlColor(CDC* pDC, CWnd* pWnd, UINT nCtlColor)

{

    return m_brush;

}
最后,在Dlg.cpp文件的OnInitDialog()函数后面加上m_brush.CreateSolidBrush(RGB(255, 255, 102));//设置背景颜色为黄色。编译运行函数即可。
2.MFC如何设置背景图片
首先在网上下载一张Bitmap的图片,放在res文件夹下

接着在OnInitDialog()后面加上如下代码
   CString strBmpPath = _T(".\\res\\backgroundone.jpg");

    CImage img;

    img.Load(strBmpPath);

    MoveWindow(0, 0, img.GetWidth(), img.GetHeight());

    CBitmap bmpTmp;

    bmpTmp.Attach(img.Detach());

    m_brush.CreatePatternBrush(&bmpTmp);
创建一个新工程,可以什么都不加。打开.rc, 创建或打开Icon资源(以下都以Icon为例)。
单击工程窗口的资源视图标签,选中资源ID为IDR_MAINFRAME图标资源,然后按Delete键把它删除掉,当然也可以不删,具体后面会讲到。
从资源菜单中选择Resource,然后选择Icon,添加资源,选中Icon类型,点击导入,此时会叫你选择本地的图片,记住必须选择.ioc格式的图片,否则导入失败。
把新图标的资源ID改为IDI_ICON(也可以不改)。 具体做法如下:
有一点很重要,你改知道就是 打开Header Files下的Resource.h,找到Icon下的图标,系统默认是从128开始的,
#define IDR_MAINFRAME 128
#define IDR_ICONTETYPE 129(单/多文档程序的文档图标)
#define IDI_ICON1 130
#define IDI_ICON2 131
a.修改exe文件图标
VS2010生成的exe文件图标是用Icon下几个图标中value值最小的,顺序为IDR_MAINFRAME、IDR_ICONTETYPE、新加 的,所以想更改生成的exe文件图标,只要保证图标的value值是Icon下几个图标中最小的就可以了
1. 导入自己的.ioc图片,并在Resource.h中,将自己加的icon资源Value改为最小,如下,因此不一定要删除IDR_MAINFRAME
#define IDR_MAINFRAME 129
#define IDI_ICON1 128(自己添加的icon)
2. 然后编译运行,找到你的debug目录,你将看到图标已经更改的.exe执行文件,这种方法可以将任何你喜欢的图片做成.exe文件图标
b.修改标题栏图标
1. 如上操作,导入自己喜爱的ico图片,编辑新加icon的ID,比如我新加的Icon资源ID为 IDI_ICON1
22. 基于对话框的程序,在构造函数中有一句
m_hIcon = AfxGetApp()->LoadIcon(IDR_MAINFRAME);
此时把IDR_MAINFRAME改为我的IDI_ICON1的图标名。
首先,拖动几个Button到窗口,然后修改Button的Owner Draw属性为true
接着,右击Dialog窗口 --> Class Wizard --> Messages --> WM_DRAWITEM --> Add Handler --> Edit Code
void CMFCInterfaceDlg::OnDrawItem(int nIDCtl, LPDRAWITEMSTRUCT lpDrawItemStruct)

{

    // TODO: Add your message handler code here and/or call default

    //获得button标题

    //CString btnCaption = _T("Dialog");

    CDC* pDC = CDC::FromHandle(lpDrawItemStruct->hDC);

    CString btnCaption = L"";

    //设置标题

    switch (lpDrawItemStruct->CtlID)

    {

    case ID1:

        btnCaption = "1";

        break;

    case ID2:

        btnCaption = "2";

        break;

    case ID3:

        btnCaption = "3";

        break;

    default:

        ;

    }

    CRect drawRect;

    //获得绘图DC

    //得到原Button的矩形大小

    drawRect.CopyRect(&(lpDrawItemStruct->rcItem));

    //绘制控件框架

    pDC->DrawFrameControl(&drawRect, DFC_BUTTON, lpDrawItemStruct->CtlType);

    //创建画刷

    CBrush pBrush;

    pBrush.CreateSolidBrush(RGB(100, 130, 10));

    //画矩形

    pDC->FillRect(drawRect, &pBrush);

    //定义一个CRect用于绘制文本

    CRect textRect;

    //拷贝矩形区域

    textRect.CopyRect(&drawRect);

    //获得字符串尺寸

    CSize sz = pDC->GetTextExtent(btnCaption);

    //调整文本位置 居中

    textRect.top += (textRect.Height() - sz.cy) / 2;

    //设置文本背景透明

    pDC->SetBkMode(TRANSPARENT);

    //设置文本颜色

    pDC->SetTextColor(RGB(0, 0, 255));

    //绘制文本内容

    pDC->DrawText(btnCaption, &textRect, DT_RIGHT | DT_CENTER | DT_BOTTOM);

    CDialogEx::OnDrawItem(nIDCtl, lpDrawItemStruct);

}
当然,对于不想要改变的Button,将Owner Draw属性设为false就行。
5.static text字体及颜色的绘制
颜色绘制:
在OnCTLColor中
HBRUSH CMFCInterfaceDlg::OnCtlColor(CDC* pDC, CWnd* pWnd, UINT nCtlColor)

{

    //HBRUSH hbr = CDialogEx::OnCtlColor(pDC, pWnd, nCtlColor);

    HBRUSH hbr = CDialogEx::OnCtlColor(pDC, pWnd, nCtlColor);

    if (pWnd == this)

    {

        return m_brush;

    }

    if (pWnd->GetDlgCtrlID() == (IDC_STATIC_TITLE))//IDC_STATIC_TITLE:标题ID

    {

        pDC->SetBkMode(TRANSPARENT);

        pDC->SetTextColor(RGB(255, 251, 240));

        return HBRUSH(GetStockObject(HOLLOW_BRUSH));

    }

    if (pWnd->GetDlgCtrlID() == (IDC_STATIC))//IDC_STATIC:文本ID

    {

        pDC->SetBkMode(TRANSPARENT);

        pDC->SetTextColor(RGB(0, 225, 225));

        return HBRUSH(GetStockObject(HOLLOW_BRUSH));

    }

    return hbr;

    //return m_brush;

}
额外提示:pDC->SetBkMode(TRANSPARENT);是设置文本背景透明。
字体绘制:
首先,在Dlg.h文件中声明Font变量CFont newFont;
然后,在OnInitDialog()函数后面加上以下代码
        CFont* font;

    font = static_title.GetFont();//获取CFont对象

    LOGFONT lf;

    font->GetLogFont(&lf);//获取LOGFONT结构体

    lf.lfHeight = -15;    //修改字体大小

    lf.lfItalic = TRUE;        //倾斜

    lf.lfWeight = 400;   //修改字体的粗细

    newFont.CreateFontIndirectW(&lf);//创建一个新的字体

    static_title.SetFont(&newFont);
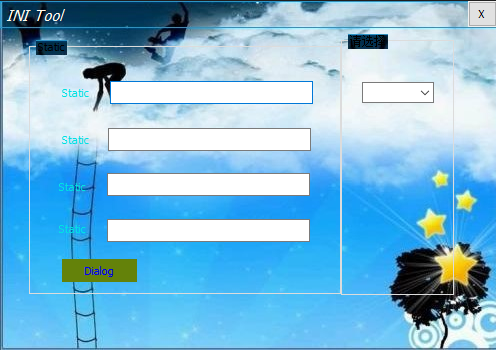
6.MFC取消标题栏,以及自制标题栏
首先,去掉原本的标题栏,将属性Border设置为NONE。
然后,观察上面那张图片,上面那个矩形区域就可以当做标题栏。首先要做的就是为它添加一个退出按钮,就是那个叉叉。
1. 拖动一个button到矩形区域,自行调整大小以及位置,设置它的Caption为大写的X,哈哈哈,其实可以为Button贴图,不过本人为了方便,写个X冒充。将其ID设置为IDC_BUTTON_CLOSE。
2. 为这个Button添加函数,实现单击时关闭程序。双击Button进入代码编辑页面,输入以下代码
void CMFCInterfaceDlg::OnBnClickedButtonClose()

{

    CDialog::OnOK();

}
此时,它的退出功能已经完成。但是运行时,可能发现Button的位置偏左,这时候,就可以用代码微调Button的位置,在OnInitDialog()函数后面加上以下代码
CRect rect;

    GetDlgItem(IDC_BUTTON_CLOSE)->GetWindowRect(&rect);//获得空间的绝对坐标

    ScreenToClient(&rect);//获得相对于主窗体的坐标

    rect.OffsetRect(CSize(15, 0));//这里要是要移动的相对位置

    GetDlgItem(IDC_BUTTON_CLOSE)->MoveWindow(rect);//移动到目标位置
数字可以自己调节。
另外关于Button贴图的,附上此链接:https://blog.csdn.net/u011711997/article/details/52551106
7. 如何实现标题栏的拖动功能
需要添加三个函数
void CTestDllDlg::OnLButtonUp(UINT nFlags, CPoint point)

{

    // TODO: Add your message handler code here and/or call default

    ReleaseCapture();

    CDialogEx::OnLButtonUp(nFlags, point);

}

void CTestDllDlg::OnLButtonDown(UINT nFlags, CPoint point)

{

    // TODO: Add your message handler code here and/or call default

    SetCapture();

    CDialogEx::OnLButtonDown(nFlags, point);

}

void CTestDllDlg::OnMouseMove(UINT nFlags, CPoint point)

{

    // TODO: Add your message handler code here and/or call default

    static CPoint PrePoint = CPoint(0, 0);

    if (MK_LBUTTON == nFlags)

    {

        if (point != PrePoint)

        {

            CPoint ptTemp = point - PrePoint;

            CRect rcWindow;

            GetWindowRect(&rcWindow);

            rcWindow.OffsetRect(ptTemp.x, ptTemp.y);

            MoveWindow(&rcWindow);

            return;

        }

    }

    PrePoint = point;

    CDialogEx::OnMouseMove(nFlags, point);

}
亲测可用,捕捉鼠标按下与释放。
cpp
// TestDllDlg.cpp : implementation file

//

#include "stdafx.h"

#include "TestDll.h"

#include "TestDllDlg.h"

#include "afxdialogex.h"

#ifdef _DEBUG

#define new DEBUG_NEW

#endif

// CAboutDlg dialog used for App About

class CAboutDlg : public CDialogEx

{

public:

    CAboutDlg();

// Dialog Data

#ifdef AFX_DESIGN_TIME

    enum { IDD = IDD_ABOUTBOX };

#endif

    protected:

    virtual void DoDataExchange(CDataExchange* pDX);    // DDX/DDV support

// Implementation

protected:

    DECLARE_MESSAGE_MAP()

};

CAboutDlg::CAboutDlg() : CDialogEx(IDD_ABOUTBOX)

{

}

void CAboutDlg::DoDataExchange(CDataExchange* pDX)

{

    CDialogEx::DoDataExchange(pDX);

}

BEGIN_MESSAGE_MAP(CAboutDlg, CDialogEx)

END_MESSAGE_MAP()

// CTestDllDlg dialog

CTestDllDlg::CTestDllDlg(CWnd* pParent /*=nullptr*/)

    : CDialogEx(IDD_TESTDLL_DIALOG, pParent)

{

    m_hIcon = AfxGetApp()->LoadIcon(IDI_ICON1);

}

void CTestDllDlg::DoDataExchange(CDataExchange* pDX)

{

    CDialogEx::DoDataExchange(pDX);

    DDX_Control(pDX, IDC_COMBO1, m_combo);

    DDX_Control(pDX, IDC_COMBO2, m_combo_sec);

    DDX_Control(pDX, IDC_BUTTON_CLOSE, m_btnClose);

    DDX_Control(pDX, IDC_STATIC_TITLE, static_title);

}

BEGIN_MESSAGE_MAP(CTestDllDlg, CDialogEx)

    ON_WM_SYSCOMMAND()

    ON_WM_PAINT()

    ON_WM_QUERYDRAGICON()

    ON_EN_CHANGE(IDC_MFCEDITBROWSE1, &CTestDllDlg::OnEnChangeMfceditbrowse1)

    ON_CBN_SELCHANGE(IDC_COMBO1, &CTestDllDlg::OnCbnSelchangeCombo1)

    ON_CBN_SETFOCUS(IDC_COMBO1, &CTestDllDlg::OnCbnSetfocusCombo1)

    ON_BN_CLICKED(OK, &CTestDllDlg::OnBnClickedOk)

    ON_STN_CLICKED(result, &CTestDllDlg::OnStnClickedresult)

    ON_BN_CLICKED(clear, &CTestDllDlg::OnBnClickedclear)

    ON_CBN_SETFOCUS(IDC_COMBO2, &CTestDllDlg::OnCbnSetfocusCombo2)

    ON_BN_CLICKED(IDC_BUTTON_CLOSE, &CTestDllDlg::OnBnClickedButtonClose)

    ON_WM_CTLCOLOR()

    ON_WM_DRAWITEM()

    ON_WM_LBUTTONUP()

    ON_WM_LBUTTONDOWN()

    ON_WM_MOUSEMOVE()

    ON_WM_SIZE()

END_MESSAGE_MAP()

// CTestDllDlg message handlers

BOOL CTestDllDlg::OnInitDialog()

{

    CDialogEx::OnInitDialog();

    // Add "About..." menu item to system menu.

    // IDM_ABOUTBOX must be in the system command range.

    ASSERT((IDM_ABOUTBOX & 0xFFF0) == IDM_ABOUTBOX);

    ASSERT(IDM_ABOUTBOX < 0xF000);

    CMenu* pSysMenu = GetSystemMenu(FALSE);

    if (pSysMenu != nullptr)

    {

        BOOL bNameValid;

        CString strAboutMenu;

        bNameValid = strAboutMenu.LoadString(IDS_ABOUTBOX);

        ASSERT(bNameValid);

        if (!strAboutMenu.IsEmpty())

        {

            pSysMenu->AppendMenu(MF_SEPARATOR);

            pSysMenu->AppendMenu(MF_STRING, IDM_ABOUTBOX, strAboutMenu);

        }

    }

    // Set the icon for this dialog.  The framework does this automatically

    //  when the application's main window is not a dialog

    SetIcon(m_hIcon, TRUE);            // Set big icon

    SetIcon(m_hIcon, FALSE);        // Set small icon

    // TODO: Add extra initialization here

    CString strBmpPath = _T(".\\res\\backgroundone.jpg");

    CImage img;

    img.Load(strBmpPath);

    MoveWindow(0, 0, img.GetWidth(), img.GetHeight());

    CBitmap bmpTmp;

    bmpTmp.Attach(img.Detach());

    m_brush.CreatePatternBrush(&bmpTmp);

    CRect rect_close;

    GetDlgItem(IDC_BUTTON_CLOSE)->GetWindowRect(&rect_close);//获得空间的绝对坐标

    ScreenToClient(&rect_close);//获得相对于主窗体的坐标

    //rect.OffsetRect(CSize(5, 0));//这里要是要移动的相对位置

    rect_close.OffsetRect(CSize(17, 0));//这里要是要移动的相对位置

    GetDlgItem(IDC_BUTTON_CLOSE)->MoveWindow(rect_close);//移动到目标位置

    CFont* font;

    font = static_title.GetFont();//获取CFont对象

    LOGFONT lf;

    font->GetLogFont(&lf);//获取LOGFONT结构体

    lf.lfHeight = -15;    //修改字体大小

    lf.lfItalic = TRUE;        //倾斜

    lf.lfWeight = 400;   //修改字体的粗细

    newFont.CreateFontIndirectW(&lf);//创建一个新的字体

    static_title.SetFont(&newFont);

    m_combo.AddString(L"Add");

    m_combo.AddString(L"Delete");

    m_combo.AddString(L"Update");

    m_combo.AddString(L"Query");

    m_combo.SetCurSel(0);

    return TRUE;  // return TRUE  unless you set the focus to a control

}

void CTestDllDlg::OnSysCommand(UINT nID, LPARAM lParam)

{

    if ((nID & 0xFFF0) == IDM_ABOUTBOX)

    {

        CAboutDlg dlgAbout;

        dlgAbout.DoModal();

    }

    else

    {

        CDialogEx::OnSysCommand(nID, lParam);

    }

}

// If you add a minimize button to your dialog, you will need the code below

//  to draw the icon.  For MFC applications using the document/view model,

//  this is automatically done for you by the framework.

void CTestDllDlg::OnPaint()

{

    if (IsIconic())

    {

        CPaintDC dc(this); // device context for painting

        SendMessage(WM_ICONERASEBKGND, reinterpret_cast<WPARAM>(dc.GetSafeHdc()), 0);

        // Center icon in client rectangle

        int cxIcon = GetSystemMetrics(SM_CXICON);

        int cyIcon = GetSystemMetrics(SM_CYICON);

        CRect rect;

        GetClientRect(&rect);

        int x = (rect.Width() - cxIcon + 1) / 2;

        int y = (rect.Height() - cyIcon + 1) / 2;

        // Draw the icon

        dc.DrawIcon(x, y, m_hIcon);

    }

    else

    {

        CDialogEx::OnPaint();

        //CDialogEx::OnPaint();

    }

}

// The system calls this function to obtain the cursor to display while the user drags

//  the minimized window.

HCURSOR CTestDllDlg::OnQueryDragIcon()

{

    return static_cast<HCURSOR>(m_hIcon);

}

void CTestDllDlg::OnEnChangeEdit1()

{

    // TODO:  If this is a RICHEDIT control, the control will not

    // send this notification unless you override the CDialogEx::OnInitDialog()

    // function and call CRichEditCtrl().SetEventMask()

    // with the ENM_CHANGE flag ORed into the mask.

    // TODO:  Add your control notification handler code here

}

char* cstringTochar(CString str_tmp) {

    char *ptr;

    CString str;

    str = str_tmp;

#ifdef _UNICODE

    LONG len;

    len = WideCharToMultiByte(CP_ACP, 0, str, -1, NULL, 0, NULL, NULL);

    ptr = new char[len + 1];

    memset(ptr, 0, len + 1);

    WideCharToMultiByte(CP_ACP, 0, str, -1, ptr, len + 1, NULL, NULL);

#else

    ptr = new char[str.GetAllocLength() + 1];

    sprintf(ptr, _T("%s"), str);

#endif

    return ptr;

}

void CTestDllDlg::OnEnChangeMfceditbrowse1()

{

    // TODO:  If this is a RICHEDIT control, the control will not

    // send this notification unless you override the CDialogEx::OnInitDialog()

    // function and call CRichEditCtrl().SetEventMask()

    // with the ENM_CHANGE flag ORed into the mask.

    // TODO:  Add your control notification handler code here

    //CString strFile = _T("");

    //CFileDialog dlgFile(TRUE, NULL, NULL, OFN_HIDEREADONLY, _T("Describe Files (*.ini)|*.ini|All Files (*.*)|*.*||"), NULL);

    //if (dlgFile.DoModal()) {

    //    strFile = dlgFile.GetPathName();

    //}

    //SetDlgItemText(path, strFile);

    //SetDlgItemText(key, L"aaa");

    m_combo_sec.ResetContent();//清空所有ComboBox的项目

    CString path_cstr;

    GetDlgItemText(IDC_MFCEDITBROWSE1, path_cstr);

    char* path_str;

    path_str = cstringTochar(path_cstr);

    HINSTANCE hInst;

    hInst = LoadLibrary(_T("IniDll.dll"));

    typedef int(*Getsec_num)(char* path_str);

    Getsec_num getsec_num = (Getsec_num)GetProcAddress(hInst, "GetSections_num");

    int num = getsec_num(path_str);

    char* sec_set;

    typedef char*(*Getsec)(char* path_str, int num);

    Getsec getsec = (Getsec)GetProcAddress(hInst, "GetSections");

    for (int i = 1; i < num + 1; i++) {

        sec_set = getsec(path_str, i);

        CString value_cstr_tmp(sec_set);

        m_combo_sec.AddString(value_cstr_tmp);

        //m_combo.SetCurSel(0);

    }

    m_combo_sec.SetCurSel(-1);

    FreeLibrary(hInst);

    //SetDlgItemText(key, path_cstr);

}

void CTestDllDlg::OnCbnSelchangeCombo1()

{

    // TODO: Add your control notification handler code here

    //CString strPre, strNew;

    ////GetDlgItem(IDC_COMBO1)->GetWindowTextW(m_paramname);//改变前的文本

    ////SetDlgItemText(path, m_paramname);

    //int nSel = m_combo.GetCurSel();

    //m_combo.GetLBText(nSel, strNew);

    ////SetDlgItemText(path, strNew);

    ////m_combo.GetWindowText(strPre);

    //if (!strNew.CompareNoCase(L"Query")) {

    //    SetDlgItemText(value, strNew);

    //    //query_page.DoModal();

    //    //query_page.ChangeProc(GetDlgItem(IDC_COMBO1)->GetSafeHwnd());

    //}

    GetDlgItem(value)->EnableWindow(TRUE);

    CString strNew_change;

    int nSel_change = m_combo.GetCurSel();

    m_combo.GetLBText(nSel_change, strNew_change);

    if (!strNew_change.CompareNoCase(L"Query")) {

        GetDlgItem(value)->EnableWindow(FALSE);

    }

}

void CTestDllDlg::OnCbnSetfocusCombo1()

{

     //TODO: Add your control notification handler code here

    //m_combo.ResetContent();//清空所有ComboBox的项目

    //m_combo.AddString(L"Add");

    //m_combo.AddString(L"Delete");

    //m_combo.AddString(L"Update");

    //m_combo.AddString(L"Query");

    //int nSel = m_combo.GetCurSel();

    //m_combo.SetCurSel(nSel);

}

void CTestDllDlg::OnBnClickedOk()

{

    // TODO: Add your control notification handler code here

    CString strNew;

    int nSel = m_combo.GetCurSel();

    m_combo.GetLBText(nSel, strNew);

    CString path_cstr, sec_cstr, key_cstr, value_cstr;

    char* path_str;

    char* sec_str;

    char* key_str;

    //GetDlgItemText(path, path_cstr);//获取指定ID的编辑框内容

    GetDlgItemText(IDC_MFCEDITBROWSE1, path_cstr);

    if (!strNew.CompareNoCase(L"Query")) {

        int nSel_sec = m_combo_sec.GetCurSel();

        m_combo_sec.GetLBText(nSel_sec, sec_cstr);

    }

    else {

        m_combo_sec.GetWindowText(sec_cstr);

    }

    //GetDlgItemText(section, sec_cstr);//获取指定ID的编辑框内容

    GetDlgItemText(key, key_cstr);//获取指定ID的编辑框内容

    path_str = cstringTochar(path_cstr);

    sec_str = cstringTochar(sec_cstr);

    key_str = cstringTochar(key_cstr);

    if (!strNew.CompareNoCase(L"Query")) {

        GetDlgItem(value)->EnableWindow(TRUE);

        //SetDlgItemText(value, strNew);

        HINSTANCE hInst;

        hInst = LoadLibrary(L"IniDll.dll");

        typedef char*(*Read)(char* sec_str, char* key_str, char* path_str);

        Read read_string = (Read)GetProcAddress(hInst, "Ini_Read");

        //Read read_string = (Read)GetProcAddress(hInst, (LPCSTR)MAKEINTRESOURCE(2));

        char* a = read_string(sec_str, key_str, path_str);

        //char* a = Ini_Read(sec_str, key_str, path_str);

        CString value_cstr_tmp(a);

        SetDlgItemText(value, value_cstr_tmp);

        //SetDlgItemText(result, L"查询成功");//获取指定ID的编辑框内容

        FreeLibrary(hInst);

        AfxMessageBox(_T("查询成功!"));

        GetDlgItem(value)->EnableWindow(FALSE);

    }

    else if (!strNew.CompareNoCase(L"Add")) {

        GetDlgItemText(value, value_cstr);

        char* value_str = new char[1024];

        value_str = cstringTochar(value_cstr);

        HINSTANCE hInst;

        hInst = LoadLibrary(_T("IniDll.dll"));

        typedef void(*Write)(char* sec_str, char* key_str, char* value_str, char* path_str);

        Write write = (Write)GetProcAddress(hInst, "Ini_Write");

        write(sec_str, key_str, value_str, path_str);

        //SetDlgItemText(result, L"添加成功");//获取指定ID的编辑框内容

        FreeLibrary(hInst);

        AfxMessageBox(_T("添加成功!"));

    }

    else if (!strNew.CompareNoCase(L"Update")) {

        GetDlgItemText(value, value_cstr);

        char* value_str = new char[1024];

        value_str = cstringTochar(value_cstr);

        HINSTANCE hInst;

        hInst = LoadLibrary(_T("IniDll.dll"));

        typedef void(*Write)(char* sec_str, char* key_str, char* value_str, char* path_str);

        Write write = (Write)GetProcAddress(hInst, "Ini_Write");

        write(sec_str, key_str, value_str, path_str);

        //SetDlgItemText(result, L"修改成功");//获取指定ID的编辑框内容

        FreeLibrary(hInst);

        AfxMessageBox(_T("修改成功!"));

    }

    else if (!strNew.CompareNoCase(L"Delete")) {

        //GetDlgItemText(value, value_cstr);

        //char* value_str = new char[1024];

        //value_str = cstringTochar(value_cstr);

        if (!key_cstr.CompareNoCase(L"")) {

            HINSTANCE hInst;

            hInst = LoadLibrary(_T("IniDll.dll"));

            typedef void(*Del_Sec)(char* sec_str, char* path_str);

            Del_Sec del_sec = (Del_Sec)GetProcAddress(hInst, "Ini_Del_Sec");

            del_sec(sec_str, path_str);

            FreeLibrary(hInst);

            AfxMessageBox(_T("删除成功!"));

        }

        else {

            HINSTANCE hInst;

            hInst = LoadLibrary(_T("IniDll.dll"));

            typedef void(*Del_Key)(char* sec_str, char* key_str, char* path_str);

            Del_Key del_key = (Del_Key)GetProcAddress(hInst, "Ini_Del_Key");

            del_key(sec_str, key_str, path_str);

            FreeLibrary(hInst);

            AfxMessageBox(_T("删除成功!"));

        }

    }

}

void CTestDllDlg::OnStnClickedresult()

{

    // TODO: Add your control notification handler code here

}

void CTestDllDlg::OnBnClickedclear()

{

    // TODO: Add your control notification handler code here

    SetDlgItemText(IDC_MFCEDITBROWSE1, L"");

    m_combo_sec.ResetContent();//清空所有ComboBox的项目

    SetDlgItemText(key, L"");

    SetDlgItemText(value, L"");

    SetDlgItemText(result, L"");

}

void CTestDllDlg::OnBnClickedbutton()

{

    // TODO: Add your control notification handler code here

}

void CTestDllDlg::OnCbnSetfocusCombo2()

{

    // TODO: Add your control notification handler code here

}

void CTestDllDlg::OnBnClickedButtonClose()

{

    // TODO: Add your control notification handler code here

    CDialog::OnOK();

}

HBRUSH CTestDllDlg::OnCtlColor(CDC* pDC, CWnd* pWnd, UINT nCtlColor)

{

    HBRUSH hbr = CDialogEx::OnCtlColor(pDC, pWnd, nCtlColor);

    // TODO:  Change any attributes of the DC here

    // TODO:  Return a different brush if the default is not desired

    if (pWnd == this)

    {

        return m_brush;

    }

    if (pWnd->GetDlgCtrlID() == (IDC_STATIC_TITLE))

    {

        //MessageBox(_T("static text"));

        pDC->SetBkMode(TRANSPARENT);

        pDC->SetTextColor(RGB(255, 251, 240));

        return HBRUSH(GetStockObject(HOLLOW_BRUSH));

    }

    if (pWnd->GetDlgCtrlID() == (IDC_STATIC))

    {

        //MessageBox(_T("static text"));

        pDC->SetBkMode(TRANSPARENT);

        //pDC->SetTextColor(RGB(0, 225, 225));

        return HBRUSH(GetStockObject(HOLLOW_BRUSH));

    }

    return hbr;

}

void CTestDllDlg::OnDrawItem(int nIDCtl, LPDRAWITEMSTRUCT lpDrawItemStruct)

{

    // TODO: Add your message handler code here and/or call default

    ////获得button标题

    //CString btnCaption = _T("Dialog");

    //CDC* pDC = CDC::FromHandle(lpDrawItemStruct->hDC);

    CString btnCaption = L"";

    //设置标题

    switch (lpDrawItemStruct->CtlID)

    {

    case OK:

        btnCaption = "OK";

        break;

    case clear:

        btnCaption = "Clear";

        break;

    default:

        ;

    }

    CDC* pDC = CDC::FromHandle(lpDrawItemStruct->hDC);

    CRect drawRect;

    //获得绘图DC

    //得到原Button的矩形大小

    drawRect.CopyRect(&(lpDrawItemStruct->rcItem));

    //绘制控件框架

    pDC->DrawFrameControl(&drawRect, DFC_BUTTON, lpDrawItemStruct->CtlType);

    //创建画刷

    CBrush pBrush;

    //pBrush.CreateSolidBrush(RGB(100, 130, 10));

    pBrush.CreateSolidBrush(RGB(0, 128, 255));

    //画矩形

    pDC->FillRect(drawRect, &pBrush);

    //定义一个CRect用于绘制文本

    CRect textRect;

    //拷贝矩形区域

    textRect.CopyRect(&drawRect);

    //获得字符串尺寸

    CSize sz = pDC->GetTextExtent(btnCaption);

    //调整文本位置 居中

    textRect.top += (textRect.Height() - sz.cy) / 2;

    //设置文本背景透明

    pDC->SetBkMode(TRANSPARENT);

    //设置文本颜色

    pDC->SetTextColor(RGB(0, 0, 255));

    //绘制文本内容

    pDC->DrawText(btnCaption, &textRect, DT_RIGHT | DT_CENTER | DT_BOTTOM);

    CDialog::OnDrawItem(nIDCtl, lpDrawItemStruct);

    //CDialogEx::OnDrawItem(nIDCtl, lpDrawItemStruct);

}

void CTestDllDlg::OnLButtonUp(UINT nFlags, CPoint point)

{

    // TODO: Add your message handler code here and/or call default

    ReleaseCapture();

    CDialogEx::OnLButtonUp(nFlags, point);

}

void CTestDllDlg::OnLButtonDown(UINT nFlags, CPoint point)

{

    // TODO: Add your message handler code here and/or call default

    SetCapture();

    CDialogEx::OnLButtonDown(nFlags, point);

}

void CTestDllDlg::OnMouseMove(UINT nFlags, CPoint point)

{

    // TODO: Add your message handler code here and/or call default

    static CPoint PrePoint = CPoint(0, 0);

    if (MK_LBUTTON == nFlags)

    {

        if (point != PrePoint)

        {

            CPoint ptTemp = point - PrePoint;

            CRect rcWindow;

            GetWindowRect(&rcWindow);

            rcWindow.OffsetRect(ptTemp.x, ptTemp.y);

            MoveWindow(&rcWindow);

            return;

        }

    }

    PrePoint = point;

    CDialogEx::OnMouseMove(nFlags, point);

}

void CTestDllDlg::OnSize(UINT nType, int cx, int cy)

{

    CDialogEx::OnSize(nType, cx, cy);

    //CDialogEx::OnSize(nType, cx, cy);

    // TODO: Add your message handler code here

}
第六篇--MFC美化界面的更多相关文章
- 第五十三篇 -- MFC美化界面2
IDC_STATIC 1. 设置字体样式 方法1:在OnInitDialog()函数中使用以下语句 CFont * f; f = new CFont; f->CreateFont(50, // ...
- VC之美化界面(内容覆盖十分全面,经典)
界面美化 摘要本文专题讨论VC中的界面美化,适用于具有中等VC水平的读者.读者最好具有以下VC基础: 1. 大致了解MFC框架的基本运作原理: 2. 熟悉Windows消息机制,熟悉MFC的消息映射和 ...
- 【Python之旅】第六篇(七):开发简易主机批量管理工具
[Python之旅]第六篇(七):开发简易主机批量管理工具 python 软件开发 Paramiko模块 批量主机管理 摘要: 通过前面对Paramiko模块的学习与使用,以及Python中多线程与多 ...
- 第六篇 ANDROID窗口系统机制之显示机制
第六篇 ANDROID窗口系统机制之显示机制 ANDROID的显示系统是整个框架中最复杂的系统之一,涉及包括窗口管理服务.VIEW视图系统.SurfaceFlinger本地服务.硬件加速等.窗口管理服 ...
- 跟我学SpringCloud | 第十六篇:微服务利剑之APM平台(二)Pinpoint
目录 SpringCloud系列教程 | 第十六篇:微服务利剑之APM平台(二)Pinpoint 1. Pinpoint概述 2. Pinpoint主要特性 3. Pinpoint优势 4. Pinp ...
- Egret入门学习日记 --- 第六篇(书中 3.6~3.9节 内容)
第六篇(书中 3.6~3.9节 内容) 在本篇写之前,还是要为昨天写的日记道歉才行,差点就误人子弟了. 没想到在程序员界最低级的错误 “单词拼写错误” 还是会经常犯. childrenCreated ...
- 第六篇Scrum冲刺博客--Interesting-Corps
第六篇Scrum冲刺博客 站立式会议 1.会议照片 2.队友完成情况 团队成员 昨日完成 今日计划 鲍鱼铭 搜索页面以及音乐详情页面数据导入及测试 各界面数据请求云函数设计及实现 叶学涛 进行页面的优 ...
- Scrum 冲刺 第六篇
Scrum 冲刺 第六篇 每日会议照片 昨天已完成工作 队员 昨日完成任务 黄梓浩 完成app项目架构搭建 黄清山 完成部分个人界面模块数据库的接口 邓富荣 完成登录注册接口 钟俊豪 完成部分博客圈模 ...
- 解剖SQLSERVER 第十六篇 OrcaMDF RawDatabase --MDF文件的瑞士军刀(译)
解剖SQLSERVER 第十六篇 OrcaMDF RawDatabase --MDF文件的瑞士军刀(译) http://improve.dk/orcamdf-rawdatabase-a-swiss-a ...
随机推荐
- H5播放需要解密的m3u8音频文件
<audio ref="audio"></audio> import CryptoJS from "crypto-js"; import ...
- Paxos 图解 (秒懂)
文章很长,建议收藏起来,慢慢读! 疯狂创客圈为小伙伴奉上以下珍贵的学习资源: 疯狂创客圈 经典图书 : <Netty Zookeeper Redis 高并发实战> 面试必备 + 大厂必备 ...
- 数据泵导出报错ORA-31693 ORA-02354 ORA-01466
1.Oracle数据泵导出schema时有报错: Connected to: Oracle Database 11g Enterprise Edition Release 11.2.0.3.0 - P ...
- 复习Spring第一课--Spring的基本知识及使用
关于Spring: spring容器是Spring的核心,该容器负责管理spring中的java组件, ApplicationContext ctx = new ClassPathXmlApplic ...
- theUnforgiven-冲刺第一天
每天的冲刺博客分为scrum和PM报告两部分 吴邦天 负责项目整体构思以及对任务安排,承担项目具体设计,编码: 唐嘉诚 负责项目前端页面设计,承担整个项目的后端数据库搭建以及编码 周游 项目美化以及细 ...
- Netty 框架学习 —— 预置的 ChannelHandler 和编解码器
Netty 为许多提供了许多预置的编解码器和处理器,几乎可以开箱即用,减少了在烦琐事务上话费的时间和精力 空闲的连接和超时 检测空闲连接以及超时对于释放资源来说至关重要,Netty 特地为它提供了几个 ...
- 流程自动化RPA,Power Automate Desktop系列 - 构建VuePress文档中心脚手架
一.背景 笔者曾基于VuePress搭建过一个文档中心,但是在实现在线管理功能之前,很多时候,新建文档需要手动处理很多数据,看有没有可能实现一个脚手架来处理这些问题,所谓脚手架,就是进行文档初始化的一 ...
- 17、mysql主从同步Last_IO_Errno错误代码说明
登录mysql从库:mysql> show slave status\G; Last_IO_Errno:1005:创建表失败 1006:创建数据库失败 1007:数据库已存在,创建数据库失败 1 ...
- InterlliJ Debug启动提示:Method breakpoints may dramatically slow down debugging
- POJ 2663 Tri Tiling dp 画图找规律
状态:d[i]代表n=i时的方案数. 状态转移方程:d[i]=d[i-2]+2*(d[i-2]+d[i-4]+-+d[0]) i只会为偶数,奇数情况不存在,d[0]=1 找状态转移方程的时候画图更好理 ...