【springboot】集成swagger
1.简介
本章介绍 SpringBoot2.1.9 集成 Swagger2 生成在线的API接口文档。
2. pom依赖:
通过对比了swagger的几个版本,发现还是2.6.1问题最少
<!-- swagger2 依赖 -->

    <dependency>

        <groupId>io.springfox</groupId>

        <artifactId>springfox-swagger2</artifactId>

        <version>2.6.1</version>

    </dependency>

    <dependency>

        <groupId>io.springfox</groupId>

        <artifactId>springfox-swagger-ui</artifactId>

        <version>2.6.1</version>

    </dependency>
3. swaggerconfig配置类:
3.1 SwaggerConfig 配置类
package cn.com.wjqhuaxia.config;

import org.springframework.context.annotation.Bean;

import org.springframework.context.annotation.Configuration;

import springfox.documentation.builders.ApiInfoBuilder;

import springfox.documentation.builders.PathSelectors;

import springfox.documentation.builders.RequestHandlerSelectors;

import springfox.documentation.service.ApiInfo;

import springfox.documentation.spi.DocumentationType;

import springfox.documentation.spring.web.plugins.Docket;

/**

 * @Description: swagger配置类

 */

@Configuration

// 开启swagger2

// 选择不同的环境启用 swagger 以下两种方式,推荐第一种

// @Profile({"dev","test"})

// @ConditionalOnProperty(name = "swagger.enable", havingValue = "true")

public class SwaggerConfig {

	@Bean

	public Docket createRestApi() {

		return new Docket(DocumentationType.SWAGGER_2)

				.groupName("用户权限项目") // 设置项目名

				.apiInfo(apiInfo())

				.pathMapping("/")	 // 设置api根路径

				.select()				 // 初始化并返回一个API选择构造器

				.apis(RequestHandlerSelectors.basePackage("cn.com.wjqhuaxia"))	// swagger api扫描的路径

				.paths(PathSelectors.any())	// 设置路径筛选

				.build();					// 构建

	}

	private ApiInfo apiInfo() {

		return new ApiInfoBuilder()

				.title("user-auth服务")

				.description("提供用户权限功能服务接口")

				.license("")

				.licenseUrl("")

				.termsOfServiceUrl("")

				.version("1.0.0")

				.build();

	}

}
3.2 配置说明
一、Docket类的方法:

Docket groupName(String var):设置栏目名

Docket apiInfo(ApiInfo apiInfo):设置文档信息

Docket pathMapping(String path):设置api根路径

Docket protocols(Set<String> protocols):设置协议,Sets为com.goolge.common下的类,Sets.newHashSet("https","http")相当于new HashSet(){{add("https");add("http");}};

ApiSelectorBuilder select():初始化并返回一个API选择构造器

二、ApiSelectorBuilder类的方法:

ApiSelectorBuilder apis(Predicate<RequestHandler> selector):添加选择条件并返回添加后的ApiSelectorBuilder对象

ApiSelectorBuilder paths(Predicate<String> selector):设置路径筛选,该方法中含一句pathSelector = and(pathSelector, selector);表明条件为相与

RequestHandlerSelectors类的方法:

Predicate<RequestHandler> any():返回包含所有满足条件的请求处理器的断言,该断言总为true

Predicate<RequestHandler> none():返回不满足条件的请求处理器的断言,该断言总为false

Predicate<RequestHandler> basePackage(final String basePackage):返回一个断言(Predicate),该断言包含所有匹配basePackage下所有类的请求路径的请求处理器

三、PathSelectors类的方法:

Predicate<String> any():满足条件的路径,该断言总为true

Predicate<String> none():不满足条件的路径,该断言总为false

Predicate<String> regex(final String pathRegex):符合正则的路径
3.3 对应图示
对应以上3.1配置的简单图示
4. controller类api设置
4.1 controller配置
package cn.com.wjqhuaxia.controller;

import java.util.List;

import org.springframework.beans.factory.annotation.Autowired;

import org.springframework.web.bind.annotation.PathVariable;

import org.springframework.web.bind.annotation.RequestBody;

import org.springframework.web.bind.annotation.RequestMapping;

import org.springframework.web.bind.annotation.RequestMethod;

import org.springframework.web.bind.annotation.RestController;

import cn.com.wjqhuaxia.dao.IUserDao;

import cn.com.wjqhuaxia.model.UserEntity;

import io.swagger.annotations.Api;

import io.swagger.annotations.ApiImplicitParam;

import io.swagger.annotations.ApiImplicitParams;

import io.swagger.annotations.ApiOperation;

@RestController

@RequestMapping(value = "/user")

@Api(description = "用户管理接口")

public class UserManageController {

	@Autowired

	private IUserDao userDao;

	@ApiOperation(value = "获取用户列表", notes = "获取用户列表")

	@RequestMapping(value = "/getUsers", method = RequestMethod.GET)

	public List<UserEntity> getUsers() {

		List<UserEntity> users=userDao.getAll();

		return users;

	}

	@ApiOperation(value = "根据用户id获取用户信息", notes = "根据用户id获取用户信息")

	@ApiImplicitParams({

			@ApiImplicitParam(name = "id", value = "用户标识", required = true, paramType = "path", dataType = "Long") })

    @RequestMapping(value = "/getUser/{id}", method = RequestMethod.GET)

    public UserEntity getUser(@PathVariable Long id) {

    	UserEntity user=userDao.getOne(id);

        return user;

    }

	@ApiOperation(value = "新增用户" ,  notes="新增用户")

    @RequestMapping(value = "/add", method = RequestMethod.POST)

    public String save(@RequestBody UserEntity user) {

    	userDao.insert(user);

    	return "用户添加成功!";

    }

	@ApiOperation(value = "修改用户" ,  notes="修改用户")

    @RequestMapping(value="update", method = RequestMethod.POST)

    public void update(@RequestBody UserEntity user) {

    	userDao.update(user);

    }

	@ApiOperation(value = "删除用户" ,  notes="删除用户")

    @RequestMapping(value="/delete/{id}", method = RequestMethod.GET)

    public void delete(@PathVariable("id") Long id) {

    	userDao.delete(id);

    }

}
4.2 配置说明
@Api()用于类; 表示标识这个类是swagger的资源

@ApiOperation()用于方法; 表示一个http请求的操作

@ApiParam()用于方法,参数,字段说明; 表示对参数的添加元数据(说明或是否必填等) 【暂时没用,当前使用SpringMVC@RequestParam】

@ApiIgnore()用于类,方法,方法参数 表示这个方法或者类被忽略

@ApiImplicitParam() 用于方法 表示单独的请求参数

@ApiImplicitParams() 用于方法,包含多个 @ApiImplicitParam
4.3 图示

5. 实体类配置
5.1 实体类
/**

 * 用户对象

 * @author wjqhuaxia

 */

@ApiModel(value="UserEntity", description="用户对象")

public class UserEntity implements Serializable {

	private static final long serialVersionUID = 1L;

	@ApiModelProperty(value="用户id",name="id",example="1")

	private Long id;

	@ApiModelProperty(value="用户名",name="userName",example="mao2080")

	private String userName;

	@ApiModelProperty(value="密码",name="passWord",example="123456")

	private String passWord;

	@ApiModelProperty(value="性别",name="userSex",example="MAN")

	private UserSexEnum userSex;

	@ApiModelProperty(value="昵称",name="nickName",example="天际星痕")

	private String nickName;

	....get/set方法略。

}
5.2 配置说明
@ApiModel()用于类 表示对类进行说明,用于参数用实体类接收

@ApiModelProperty()用于方法,字段 表示对model属性的说明或者数据操作更改
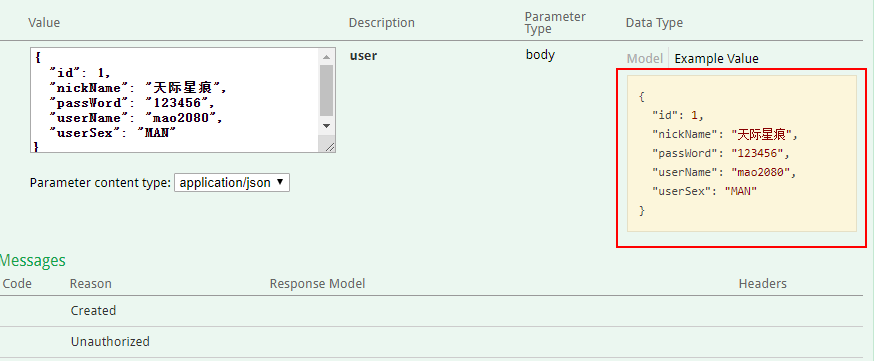
5.3 简单图示
6. 测试:
访问http://localhost:8080/swagger-ui.html
注意: 访问路径有配置工程名的带上工程名,避免404。此处未配置工程名。
参考:
https://blog.csdn.net/cp026la/article/details/86501095
https://www.cnblogs.com/mao2080/p/9021714.html
https://blog.csdn.net/z28126308/article/details/71126677
【springboot】集成swagger的更多相关文章
- spring-boot 集成 swagger 问题的解决
spring-boot 集成 swagger 网上有许多关于 spring boot 集成 swagger 的教程.按照教程去做,发现无法打开接口界面. 项目由 spring mvc 迁移过来,是一个 ...
- 20190909 SpringBoot集成Swagger
SpringBoot集成Swagger 1. 引入依赖 // SpringBoot compile('org.springframework.boot:spring-boot-starter-web' ...
- SpringBoot集成Swagger,Postman,newman,jenkins自动化测试.
环境:Spring Boot,Swagger,gradle,Postman,newman,jenkins SpringBoot环境搭建. Swagger简介 Swagger 是一款RESTFUL接口的 ...
- springboot集成swagger添加消息头(header请求头信息)
springboot集成swagger上篇文章介绍: https://blog.csdn.net/qiaorui_/article/details/80435488 添加头信息: package co ...
- springboot 集成 swagger 自动生成API文档
Swagger是一个规范和完整的框架,用于生成.描述.调用和可视化RESTful风格的Web服务.简单来说,Swagger是一个功能强大的接口管理工具,并且提供了多种编程语言的前后端分离解决方案. S ...
- SpringBoot集成Swagger接口管理工具
手写Api文档的几个痛点: 文档需要更新的时候,需要再次发送一份给前端,也就是文档更新交流不及时. 接口返回结果不明确 不能直接在线测试接口,通常需要使用工具,比如postman 接口文档太多,不好管 ...
- springboot 集成swagger ui
springboot 配置swagger ui 1. 添加依赖 <!-- swagger ui --> <dependency> <groupId>io.sprin ...
- springboot集成swagger实战(基础版)
1. 前言说明 本文主要介绍springboot整合swagger的全过程,从开始的swagger到Knife4j的进阶之路:Knife4j是swagger-bootstarp-ui的升级版,包括一些 ...
- springboot集成swagger
对于搬砖的同学来说,写接口容易,写接口文档很烦,接口变动,维护接口文档就更更更烦,所以经常能发现文档与程序不匹配. 等过一段时间就连开发者也蒙圈了 Swagger2快速方便的解决了以上问题.一个能与S ...
- springboot集成swagger文档
//此处省略springboot创建过程 1.引入swagger相关依赖(2个依赖必须版本相同) <dependency> <groupId>io.springfox</ ...
随机推荐
- Linux常用命令 day day up
一.Shell二.Linux命令的分类1.查看内部命令2.禁用内部命令三.Linux命令行格式四.编辑Linux命令行的辅助操作五.获得命令帮助的方法1.pwd--查看当前的工作目录2.cd--切换工 ...
- PYTHON 转化函数
ord(c)#字符转ASCII码值,10进制:自变量只能是一个字符 chr(a)#通过ASCII码值得到对应的字符 bin()函数:将整数(十 等进制)转化为二进制 bool():将指定参数转化为bo ...
- Python_结合Re正则模块爬虫
##### 爬取古诗文import reimport requestsdef parse_page(url): headers = { 'User-Agent':'Mozilla/5.0 (Windo ...
- 算法leetcode二分算法
二分算法通常用于有序序列中查找元素: 有序序列中是否存在满足某条件的元素: 有序序列中第一个满足某条件的元素的位置: 有序序列中最后一个满足某条件的元素的位置. 思路很简单,细节是魔鬼. 一.有序序列 ...
- [NOIp2012]疫情控制 题解
好久没更,强迫自己写一篇. 神 tm 大预言家出的题 注意到如果 \(x\) 小时可以控制住疫情,则 \(\forall x'>x\) 必然也可以控制住疫情,显然答案具有单调性,可以二分答案. ...
- Cesium局部区域精细瓦片数据下载技巧
当Cesium加载局部的目标地区(如中国某个市)的0-18层或更高层数据时,当缩小到zoom较小时可能地球有部分区域(如南半球或左半球)无瓦片覆盖. 为使得整个地球有瓦片覆盖,可利用以下技巧下载瓦片: ...
- 创建多个Dialog时,namespace冲突问题的解决 -- 基于QT 5.2
问题来源: 我用MainWindow作为主界面,Dialog作为设置界面,还需要一个AboutDialog作为关于界面. 设置界面的Dialog头文件dialog.h是这样的: // dialog.h ...
- python 接口测试之 图片识别
4.1 pytesser安装 2.安装pytesser,下载地址:http://code.google.com/p/pytesser/ ,下载后直接将其解压到项目代码下,或者解压到python安装目录 ...
- MySQL是怎么解决幻读问题的?
前言 我们知道MySQL在可重复读隔离级别下别的事物提交的内容,是看不到的.而可提交隔离级别下是可以看到别的事务提交的.而如果我们的业务场景是在事物内同样的两个查询我们需要看到的数据都是一致的,不能被 ...
- Windows Server创建域控制器
推荐选择系统镜像为windows server2016(2019有诡异的bug不能安装域控.) 1.本地域安装设置 (1)连接到windows server2016 打开服务器管理器(Server M ...


